An apron or protective screen is an incredibly useful device. It is no secret that soot, steam, temperature changes, and condensation quickly destroy finishing materials and significantly limit their choice. A glass, plastic, or ceramic panel near the stove and worktops prevents damage to materials and prolongs their life.
Installation of a kitchen apron is often done independently. This is quite a difficult but doable job.
Types of kitchen aprons
Protective screens are made from a variety of materials. Accordingly, how it is attached and which apron to choose for the kitchen depends on the characteristics of the material. The most common options are:
- An apron in the kitchen can be made of plastic - this is the most affordable and budget option, although not very durable. The materials are quite sensitive to heat and only polycarbonate models are allowed to be installed near a gas stove, since its temperature resistance is slightly higher - +120° C versus +80° C.
They are used as opaque plastic - PVC panels, as a rule, and transparent - acrylic or polycarbonate glass. Imitates any natural or artificial material: stone, wood, tile, leather. The materials are lightweight, easy to cut and fastened with both self-tapping screws and glue.
- A kitchen apron made of chipboard is also a very budget option, but is just as short-lived as plastic. The material swells quite quickly when exposed to moisture and does not tolerate temperature changes. It cannot be used as a protective screen around the stove.
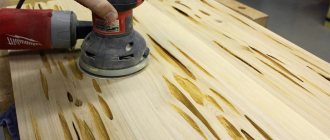
- MDF is a chipboard of high strength and density. Unlike chipboard, the material tolerates moisture well and does not change shape under the influence of temperatures. Its durability is higher, but inferior to both glass and ceramics. Attaching MDF panels is quite simple: the boards are lightweight and easy to cut. This material allows additional design - photo printing, for example.
- Glass – glass panels or sheets. Resistant to temperature and moisture in any form, does not accumulate dirt, is easy to clean, and is one of the most hygienic models. Disadvantage: installing an apron with your own hands is very difficult. In principle, you cannot install the skins yourself, since the weight of the product is very large. In addition, the cost of the material is quite significant.
- Ceramic tiles are an option that is both affordable and has all the necessary qualities. Ceramics are insensitive to steam, water, and even the highest temperatures. Even a beginner knows how to install a tile backsplash. In addition, it is a very decorative material.
Decorating chipboard
To give products the necessary aesthetic properties, the chipboard surface is finished with paper, veneer, polymer film or plastic. Modern methods of applying images make it possible to produce sheets with photo printing, creating high-quality decor.
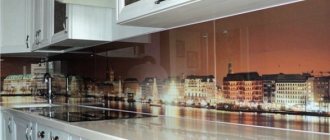
Using slabs with photo printing, you can make a kitchen apron with any pattern or photo - a reproduction of a classic painting; you can also apply photographs from a family archive, a futuristic landscape, a corner of nature, an image of your favorite animal, a bright flower, a beautiful pattern.
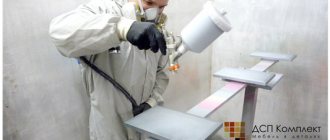
Finishing with photo printing involves applying a selected design to a sheet using a UV printer. When decorating with photo printing, a colored layer is formed on the surface of the slab in the form of an image that matches the original down to the smallest detail. To protect the surface with photo printing and make it resistant to various types of physical and chemical influences, a layer of special varnish is applied to it.
An apron with photo printing is an effective and stylish decorative element that can become the main element of kitchen design. It immediately attracts attention, while other interior details or design features of the furniture become less noticeable. In conditions of limited funds, this fact makes it possible to save on other room decoration items.
The traditional way of decorating particle boards is lamination. The resulting laminated chipboards are coated with melamine film or several layers of special varnish. The result is durable materials with increased resistance to chemicals, mechanical damage, abrasion and moisture. These characteristics make it possible to use the material in the process of kitchen renovation.
In addition to high performance parameters, laminated boards, especially those with photo printing, acquire high aesthetic properties. Products are able to imitate the tone and texture of natural materials - rare wood, and can have a patterned, smooth or structured surface.
Preparatory stage
Attaching the apron necessarily includes preparatory work. Their nature is to some extent determined by the method of fixation. However, the general recommendations are the same for any type of installation.
- The walls are cleaned of old coating , deep cracks and potholes are sealed with plaster. The surface is well leveled. If installation is planned with glue, then the walls are also covered with putty.
- Treat the surface with a primer. The nature of the latter is also determined by the type of work. When installed on the sheathing, the walls are treated with an antiseptic primer to prevent the appearance of mold. If the material needs to be attached to the wall, the surface is primed with a composition corresponding to the type of facing material.
- Installation of sockets is carried out after installing the apron. However, the area for the device must be properly prepared, and holes for sockets and switches must be made in the finishing material. The number of outlets in the kitchen is determined by the amount of equipment.
Disadvantages of MDF
Before you start purchasing and installing an MDF apron in the kitchen, you should consider its shortcomings.
Perhaps they will become an obstacle to purchase. So:
- Negligence in care will affect the MDF board. She will be led or bent. The same applies to high humidity - you cannot mount MDF panels directly near the sink - it is better to install tiles there. The stoves must be equipped with hoods to prevent drops of condensation from settling on the surface of the apron.
- Material is flammable. This is important if the owners are planning to completely cover the wall from the edge of the set to the edge. Mandatory external control is required if a heat supply source is mounted on the wall - a gas boiler, for example.
The disadvantages are serious and should not be neglected. If, nevertheless, there are no prerequisites for future damage, then it is worth trying to create something new in the interior.
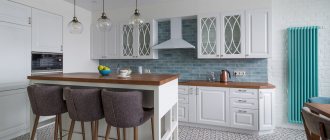
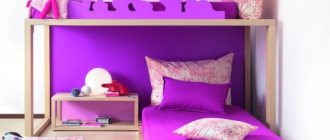
Dark furniture with an original pattern on the apron looks beautiful
How to properly install a plastic screen
Its installation is possible in two ways: with glue and with lathing. In the first case, the walls must be perfectly smooth, in the second, their condition is much less important. However, in the first case, the appearance of fungi or mold is excluded, and in the second, this possibility remains, since free space is maintained between the screen and the wall.
Installation with glue takes from 20 to 60 minutes.
- Measure the size of the future apron and cut the panels to size. If the material includes a pattern or image, this should be taken into account.
- Mounting adhesive is applied to the inside of the panel - preferably in strips at a distance of 15 cm from each other
- We press the plastic against the wall and secure it with heavy spacers. After the glue has dried, remove the spacers.
Installation on the sheathing is somewhat more complicated and takes more time.
- To begin with, a wooden beam 20–30 mm wide or a metal profile is fixed around the perimeter of the future screen. The second is preferable. Holes for fasteners are drilled, and the material itself is secured with self-tapping screws.
- If the dimensions of the apron are large enough, then intermediate apron elements are installed - either in the center or at a distance of 30–40 cm from each other.
- Mark places for sockets on the apron, switches, roof rails and other things. In such areas additional transverse bars are fixed.
- Plastic panels are cut to size and mounted on the sheathing. They are fastened with self-tapping screws and a press washer. Start from the bottom or from the corner that first catches your eye.
- The seams between the sheets can be masked with strips matched to the color of the product or a contrasting shade.
Purpose
A kitchen apron is a section of the wall located above the surface of the countertop, sink and stove. It is this area that is most often subject to contamination. During the cooking process, various food particles, including drops of fat, fall on it. To ensure that the working wall in the kitchen always has a well-groomed and beautiful appearance, special practical materials are used to decorate it.
Example of kitchen apron sizes
A kitchen apron is a kind of protective screen. In addition, it performs an aesthetic function. The working wall is often highlighted with various decorative elements that give the overall design of the room an original touch. At the same time, the finishing of the kitchen apron is always in harmony with the overall interior of the kitchen.
Installation of glass panels
The installation of the skinal is carried out after the kitchen has been completely finished, the furniture has been assembled and the electrical wiring has been installed. How to attach an apron in a kitchen of this kind is demonstrated in the following video.
You can install only small skins (and only straight ones) yourself, or fix glass panels. Only specialists can install a wall-length or corner model.
There are 3 types of fasteners:
- hinged - allows you to join panels and form a single protective screen. This method hides the condition of the wall, since the material appears at a distance of 4 mm from the surface;
- for silicone glue – allowed for small element sizes;
- with the help of Velcro - essentially wall mounting. Possible only if the latter is in perfect condition.
The most popular, despite the complexity, is wall-mounted installation.
- Mark the wall for the future apron.
- Holes with a diameter of 6 mm are drilled for the fasteners - the standard size of plastic dowels included in the kit.
- They drive dowels into the walls. The panel is freed from the protective film and placed on the fasteners. The holes in the glass are made by the manufacturer. However, the hole for the socket and switch is either made to order or made independently.
- A silicone damper is inserted into the hole in the glass - it prevents contact between glass and metal. Then install the threaded bushing and screw in the self-tapping screw. The fasteners must be reliable, but not excessive; the glass must be hung on the fasteners, and not pressed between the screw and the wall.
Self-tapping screws are masked with decorative caps.
If you plan to install lighting, fasteners should be purchased specially. In this case, the minimum distance between the panel and the light source should be 3 cm.
Preparing and installing an apron in the kitchen
Before installing the kitchen apron, you need to level the wall, if necessary, or simply clean the surface. It is necessary to carry out communication systems and wiring in advance if you plan to make an apron with lighting or install additional lamps and sockets.
If the kitchen wall contains large irregularities or protrusions, it should be leveled by installing a wooden or metal frame. To do this, slats are attached vertically along the level with an interval of 40–60 cm, and the sheet is subsequently screwed to them with self-tapping screws.
Installation on a flat wall can be done in several ways.
Before cutting the sheet, remember that the edges of the apron should extend beyond the line of the kitchen countertop and the bottom edge of the cabinets by 3-5 cm.
- 1 If the kitchen apron will have sockets or lamps, then you need to drill holes for them.
- 2 Having cut the slab into pieces of the required size, you should glue them using assembly adhesive. If you need to install large sheets that are heavy, you need to additionally secure the slab in several places with fasteners with decorative caps or close them with plugs.
- 3 If the slabs have an edge designed in a tongue-and-groove system, then the parts of the apron are easily and neatly joined together into a single sheet. In this case, the cut with the groove is secured using clamps, and the next sheet with a ridge is inserted into it.
Pros and cons of using plastic panels
The advantages of using aprons made of plastic include:
- acceptable, adequate price;
- protection from moisture;
- easy to install;
- easy to operate;
- most modifications of panels have high-quality protection against damage;
- a wide range of models, allowing you to choose a pattern and color to suit every taste;
- good protection against mold.
- deformed under the influence of high temperatures;
- the ends of the panels will have to be covered with a special profile;
- Even high-quality panels do not look 100% natural, and the synthetic component of the material is felt.
Types of decorative coating for MDF panels
MDF is made by pressing wood chips with an adhesive composition . The resulting slab is subjected to further decorative finishing using various technologies. The result is: laminated, painted, laminated, veneered MDF boards.
Laminated coating is made by treating panels with PVC film or melamine paper. Laminated MDF panels can withstand various adverse influences without damage. They are used in furniture production, including for making kitchen facades.
MDF panels are also painted. And then they make furniture for bathrooms or kitchens. However, painted panels have a significant drawback: such a coating does not withstand temperature and mechanical factors.
Gluing plastic to a panel is called laminating. Such a panel becomes more moisture-resistant, wear-resistant and temperature-resistant . Due to their practicality, such panels are often used to make kitchen splashbacks and other kitchen elements.
By veneering MDF panels, they acquire the appearance of natural wood.
There is another way to decorate MDF panels. This is the application of various drawings and photographs to the surface using photo printing. Such panels are called skinali. Initially they were made of glass. Skinals are very popular and are used to decorate kitchen aprons.
Decoration options
Decorate the apron using:
Decorative painting
The simplest and at the same time creative way of decoration is to paint panels with special paints. You can do it yourself or with the help of professional artists.
The use of this method opens up wide scope for imagination and does not limit apartment owners in self-expression.
Photo wallpaper
If you are not good at drawing, try applying photo wallpaper to the panels. They are presented in a wide variety of designs and colors, among which everyone will find a suitable option. Photo wallpapers are applied faster than painting.
Film
A fairly common decor option for the kitchen is the use of MDF panels covered with a special PVC film. Advantages of the option:
- price;
- the coating is easy to clean;
- easy to install.
Three advantages in favor of MDF
What is the main advantage of MDF panels? The first is cost. MDF will be cheaper than other popular materials such as tiles, glass, mosaics and porcelain tiles. You can also use moisture-resistant panels:
- Decorate using a photo: you can choose any glossy design or original pattern and apply it to the film using printing. Install on any surface, regardless of what material the wall was previously lined with.
- Quick and easy to dismantle.
- Use as a “shield” for low-current networks and ventilation ducts.
Of course, reviews of this material also note disadvantages - the likelihood of mechanical damage and “intolerance” to fire. At the same time, reviews speak of a significant advantage of MDF - the ease of installation of panels.
You can carry out the installation yourself, and you will need ordinary tools and a few hours of free time. Let's figure out how to install the panels with your own hands - start with preparing the surface, tools and step by step we will understand each action. In the next photo you will see what the interior looks like after installing the panels.
Ways to usually install an MDF apron
There are two most common decor panel installations:
- Sticker for liquid nails.
- Fastening with dowels and screws.
The first method, although very simple (all you need is a tube of liquid nails and some skill), is not always feasible. The fact is that the decor panels sold are almost always deformed. This is explained by the fact that the plastic on the lining “seeks” to return to its shape (it is glued under heat, and at the same time it stretches a little). And “pressing” such a plastic panel to the wall when sticking it is quite labor-intensive. It curls naturally.
Therefore, it is better to immediately choose the installation method with drilling the wall. Although this is, of course, no easier compared to a sticker. But in case of repairs or changing the apron, the panel can simply be carefully twisted and removed from the wall. And not painfully and for a long time to tear it off.