Do-it-yourself carriage screeding is a rather complex but fascinating process that anyone can figure out. The use of the carriage screed technique is gaining great popularity around the world, because it is one of the most interesting types of finishing. The main advantage is that you can decorate your furniture in an unusual way - you just need to prepare all the necessary materials, accessories and follow the detailed instructions.
DIY carriage screed
What is a carriage screed and what types are there?
Carriage screed is a finishing technique that is also commonly called “capitone”. It appeared back in the 18th century; it was used in France to decorate carriages, and such design was considered a sign of luxury. In those days, not only vehicles, but also interior items in the homes of aristocrats were decorated with such equipment.
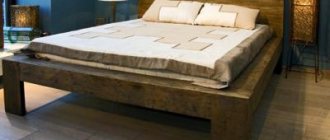
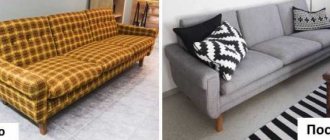
Despite the fact that the carriage screed has lost its former popularity for some time, the technique is now actively used by designers in their projects. That is why it can be found in many modern apartments. Furniture decorated in this way looks very elegant.
Interior with elements of carriage screed
It is worth noting that over several centuries, “capitone” has undergone significant changes - new unusual ways of using this technique began to appear.
Table No. 1. Types of carriage screed
| View, illustration | Description |
| Diamond-shaped | The pattern is a repetition of diamonds of the same size. Beginners in this business are recommended to opt for the standard version of rhombuses, because creating figures with sharp ends requires some experience from the master. |
| Square | In this case, the design looks like a square. It should be noted that this form is most optimal for beginners in this business, because working with straight lines is much easier. |
| Unusual geometric shapes | Professional craftsmen make screeds of various shapes, create curly headboards and rounded patterns. You should not immediately choose such a design; it is better to start learning the craft with a simpler ornament. |
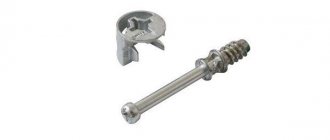
To fix the material in this technique, buttons of various diameters and nails with voluminous heads are used. They will first need to be covered with the same material or purchased to match the main material.
Decorating furniture with a carriage tie has the same principle, but there are still some differences in the execution technology. It is necessary to choose the most convenient option, because here it is the outcome that is important.
Finishing using carriage screed technology is carried out in two directions:
- the workpiece is covered with material exactly according to its size, and only then an ornament is formed on the surface;
- The upholstery of the base is done using small pieces of textile or leather of the required size.
Methods for fixing material based on
Advantages of carriage screed
The popularity of "capiton" for several centuries is due to the following advantages:
- A headboard or chair designed using this technique will be very soft and therefore comfortable.
You can read more about how to make a soft headboard with your own hands in our article.
- Such a surface does not require any special care, even if textiles rather than smooth leather are used for upholstery. You only need to periodically use a vacuum cleaner to remove dirt from the product.
- Even after many years of use, a high-quality carriage screed does not lose its original appearance.
- If over time there is a desire to replace the coating (the fabric is outdated, greasy marks have appeared), then this can be done while maintaining the integrity of the soft base. In addition, if necessary, you can restore the panel by adding only a piece of material in a certain place.
- This technique can be used to decorate almost any surface, giving it an unusual decorative look.
- Pieces of furniture with such upholstery are suitable for decorating both respectable interiors and small apartments, that is, they are completely universal.
- This is an excellent opportunity to insulate the wall and improve the level of sound insulation.
- The walls that are supposed to be decorated with a carriage screed can be leveled strictly to the level.
An example of upholstering a headboard using this technique
Advantages
Such a long journey of the Capito through time is explained by a number of advantages of using this technology in everyday life:
- ease of use – the volume created during the creative process ensures the softness and comfort of the product during use;
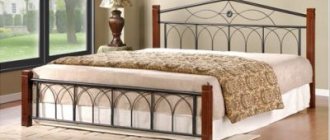
- the carriage headboard next to the bed looks aesthetically pleasing and discreetly luxurious;
- the covering does not require special care: dry or wet cleaning is not a problem for it;
- long service life;
- you can always change the upholstery, following fashion trends in color and texture;
What kind of fabric is used for the carriage tie?
The choice of material for the carriage tie is key. It is worth considering that not every type of textile is suitable for such a design.
Therefore, when choosing a particular fabric, take into account the following features:
- the material should be quite dense, because during work the master pulls it tightly, and due to constant pressure the thin fabric will quickly become unusable;
- it is advisable to choose only one-color fabric or with a large ornament, because any small pattern will be hidden in the folds, and this, in turn, does not look very aesthetically pleasing;
- It is not recommended to save on material, because decorating the carriage cloth requires a lot of effort from the master and it will be a shame if it breaks after a few weeks.
Table No. 2. The most suitable materials for creating a carriage screed
| View, illustration | Description |
| Chenille | This is a natural fabric with good wear resistance. |
| Flock | An artificial material that has a velvety texture. Its main advantage is the presence of a huge variety of shades. |
| Jacquard | Typically, such fabric has large patterns that will look best in a screed. The material itself looks luxurious. As many craftsmen note, you can work with it only if you have the appropriate skills, because you will need to correctly calculate the locations of the ties so as not to spoil the design. |
| Velours | This material, like folk, has a texture reminiscent of velvet. It has a higher cost, but is also soft, making it easier to pull. |
| Leather | Both natural and artificial leather are used for carriage screeds. The second option has a budget cost, but is less wear-resistant. This is an ideal option for this technique, because leather is the easiest way to form an even pattern. Beginners are advised to pay attention to eco-leather; it has a low cost but is of good quality. |
Prices for various types of materials for covering a sofa
Eco leather
Do it yourself
If you have an irresistible desire to cover the buttons yourself, then stock up on the required amount of fittings and fabric. Let's get started:
Note!
Do-it-yourself sliding wardrobe - manufacturing manual with a full description of the stages, types of structures, choice of manufacturing materials (photo + video)DIY stool - types of stools, manufacturing materials, step-by-step master class with simple diagrams and drawings for beginners
DIY table: instructions and recommendations on how to quickly and easily make a tabletop and legs
- place the button on the fabric, trace it along a diameter twice as large as the original and cut out the blank;
- Using a needle and thread, make medium-sized stitches along the edge of the outer circle;
- place the button in the center and tighten the thread so that the material fits tightly;
- fasten the thread.
Tips for working with carriage screed technology
Before you start finishing a particular surface using the capitone technology, it is recommended to listen to the advice of experienced craftsmen. So, you should start upholstery by drawing up a detailed diagram with indicated dimensions. This point is fundamental, otherwise it will be difficult to do quality work.
Recommendations from experts will help you avoid mistakes in your work
If you do not have any experience in finishing furniture using this technique, it is recommended to first practice on small pieces of material. This will prevent you from spoiling the whole canvas. The foam rubber is connected to the base using special glue. It is sold in bulk cans and spray bottles. It is advisable to opt for the second option, because it is much more convenient. It is necessary to make cuts in foam rubber and wood only after the glue has hardened. In order not to make a mistake when marking the foam rubber, you must first mark it on thick cardboard of the appropriate size.
Marking foam before work
As we said earlier, usually buttons covered with the same material as the base are used to decorate the carriage tie, but this is not a mandatory step. For such purposes, you can purchase decorative nails with rhinestone-shaped heads.
Important. Some craftsmen prefer to make structures with a more pronounced relief. To do this, you will need to use polyethylene in the form of foam, onto which a dense layer of padding polyester (about 5 centimeters) is fixed using the same glue. Before you start fixing the fabric, you need to straighten it and smooth out all the folds. As a result, there should be no skewed areas.
An example of a neat drawing using the capito technique
Buttons or decorative nails must be placed at exactly the same depth. Otherwise, you will get a crooked drawing. The threads for attaching buttons must be very strong, otherwise they will quickly break during use of the product (especially if it is upholstered furniture). If you can’t make an even pattern on a test piece of material, then it’s better not to do the finishing yourself - this could ruin the expensive fabric. In this case, it is recommended to use the services of an experienced professional.
Cost of labor and materials
Making a finishing drawing
In order to buy the required amount of fabric and fasteners and correctly distribute the arrangement of the ornament, you will need to draw up a preliminary drawing.
Example of a panel design scheme
Using the above drawing, calculations must be made. Initially, you should measure the structure that is supposed to be finished. After which it is better to display these values on the drawing in the appropriate sequence.
This figure shows a panel with a diamond-shaped pattern, the dimensions of which are 200x95 centimeters. At the same time, in order to know the exact locations for installing the fasteners, you need to take a square as a basis (it is shown in the figure on the left). In this case, its dimensions are 20x20 centimeters. It is these values that will help determine the size of the diamonds.
It should be noted that in our case, only the upper part of the panel is decorated with the capito technique. And at the bottom there are uniform stripes (their width will be the same as that of rhombuses).
It is more convenient to mark foam rubber with a bright marker
There is a distance of 10 centimeters on both sides for installing fasteners. The result is nine stripes arranged vertically. Their total height to the place of fixation will be 40 centimeters. There is a distance of 5 centimeters at the top of the panel (before the start of the buttons). Using the same principle, you should calculate the location of the ornament on the base in any other case.
The material will also need to be marked, but in accordance with some features. So, the size of the squares in this case will be 4 centimeters larger. This is necessary in order to form a relief.
After all the calculations have been made, it is necessary to transfer this entire drawing onto a cardboard canvas, which should be exactly the same size as the base itself. Here you should also mark the places where all fasteners are fixed and make holes. It is better to double-check the correct location of the markings several times, because the quality of the screed will depend on this.
Video - Marking the carriage screed
DIY bed headboard
Do-it-yourself carriage screed for a double-sided headboard panel
Carriage screed can also be used to update tired furniture. For example, you can update an old bed by making a headboard for it with a Capitone finish with your own hands. Of course, you will have to put a lot of effort into this, but the result will definitely justify it. Self-production has a number of obvious advantages over a purchased product:
- it is possible to realize an individual bed design that best suits the interior, to create a product of non-standard sizes and unusual shapes;
- you can independently choose the color, texture and quality of fabric, materials and accessories;
- significant savings compared to a finished product and a made-to-order product.
In order for a do-it-yourself bed to look perfect, you must strictly follow the instructions for making a carriage screed.
Homemade bed with carriage headboard
Materials and tools for upholstery panels
In order to make the surface upholstery in accordance with all requirements, it is necessary to prepare some materials and equipment for the work.
The materials you will need to purchase are:
- Plywood sheet, the thickness of which must be at least 7 millimeters. In this case, the exact parameters of the base depend on the preliminary drawing.
- Thick, one-color upholstery fabric. It should be borne in mind that the canvas must have a size one and a half times larger than the base itself - this is necessary to form the relief.
- Dense furniture foam rubber with a thickness of at least 5 centimeters exactly to the size of the base. If necessary, it can be replaced with padding polyester of similar thickness.
- Buttons for fixing with a diameter of about 2 centimeters. Their number will depend on the dimensions of the facing panel and the characteristics of the ornament.
- Thick threads for securing buttons.
- Cardboard for making patterns.
- Glue for joining foam rubber and plywood base.
In addition, during the work you will need the following devices:
- metal rulers of different lengths;
- measuring tape;
- markers for textiles;
- a screwdriver with a special cutting attachment;
- jigsaw;
- furniture stapler.
Special attention should be paid to the special attachment for rounded cutouts - it is called a tsifenbor. It is fixed to an electric drill or screwdriver, after which it will be possible to cut indentations on the surface. The peculiarity is that in this way not only foam rubber is cut, but also denser types of material, even wood.
Special nozzle for cutting foam rubber
Making a template
The success of the event as a whole will largely depend on the correctness of the pattern, so care and accuracy are important when making it.
For the template, take a sheet of cardboard that matches the dimensions of the finished product. The easiest way is to draw a square marking of standard sizes 10x10 cm.
To obtain such markings, you need to apply marks along the length and width every 10 cm using a marker and tape measure, then draw horizontal and vertical lines. When choosing the geometry and size of figures, it is important to maintain proportional compliance.
To obtain a geometric pattern in the form of a rhombus, you can use a surface marked into squares. In each square you need to draw its diagonals.
The intersections of the diagonals of the squares and the vertices are marked with a felt-tip pen so that the required geometric figure is obtained. Trace the resulting diamonds with a marker or felt-tip pen.
Holes are cut out at the tops of the diamonds through which buttons or furniture nails will be attached in the future.
Step-by-step instructions for carriage screed
After studying some of the intricacies of the carriage screed, you can begin work on surface cladding. Today we will look at the steps of finishing a panel with a solid canvas, because this is the most popular and convenient method.
Cladding using the capitonné technique using a single piece of fabric
Step one: first you need to attach the foam rubber to the plywood base. For this purpose, we use glue, but the use of other techniques is also permitted.
We fix the soft part on the base
Step two: on top of the foam rubber you need to put a pattern with markings where all the holes are marked, as in the preliminary diagram. The cardboard sheet should be held well, so this activity will require the help of another person. Then you need to circle the round holes using a textile marker.
We apply the pattern to the foam rubber
Step three: then you need to make holes in the foam rubber exactly according to the markings using a screwdriver and a special nozzle. Next, you need to make holes in the wood through the same recesses. They will be needed to tighten the fasteners.
Making indentations in the soft part
You can do it another way; to do this, mark the plywood before gluing the foam rubber. It is necessary to mark the points for fixing the buttons on it. Then holes for fasteners should be made at these points.
Making markings on plywood
Foam rubber can be fixed on top of this base
Step four: then you will need to pierce the foam through the base using sharp nails. In these places it is necessary to leave marks for attaching buttons. After which the nails should be removed and holes should be made in the foam rubber using the same nozzle.
We pierce the foam right through
Step five: the next step is to apply diamond markings to the surface. In this case, their size will be 18x12 centimeters. In order not to make a mistake with the markings, it is advisable to prepare a diamond model from cardboard.
Diamond model for marking foam rubber
Step six: Next, you need to mark the upholstery fabric from the inside out. In this case, you should take a larger diamond model, taking into account the formation of the relief.
Diamond layout
Step seven: you need to once again check the accuracy of the markings. After all, any mistake will lead to a crooked screed.
It is necessary to check the correctness of the markings
Step eight: Next, you need to make punctures along the marked points (use an awl for this). Dense threads will pass through them to secure the buttons.
It is necessary to make punctures in the material
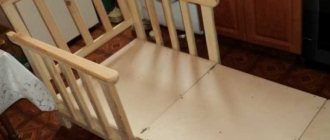
Step nine: when all the holes for fastenings are ready, you need to carefully lay out the material on a soft base. For ease of operation, it is necessary to install the panel in such a way as not to block access to it from the inside. The best solution would be to place it on several chairs.
Placing the panel on a flat surface
Step ten: then you should prepare the threads for fixing the fasteners. In our case, for the purpose of tensioning the material, buttons covered with eco-leather will be used. It is necessary to cut the threads into several parts, exactly according to the number of buttons. The ends of these dense threads must be processed using matches or a lighter. Then the cut parts are bent and tied with a tight knot (it should not fit into the hole).
Threads for fastenings
Step eleven: place the pieces in the holes from the extreme part of the panel from the second line. The thread is threaded into the skin using a needle so that one of its ends is on the wrong side. The other end of the thread should remain on the front side.
We thread the threads through the holes
Step twelve: the end of the thread from the wrong side must be fixed to the plywood base using a furniture stapler. You can make this task easier for yourself and do as shown in the picture - install several screws on the plywood, which are easy to hook threads onto. After which they can be attached with a stapler without any problems.
Securing the cord from the inside out
Step thirteen: other threads must be fixed in the same way, securing them to the previous ones that are in this line.
Alternately fastening threads
Step fourteen: the same actions should be done with all holes. It is important to remember that one edge of the thread should be on the outside.
Leave the edge of the thread on the front side
Step fifteen: the same manipulations must be done with the first line from the edge.
It is necessary to insert the needle into the holes one by one
Step sixteen: after pulling up the row, tensions are formed, from which folds are made.
Forming folds
Step seventeen: during the stretching process, part of the pattern begins to be visible.
The diamond becomes noticeable
Step eighteen: upon completion of the formation of diamonds of one line, you need to secure them with threads through buttons. After obtaining the desired tension depth, you should hook the edge of the thread with a stapler to the plywood.
It is necessary to pass the end of the thread into the button
Step nineteen: upon completion of work on the site, it is important to evaluate the quality of the screed.
Finished finishing area
Step twentieth: after forming the relief in the center, you need to move to the edges. In order to make even folds on the skin, you need to cut the edges.
Cutting the skin along the edges
Step twenty-one: then these cuts are folded to the wrong side, and a normal fold is obtained.
Folding the edges
Prices for the model range of pneumatic staplers
Pneumatic staplers
Step twenty-two: at the end you need to bend all the corners and trim off unnecessary pieces of leather.
Ready screed