Material calculation
Installation of a plasterboard partition requires a preliminary calculation of the required number of sheets, selection of a frame and profile (beam) for it, as well as glue or screws. In this case, it is necessary to take into account:
- dimensions of the planned structure;
- standard size (and area) of drywall sheets;
- expected loads on the structure;
- the required level of sound insulation (possibly also thermal insulation);
- subsequent surface finishing.
How many panels are needed?
When doing the work yourself, it is important to remember the weight of the plasterboard panels, especially if you have to lift them to a considerable height. Manufacturers offer standard sheets, the weight of which is determined by the thickness and dimensions
For a room 8x8 m with a ceiling height of 2.5 m, in which it is necessary to make a zoning (not completely separating the room, but only separating part of it) partition 5 m long, you will need
Naturally, the number of sheets is rounded to the nearest whole number, that is, 9 sheets will be required for the double-sided lining of the partition.
Profile: what and how much
In our country, they mainly use a metal profile designed specifically for installing plasterboard partitions. It has several varieties, used in different parts of the structure.
According to this table, the number of required metal elements is calculated from the condition:
- floor and ceiling guide profiles - along the length of the partition, that is, 5 m each;
- rack profile - the number of racks is multiplied by the height of the room. For an ordinary, non-load-bearing partition, you can take the minimum size of the racks, 50x50 mm. It is advisable to strengthen the outer racks, that is, choose a 75x50 mm or 100x50 mm profile for these places;
- corner profile is available upon request. Its quantity corresponds to the number of corners requiring reinforcement, multiplied by the height of the partition.
Another important point: the width of the guide profile is selected taking into account the planned thickness of the partition. With a PN-2 profile of 50X40 mm, the thickness will be
Here 12.5 mm is the thickness of one plasterboard sheet. If mineral wool or another 50 mm thick insulator is used as a soundproofing material, such a profile is sufficient. If a larger layer of insulating material is planned, a wider profile is laid.
The pitch of the racks is selected taking into account the standard width of the panel and the planned rigidity of the interior partition made of plasterboard. Typically, racks are placed in increments of 600 or 400 mm, then the joints of the sheets fall clearly on the shelves of the rack profiles.
By choosing a pitch of 600 mm, a profile width of 50 mm and the presence of two reinforced corners (one edge of the partition rests against the main wall), we obtain:
- guide profile PN-2 (50x40 mm) – 5 x 2 = 10 m;
- PS rack profile (50x50 mm) – (5: 0.6) x 2.5 = 8.33 x 2.5 = 20.9 m. In reality, we take the number of racks equal to 8 for a 50x50 mm PS and add a 75x50 mm corner PS. That is, the required quantity is 8 x 2.5 = 20 m plus 2.5 m, respectively;
- corner profile PU 20x20 mm – 2.5 x 2 = 5 m.
The number of screws is calculated individually, taking into account the recommended pitch of 35 mm. For this area you will need about 370 pieces of self-tapping screws with a length of 25 mm. The length is chosen taking into account the fact that at least a third of the self-tapping screw must be inside the profile; with a sheet thickness of 12.5 mm, 25 mm is sufficient.
The guide profile is fastened to the floor and ceiling using dowel nails. For the specified length (5 m) you will need 10 dowel nails for each profile, that is, 20 pieces in total.
Additional materials
If it is necessary to soundproof plasterboard partitions, additionally purchase mineral wool or a similar material at the rate of 12.5 square meters. m. To eliminate (reduce) the transmission of vibration from the basic structures of the building to metal profiles, a backing tape is used. It is glued to the back of the profile after cutting it and before installation. In the case of a rack profile, it is advisable to glue both sides adjacent to the plasterboard cladding. The amount of tape and its type are selected individually.
The joints between the plates are sealed with a special putty or sealant; the specified area will require approximately 7...8 kg. The joints are glued with reinforcing tape; 8 joints 2.5 m long require 20 meters of tape.
The surface of the plasterboard sheets is puttied and primed; 15 kg and 2.5 kg of materials are required, respectively (the amount depends on the brand of material and the type of further finishing).
Manufacturing stages
After preparing all the tools, they move on to the actual process of making a TV stand. There are only a few stages. Each of them has some features.
Create a drawing
Knowing the overall dimensions, they create drawings and diagrams of the future bedside table. It is most convenient to do them on graph paper. For greater accuracy, three projections are required: front, top, side. They are quite sufficient to display all the necessary sizes. If an angular view is interesting, then it will be easy to construct it by intersecting lines from previous angles. The diagrams will give a detailed idea of how to make a TV stand with your own hands. When calculating the thickness of parts, the load on each of them is taken into account. The longer the shelf, the less weight it can support.
You should definitely take into account the thickness of the material used, otherwise there is a risk of ending up with insufficient distance between the shelves.
Cutting and edging parts
If you plan to do the cutting, sawing and trimming yourself, then it is important to take your time and carefully measure each line. It is advisable to start work by preparing templates for all parts. They will help distribute the elements of the cabinet on the canvas of the selected material and save it. To do this, all the details are drawn on thick Whatman paper and cut out. Then they are placed on the material sheet so as to fit the maximum amount. A cut is made along the outlined contours.
Types of cabinets for linen, their features and placement options
To give the parts a neat appearance, be sure to grind the cut ends. If natural wood is chosen as the main material for the cabinet, all surfaces are subjected to the procedure. If the production is carried out from chipboard, then the edges are covered with a special tape using an iron or PVC edging. The edges of the plasterboard TV structure are not particularly treated. Simply coat them with primer and paint.
Prepare templates
Sawing parts
Sand the cut ends Apply special tape
Prime and paint
Assembly
Having completed all the preparatory procedures with the sawn blanks, they begin to assemble the TV stand with their own hands. The work is carried out in the following order:
- The tabletop is used as a basis. The side edges are attached to it.
- Next, the bottom of the structure is screwed on.
- Next, the resulting frame is filled with internal elements: a partition, shelves, guides for the drawers are installed and assembled.
- Lastly, attach the backrest, doors, and cabinet handles.
To ensure that the furniture comes out level, you need to use a building level. There are short models that are very convenient to work with. Before finally fixing the cabinet parts, it is necessary to check the evenness of their fit.
Fixation of legs
The cabinet can stand on the bottom shelf, have static legs with thrust bearings or rollers to allow free movement around the room. This point must be taken into account when creating a drawing. If legs or rollers are selected, it is recommended to fix them at a distance of 50 mm from the edges of the structure. The fixation order is as follows:
- marking the location of legs or rollers;
- drilling holes for fastening with self-tapping screws;
- screwing all components using a screwdriver.
If the legs are deepened at a distance from the edge of more than 100 mm, then the appearance of the cabinet will be “floating”. This can only be done for a sufficiently wide base. Otherwise, the cabinet will be unstable.
When assembling the cabinet, you must use a level at each stage. It will help determine the parallelism and perpendicularity of the attached parts. With its help, the resulting curvature is leveled out.
Plasterboard sheet is a convenient and cheap source material, but it requires certain skills when working. A do-it-yourself plasterboard cabinet is quite weak in terms of its ability to withstand the weight of a TV and other equipment. This design requires mandatory reinforcement.
The advantages of different types of cabinets with a mirror in the hallway, their design
Methods for installing a soft wall
Today, specialists who develop the design and placement of a soft wall in the bedroom use the following methods:
- capitone method;
- frame covering;
- drapery;
- use of soft tiles.
Capitone method
This method is the most common and fashionable. It is based on a pattern formed by using buttons that tighten the material and upholstery at certain points. Some call it carriage wrapping, since in past times this was how the interior walls of carriages were covered.
For the base, use MDF panels, plasterboard or wood, on which holes are drilled in a checkerboard pattern at the same distance from each other. Fix the filler and stretch the upholstery fabric. Decorative buttons are fixed using a nylon thread, which is passed through the back wall in the prepared holes. After fixing each button, you need to secure the nylon thread using a construction stapler, and only then move on to the next one. This option is used when decorating the walls near the bed in the bedroom.
Covering the frame
To carry out the work, you will need slats, from which you need to mount a frame of the desired size, and then it is fixed to the wall using self-tapping screws. A filler is placed between the slats, which should fit tightly into the cell; if necessary, liquid nails can be applied around the perimeter. After this, you can begin attaching the fabric, which is cut with a margin. The upholstery fabric is fixed using a construction stapler from top to bottom. This will avoid sagging or, conversely, excessive tension of the material.
Drapery
Drapery cannot be called a full-fledged soft surface, since it is classified as fabric wallpaper. The created canvas using several materials of various shapes is glued to the wall using liquid nails. You can use both the whole canvas and its fragments.
Soft tiles
To create soft tiles, the capitonné method is used, which can be decorated with or without buttons. The result is slabs of different sizes and colors (optional). They are fixed to the wall in the planned order using liquid nails.
A soft wall is an easy way to complement the interior of a room with an original element, the shape and color of which can be in harmony with the main colors used for the interior, or, conversely, be a bright accent.
Tips for readers:
- do-it-yourself concrete ceiling putty;
- how to properly install an acrylic bathtub.
How to secure?
Let's look at the details of self-assembly of the rear part. There are several ways to do this, each of which is suitable in a specific case.
Overlap fastening
The most practical and inexpensive option for this method would be fibreboard (in common parlance “hardboard”). The thickness of the fiberboard should be 3-5 mm. This material is especially suitable for sliding wardrobes. You can also use plywood, OSB and other materials with a flexible structure. You should not use nails for fiberboard or chipboard - fastening with their help is unreliable, and the panel may fall off over time at the slightest impact.
Step-by-step installation instructions:
- Assemble the cabinet and open the back according to its size, but 2 mm less on each side. For example, for a structure measuring 1800x700, the fiberboard should be 1798x698 (the base is not taken into account).
- Secure the corners of the sheet to the body. Use screws measuring 3x16, 3.5x16 or 4x16 for this.
- Screw in the screws along the edges of the sheet. Their exact number depends on the size of the cabinet. For greater strength, the distance between the screws should not be more than 10-15 cm. At this stage, to save money, you can nail a small number of nails measuring 1.2×25 or 1.2×20.
Groove mount
Most often this method is used for kitchen wall units. In this case, the recessed wall does not prevent the cabinet from fitting tightly to the wall and is easily adjustable. This method is also suitable for furniture that is in plain sight. The back part inserted into the groove becomes invisible and the cabinet looks beautiful.
Installation in grooves with additional fixation with corners
Step-by-step instruction:
- Pre-make grooves 10 mm deep. in the walls, bottom and roof of the module.
- Now secure the back into the grooves. Assembly starts from the bottom and ends with the roof.
- If the width of the grooves is too small, you can slightly grind the edges of the back wall.
In the form of an internal insert
This method allows you to secure the back part from the inside without moving the cabinet. Most often used for large and heavy furniture. But a fiberboard sheet is not suitable for this. “Orgalite” demonstrates good strength during tensile deformation, but in this case the entire structure will compress the back wall, so it is better to choose laminated chipboard with a thickness of 6-10 mm, which will withstand such a load.
Step-by-step installation instructions:
- Cut the blanks a couple of millimeters smaller than the dimensions of the niches. The remaining clearance will be used for the seal. Do not forget to process the edges of the finished sheets so as not to scratch the inner sides of the walls and shelves;
- Before installing the panel, secure 4-8 metal corners in each niche so that the back side of the corner is flush with the end. This way you will place the wall evenly, and it will not fall out on the back side - the corners will hold it inside.
- After installing each sheet of chipboard, attach it from the inside. You can use rastex, canonical screed, plastic or metal corners. Read more about fastening methods.
The video below shows the homemade production of an inset back wall without the use of professional tools.
Butt-to-butt connection
This option is suitable when you need to install a back wall of several sheets on a two- or three-section cabinet or if the fiberboard sheets are narrow. In this case, the remaining edges of the sheets are screwed overlapping with self-tapping screws (see the first method).
How to install correctly:
- Attach the fiberboard sheets overlapping the edges of the cabinet.
- Use self-tapping screws at the joints. They are screwed between the fiberboard sheets on top of special plates that come with the cabinet, which will firmly press both sheets to the partition.
Connecting profile 2 meters long for the rear wall of the cabinet.
Branded fasteners
Furniture hardware companies often offer their own proprietary cabinet designs. They are easy to install, used in finished projects, and sold individually and in packages in hardware stores.
Plastic short holder for the rear wall Holes are drilled in the rear part, the holder pins are inserted into them. The corners are attached to the inner wall of the cabinet with screws. Quick-release fasteners. Installation diagram for the corners.
After installing the back wall of the cabinet, if it is placed in the center of the room, think about decor options.
Finishing of internal adobe walls
Internal wall cladding with plasterboard is carried out in several ways:
- A frame is made from metal profiles and sheets are attached to it
- Fasten drywall directly to the walls with long self-tapping screws
- Glue drywall directly to the base
Before starting repairs, it is advisable to make a natural ventilation system in the room, which will reduce the humidity in the house and maintain the evenness of the plasterboard sheets.
For the frame method you must have the following tools and materials:
- Metal profile
- Fasteners
- Suspensions
- Tapping cord, plumb line and building level
- Grinder and metal scissors
- Construction knife
- Square, pencil or construction marker
- Roulette
- Cutter
Before starting work on the construction of the frame, profiles should be prepared. They are cut to length. The rack profile is cut into pieces equal to the distance from the ceiling to the floor. You can cut off another 5 mm. The guide profile is cut to a length equal to the length of the wall on which it is planned to attach the sheathing. The process of finishing gypsum board walls using a frame includes the following steps:
- Carrying out marking work. This is a critical stage on which the correct installation of the frame depends. At this stage, you need to find the most protruding part of the wall. When this point is found, marking work begins. For this you need a laser level and a tapping cord;
- Attaching the guide profile to the floor along a precisely marked line. The profile is attached to the concrete screed with dowels, and to the wooden screed with self-tapping screws;
- Fastening the ceiling profile parallel to the bottom one;
- Installation of rack profiles in the resulting grooves;
- Installation of stiffeners between the vertical parts of the base;
- Laying insulation, preferably glass wool. Using high-quality insulation will prevent the appearance of rodents in the house, which can live in the space behind the sheets;
- Covering the frame with plasterboard. It is better to finish the walls with moisture-resistant plasterboard sheets. But you can also buy regular ones. In this case, they should be treated on both sides with a moisture-resistant primer. The first sheet should be attached near the corner of the room or near the doorway.
The simplest way to finish adobe walls with plasterboard is to cover them with this material. It is necessary to glue gypsum boards when it is necessary to avoid large losses of usable area. Also, attaching drywall without a frame to adobe walls can reduce the cost and time of wall cladding. This building material can be glued to walls if the deviation from the vertical is less than 30 mm.
To glue the sheets, you need the following tools:
- Container for mixing glue
- Construction mixer
- Spatula, notched trowel, trowel
- Plumb, level
- Block and rubber mallet
The technology for attaching gypsum boards using glue consists of these steps:
Identification of base irregularities. Using a building level or plumb line, unevenness is measured; Preparing the base. This process includes scraping off the old cladding and filling large uneven areas and cracks; Treating walls with a primer; Cutting plasterboard sheets. When carrying out this work, you should not forget that 10 mm of free space should be left between the sheet and the floor, which is necessary for free air circulation. Otherwise, the glue will not be able to dry; On the floor near the wall it is necessary to place several scraps, slats no more than 10 mm thick, on which the sheets will rest; Place the prepared sheets on a flat surface, preferably closer to the wall, and apply glue to them. It can be applied in two ways. You can apply a thin layer of glue along the center and perimeter of the sheet using a notched trowel. Or apply it pointwise over the entire surface of the sheet; We apply a sheet of drywall to the wall, starting from the corner of the room. Then we move along the perimeter. Periodically it is necessary to check the correct position of the plasterboard using a building level; Level the sheet using gentle blows with a rubber mallet.
But this must be done extremely carefully, otherwise the plaster will break in those places where glue is not applied. It is more advisable to use a board or timber for leveling, which can be hit with greater force and without fear that the sheet will burst.
After completing the installation work, you must let the glue dry for 2-3 days. At the same time, there should be no sudden temperature changes in the room. From under the drywall, remove the available materials that held the sheets in place, and putty the resulting cracks along with the seams.
Assembly features for different types of furniture
The process of assembling cabinet furniture with your own hands may vary depending on the product. Tall cabinets are best assembled horizontally. To find out whether it is possible to fasten the elements in this position, you need to lean the side against the wall of the room. If the part does not reach the ceiling at an angle, then the work will be much simpler.
When assembling a furniture set, it is necessary to check the module bodies using a building level. The side elements should not deviate from the vertical, and the top parts from the horizontal. Otherwise, gaps will appear, due to which the appearance of the product will suffer.
Dresser
These pieces of furniture have approximately the same assembly pattern. First, the frame is assembled. Next they move on to working with boxes. First, the side parts are fastened, then the front and back walls. At the very end, the bottom is installed. The next stage is attaching the guides. One part, which must slide, is attached to the bottom of the box, and the second to the wall of the frame.
Step-by-step instructions for making your own cabinets from chipboard, MDF
To choose the correct mounting location, you should use a tape measure and a pencil. Having marked identical segments on all sides of the frame, you can safely attach the guides. If the chest of drawers has additional elements (mirror, changing surface), then they must be installed on a fully assembled product.
Bed
Standard models consist of a frame, base and headboard. Assembly in each specific case occurs according to the instructions. The process consists of the following steps:
- Installation of the base. Having connected the three frames and the headboard, attach the legs to the frames.
- Attaching corners and shelves to the base. Everything should be laid out evenly and only then secured with screws.
- Attaching the central backrest to the frames. This should be done only after the frame has been completely assembled.
How can you arrange furniture in a room of 18 meters, photos of the best options
All that remains is to lay an additional beam for the mattress pad on the frame, then the assembled product is tightened with furniture screws. This action allows you to adjust the firmness of the bed. All wooden elements are varnished and the work can be considered complete.
If the bed is equipped with a lifting device, the assembly will be different. The main difference is the non-standard connection of parts using a wedge-shaped method. When assembling the lifting mechanism, you need to fasten all the elements with screws and tighten them well. The frame is attached to the body only by the lower part of the mechanism, which should already be installed. This design is very bulky, so it should be assembled by two or even three people.
Closet
This cabinet furniture is the easiest to assemble. First, connect the shelves to the side walls using confirmats and a screwdriver. Then comes the fastening of the back part, where you will need special nails for furniture and a repair stapler with staples. After assembling the box, you need to make sure that the diagonals and right angles between the structural elements are equal. Next comes hanging and adjusting the facades, after which the shelves are installed. If there are pull-out drawers, they are inserted at the very beginning.
Closet
Assembling the body should begin with the work of attaching the base to the bottom with dowels and minifixes (eccentric couplers), after which the support nails are driven in. The presence of opposite holes on the side walls is very important; attention must be paid to this. After fixing the rear part, you need to check the corners and diagonals. Next, the fastening parts for the shelves, the shelves themselves, the bar and, if any, the drawers are installed. The plinth can be dismantled provided that the cabinet does not have a base and trim at the bottom.
The main feature of any wardrobe is its sliding door system. They are installed on furniture last. First, the limiters are attached, only then the upper guide rail is attached (it is too early to install the lower one). The door panel is inserted into the far grooves of both guides, and the leaf into the near ones. The adjustment is now made. Only now can you fix the bottom rail and stick on the brushes for sealing.
Kitchen set
Self-assembly of such cabinet furniture is a very difficult task, which requires a variety of fasteners and special fittings. Everyone starts by preparing the lower sections. Using Euroscrews, they are fastened to the sidewalls, slats for the table top are inserted, and the back part is attached. Additionally, when assembling the parts, you will need a stapler, nails with a head perimeter of 1 cm and a self-tapping screw for adjusting the legs. Then the hinges are installed in the landing slots, the facades are hung and tightened.
Steps for making a simple do-it-yourself plasterboard cabinet
The upper cabinets are assembled in a similar way. However, there is some heavy installation involved. High sections are hung on a mounting bar, massive bolts, hinges or dowels. Suitable height is 55-60 cm from the bottom tier.
The corner set begins with the installation of a radius cabinet.
Making soft walls with your own hands
To make soft panels yourself, you need to prepare the following tools and materials: upholstery material (fabric, leatherette), plywood, buttons, backing, glue, hacksaw, ruler, drill, pencil, stapler, scissors, hook, wire or nylon cord. Choose a flat surface and get to work:
- First, cut a piece of plywood to the desired size and shape. It is better to choose plywood 3-5 mm thick.
- Make markings for attaching buttons.
- Use a drill to make a hole for the buttons. If the element is large, make additional holes for fixing on the wall.
- Cut the backing with a knife (foam rubber, padding polyester) to the same size as the base.
- Now stick the backing onto the plywood.
- Prepare a pattern from upholstery material with an allowance of 5-7 cm to fold onto the back side of the base.
- Thread the cord or wire through the button. Using a hook on the back of the base, pull out the cord. Securely secure the button so that it does not sag.
- The cord is secured with a stapler.
- Now wrap the upholstery material itself behind the base and secure with staples.
Designing a wall for the living room
After we managed to collect all the necessary materials and prepare the tool, we can begin preparing the project for the future
walls. Wall design is the most important stage of work. Because in the process of drawing up a project, we clearly determine the size of the future piece of furniture and its internal configuration. And we finally determine how much we will spend this or that material.
At the wall design stage, we can determine in more detail the amount we will need to purchase everything we need. And also more clearly plan the order of subsequent actions. When designing a wall, you must take into account not only its general parameters, such as width, length, depth, height, but also specific ones, such as the thickness of the materials that will be used in the process of its manufacture. After all, if specific parameters are not taken into account, you can make a very serious mistake. After you finish with the sketch, you can start drawing up the drawing, or (which is better), delegate this work to a third party (a specialist in this field).
Linear and angular
In a medium-sized living room, linear or corner walls are most often installed. As already mentioned, the number of cabinets, chests of drawers, drawers, cabinets is chosen based on what things and in what quantities will have to be stored in them. If you need a lot of cabinets so that they do not look bulky, choose a light color for the doors. Some doors can be made of translucent glass and these cabinets can be illuminated. This will make the furniture even less “oppressive” and such an ensemble will look more modern.
You can make the furniture visually lighter if the lower part is dark and the upper part is light. Not necessarily white. The colors are suitable but milky, light beige, creamy, light gray, etc. In the same range as the dark bottom, but much lighter.
Slide walls in a dark-colored living room are suitable for spacious, bright rooms. Interesting unusual style. Traditionally, a TV is in the center, and there are cabinets on the sides. To prevent them from being heavy, the middle is decorated in a light beige color. One of the characteristic features of modern furniture is the uneven top edge. Layout with a large number of shelves.
Such a slide can only be installed if the interior is designed in the same style
Open and closed cabinets and shelves
A little about the arrangement of furniture in the living room wall. If there are cabinets, in a linear arrangement they are placed along the edges, leaving the middle almost empty - a low cabinet is placed under the TV installation, and a couple of shelves can be placed on top.
Much less common are models of wall cabinets, in which cabinets for clothes and dishes or pencil cases are interspersed with shelves and are located not at the edges, but in an arbitrary place. This is not to say that this type of furniture arrangement is worse. It's just more original and non-standard.
The corner walls of the slide into the living room are much more varied in terms of furniture arrangement. Sometimes the cabinets are also located at the edges, the middle is occupied by low cabinets, and in the center (in the corner) there is a place for the TV. There is an opposite layout - in the center there is a corner cabinet (or cabinets), along the edges there are low cabinets and shelves above them.
Unusual corner wall slide in high-tech style. No unnecessary details - smooth surface and only the central part stands out
In the center there is a place for a corner sofa - a non-standard approach
A dark solid wall is suitable for very bright rooms
A rare phenomenon - a combination of different colors
Cabinets in the corner and shelves along the edges - looks original
The highlight of this ensemble is the unusual doors and the imbalance between the upper and lower parts of the furniture
Corner wall slide in modern style
A common solution is a TV in the corner
If the walls are different lengths
The corner walls of the slide in the living room can completely occupy one wall and only cover a small part of the adjacent one. This is convenient if the room is small and there is a window near the corner. It is the corner layout option that will allow for more efficient use of space that cannot be used in any other way.
How to make a furniture wall with your own hands
Preparatory work
Selecting a wall style
The main compositional task is to make the interior harmonious by arranging individual elements in the same style in the available space. The material can be purchased or homemade - in this case, you need to be able to have a good understanding of wood species, among which experts recommend choosing hard varieties (oak, larch, maple and others).
To make your own wall, carefully select materials. Such solutions for the hall are quite expensive, but with skillful processing they will decorate any home for many years. And for the health of the household there will be only advantages.
It is better to give preference to natural wood.
Drawing selection
First, a drawing is created and calculations are made to calculate the volume of costs relative to materials. How accurately the work is done, the quicker it will be possible to assemble and install the finished set. A DIY furniture wall will turn out to be of high quality if you calculate not only the dimensions of the niches, width, height, number of furniture elements, but also the thickness of the material.
An example of a drawing for making a furniture wall yourself. Experts do not advise blindly copying drawings and diagrams from the Internet, but many of them can become an excellent teaching aid, the basis for your individual design work.
Selection of tools and materials
To carry out assembly work you will need the following tools:
- Measuring accessories - tape measures, rulers, levels, plumb lines, squares.
- Bolts, screws, nuts, sealing elements.
- Tools for installation operations - screwdriver, drill, hammer drill, polyurethane foam, jigsaw.
- Cleaning operations - sandpaper, sanders, spatulas, epoxy glue, primer.
In order to make a wall with your own hands, of course you will need a set of certain tools. The main materials for the manufacture of modern furniture walls are solid wood, MDF boards, laminated chipboard and chipboard. The components of the complex may be glass or have an aluminum frame, which will make the project more expensive.
Build process
Initially, after finishing work on the drawings, a frame is made - the supporting structure and the main support of the future set. Guides made of timber are attached to the walls - shelves are attached to them. Then the structure is sheathed with decorative panels from the selected material. Wide, glued boards are better suited for assembling tubes. It is more convenient to cut fiberboard elements with a jigsaw.
Before final assembly, all elements are carefully polished. The next stage is finishing the product, which is carefully polished, irregularities are removed, which allows the formation of continuous smooth transitions. An experienced craftsman can make decorative carvings of patterns on wood, and make unique carved doors for cabinets, which also make it possible to hide seams and joints. Black and red wood is ideal for noble decor.
If desired, the furniture can be decorated with a variety of patterns.
For a slide in a classic style, a restrained style of fittings made in strict tones is more suitable. For Provence style, light colors look good. An important emphasis is placed on the application of paint, before which the surface is sanded and primed.
Final stages
After completing the horizontal work, the modules are lifted, followed by arrangement according to the sketch and leveling. If the legs are non-adjustable, you can use special spacers.
Assembly and installation of the wall occurs when all parts are completely ready. Safety will ensure good stability of the structure. This is ensured by precise installation work relative to the horizontal and vertical planes, eliminating the risk of the wall tipping over in the future.
Following completion of the installation of the main structure, decorative fittings are installed in their places: linings, handles, glass stickers. Many today prefer to use slides with smoothly opening drawers and doors - this is achieved by installing mortise closers, bumpers, and door hinges with a spring mechanism.
For decoration, you can use all kinds of accessories and decorative stickers.
Making furniture drawings with your own hands: general overview
Hello dear friends.
Today we will talk about such, at first glance, a simple thing as making drawings.
What exactly are they, and what information do they carry?
And they are an image of furniture (in projections) with overall and main dimensions indicated.
Based on these drawings, all the details of the future product are calculated.
It can be calculated either manually or using special programs (for furniture makers).
In other words, the furniture drawing is the source material for calculating the entire project (a project is a package of “documents” on the basis of which the furniture in question can be manufactured, assembled and installed).
What are the drawings for? We figured it out.
Now let's talk about how to make them?
And making a drawing is not as easy as it seems at first glance (I’m already repeating myself, but this is actually true).
To create a drawing you need:
- Know the dimensions of the room (or part of the room) where the furniture is planned (in some cases, this is not required, for example, when you just need to make a chest of drawers of a certain size that will not be associated with the nuances of a certain room).
- Understand the size of the gaps (in the case of built-in furniture, for example, a kitchen set) that must be given for the overall dimensions of the product.
- Understand the dimensions of the designed modules in accordance with the built-in fittings (for example, the same built-in guides for drawers).
- Correctly design the design of the product to ensure its maximum rigidity (sizes of modules, presence of stiffeners).
- Take into account the dimensions of the components (parts) of the product relative to the dimensions of the sheet material from which these parts will be made (so that it does not turn out that, for example, the designed side of a sliding wardrobe will be larger than the dimensions of the sheet of material from which it should be made).
- Understand the geometry of some parts (for example, the facade, which is attached to the frame on hinges, must have a height greater than the width, in order to avoid unnecessary load on these hinges).
- Regarding the overall dimensions of the entire structure, you also need to understand its stability (for example, if the structure is tall and narrow, it will not be stable). In the case of low stability, you need to be able to plan options for attaching such a structure to the wall (as, for example, shown in this article).
- Understand what dimensions furniture niches should have in order to plan drawers in them (there is no point in planning drawers that are too small (in width), just as there is no point in planning drawers that are too large, for a number of reasons...).
Here are the main points of making, so to speak, a semi-finished product for making a project - a drawing.
Now let's look at all of the above with a simple example:
Let's make a drawing of a chest of drawers.
Let us automatically leave out the first two points listed above (they are discussed in articles on designing kitchen units), since, usually, the dimensions of a chest of drawers are immediately determined “by eye”.
Let our future product have the following overall dimensions:
- Width – 1200mm
- Height – 832mm
- Depth – 500mm
And let it consist not only of drawers, but also of modules with hinged doors.
These will be three independent modules that will be installed on a common base and covered with a common cover on top (the dimensions of the cover and base will be the same, and their width will be equal to the total width of these three modules).
Therefore, we will give a box with drawers (width) - 600mm (just the normal size for such a module).
It turns out that there will be 300mm left on the outer boxes (those with drawers) (also quite normal).
We figured out the width.
Now let's "estimate" the depth:
The overall depth “along the cover” is 500mm.
If you “fill in” the facades from the same material from which the chest of drawers itself will be made (let it be laminated chipboard, 16mm thick), then it makes sense to make the module boxes 20mm (according to the thickness of the facades) less than the depth of the lid.
It turns out that the width of the sides of the modules will be equal to:
500-20=480 (mm).
Now you need to figure out whether this depth is enough so that a stiffener and a 450mm guide can be installed in the box:
480-16-450=14 (mm), where: 16mm is the thickness of the stiffener (it will be installed in a module with drawers), 450mm is the size of the guide, and 14mm is the gap between the drawer (the depth of which will be equal to the depth of the guide) and stiffening rib.
It turns out that the overall depth of the chest of drawers (according to its lid) also fits normally.
Well, the height...
In such cases, the height is usually looked at from the point of view of the stability of the structure.
With a height of 832mm and a depth of 500mm, the structure will have “satisfactory” stability. So, the height can also be left unchanged.
Only now, after determining the dimensions and checking them for compliance with the built-in fittings, module sizes, general stability (see the list presented above), you can draw up a drawing (it is presented above).
And based on this drawing, all the details of this product will be calculated.
In these calculations, there is another fundamental value - the thickness of the material (in this case, as mentioned above, it is 16 mm).
Operating with this value, almost all calculations will be made.
Now we can “draw” a general drawing of the product, from which we can make drawings of its components (three modules), from which, subsequently, we can calculate all the detailing.
Here is a simple mechanism for drawing up a drawing of furniture that we will make with our own hands.
In conclusion, I will say that, in practice, for beginners, sometimes everything works out, not as simple as described in this article.
They often lose sight of something (why are novices, and seasoned furniture makers sometimes make mistakes, they are also real people).
Therefore, if you have a desire to make some serious furniture yourself (kitchen set, wardrobe, bedroom set, etc.), and you are afraid of making mistakes in the calculations (and these mistakes, as a rule, cost the most) - in this case , there is online furniture design.
This option will save you from mistakes and provide you with a high-quality furniture project that you want to make with your own hands.
Well, I’ll end here.
We wish you beautiful and high-quality furniture!
See you.
Wall mount
It is wrong to fasten the wall bars to the wall with steel corners and self-tapping screws, as amateur craftsmen often do. As soon as one corner breaks due to metal fatigue (which is most likely just during training), the entire fastening can come off at once. Fastening an adult wall bars to a load-bearing wall is possible at 4 or 6 points. It is advisable to attach the nursery at 2 points, see below.
At 4 points, the wall bars are fastened with thrust bearings on 3-4 screws in dowels each, see above. This mount is mainly for people of light weight (up to 70 kg). The lower pair of thrust bearings is located in the middle between the first and second crossbars, and the upper one - between the 2nd and 3rd from above.
When fastening to 6 points, the bottom two are located closer to the floor, but not less than 0.75 of the width of the bowstring from its lower edge. If, say, the string is 150 mm wide, then the distance of the lower attachment points from the floor is 100 mm. The upper points are marked in the middle between the last and penultimate crossbars, and the middle ones - in the middle between the lower and upper ones, but so that they also fall in the middle of the distance between the crossbars.
A Swedish wall with 6 points is usually secured with anchor bolts from M10, but the diameter along the body of the bolt is no more than 1/3 of the thickness of the bowstring and no more than 1/2 of its thickness for the head with a washer. Stepped through holes are drilled in wooden bowstrings for bolts and washers. The depth of the larger hole (under the head) is half the width of the bowstring. Smooth holes are drilled in steel bowstrings for the body of the bolt. Recessing anchors into a load-bearing wall (in addition to the thickness of the finish):
- In concrete - from 100 mm.
- In brick - from 110 mm.
- In wood – from 130 mm.
What kind of walls can you make with your own hands?
Considering the many materials and technologies used in our time, you can make a wall of any variation with your own hands. The thing is that laminated and veneered parts that are especially difficult to produce can be ordered from the furniture manufacturer. And do the other with your own hands. So, what wall variations can you try to make with your own hands?
- Traditional walls.
- Modular walls.
- Corner walls.
- Suspended walls.
- Walls of the oar system.
It should be noted right away that traditional walls made of wood can only be made by a craftsman who knows how to work with this material. Even if you have ever worked with wood in your life, it is better not to undertake the independent production of wooden furniture. After all, the material must be correctly selected, prepared, and finished. The chances that without skill you will do all this correctly are small.
It is better to take as a basis materials that are easier to finish: chipboard, MDF, and plastic. In many cases, even metal. Do not forget that before choosing the benefits of producing one or another wall variation, evaluate these facts.
- The type of material, its color and texture, what you will work with.
- The artistic composition that you will follow when making furniture.
- Dimensions and shape of the future wall.
- Distinctive characteristics of its location within your reception room.
- Indicators of individual wall elements.
- Distinctive characteristics of the organization of electrical communications for lighting components.
Preparing tools and materials
To make a wall with your own hands, you don’t need any difficult special tools. We would like to present you with a general list of them.
- Ordinary or electric jigsaw;
- screwdriver or simple Phillips screwdriver;
- drill;
- tape measure, square, plumb line;
- chisel, clamp;
- mallet, hammer.
It all depends on the features of the product; additional names can be added to the list of tools. But in any case, any of the similar tools can be found in the pantry of any good owner.
Regarding the choice of materials for the future wall, not everything is certain either. To make it easier to determine the general list of materials, let’s give a list of them using a standard example of an ordinary chipboard wall with a wood frame 3.3 m long and 1.8 m high. So, what material is used for a similar wall.
- Wood racks;
- wood crossbars;
- roofing made of fiberboard or plywood;
- shelves (MDF or chipboard);
- wooden overlays for shelves and lids;
- side and rear walls made of plywood, fiberboard or MDF;
- side support bars made of wood;
- frame front limiters;
- rear support strips for shelves;
- lower support strips for shelves;
- rear corner pads;
- lower horizontal and vertical corner pads;
- decorative facade (wood, laminated chipboard, etc.);
- front, rear and side walls for pull-out drawers (fibreboard, plywood);
- self-tapping screws for wood, cladding nails, self-tapping screws with countersunk heads;
- handles for doors and drawers;
- roller guides;
- wires, control unit, step-down transformer and LED strips (blocks);
- Round head screws, washers, nuts, locknuts.
Selecting material for making furniture
Many parts for assembling furniture can now be purchased ready-made. These could be, for example, shelves of complex shapes made of glass or chipboard. Specialized stores sell ready-made facades and countertops, mirrors and other structural elements that allow the installation of exclusive interior items.
In addition, carpentry workshops offer to cut blanks of the sizes and shapes you need. Therefore, it is not necessary to have complex woodworking equipment to make furniture yourself. This service will allow you to use not only non-standard parts, but also provide reliable fastening of the elements to each other.
Drawing of a coffee table for the living room.
The fact is that the most durable way to connect large parts is considered to be a tongue-and-groove assembly. But to make it you need a milling machine or a hand cutter. And also considerable experience in using them. But all the necessary components and parts can be performed by a master for an additional fee. All you have to do is assemble the furniture.
When going to the workshop, prepare a drawing with all the necessary dimensions. Ideally, you should have on hand a diagram of each individual part with the fastening locations and their dimensions marked on it. If you want to order the production of shaped elements (lids or tabletops), then you need to first make a life-size paper pattern.
For self-assembly of furniture, the following materials are now usually used:
- Chipboard or MDF - for side walls and frames of large furniture;
- Laminated chipboard - for facades, covers and countertops;
- thin plywood or fiberboard - for the back walls and bottoms of drawers.
The thickness of the material depends on the design of the furniture. To make furniture cabinets for the living room, MDF or furniture board (solid wood) is usually used. But option 2 will cost much more. Chipboard is considered more reliable and less susceptible to temperature changes and moisture. Therefore, such material is often used in the manufacture of kitchen furniture.
Return to contents
Housing assembly
We assemble each furniture wall module separately. We place the side part on the edge with its front side facing the floor and attach the roof. Then we attach the second sidewall and the bottom of the section. Screw the back wall and turn the module face up. We hang the doors and install the cabinet in place. We insert shelves and drawers. Assembly is complete.
Additional materials for assembly
For high-quality assembly of modules and connecting them to each other, special connecting fittings are required:
- Confirmat (Euroscrew) – provides a convenient, reliable, most accurate connection of parts to each other by screwing with a hexagon. Allows subsequent disassembly. The disadvantage of the confirmat is that when using it, only through holes are needed (it is not suitable for attaching a table top).
- Minifix (eccentric coupler) - allows you to connect and disconnect any parts located perpendicular to each other without loosening the fastening. The downside of the minifix is that it requires a special Forstner drill to install it and very precise drilling.
- A dowel (chopik) is a simple fastening. Holes are drilled in two parts, 2-3 drops of glue in each. A dowel is driven into one of them half the length, the second piece is placed on top. The downside of the dowel is that it is very difficult to separate without damaging the parts.
- Furniture corner coupler is an easy-to-install, reliable connecting element. A worthy replacement for modern fittings.
- Intersectional screed – connects furniture modules to each other and ensures structural rigidity.
Required materials and tools
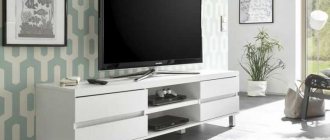
It is important to determine the main material of the TV stand for making it yourself. It should also be in harmony with the interior design. Self-assembly of a TV stand is made from popular building materials:
- plasterboard is a malleable and comfortable material; furniture of unusual shapes is often made from it, but it cannot withstand the loads of heavy equipment;
- Chipboard and plywood are budget options, easy to process, suitable for simple and undemanding products in terms of appearance;
- MDF is a good lightweight material with an attractive appearance, very durable and easy to use;
- natural wood (solid boards or furniture panels) is an ideal material for furniture; it produces uniquely beautiful things, including a bedside table.
Popular designs of modern TV stands, placement options
Additionally, fiberboard can be purchased to cover the back wall and bottom of the cabinet drawers. In the case of designing an open shelving structure, you can do without it. Particular attention is paid to the selection of accessories for the cabinet. Each person calculates the number of necessary components individually based on the specific model. Required elements include:
- confirmations;
- self-tapping screws;
- small nails;
- shelf supports;
- drawer guides;
- handles or “push mechanisms”;
- hex plugs.
Before assembly, you need to check that you have all the tools that may be needed for the job:
- electric drill with drills 5 and 8 mm;
- screwdriver;
- Phillips screwdrivers;
- hammer;
- roulette;
- ruler;
- level;
- a simple pencil;
- Whatman sheet.
This list can be supplemented with a jigsaw and a grinder if you decide to make the cut yourself. It is worth noting that many companies provide similar services on site. This significantly reduces assembly time.
Drywall
Chipboard Plywood
MDF
Natural wood
Required Tools