Restoring old furniture is an interesting option to update interior elements and show your creativity. It is not necessary to go to a furniture store or factory and buy new furniture. By showing your imagination, you can give tables, chairs, and shelves an attractive look and a special twist. The simplest and most economical option for updating an old cabinet is to paint the furniture using decorative paints and varnishes.
You can also use wallpaper, decoupage, photo printing, photo wallpaper and decorative plaster for restoration. But which method should you choose?
Wallpaper finishing
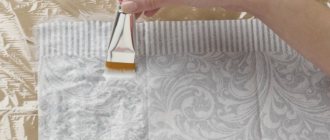
One of the most economical and affordable ways to update an old cabinet with your own hands is wallpapering. This does not require any special skills or effort. The restoration procedure is no different from a regular repair involving re-sticking the wallpaper - except that the surface will be different.
It is advisable to select a material that is easy to wash using special chemicals.
- First you need to choose a wallpaper design, a color that will “fit” into the interior of the room.
- Purchase the required amount of material, having previously measured the area of the furniture body.
- After this, all that remains is to cut the strips of the required length, apply a layer of glue to the surface of the cabinet and iron the glued wallpaper with a roller.
If there are certain designs and patterns on the room wallpaper, it is desirable that the furniture be finished with a single-color coating.
With the help of wallpaper you can turn an old wardrobe into a harmonious part of the interior. Interior designers often resort to this technique when creating unusual projects.
Almost everyone can glue beautiful canvases, update old furniture, and restore it with their own hands.
Antiquity in noble craquelure
Create with your own hands an antique rarity from a cabinet with a beautiful gilded texture, consisting of many small and deep cracks, “testifying” to the venerable age of the item.
Craquelure is a painting method in which the base layer of paint, enamel or putty cracks.
To create a “magic potion” you will need:
- Two-phase craquelure varnish;
- Transparent acrylic varnish with a matte texture;
- “Golden” powder as a grout (powder made from non-ferrous metals crushed to a finely dispersed state - bronze, aluminum, copper);
- Grout sponge.
To ensure that the paint becomes cracked, the surface is first coated with craquelure varnish.
Sequencing.
- Apply the first phase of craquelure varnish. Wait until it dries to a thick sticky consistency.
- Apply and dry the second phase in the same way.
- Use a sponge to rub the “golden” powder into the cracks that have formed.
- Apply a final coat of matte varnish and dry thoroughly.
A cabinet aged using the craquelure technique will look like an expensive antique.
ON A NOTE! Instead of powder, a special composition for patination and bitumen wax, “dry” pastel are suitable. The longer the craquelure layer dries, the deeper the cracks appear on the surface of the furniture.
Photo restoration
Another option on how to transform an old cabinet is to use photographs or photo wallpaper. This can be done with the help of printing companies engaged in large-format printing: with their help, you can enlarge any photographs and decorate the surface of the case with them, turning it into a panel or collage.
Modern technologies make it possible to make large-sized and high-quality pictures on almost any surface.
Before gluing the photo to the cabinet, you need to clean the surface of the furniture from old paint and level it using sanding and a layer of primer. After this, you can start gluing up photos. It is also practiced to secure the new appearance of the cabinet by applying a layer of transparent varnish.
When applying a picture to glass or a mirror, the picture will be glossy, but on chipboard it will be matte, like a photograph printed on matte paper.
Work order:
At first I wanted to paint it like this without removing the door, then I realized that it would be inconvenient. So I took a risk. and took it off. It turned out not to be difficult. True, worries about how to put them back on were present until the last moment. In the end, I also screwed it myself; I didn’t have the patience to wait for my husband))).
I pulled out the built-in lights and wrapped them in a suspended state with masking tape. The same tape was used to protect the walls on the sides of the cabinet, the floor, and the mirrors on the doors. Prepared the workplace. I decided to paint it. on the bed)))! I covered it carefully with polyethylene. And I have never regretted this choice. The bed was large and high, everything fit, there was no need to bend over and crawl on all fours. I prepared approximately equal stacks of books and wrapped them in cling film. They are needed as substrates so that the doors can be lifted and painted as if suspended; the painted edges will not come into contact with a flat surface.
Stage 2.
I sanded all surfaces that needed to be painted. It is necessary to sand lightly, without fanaticism, with the finest sandpaper. Light circular movements. Purpose: to create roughness without removing the laminated layer. If there are dents and scratches, they should be filled with putty at this stage. After sanding, thoroughly wipe all surfaces with degreaser. It will remove dirt, grease marks, and everything that can disrupt the adhesion of the primer and paint.
Stage 3.
Primer. I went through hard-to-reach places with a brush, and the rest with a roller. A thick layer is absolutely not necessary; it must be covered with primer without drips and in a thin layer. Uneven coloring is not a problem, but there should be no gaps. I didn’t prime the rattan inserts; the paint applied well to them anyway.
They are easy to paint - just roll them with a roller; with a brush it is more difficult not to go beyond the edges. Wipe off any blemishes immediately with a cloth. Each layer was dried as recommended by the manufacturer; the acrylic dries “touch” in an hour and, in principle, you can carefully turn the door over and paint the other side.
Stage 5.
I assembled the closet. I screwed the doors and handles. I removed the masking tape and cleaned everything up. At first I planned to keep the doors open for two days, I was afraid that they would stick. Nothing like that - you can close it right away.
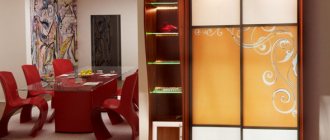
Fabric decor
You can also update an old closet using fabric. This will give the outline softness and volume and allow the furniture to harmoniously combine with the interior. The convenience of this technique is that you can change the selected color at any time without having to re-prepare the surface.
The facade design fabric should be combined with the textiles already in the room.
To update your closet you will need:
- Textile;
- Layer (sintepon or foam);
- Stapler for furniture.
The contrasting patterns on the fabric front of the cabinet are very elegant and also give the interior a “Japanese” atmosphere.
First, the lining is attached over the entire surface of the body using staples (another option is to use liquid nails). The material is stretched over it and symmetrically secured.
Restoration of an antique cabinet. Part 1: introduction and a short excursion into history
As I recently wrote on my blog, I finished restoring an antique cabinet. There I promised to publish a “long-lasting” master class on its restoration. I keep my word. Let me remind the reader that the restoration process consists of restoring the original appearance of the product as much as possible. And now the so-called “aging” of a remake completed today has become very fashionable, but in my case there was no need to age anything.
I warn you that the reader needs to be patient, since a lot of work has been done and there will be a lot of material in the master class, several hundred photographs were taken, of course, I will not publish all of them, but...
The title photo shows the working hours of restoration work. My readers know that this photo will accompany all parts of the master class.
In the process of work, I read a sufficient amount of literature, became familiar with, in my opinion, very interesting facts, so I decided to share the most interesting of them with my readers on the pages of the magazine, especially since they allow me to more accurately understand the history of the “birth” of this cabinet.
So, this is the cabinet that came into my hands.
The cabinet was purchased by the customer of the restoration work in the Braslav region, located in the Vitebsk region of Belarus. Today, the northern border of the Braslav region runs along the state border of the Republic of Belarus with present-day Lithuania and Latvia.
Upon initial acquaintance with the cabinet, it turned out that its creation period dates back to the second half - the end of the 19th century. At that time, the Braslav district, according to its administrative location, was located on the territory of the Novoaleksandrovsky district of the Kovno province of the Russian Empire. The center of the county is the village of Novoaleksandrovskoye (now the Lithuanian village of Zarasai), and the center of the province is the city of Kovno (now the Lithuanian city of Kaunas).
The Kovno province was created by decree of Nicholas I from the seven northern districts of the Vilna province in 1842. The Kovno province occupied the western corner of the Grand Duchy of Lithuania (not to be confused with modern Lithuania). It bordered from the north and east with the Courland province, from the south - with the Vilna and Suwalki provinces (from the latter it was separated by the Memel River (present-day Neman)) and from the west - with Germany and the Grobinsky district of the Courland province.
The Kovno province included almost the entire territory of the former Zhmud eldership of the Grand Duchy of Lithuania, as well as parts of the Troka and Vilna voivodeships of the Postolithic Rech. The space it occupies is 35,711.9 square meters. versts (40641.36 sq. km) Kovno province was one of the smallest provinces in Russia. Novoaleksandrovsky district occupied the eastern part of the Kovno province. Currently, the entire territory is part of Lithuania, a small part is part of Latvia and Belarus.
From the historical background, it becomes clear why the style of the cabinet belongs to the so-called “Western style,” which was widespread in those days in Germany, Poland, and other Western countries. You could even say that this is a style similar to “neo-baroque”. This is especially pronounced in the upper part of the cabinet, in its decorating element, the so-called crown,
as well as the design and appearance of cabinet doors.
This “Western” style was very common in the 19th century.
There are several other points that one way or another confirm the age of the cabinet.
1. Condition of the wood.
If you carefully look at the condition of the wood of the cabinet elements, which are shown below in several photographs, it becomes clear that the age of the cabinet is very respectable.
The wood-boring beetle thoroughly damaged the elements of the cabinet, especially in its lower part. It is clear that in any “remake” there will be no such damage...
2. The presence of a certain type of nails.
Nails are one of the best keys in determining the historical age of a building, furniture, and other monuments of wooden architecture. This is especially pronounced in the period of the 18th - early 20th centuries, because At this time, the production of nails was experiencing a real revolution. This situation with nails was determined at that time by the transition from manual labor to mechanized labor, and the rapid development of industry. If, for example, the history of forged nails (i.e. nails handmade by a blacksmith) in time frames takes at least a millennium, from the beginning of blacksmithing, and forged nails came into wide use in the period of the 10th - 18th centuries, then the nails that came to replaced by forged ones, lasted no more than a century.
Nails used to be very expensive, because the manual labor of a blacksmith was always hard and was highly valued. Therefore, even if there was a fire, people collected nails from the ashes, took them to the blacksmith for part-time work, and put them back into circulation. The stock of nails was truly a whole capital.
The cost of nails decreased slightly in the second half of the 18th century, when they were no longer made by hand. Forged nails were replaced by so-called “cut nails”. The first unit for the industrial production of nails was invented, and it was called a “cutting machine.” As for the name "cut nails", it would be correct to call them "cut nails", because they were cut, as it were, with a device similar to large sheet steel scissors. The thickness of the steel sheet became the thickness of a nail. The cut nails thus had two parallel sides formed by the planes of the sheet of steel from which they were cut. Therefore, their second name is square nails. This is their main difference from forged nails, which were also square, but during the forging process they narrowed in the direction from the head to the pointed end. The cutting machine, unfortunately, was not so perfect as to combine all the nail production processes. She only made the shank of the nail; the head had to be formed on another machine. In any case, the share of manual labor in such production was large. Cut nails reached their heyday by 1820, and in the middle of the 19th century they already dominated the market.
Cut nails ceased to be made only at the beginning of the twentieth century, when in the manufacture of nails they began to use wire that was equal in cross-section along the entire length. In my opinion, it is also interesting that the first machine on which it was possible to produce wire appeared at the beginning of the 19th century, but that wire was thin and not suitable for the production of nails. Wire of a sufficiently large cross-section and, moreover, strong, made of steel, was invented only in 1910. This invention made it possible to make round wire nails. The process was completely mechanized, nails became affordable and appeared in every home.
There were cut nails in the closet.
There are two types. Their characteristics are as follows.
1. Section 3.2 mm x 3.2 mm, length 83 mm, head diameter 8.5 mm
2. Section 1.8 mm x 1.8 mm, length 51 mm, cap diameter 4.8 mm.
I will cite interesting data contained in the Encyclopedic Dictionary, edited by F.A. Brockhaus and I.E. Efron, published in 1890-1907. In the dictionary you can find a lot of information on nails, in particular, you can read the following:
“At the present time, almost all the nails consumed in Russia are made in Russian Foreign trade of Russia along the European border,” in 1891, a total of 2,000 pounds of different nails were imported. Expensive nails are imported, costing an average of 10 rubles. per pood; this is all, either very small shoe and wallpaper nails, machine-made or cast, or nails with decorated heads for upholsterers.”
Having studied a lot of materials on the history of nails, I discovered that in Russia the first mention of nailing machines can be attributed to 1835, when, having returned from England, Efim Aleksandrovich Cherepanov (1774-1842) and his son Miron Efimovich Cherepanov (1803 - 1849) designed and They built a nailing machine at the Tagil plant. Massive use of nailing machines in Russia began in 1870-1880. Basically, equipment for the production of nails was supplied from Germany and England. It is interesting that in 1880 a nail factory was founded in the then Minsk province (by brothers Leopold and Alexander Lurie in the city of Pinsk).
Therefore, it becomes clear that if a cabinet was made somewhere in the 60s of the 19th century, then the nails in it are not of domestic production, but received from abroad (imported), if at the end of the 19th century - then the nails are ours, domestic, Russian , perhaps even made in Pinsk.
If you look at the reference literature, then in those days their markings were indicated in inches (2.54 cm), then my nails were “two inches” and “three inches and a quarter”, if they were domestic. But if they were imported, then they were called “sixpenny” and “twelve-penny”.
To explain this name, I will dwell on this in a little more detail. It turns out that the concept of “penny” in relation to nails, which has survived to this day in some countries, especially in England, appeared in England in the 17th century. At that time, the pound sterling (English monetary unit) was divided into shillings and pence, and the penny was the smallest coin. Until the 17th century, nails did not have any standard sizes. Each nailer (the so-called blacksmiths who made nails) made nails of the length that he considered necessary. But prices for nails remained constant, or almost constant, for a very long time. Therefore, in the end, the standard of nails was formed on the basis of their prices. At that time, one hundred smallest nails cost one penny, larger nails cost four pence, one hundred large nails cost eight pence, 16, etc., so they were called “one penny”, “four penny”, etc. Of course, today there are special tables with which you can convert standard nail sizes, for example, from penny size to inch or millimeter (which, by the way, are accepted today).
To finish with the nails, I note that in relation to my cabinet, it can be noted that if the nails in it were forged, then with a 100% probability its creation date could be attributed to the period of the early 19th century.
3. Design features.
The fact that the cabinet was created in the time period I indicated above is supported by the method of constructing the paneled structure of the rear wall of the cabinet.
After all, by the end of the 19th century, plywood was invented and, as a rule, already at the beginning of the 20th century, it began to be widely used in the construction of furniture.
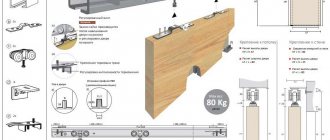
4. The use of original metal fittings and the method of their installation.
If you look at the hinged hinges of the cabinet doors,
then we can say that such loops were used in the 19th century. Now their analogue is called the “heel loop”. When installing the doors, the top receiving hinge was placed on the edge of the front outer frame of the cabinet.
But on the door itself the hinge is almost in the middle.
The door itself, in our previous photo, with its left side, when opening, slightly entered the inside of the cabinet, and when closing, it was recessed into a specially selected volume of the internal vertical surface of the outer frame of the cabinet (in the next photo this selection is visible to the right of the drill chuck).
This original arrangement of the hinges allowed the door to go beyond the outer side surface of the outer frame when closing the cabinet and create a beautiful relief on the front side of the cabinet.
The cabinet had an unusual locking device on the left cabinet door.
I will dwell on it in more detail in my other parts of the master class.
Of course, the locks on the right door and left drawer of the cabinet with their original nails for fastening are truly antique. These nails were definitely made abroad; they weren’t cut.
5. Using the original design of the wooden inner wardrobe hanger.
Inside the cabinet there was a very original hanger, consisting of two elements that rotated almost 180 degrees around the main frame element fixed on the back wall of the cabinet.
We will also talk about this element in more detail in my master class later.
It is no secret that when assessing the age of the cabinet, I relied on the opinions of my colleagues involved in restoration.
As I wrote at the beginning of this part, the cabinet was purchased and taken from the north of Belarus from the current Braslav region. Those who owned this cabinet, unfortunately, could not tell my customer its story. In the literature that I managed to read, I could not find any information about such work. This is not surprising, since books on restoration, as a rule, describe the work of famous masters and provide examples of the restoration of expensive, often unique works.
In my case, it is completely clear that this cabinet is not some kind of work of art, but, apparently, was made, albeit of very high quality, in some kind of handicraft workshop (carpentry artel), of which there were a great many in those days.
Apparently, the buyer of this cabinet was either some poor nobleman, quite possibly a representative of the clergy, military rank, merchant class or local intelligentsia. The peasants could not afford such a thing at all. Good furniture in those days was made from valuable wood, inlaid with gold, silver, and other metals and was very expensive. Only very wealthy people could afford to purchase it.
My words can indirectly be confirmed by the Encyclopedic Dictionary I have already mentioned, which reports that by January 1, 1896, the population of the Novoaleksandrovsky district of the Kovno province was about 230,000 people. Peasants predominated - 170,000, there were nobles - 4402, clergy - 821, honorary citizens and merchants - 294, burghers - 30889, military class - 8693.
My closet, with the exception of the decorative elements, was made of pine boards. I would like to note that the boards were very carefully and well dried before work. This can be judged by the fact that despite the fact that there are many boards with knots in the cabinet elements, after so many years, the knots have not fallen out of the boards. The use of pine boards also confirms my version that the owner of the cabinet was a poor man.
I note that in the same “Encyclopedic Dictionary” there is an indication that in Novoaleksandrovsky district in 1896 there were, in addition to 3 distilleries, 7 flour mills and a number of other factories, 1 sawmill. It is quite possible that it was at this plant that the boards from which our cabinet was made were made.
I would also like to tell you about the main dimensions of the cabinet. Its height, including 9 cm legs, is 185 cm, width 129 cm, depth 63.5 cm. All elements of the main frame are made of boards 30 mm thick. Partitions are made of boards 18 mm thick. The drawers have a size of 50x21 cm on the outside, the side surfaces of the drawers are also made of boards 1.8 cm thick, but the bottom is made of boards 0.8 cm thick. The boards of the shelves in the closet are the same thickness.
While working, touching the details of the cabinet, I constantly thought about those craftsmen who created this cabinet. It was very pleasant to work with wooden furniture, very competently made by hand many years ago according to all the classical rules and technologies of carpentry. After all, the wardrobe, and other furniture made in those days, still pleases our eyes today. And this particular cabinet, restored by me, will serve its new owners for many years to come. Unlike modern furniture, which, despite the high cost, is produced of inadequate quality in violation of all sorts of technologies and, often, falls apart almost immediately after purchase...
Well, to conclude my introduction, I would like to show in the photo what a beauty my closet turned out to be when I left.
Let me finish with this short, but, I think, quite interesting introduction.
Thank you for your attention.
Best regards, A. Novikov
Stenciling
Applying decorative plaster is a more complex procedure that allows you to create voluminous facades with an unusual three-dimensional pattern.
This method produces three-dimensional elements, which can then be painted or gilded.
The renewed surface can also be painted in the desired color, gilded or even patinated, giving a slightly aged effect.
If the product you will decorate is covered with old paint, you must sand the entire surface with sandpaper.
To work you will need:
- Decorative plaster;
- Putty knife;
- Special tape;
- Sandpaper for cleaning the body;
- Stencil (you can buy it or make it yourself from cardboard).
Rollers for decorative plaster.
You must first treat the areas where the decor will be applied. Stripping is done down to the wood layer. If there are cracks, it is recommended to cover them with a layer of putty to level the surface.
The stencil is attached to the cabinet using tape, and a layer of decorative plaster is evenly applied over it.
The stencil is removed before the plaster dries. Any irregularities that appear are smoothed out with a knife or spatula.
When the decor is dry, you can sand it again.
After this, you can begin painting or coating with acrylic varnish. This will protect the surface from damage for a long time.
Painting a wooden cabinet made of chipboard
Paint selection
- For processing wood and chipboard, you can use alkyd or acrylic ,
- spray or regular wood paint,
- for deeper coloring - varnishes, but most often preference is given to acrylic paints .
They are non-toxic, dry at room temperature, which in our case and when painting home furniture is very convenient, they are presented in a wide range in stores, they can be colored , i.e. dilute with white paint to achieve the desired color. In addition, there is a choice of acrylic paints with a mother-of-pearl effect or, for example, metallic.
- Varnishes are used mainly to give furniture an antique , but well-groomed, noble and rich look. In this case, the surface is painted several times after each layer has completely dried.
- Varnishes are also necessary to fix the color and protect the surface from scratches and minor damage.
- You will need varnish even if you decide to paint the chest of drawers in an antique or Provence style.
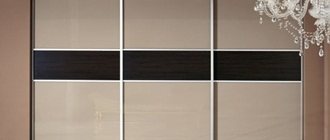
Mirror decoration
An elegant solution is to install mirrors on the fronts of an old cabinet.
Mirrors will add volume to the room and brighten the space, making it more attractive.
For such a transformation you will need mirrors and fixtures. Having carefully measured the facade, you can order canvases from a specialized workshop.
A mirror on the closet door will immediately transform the room and update the interior.
It is worth considering that the use of liquid nails implies a horizontal position of the surface. Therefore, you will have to either disassemble the cabinet body or use conventional hinged fasteners.
There is no need to cover the entire surface or apply thick stripes too close to the edge.
Old furniture that has served for a long time does not necessarily need to be replaced. With some imagination and a little effort, you can give it a new look with your own hands and increase its service life by several years.
We hope that our ideas and advice will be useful to you.
Photos and photo wallpapers
To achieve dramatic changes, it is not necessary to change the facades of the kitchen unit or other types of cabinets. Sometimes it’s enough to print your favorite photos or buy photo wallpaper.
If you contact specialized companies, you can use printing equipment to print your photographs and favorite images in the required format. Or just look for photo wallpapers on sale that you like.