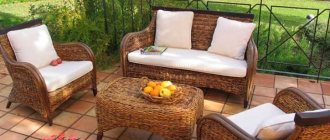
DIY billiard table
Billiards has a long and very rich history. The game originated around the 15th century in Northern Europe, when it resembled croquet, and the court served as a grass field. The game developed and became very popular, and soon it was decided to move it indoors to be played on a wooden table with a green cloth simulating grass and a border around the edges. At that time, instead of hitting, the balls were pushed, and wooden sticks were called not a cue, as today, but a “mace.”
Today, billiards is entertainment for any age and a great way to unite the family and entertain guests. Making a pool table with your own hands is not easy , many are intimidated by the size, weight and technical nuances when it comes to specific functions. But nothing is impossible; the master classes and photographs presented in this article will certainly help if you want to make your own billiard table.
Materials and tools
Materials needed to make the table:
- wooden legs made of laminated veneer lumber;
- solid wood for slats and side strips;
- medium grit sandpaper;
- lining fabric, green billiard cloth;
- mesh for making pockets;
- waterproof impregnation, varnish, epoxy putty;
- rubber for edging the striking edge of a table with a triangular cross-section;
- a sheet of chipboard for making a tabletop (it is best to make a solid tabletop, without joints). Thickness from 16 mm to 25 mm;
- ready-made pockets or metal staples for their manufacture (you can use 4 corners of the same size);
- self-tapping screws (about 200 pcs.), furniture bolts (about 40 pcs.), confirmations (15–20 pcs.);
- wood glue (or PVA), rubber glue (you can take “Moment 88”).
Tools:
- tape measure, pencil, marker, level;
- drill and drills (including Fostner drill);
- saw, grinder, jigsaw;
- screwdriver or screwdriver, wrenches;
- pliers, hammer;
- milling cutter;
- brushes, spatula;
- furniture stapler and staples (for covering with fabric).
Maybe,
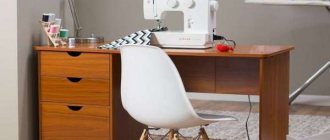
Sewing table design
Every woman will say with confidence that she feels comfortable when sewing when the table is large enough to place fabric, a sewing machine, or an overlocker.
It is good if the table folds and the seamstress can use only half of it if necessary.
It is a huge advantage when there is space on the table for accessories, fabrics and threads. Of course, you will have to deal with such a device, but working at such a table will be very pleasant.
For example, a corner model will be a comfortable workplace for a woman, especially if she has to sew a lot every day. In such a table, the left side folds out and is a continuation of the surface on which the machine stands.
On the right side, the table can be positioned diagonally towards the seamstress. Here you will find not only drawers or a laptop, but also an iron and much more. In such a table, everything will be at hand - cabinets with threaded rollers and fabric, niches for various devices and tools.
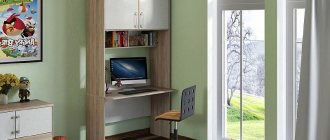
If there is not enough space in your apartment or house to install a large sewing table, you can build a bookshelf.
This table will also be very convenient, since two sections are built on revolving doors.
Inside the cabinet there is a special compartment for installing the machine, as well as many shelves for tools, workpieces and materials. The door pockets can accommodate various small items.
Tip: The cabinet can be positioned only when needed and used only when not in use.
Table-Tablet in open form for work.
As a rule, sewing tables can be of various modifications. You can come up with something of your own, and then get an attractive and practical piece of furniture, a reliable seamstress assistant.
Sewing table drawing
As mentioned, a corner table is the most comfortable table for seamstresses. Therefore, it is best to make just such a table so that a woman can place everything she needs on it.
Drawing a table for a sewing machine.
Please note: the table height shown here includes the wheels. Keep this in mind when cutting parts.
Folding-extendable dining table
To make such a table, you can even become a novice housewife. Despite the lightness of the structure, the table is very stable.
The tabletop width is 700 mm and the length is 1200 mm. An additional center insert increases the surface area. The total length of the table in extended form is 1670 mm.
This table seats eight adults: one at each end and three on both long sides.
Materials and tools
To make a folding table ourselves, we need the following materials:
laminated chipboard 25 mm thick; PVC edge using hot melt adhesive (thickness no more than 2 mm); 50 x 50 mm (500 mm) aluminum corner - 4 pcs. Telescopic guides (500 mm) - 2 pcs. Thick metal leg (710 mm) - 4 pcs. Furniture lock - 6 pieces; Screw M4 10 mm; Self-tapping screws 20 x 4 mm and 16 x 3 mm; House gloves.
Find out how to make a round table: ///6.//mebel/stoly/-rukami.html
Tools needed for your work:
Tape measure, pencil, long ruler, marker; Clamps (for cutting L-sheets) chipboard); Construction level; milling machine; Construction hair dryer (heat gun); screwdriver; Drill and drill bit with a diameter of 4.2 mm; circular saw. Puzzle and saw blade with fine teeth (to avoid chipping the edge of the laminate). Chipboard)
Drawing and cutting of material
Before starting work, it is necessary to determine the dimensions of the future product and create a drawing of the folding table. In our example, the dimensions of the sliding tabletop when folded (left) and with an insert (right) are as follows:
How to make a kitchen table: ///6.com//mebel//:// How to make a kitchen table?
Stages of work
Step 1: First we mark and cut out three pieces of the table top from the chipboard: two identical pieces 700 x 600 mm and one for use - 700 x 470 mm. To make cuts in the area... A chipboard normal puzzle would be good.
Important: If the workpiece will be processed with a milling machine in the future, then it is worth adding a few millimeters on each side.
Then, using clamps, the sheet metal is fixed using clamps. The chipboard is installed on any flat surface. At the cutting edge adjustment level, we guide the jigsaw blade quietly and precisely.
Step 2: Edge the workpieces with a router knife to ensure perfect cutting alignment. The cutter must also work slowly and precisely and pass through each part of the cutter.
Step 3: Glue the ends of the pieces to the edges of the pieces. PVC. We fix the workpiece vertically on a chair or table using a screwdriver. Cut off the required piece of edge and apply it to the haircut and heat it with a hairdryer. All work is performed using house gloves. After the glue has completely dried, you can begin making the table.
Step 4: For safety reasons, you can cut and round the sharp corners on all aluminum corners.
Step five. Now we make two queues and a conductor. On the outside of the corner, mark 25mm from the rounded edges and draw a line dividing the side of the corner into two halves. A similar procedure is performed with each of the remaining corners.
Step 6: Attach the guides to the corners and make holes for the screws. Nail lightly (to prevent the drill bit from jumping off) and drill the hole. Put them together.
Step seven. We have two corner structures. We place them on a flat surface as follows: Corners with thin guides (movable) - inside, corners with thick guides (fixed) - outside. We drill four holes in the fixed corners and four holes in the moving corners.
Please note: all holes in the movable guides are made from the outside, from the inside in the fixed guides (i.e. the holes must be on opposite sides of the product).
Step 8. Two identical pieces of chipboard Place it on a flat surface, turn it face down. Place two telescopes on top (inside on the movable side and outside motionless) at a distance of 8 cm from each edge. The center of the telescope should coincide with the joint of the parts.
Step 9: Screw the moving side with screws (20 x 4 mm) to the right side of the tabletop and the fixed side to the left.
Step 10. On each side of the table we fix the lock using 16 x 3 mm screws.
Step 11: Open the locks and open the countertop. Insert the center piece face down between them. Pull the work surface together firmly to create a level surface.
Step 12: Install the missing lock pieces with screws for each corner of the center of the tabletop - two on each side. It turns out that the locks are opened/closed by a two-piece tabletop, and also opened/closed by a three-piece tabletop.
Step 13 Using self-tapping screws, attach the legs to the tabletop.
We open the locks and open the table top.
Insert the middle part and push the side parts. Close the locks.
For more information on how to make your own folding table, watch the video:
Page 3
A student in every class, from the youngest to the oldest, needs a place to study.
A student's desk should be functional, comfortable and not bulky. Wooden tables are most often chosen for children.
If students are already working with computers in first grade today, there should be room on the desk for them too.
Creating a school table yourself is a significant saving on the family budget. The tabletop can be modified in the most incredible way, and then the handmade table will look like an expensive designer item.
Desk for schoolchildren
We will not deal with the typical desks that were found in all Russian homes in the 90s of the last century. Such tables are boring to execute.
Let's look at an unusual table with A-shaped legs (goats) and a durable long work surface. You can use an old door leaf with a flat surface as a tabletop.
You can install a computer on such a table: Place the monitor on the tabletop and place the system unit in one of the legs.
You can use oak or pine board for the A-post. The width of the plates used to make the legs can be any (it is advisable to use from 75 to 125 mm).
The height of the table is 75 cm. In our case, the width of the tabletop is 70 cm, length - 180 cm, thickness - 4 cm. The length of the boards to which the legs are attached corresponds to the width of the tabletop - 70 cm.
Materials and tools
To produce a school bench we need the following materials:
The board is cut - 14 pieces…………………………………………………………………………………………………………………… ………………….; Bolt - 5-6 pcs; The scale consists of 6 parts………………………………………………………………………………………………………….; self-tapping screws; Furniture screws for attaching legs (6 x 75); Desktop equipment; medium-grit sanding paper; PVA glue ; Waterproof impregnation for woodworking, varnishing or painting.
The right tools:
ruler, meter; pencil, marker; puzzle, saw; milling machine; exercise; screwdriver or screwdriver; Brushes.
If you are interested in how to make a folding table yourself, read our article: //6./dom/mebel/stoly/123455321/-rukami.html.
Stages of work
Step one. Draw and cut the tabletop. Sand it down with sandpaper or a sander. Side by side edges can be made with a special finishing edge that can be purchased from any construction company.
Please note: when using a cantilever arm, the finished tabletop width is 72 cm!
Step 2: Cut 8 boards at least 75cm long (you may need to cut the edges with a power saw) and sand them.
Step 3: The angle of the goat boards should be chosen so that the total height of the legs for a tabletop thickness of 75 cm. To do this, cut out small sticks located between the upper parts of the supports. The width between the lower parts should be 22 cm.
Step 4: Drill two 9mm holes in each of the two 70cm long boards (for attaching the goats). The holes must be equally spaced! We retreat about 3.5-4 cm from the top, it all depends on the width of the board. Drill 9mm holes in the top of the legs in the middle. Furniture screws are used to secure the legs and structure with screws.
Please note: The screw size is 6mm and the hole diameter is 9mm! This is necessary since the table legs are mounted at an angle.
Step 5: Attach two 19cm long rods to the underside of the goat. The height of the rods should be at least 3 cm from the ground. Place the two shelves on the posts and secure them with screws.
Step 6: After measuring the distance between the goats, tighten the wood strips to prevent the tabletop from moving down.
To increase the stability of the tabletop, it is recommended to use a scale. Drill holes in the base plates 8mm deep and 22mm deep in the work surface. The belt pulleys should be dipped in PVA glue and place it in the board, then carefully place the table top on it. For such a massive table, it is necessary to make 2-3 cabinets on each side.
Step 7: Saturate all wooden parts of the table. Apply at least 3 coats to the children's table (to ensure it is waterproof). Each layer must dry completely. After the last layer has dried, the table should be painted or varnished. You can add a little paint to the varnish to give it the desired shade.
Please note: the table can be decorated upon request. Decoupage is the best technique for decorating children's tables. Just choose a cheerful drawing or decorate the tabletop with pictures of your child’s favorite figures.
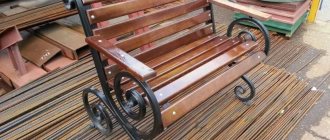
What does a billiard table consist of?
The traditional billiards design is quite simple.
As a rule, it necessarily includes four main components:
- table top;
- frame;
- sides;
- supports.
When making a frame at a furniture factory, valuable oak, mahogany or ash wood is most often used, but when creating the main body at home, you can also use more inexpensive materials, for example, medium-density fiberboard (MDF) or pine wood.
Natural graphite slate is almost always used to make countertops in luxury models. In more budget economy-class products, the use of laminated chipboard (LDSP) with a thickness of at least 16 mm is allowed.
School desk options
Tables for first-graders should be spacious so that there is enough space for textbooks and notebooks.
For high school students, you can purchase or make a multifunctional desk with a sliding keyboard and a large number of shelves or drawers on the surface.
It is very important that the child’s workplace is as pleasant as possible and that all the necessary conditions for studying are available.
School desks can vary greatly in appearance and design - from simple corner and straight desks to creative transformer desks.
nightstand
folding table
dining apartment
Table dimensions
The dimensions of pool tables intended for home use usually depend on the overall dimensions of the room. However, when creating a structure with your own hands, you should still adhere to certain generally accepted standards.
According to established canons, classic American tables usually have the following parameters:
- the height of the products from the playing plane to the floor usually varies from 80 to 85 cm;
- the width is usually about 186 cm;
- the length should be no more than 3.5 m, but in fairness it is worth noting that lovers of Russian billiards, especially fans of the Russian “Pyramid”, very often play on fields at least four meters long.
Particular attention should be paid to the size of the pockets. American billiard designs usually have a pocket width of approximately 88 mm, while domestic products almost always have a pocket width of no more than 76 mm.
How to make a billiard table with your own hands?
Home and family January 8, 2015
Billiards is one of the most famous and widespread games in the world. This type of entertainment is very fashionable and can be found in almost any city. Many of those who have enough space in their home and money in their wallets set up their own personal billiards room.
History of billiards
Billiards belongs to the ancient games. No historian has been able to establish the exact period of its appearance. Some scientists believe that billiards appeared at the time of the emergence of chess, others argue that it is an earlier game. All that is known is that she was born in the East, but in which country is also a mystery.
The first billiard table was released in 1469. The furniture maker fulfilled the order of the monarchs. Even the name of the furniture maker has survived to this day - Henri de Vinem. It was he who created the table design, which has remained virtually unchanged to this day.
In those distant times, this game was available only to high-ranking persons and high society. The common people did not have the opportunity to get to know her.
Billiards in the modern world
Since the game of bowls gained popularity, it has spread to almost all areas of life.
Billiards is a modern world sport, the annual championships of which attract a large number of players, fans and admirers.
Many billiard clubs and organizations train professional and amateur players. In the Middle Ages, accessible only to high society, billiards in the modern world has become open to almost every person.
You can make a table to order from the material you like in every furniture workshop that specializes in such production.
In a short time and for a reasonable fee, they will produce exactly what will fit both in size and in accordance with the style of the interior. And many craftsmen and craftsmen can make a billiard table with their own hands.
With a little effort and spending 5-10 days, you can create such entertainment at home.
Creating tables
One of the most important issues in creating play furniture is the correct materials and tools. The higher the quality of the components, the better the finished product will be and will last longer.
Base, cloth, auxiliary materials - all this is widely represented on the modern market. To create a billiard table with your own hands, drawings must be prepared in advance.
To do this, it is worth calculating the place where the gaming room will be located, drawing out the dimensions of the table and all the components necessary to create it.
Variety of billiard tables
In the world of engineering and design in our time, everything is modified and refined. This phenomenon has not been spared by billiard tables, which can now be found made of glass, stone, with the addition of modern technologies and 3D effects. But still, the classic look prevails over the modern.
The production of such an object takes quite a long time, and a lot of high-quality materials are spent on this process. The cloth, the base, the details, the mesh for the pockets - all this affects the quality of the table and, accordingly, the games at it.
To install a billiard table, it is advisable to invite specialists with extensive experience in this field. This process takes about 2 days. Every detail is inspected by a professional, any defects and errors are removed or the parts are replaced with new ones.
Tools
In order to make a billiard table with your own hands, you will need a standard set of tools that are present in the workshop or garage of almost any man. The special equipment in this case is a jigsaw and a drill, which will have to be purchased if they are not available.
For fastening and assembly you will need self-tapping screws, screws and bolts with the required cross-sectional size and thread.
Billiard table design
A standard billiards table consists of a frame, the base of the playing field, sides, pockets and cloth. The frame is the basis of the entire structure; the playing field is supported on it. It consists of supports, which can be 4, 6 or 8 pieces, depending on the size of the billiard table. The rigidity and strength of the structure are provided by drawers and lintels. The base of the playing field is the most important part of the billiard table.
It is she who is responsible for the good rolling of the balls. To do this, you need to choose a material with a smooth surface, without defects. Every mistake will affect the game. The sides of the table act as a shock wall, so they must be strong and give a good rebound. The cloth must be durable and preferably high quality; the stronger it is, the longer the table will last without reupholstering.
Manufacturing instructions
Frame
The base of the table must be assembled from strong and massive boards so that the structure dampens vibrations well
The procedure for making a supporting structure, which will be a lattice of wooden blocks 50x100 millimeters thick, is as follows:
- Using a saw or jigsaw, we cut the bars in accordance with the drawing data.
- Assembling the outline. We fasten the beams to each other with self-tapping screws using a screwdriver. We screw the hardware into the end to make a reliable connection.
- We install transverse and longitudinal bars, and then strengthen the structure with metal corners or small wooden blocks, fixing them with thin screws or wood glue.
Work on a flat surface, such as the floor. This way you can fix all the frame elements in one plane.
Tabletop
When purchasing a sheet of chipboard, inspect it for cracks and check the evenness of the surface.
Let's move on to preparing the playing surface, the work is performed according to the following algorithm:
- According to the drawing, we apply markings to a sheet of laminated chipboard and use a jigsaw to cut out the product.
- Then carefully attach the tabletop to the frame using a screwdriver and self-tapping screws.
- We make holes in it for pockets. We use a jigsaw for this.
- At the final stage of preparing the tabletop, it is covered with cloth. First, we glue the lining fabric onto the plane, and then we stretch the decorative fabric. We fasten the latter using a construction stapler.
You can cut the chipboard sheet directly when purchasing the product. The cost of such a service is low, and using professional equipment, craftsmen will cut the sheet strictly to the required dimensions and with high accuracy.
Boards
The height of the side should be slightly more than half the diameter of the ball
The edge is considered a decorative part of a billiard table and consists of several elements: the main beam and a cloth-covered slats with a rubber bumper strip.
If you plan to use balls with a diameter of 60 millimeters, the height of the side should be approximately 37 millimeters.
- We cut the bars for the sides to the required length and give them the desired profile using a plane.
- We process the product with sandpaper to eliminate unevenness.
- We fix the rubber strip. The glue should be applied evenly, preferably in a dotted manner.
- After attaching the fender strip, we cover the sides with decorative fabric.
- We attach them to the tabletop using self-tapping screws or through bolts. In the latter case, you can easily dismantle the side at the right time and reupholster the table. The walls must be fixed to the tabletop very carefully so that all the pockets are the same.
- We install metal brackets using screws. Place them in leather cases for an aesthetically pleasing look. This will also reduce the force of the ball hitting the bracket.
- Finally, we attach the net to the pockets.
The sides are attached to the tabletop after covering
The width of the pockets can be from 65 to 83 millimeters (depending on the size of the balls). It is advisable to make corner pockets with a slight expansion towards the edges. This will allow the ball to hit the target after bouncing off the inner wall.
Legs
If you want to make legs of an original shape, then it is better to seek help from an experienced carpenter
It remains to equip the product with legs; the order of their manufacture looks like this:
- First, we turn the wooden blocks on a lathe in accordance with the drawing data.
- We screw flanges to the lower ends of the future legs. Fastening is done using four self-tapping screws.
- We weld M12 nuts to the flanges.
- We make heels. The metal used here is thick (10 millimeters), so it must be cut by a specialist using a plasma or laser cutting machine. It is necessary to drill small recesses in the center of the products.
- We screw the M12 bolts into the nuts welded to the flanges.
The stands can be equipped with rubber pads or rollers so that they do not scratch the floor, and the table can be easily moved.
Video: DIY billiard table
Give yourself the opportunity to relax in comfort - make a billiard table with your own hands
Many owners of private houses or spacious apartments are thinking about installing a billiard table in one of the rooms. This solution will brighten up any holiday or simply organize a pleasant vacation in a friendly company.
However, the cost of such a table in furniture stores sometimes makes you doubt: is this pleasure worth the money? It turns out that it is much cheaper to make a billiard table with your own hands than to purchase a ready-made one.
The main thing is to know what materials you need to choose and what you will need for proper assembly.
What are they made of?
At the stage of choosing materials for making a billiard table, it is important to remember that wood and cloth should be as wear-resistant as possible. This will extend the life of the furniture.
Sides, frame, legs, tabletop
The best option for making a table base is wood . This material is quite strong, durable and environmentally friendly, which is important for many lovers of natural furniture.
Natural wood bars must be solid. Thanks to this, there will be no chance of dust, moisture and dirt getting into the base, which in turn can cause rapid damage to the furniture.
Solid bars can be ordered from pine, beech or oak . The last two breeds are more difficult to obtain, and they will cost an order of magnitude more.
For those who want to save on buying wood, you can use an alternative option, which is to replace the wood with chipboard. This material is not as durable, but it looks no less beautiful in the interior. From laminated chipboard you can make:
- supporting structure;
- legs;
- table top.
In this case, the thickness of the material should be at least 18-20 mm . If you wish, you can take a thicker one, but it is worth considering that the weight of the table will increase significantly.
Pockets
An integral element of each pocket should be the metal brackets and nets that are attached to them. The important thing to remember here is the force of the ball hitting the staple and the potential for damage to thin staples. Therefore there are two options:
- Purchase ready-made metal pockets in a specialized store.
- Cast from aluminum in a plaster mold to the required dimensions.
The mesh for the pockets must be strong . You can also purchase it ready-made in a store, or weave it yourself.
Rubber for sides
For those who do not want to save on the quality of manufacturing a billiard table, it is worth purchasing original side rubber - it is very expensive, but during the game it softens blows well and has a long service life.
Not only the impact force, but also the rebound force of the ball, which is important in professional billiards, depends on the quality of the chosen rubber. Therefore, the carpenter can choose a cheaper option, but subsequently he will have to get used to the rebound force.
Cloth
The tabletop coating must be wear-resistant , since impacts from balls can gradually wear out ordinary fabric, or simply tear it with a strong impact.
When choosing cloth, you don’t need to skimp, as low-quality material often needs to be replaced. It is better to take care of its quality in advance and take into account several important criteria:
- nylon in the fabric composition should not exceed 55%, the rest of the material should be wool;
- fabric density should not be less than 300 g/m
- For Russian billiards, natural wool is usually used as cloth.
If the manufacturer does not want to bother, you can go to a specialty store and purchase a special cloth for the billiard table. It will cost more than the above fabrics, but the owner of the table will be confident in its strength and durability.
Drawing with dimensions
Nowadays it’s enough to simply find the required drawing of a billiard table on the Internet. The main thing is that the project fits in size into the room intended for installing this furniture.
If the designer does not have the desire to download and print a ready-made drawing, or he has not found a suitable option, he can draw the diagram himself, on paper or in a graphics editor. In addition, you can order a drawing from an experienced carpenter - this will save time on creating the project and eliminate hassle in the future.
The optimal size of a billiard table is considered to be:
- length – 2 m;
- width – 1 m;
- height – 80 cm.
It is advisable to maintain an aspect ratio of 2 to 1, no matter what size the designer chooses. And the height of 80 cm is comfortable for all players.
Tools
To ensure that in the process of creating such complex furniture there is no downtime searching for one or another tool, the following items should be prepared in advance:
- screwdrivers;
- hammer;
- pliers;
- spanners;
- drill;
- screwdriver;
- wood saw;
- plane;
- jigsaw;
- construction stapler;
- Bulgarian.
To save your energy and time spent on creating a table, it is best to take an electric tool (jigsaw, saw, plane).
How to make your own frame?
First of all, you will need to start making the frame . To do this, you will need to cut the prepared pieces of wood in accordance with the dimensions indicated on the prepared drawing.
Accuracy down to the millimeter is important here: errors can subsequently cause inconsistencies. The tools you need to use for this are a saw or a jigsaw.
Or you can order cutting to the specified sizes at the place where the materials were purchased - this will save time and effort.
First, the outline of the table is assembled. 4 beams are attached to each other with self-tapping screws using a screwdriver. Then the internal bars are installed in the same way.
In this way, a so-called grid is created, on which the tabletop will subsequently be installed. It is best to strengthen the structure, and it is recommended to use metal corners or small beams for this.
They are fixed with self-tapping screws or special wood glue.
We move on to the stage of marking and installing the tabletop . If, at the time of purchasing a sheet of laminated chipboard or other material, cutting to the established dimensions was not ordered, it is necessary to cut the sheet to the required dimensions. To do this, you need to apply markings using a ready-made drawing, and do not forget to take into account several important factors.
- The diameter of the billiard ball is 60 mm, based on this, the size of the pocket should be slightly larger. Typically, the side pocket has a diameter of 70-72 mm, and the corner pocket - 64-66.
- The distance from the target line of the side pocket to its edge is 0-1 mm; for a corner pocket this value should reach 5-7 mm.
- The pockets can be cut already at the stage when the sides are attached to the tabletop.
How to assemble?
The tabletop slab is attached to the frame . To do this, you can use silicone adhesive sealant. It is best to apply this glue evenly or even pointwise, and place the tabletop on it with 4 hands so that the glue does not smear.
To secure it, when the sealant has dried, you can secure the slab from below with short self-tapping screws.
After this you can make the sides . We cut the wooden blanks, but we must not forget that leather pads will be glued to the ends. Therefore, if they were not taken into account in the drawing, you need to reduce the width of each side by the thickness of the existing overlay.
School table for two children
A corner table can be a convenient and practical option for two children. Each child has a work space and drawers for storing educational materials. The tabletop width is 600 mm, thickness - from 16 mm.
If you are interested in how to make a round table, we recommend reading this article: //6.///stoly/MDF/-
Stages of work
Step 1: Cut the material or order it from the carpentry shop.
Step two. Collect all the boxes. They should be 6 large ones (3 for each table stand) and 4 small boxes for miscellaneous things under the tabletop. The confirmation holes were drilled with a Fostner drill bit. For each nail box of nails, use organic nail material.
Note: Confirmati can be replaced with regular screws, but the connection is not as secure.
Step 3: Use a corner clamp to secure the cabinet. Secure the drawer slides with screws.
Step four. Bring a table. Secure the cabinet and side panel on top. Small chipboard. Cover the back wall with a large sheet. Mount rails and fronts to small boxes.
Step 5: Install the second table in the same way as the second, as in the case of two bollards, longer.
Step 6: Place the table top on the short table. Screw it onto small plates.
Step 7: Glue the work surface to the second table.
Step 8: Attach the fronts to the large drawers and attach handles to them. Glue organic material.