What is decoupage and its varieties
Before you start decoupaging a cabinet with your own hands and delve into the nuances of this or that technique, let’s understand the terminology and implementation possibilities.
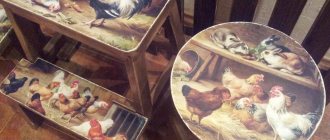
Decoupage refers to types of applied decoration of furniture and any interior items - boxes, wall clocks, plates, mirrors, etc. According to its stylistic meaning, literal translation, the word decoupage means “clippings”. Literally, the decoration technology involves gluing various cut-outs onto previously prepared surfaces and finishing them in some artistic way. As “clippings” you can use special decoupage napkins, cards, rice paper, newspapers, wallpaper and the most common prints of your favorite pictures on a thin base.
But the most interesting thing is that you can do decoupage of a cabinet with your own hands by combining other techniques, which will give the author’s handmade work individuality and special chic:
- Applying cracks using craquelure composition.
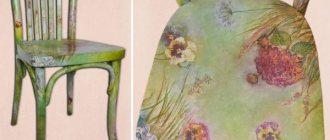
- Artificial aging of the surface in vintage and Provence style.
- Stencil painting and hand drawing.
- Gilding, patination, staining and tinting.
- Decoration with glitters and other “powders”.
- The use of natural materials (leaves, shells, textiles) to imitate relief.
- Creating a three-dimensional effect with a convex contour made of acrylic paint, putty and texture paste.
Of course, you always need to start from simple to more complex and time-consuming, developing your hand and sense of proportion. But, as a rule, the result always exceeds expectations.
Decoupage on the surface of solid wood, plywood, MDF and laminated chipboard
Typically, decoupage is used to decorate the front part of cabinets, open shelves and decorative elements (arches, columns, pilasters, etc.). For the manufacture of these furniture parts, solid wood, chipboard, MDF, plywood and other sheet materials are used.
Before you start decoupaging furniture with your own hands, you need to prepare the surfaces chosen for decoration. For example, cabinet doors.
Surface preparation
To prevent the work from “peeling off” over time, the application surface must at least be washed and degreased. But most often this is not enough and more time will have to be spent preparing the basis for future “decoration”. Preliminary work includes four main stages:
- Sanding the surface.
- Padding.
- Leveling the primer using fine sandpaper.
- Degreasing the surface.
If you plan to use decoupage to hide some furniture defect (cracks, scratches, chips), then you may also need to putty the uneven surfaces. The order of work in this case is as follows:
- Sanding and filling of cracks and chips.
- After drying, sanding and priming again.
- Leveling the surface.
- Coloring or tinting (as needed).
- Degreasing the surface.
If you plan to do decoupage of the cabinet yourself:
- On a wooden surface. We clean it, level it by sanding if necessary, degrease it, prime it, paint it with acrylic paint if the wood has been painted (if you plan to leave the natural color, then no).
- On a polished surface. Using coarse sandpaper, remove the polish from the cabinet door, degrease, prime, paint (or tint).
- On a laminated surface (chipboard, MDF). If there are no defects, then you can simply degrease and paint if desired.
You can read about the nuances of painting depending on the material from which the cabinet is made here.
What you need to decoupage furniture with your own hands
In addition to the hand tools, primer, brushes and paint that are required to prepare the surface, you also need materials for the decoupage itself. The list depends on the technique in which it will be performed.
Minimum set:
- PVA glue. Diluted 1 to 1 with water. But it is better to purchase special decoupage glue.
- Brushes for glue and varnish, sponges (pieces of dense foam rubber) . Different sizes and hardnesses - as you work, you will understand which ones you are more comfortable with. With brushes and sponges you will need to “paint” the surface, “impregnate” the workpieces with glue and carefully, without wrinkles, “straighten” them when gluing. And also, after drying, varnish.
- Clippings. You can use special decoupage cards with the desired motifs. Or napkins, newspapers, pieces of wallpaper, printouts, fabrics, etc.
- Furniture varnish (usually water-based acrylic). Claquelure varnish can also be used as a finishing coating if you want to add an antique effect. And also shellac varnish for fixing the effects of staining and toning.
Decorating a kitchen set: step-by-step instructions
If you want to refresh your old kitchen furniture, and you have some creative ideas and some free time, you can decorate the set yourself, following the step-by-step instructions. First you need to prepare the following materials and tools:
- putty (if the furniture has cracks),
- sandpaper,
- decoupage glue or PVA,
- flat brush
- acrylic varnish (glossy or matte),
- scissors,
- patterned napkins, magazine clippings, photographs, or printed images.
After all the materials have been collected, it is necessary to prepare the surface of the kitchen unit. Existing cracks should be covered with a filler or putty. Allow to dry and thoroughly sand the surface with sandpaper. To ensure that the drawing lays flat later, after sanding, apply a primer to the façade and dry it as well. https://www.youtube.com/watch?v=DhIxSeDc3CU Next, you need to prepare the image. The desired pattern is cut out from the top layer of the napkin, and glue is applied to the back side using a flat brush (the same is done with an image on paper or a magazine clipping). Next, glue should be applied to the surface of the furniture itself, apply a pattern, carefully ironing it on top with a brush or roller.
Advice! If you use a napkin to decoupage the set, then you can get by with regular PVA glue. For thicker paper you will need special decoupage glue.
After gluing the pattern, you need to dry the surface well and cover it with acrylic varnish in several layers (usually three or four layers are enough). In this case, it is necessary to leave a gap of one hour between layers. This is the last stage of the step-by-step instructions and, if the work is done correctly and carefully, the kitchen set will delight its owners with a stylish and original appearance for a long time.
DIY cabinet decoupage using napkins, newspapers, cards and printer printouts
The simplest decoupage technique is as follows: glue is applied to the base, and the decoupage motif (for example, a napkin) is impregnated with it. Then the napkin is carefully transferred to the place of gluing and “sealed” with a brush, without wrinkles or air bubbles. After the glue has dried, the decoupage is coated with furniture varnish.
The thinner the glued motif, the more accurate the decoupage turns out - it seems to merge with the surface without any additional techniques. For example, decoupage a cabinet with your own hands or special decoupage cards. Here the technology is slightly different - before application, the picture is placed on the film with the front side and wetted with the back. Then, layer by layer, a thick layer of paper is removed with a hard brush until it thins until the top layer with the picture itself is translucent. And only then, without applying glue, the film is brought to the place of gluing and the film is carefully separated.
The thicker the paper, the more it will have to be impregnated with glue so that it becomes more elastic for gluing to the base - the surface of the cabinet. To hide the protruding “volume” of the edges of the glued motif when decoupaging cabinet doors with your own hands:
- Wait for the glue to dry completely.
- Gently sand the edges of the pasted decoupage with sandpaper and lightly prime if necessary.
- After the primer has dried, coat with varnish.
But many craftswomen, on the contrary, emphasize the protruding relief of pasted applications.
For example, you can outline flower petals with an acrylic outline. Or emphasize the volume of straight lines and the texture of the drawing itself with structural paste.
You can also “sprinkle” the edges of the cutout with glitter, cover it with shells, and then paint it one color with the base.
Often the motif is hand-painted with brushes, as if continuing the pattern onto the rest of the cabinet surface, and emphasized with glaze.
Painting through a stencil also looks impressive, complementing the theme and plot of the decoupage. For example, stencils of letters and numbers in a suitable font when decoupaging a cabinet with newspapers with your own hands.
Decorating an old wall cabinet
Summer is the season for summer cottages, summer kitchens and gazebos. So we moved to the gazebo. And, of course, we dragged old tables and cabinets there so that there would be a place to store dishes and all sorts of necessities. However, I want freshness and beauty, it’s summer after all!
So I decided to do my first job with furniture. The cabinet I needed to decorate was like this:
To begin with, I re-read a bunch of master classes on remodeling furniture. But when I went to the store in our village, I realized that there was no choice of paints and varnishes here, and I would have to work with what was on the store shelves. I want to share my experience with those who find themselves in the same situation as me.
These are the materials I used:
- white acrylic paint;
- colored acrylic paints;
- acrylic lacquer;
- yacht varnish;
— printouts on photo paper with a density of 180 mg on an inkjet printer;
- brushes, sponges, roller, sandpaper.
I only decorated the doors, since the cabinet box itself was in quite good condition. Therefore, I unscrewed everything and washed it thoroughly with detergents.
Next, we thoroughly sand everything on all sides, this is necessary so that the paint adheres better to the surface of the door.
Many people wrote that it is good to pre-coat furniture with Tikkurila Otex primer, but I didn’t find it in our stores. So I painted the doors with a simple white acrylic paint for the walls and ceilings. The first layer was covered with a brush to better paint over all areas.
It turned out like this:
When everything has dried well, you need to cover it with a second layer. I did this with a roller, but you can also use a brush carefully.
Next we move on to the pictures. The pictures were pre-coated with Tair decoupage varnish, three layers with intermediate drying. This varnish holds the paint well on the picture. Then I soaked the picture in a basin of warm water for about 15 minutes. Next, I carefully tear off the paper layer from the varnish print. And I glue it to the door with PVA glue.
The photo shows that the background of the pictures is not white and they stand out on the door. So it needs some touch up paint. If you look closely, you can see that the background is not uniform, but sort of spotty, which is why I also tint it unevenly. I paint with a brush, as if smacking it.
A closer look at the photo shows how the paint extends into the picture to better hide the border.
While the inside is drying, I select the color for the edges of the door. I settled on light ocher. I paint with a brush.
I leave it to dry overnight. Then I sanded it with fine sandpaper, since the paint applied unevenly. I cover it with acrylic varnish to protect what has already been done.
To better hide the borders of the design, you need to paint the door again, at least selectively, along the border and nearby. Then I select the color of the planks. I did this right on the doors.
As a result, I settled on olive. It seemed to me the most harmonious.
I cover everything with acrylic varnish. All that remains is to paint the back side and ends of the doors.
I wait until it dries, sand it, paint it again, sand it and cover it with acrylic varnish. I leave it to dry well. I did it overnight. Then I cover the entire door with yacht varnish, since the cabinet will hang outside in the gazebo. I paint the handles olive green, screw them on and that’s it! Beauty is ready! You can hang it and admire it!
I'm happy with the result, but we need to see how this cabinet will survive the winter. And there are still two summer months ahead and an old table and chest of drawers are waiting for me, which also crave restoration, if you can call it that.
Thanks to everyone who came to my master class. I would love to read your opinions, reviews, and comments.
DIY cabinet decoupage with wallpaper and fabrics
Sometimes decoupage means completely covering an old cabinet with wallpaper or fabric. Or some part of it. For example, the back walls of open shelving cabinets - this technique looks very fresh and original, allowing the furniture to fit more organically into the interior and make it more elegant.
Facades and sidewalls are also pasted over – at will and according to the author’s idea.
DIY cabinet decoupage with wallpaper, photo from curbalertblog.com
The process of covering a closet with wallpaper, newspapers or fabrics is not much different from decoupage with cut out “appliqués”. The only thing is that the material used is not a cutting of some motif, but a piece of fabric or wallpaper of the required size to completely cover the selected surface.
Step 1. Priming, photo girlinthegarage.net
Step 2. Painting, photo girlinthegarage.net
Step 3. Decoupage of cabinet doors and drawers, photo photo girlinthegarage.net
DIY cabinet decoupage step by step master class for beginners
When decoupaging a closet or chest of drawers with fabric, wallpaper, newspapers, or cards, you can use the so-called “decopatch” patchwork technique. In this case, the material is cut into pieces and glued overlapping each other, imitating brickwork or mosaic. After drying, the boundaries of the overlap are sanded off a little, preserving the resulting “relief” of thickenings. Then coated with finishing varnish.
Tips: how to decoupage a cabinet yourself
Almost every family has an old wardrobe that is very sad to part with. To make it last for several more years, you can decorate it using the decoupage technique.
Pictures for decoupaging a cabinet can be found on the Internet and printed on a printer.
You can perform decoupage in absolutely any way, and the following are perfect for this:
- Multilayer paper napkins;
- Decoupage cards;
- Laser printing of drawings;
- Stickers;
- Stencils.
It is easiest to work with ordinary multi-layer napkins with a colored pattern applied to them, especially since the variety of patterns allows you to choose the most interesting option for yourself.
How to decoupage an old cabinet with the effect of staining, aging with craquelure and bitumen
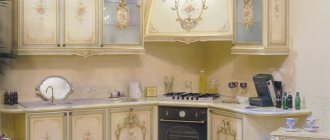
If you want to decoupage a kitchen cabinet in Provence, shabby chic, country or vintage style, then you will need special tools to create the antique effect. Craftswomen have a truly huge selection of them.
- Lucky . The most popular varnish in decoupage for creating artificial cracks is craquelure. Apply in two stages.
- Stains . Wooden surfaces can be additionally stained with stain to highlight the texture of the wood.
- Bitumen. Using bitumen and wax on the surface of a cabinet door with decoupage, you can create an aging effect.
- Waxes . They are used to patina facades and give an interesting shade to surfaces.
Additional materials at hand:
- Gloves and respirator . Most formulations are quite aggressive to the skin of the hands and have a strong odor. You will also need to use white spirit to clean your brushes.
- Sponges and rags . Disposable sponges are an excellent replacement for brushes - and you can throw them away immediately after use, without wasting time on washing. A soft rag is useful for wiping surfaces, oiling, etc.
Watch a master class on how to decoupage a cabinet with your own hands using one of the listed techniques.
The “patina of antiquity” looks impressive on wardrobes with decoupage and craquelure. The area of surface preparation followed by treatment with craquelure varnish is much larger. Therefore, try to implement your plan first on a small area of material to understand how best to work with it.
Various techniques
Decoupage techniques are divided according to the material used and the design direction in which they are decorated.
Classic version
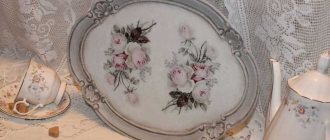
To decorate your closet in a classic style, use napkins with Victorian patterns. They will give the interior both chic and severity.
After applying the varnish, the napkin becomes more transparent, so the background is painted with light paint.
- Prepare a sketch in advance - unfold the napkins, separate the patterned part, cut out the pictures along the contour;
- Apply glue to the surface of the cabinet with a brush (sponge), carefully place the materials on top;
- Wait for it to dry (3–5 hours) and coat the composition with varnish.
Attention! If wrinkles or air bubbles form, do not remove the napkin - smooth it with a sponge, treating small details of the pattern with a thin brush.
Reverse technique
The reverse technique is suitable for decorating transparent or glass surfaces. Often newspaper clippings are used, which are glued face down to the inside of the cabinet. The pattern is translucent, creating a hazy effect. The application technique is simple:
- stick the napkin facing away from you, while the person should be on the inside of the cabinet;
- apply the desired painting and add color;
- cover the decoration area with a primer;
- To prevent abrasion of the surface, it should be treated with varnish.
Artistic method
Painted surfaces are decorated in this way. New details are added to the already decorated canvas. Even a person who does not have the slightest experience in drawing can easily master this decoupage method.
Since this method of decoration involves “playing with colors,” it is better to work during the day, so the colors will be more noticeable. The technique consists of finishing the tone and shading it.
To achieve the best effect, use pre-soaked postcards, magazine clippings, or scraps of fabric.
Volumetric option
Due to the combination of dark and light shades, the effect of chiaroscuro and three-dimensional images is created. This is how you can decorate a kitchen cabinet for dishes, a wardrobe in the hallway. This technique involves applying a design to a surface with a convex relief. For decoration you can use dried flowers, leaves, fabrics and even eggshells.
Shabby chic style - master class
For a shabby chic style interior, napkins with a floral pattern and lace are suitable. Using wax, a worn effect is created, and pastel colors will add elegance to the cabinet.
Modern style
Decorated according to all the canons of modern design, the wardrobe will look beautiful in any room. You need to buy a self-adhesive film with a ready-made pattern that imitates a painting, a scene from a cartoon, a set of characters, colors, objects - it represents a solid, single picture.
To create a drawing with your own hands, you need the following materials:
- a small piece of light-colored wallpaper;
- three-dimensional pictures depicting flowers, butterflies or animals;
- beads, rhinestones or medium-sized beads.
Step-by-step instruction:
- remove the old layer of varnish or paint using sandpaper;
- stick the wallpaper and varnish it, let it dry;
- stick the pictures of your choice in random order and decorate them with beads, seed beads or rhinestones.
Depatch
The technique for creating a deco patch is simple: using any decoupage glue (varnish, PVA), pieces of special paper are glued to the surface in such a way as to cover it, forming a solid background. Textured depatch paper is thin, does not stretch or form folds, and allows you to get the effect of leather, fur or textiles.
The main task is to obtain a surface close to the natural texture of the selected material. The method is especially popular in classrooms and libraries.
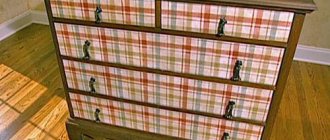
Wallpaper
Decoupage with wallpaper is easier to do than with other materials - it is suitable for novice designers. It is recommended to start with the patchwork technique - decorating parts of furniture with pieces of wallpaper with different pictures.
Before decorating, wallpaper should be soaked in warm water for 40 seconds - this will make the material more pliable.
Napkins
Many craftsmen consider napkins an ideal material for decorating furniture. The main advantage is softness and thinness; if you do not cut off the paper around the pattern, but tear it off, the transitions will be almost imperceptible.
The napkins will look good in a Provence style room - delicate romantic lines, natural patterns, and flowers are an integral part of this design.
Fabric
For decoupage, large pieces of fabric are chosen, since small pieces are more difficult to work with. There are no fundamental requirements for the type of fabric; you can even use curtains and pillowcases. The main thing is that they look stylish.
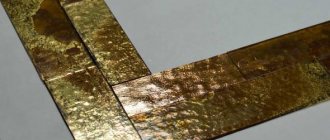
Decoupage of an old cabinet is beautiful and unusual: creating the effect of antique bronze and gilding
Artificial abrasions, traces of gilding and antique bronze, patina... All these decoration techniques ennoble the furniture, giving it an aristocratic antique look. If you want to decoupage an old cabinet in a beautiful and unusual way, be sure to use this opportunity!
The well-known Provence style is unthinkable without creating a touch of time with the help of patination. Here, cracks and abrasions on the surface of kitchen cabinet doors and other furniture are simply necessary!
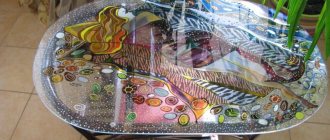
Reverse decoupage on glass
To decorate kitchen cabinet displays in Provence and country styles, you can use the reverse decoupage technique on glass. It is similar to the direct method, but is done on the back side of the glass, leaving it smooth. Sometimes craftswomen create some kind of 3D effect using manual drawing on the outer surface of the glass, duplicating some elements of the internal picture.
Cabinet decoupage is an excellent opportunity to make your furniture design exclusive. Don’t forget that the furniture should fit into the interior of the room and not look alien.
DIY decoupage of old cabinets in shabby chic style
You can restore cabinets in absolutely any way. The decoupage technique is considered quite interesting and in demand, since it is possible to translate all the most original ideas into reality and make a piece of furniture a central part of the interior.
A wardrobe decorated using decoupage in the shabby chic style will fit perfectly into the interior of the corresponding style.
Cabinets can be covered with a layer of:
- Gold;
- Silver;
- Another metallic paint.
The reverse decoupage technique is perfect for a glass facade. Another interesting type of decoupage is the shabby chic technique - artificial aging. Before decoupage, you need to prepare the cabinet, finish the existing cracks, and cover its surface with a primer.
The surface layer of paint will disappear, and the cabinet itself will look simply unique, like an old antique.
Then you can decorate it with an old photograph or glue on beautiful patterns so that they fully match the overall style of the furniture. The glued pictures must be left for a certain time to dry, and then covered with a layer of acrylic varnish. Thus, we decorate cupboards for dishes or an ordinary old cabinet, in any case, they will look simply unique.