Idea for a small bedroom: a loft bed under the ceilings and a sofa for guests below
Our mood and, as a result, our well-being depend on how comfortable and cozy we feel in the apartment. There are often cases when a young family is forced to huddle in small apartments or even a room in the parental home. At the same time, regardless of the size of the living space, everyone wants to have separate areas for receiving guests and for sleeping. There are times when a family begins to grow, but with the advent of children, additional square meters do not always appear. How to place a living room and a bedroom in one room? An excellent option for this would be a loft bed.
Wooden furniture with a loft bed, made by yourself
Such a sleeping place is not noticeable in a small apartment, does not interfere with receiving guests in the same room and remains a full-fledged comfortable bed for one or two people. To make such a structure, a frame is first made at a height of approximately 150-180 cm. The necessary orthopedic mattress is placed on it, and the resulting niche can be used as a work area, as a storage system, or as a relaxation area.
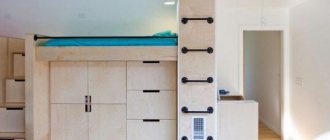
Spacious loft bed with a huge wardrobe for storing books and clothes
You can create such a non-standard bed with your own hands. To do this, you need to have at least some ability to use construction tools and have the desire to design furniture. Having built such a place yourself, the problem of finding ready-made models that are suitable for you disappears. Also, a homemade bed will save a lot of money.
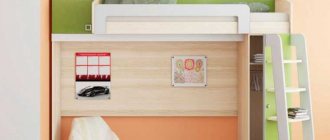
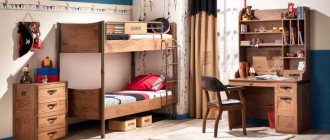
White double loft bed with work space for adults
The first step in designing furniture will be choosing the design and design of the future bed. There are three options for attaching the attic, so you need to choose one of them.
- The classic type of fixation is on four supports. Simply put, you need to make a bed on 4 very high and strong legs. With this option, you can make periodic rearrangements in the room, easily moving the structure from one wall to another.
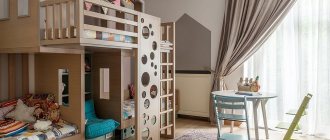
Loft bed with four legs and sofa for guests below
- The structure is supported by a wall mount and two supports. This is a very reliable fixation system, however, it is not possible to move such an attic bed: you must immediately decide on a place in the room and attach it to the wall.
Built-in large loft bed secured to the wall and floor for a secure structure
- Ceiling mounting type – suitable for lovers of original, non-standard solutions. In this option, the lower part of the room is freed from the bed support. During installation, it is necessary to ensure the strength of the ceilings in order to avoid possible future problems.
Loft bed fixed to the ceiling to maximize space
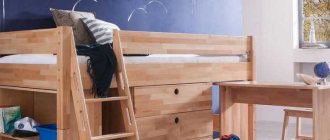
The simplest of the varieties under consideration is a bed placed on four supports. This can be as simple as a 4-leg design, or as a built-in under-bed storage system or work area, such as a built-in desk and shelves. The ladder can be placed at the end or on the front side of the bed. It can be vertical or inclined, which is much more convenient to use, but will increase the occupied space of the furniture.
Wooden loft bed with a vertical ladder and a sofa underneath
DIY light children's bed with ladder-drawers
To construct children's beds, additional boxes are often used as steps. This model is safer for daily use, but takes up more space. For children's loft beds, it is also advisable to use railings on the stairs.
Loft bed supported by a bookcase for a small bedroom
Stylish bedroom for a boy with compact furniture, thought out to the smallest detail
When determining the size of the structure, the following features should be taken into account.
- For preschool children, a sleeping place is recommended that is 160 cm long and 70 cm wide, the recommended height of the structure is about 120 cm. In this position, the parent will be able to easily check the child, measure the temperature in case of illness without lifting the baby, and so on. At the bottom of such a system, it is only possible to install drawers and open shelves for storing things, or use a niche for games and make a kind of tent or playhouse.
- For a school-age child, it is recommended to use a full-size bed with dimensions of 200 cm x 90 cm. An attic bed can be located at a height of up to 180 cm.
- An adult will find a comfortable place measuring 200x140 cm; the height can be adjusted from the ceiling - the person should be able to straighten up on the bed in a sitting position.
In all of the listed varieties, the loft bed must be equipped with sides at least 30 cm high.
High loft bed with wooden sides for a small room
Materials for making a loft bed
There are several options for materials needed to produce a custom bed.
- Wood; as a first experiment, solid pine is suitable - a relatively inexpensive material. If desired and possible, beds made of oak or beech will be more durable.
Comfortable, safe and practical DIY wooden loft bed
- MDF, chipboard, fiberboard and more. A combination of wooden boards for the frame and laminated chipboard for the shelves can also be used.
Children's loft bed “Omega” with a pull-out table made of MDF
- Metal structure - this option will require welding skills, so it is not recommended to assemble such a product at home.
Beautiful metal loft bed with sofa underneath
How to make a bunk bed safe for children
In the article “Why a bunk bed or loft bed is dangerous,” I tried to explain in as much detail as possible all aspects of the above issue. If you carefully read this material, then, I think, you should have understood that for all its advantages, the main one of which is the absolute saving of space in a child’s room, this piece of furniture is quite dangerous for the younger generation. If, in spite of everything, you still decide to purchase a bunk bed , then you simply must do everything possible to ensure that the danger is minimized. For my part, I will try to help you with this.
- Let's start with the material. Ideally, of course, it should be solid wood. Nature itself, so to speak, will “cradle” your child. I think everyone has heard about the dangers of chipboard. Of course, solid wood furniture costs much more than any other, but who saves on children and their health? If you still have no choice, then be sure to ask the seller to show the hygiene certificate for the chipboard from which the bed you like is made.
- Under no circumstances should a child under three years of age be placed on the second tier. This age is a kind of milestone in the development of children’s consciousness. It’s probably not for nothing that all construction sets and toys containing small parts have a clear age limit. The situation is similar here: after three years, a child has a much better developed sense of self-preservation - the possibility of an accidental fall is reduced significantly. However, attention!, your child will never be 100% insured.
- There must be a high fence around the perimeter of the second tier. You understand that this will reduce the risk of accidental falls during sleep.
- If the fence consists of several elements, make sure that the distance between them is not too large, so that the child does not accidentally get stuck in the hole.
- Never allow children to play on the “second floor”, no matter how much they ask you to do so, no matter how fun it is. Most falls from heights occur during games, not sleep. And then, purely for hygienic reasons, it’s worth giving up this pastime. After all, the child will bring dust and dirt into the bed on his feet and clothes.
- When buying a bunk bed, carefully inspect the stairs that your child will climb up. Very often injuries are associated with it. The steps should be as wide as possible: firstly, this will help the child feel more stable, and secondly, there are often drawers for storing things inside. The steps should be comfortable, not slippery: do not consider wooden rungs or metal pipes at all. There should be no gaps between the crib and the step where your foot could get stuck. Let there be fewer steps, but the child’s foot should fit completely on them.
- The ideal option for placing a ladder in a bunk bed is to secure it at an angle (this will make going up and down it more comfortable). If you have the opportunity to attach a ladder to both sides of the bed, this is excellent, especially if the bed occupies the central part of the room, because this will allow you to climb to the upper tier from both the right and left.
- The presence of railings is a strong argument in favor of a model you like. Often, by grabbing them at the last moment, the child can avoid injury.
- Avoid beds where the ladder pulls the top and bottom sides together; they are very dangerous.
- The bed you choose should not have any sharp corners that you could hit.
- In the store, try to “rock” an already assembled model you like, so you can draw conclusions about the quality of the assembly and the furniture fittings used by the company.
- Give preference to a bunk bed model whose steps are equipped with lighting. At night, this will help your child not be afraid when going down or going up.
- If possible, purchase a mattress that is not very high; this will make the sides higher and, accordingly, reduce the likelihood that the child will fall in his sleep.
- In order to avoid competition about where someone should sleep, establish a clear order, never deviate from it, so as not to cause resentment in one of the children.
- Psychologists are not very good about the fact that one bed “hangs” over the other. According to their research, this can negatively affect the psyche of the child who sleeps below. Consider models when the beds face in different directions. It is possible that the upper bed will “lie” on top of the wardrobe. Then, firstly, you will have one more place to store things, and secondly, the bed will receive another point of support, which will make it more stable, and therefore safe.
- Place pillows or a mattress on the floor, even if a fall, God forbid, occurs, this precaution will soften the blow.
- I strongly advise you to consider the option of a two-level pull-out bed. In my opinion, it has many more advantages over a bunk bed, you can read about them in the corresponding article.
- There should be no sharp corners that can be hit, as well as paper clips, bolts and other connecting materials.
- An important indicator is the distance between the tiers - it should be enough so that an adult can sit freely on the bed below. Only in this case can you be sure that children will not hit the top crossbar during play.
- When choosing a bed, it makes sense to take the child who will sleep on the second tier with him to the store to try out the design he likes on the spot. See if it is convenient for the baby to go upstairs and if it is safe. Get up yourself, because the bed must support the weight of an adult. Consider whether it would be convenient for you and then your child to make the bed upstairs.
- The bunk bed must be secured to the wall near which it will stand, so that at the most unexpected moment the structure does not tip over.
Required Tools
Tools for DIY Bed Assembly
Before starting work, you should ensure that you have the following tools and materials (for the manufacture of the sample described above).
- Wooden beams measuring 100x100mm - quantity and size depend on the required size.
- Tongue and groove boards are logs.
- For stairs and sides, rounded slats 2-3 cm thick.
- Plywood board when making a plywood base.
- Nails, screws, self-tapping screws, wood glue, U-shaped staples.
- Jigsaw or saw.
- Screwdriver.
- Sanding machine or sandpaper.
- Laser or water level, tape measure, hammer.
Necessary materials for making a bed
A loft bed can be designed either according to drawings and designs taken on the Internet, or according to your own sketches. A independently calculated drawing will provide individuality and convenience, designed exclusively for your premises, taking into account your own wishes. A sleeping place should be not only comfortable, but also practical, which is especially important for small apartments. By placing the bed on a raised platform, the room gains originality and functionality.
Original loft bed, made by yourself with a built-in table below
Thus, summing up all of the above, we can highlight the main advantages and disadvantages of do-it-yourself loft beds.
| pros | Minuses |
| Increasing usable area - for small apartments this is the main factor why such structures are made. | Such furniture systems can be traumatic for overly active children, but if all safety standards are observed, the risks are reduced to zero |
| Saving money - when making a model with your own hands, the cost of the finished product is several times cheaper than a purchased bed, and if you design furniture in a niche - a closet or a desk with shelves - you will get a full-fledged furniture set. | Difficult access to a sleeping place, also some people do not like to sleep on a hill, the air is warmer from above and a feeling of lack of oxygen is created. |
| Original design. | Tall structures cannot be installed in apartments with low ceilings; in this option, it is recommended to use lower models with the possibility of placing a chest of drawers or low bedside tables at the bottom of the bed. |
| Increased self-esteem of the owner of the bed - something to brag about to friends. |
Ready-made homemade loft bed for a girl
Manufacturing highlights
Instructions on how to make a bed will help you understand the main stages of the process:
- You can cut wooden elements yourself or order them at the point of purchase.
- All parts of the loft bed are thoroughly sanded, chips and sharp corners are eliminated.
- The wood is treated with antiseptic agents on all sides.
- Holes for fasteners are drilled directly during the assembly process; before joining, the areas of the holes are treated with glue.
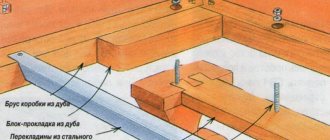
- Start assembling the attic frame. To do this, you will need to connect the bed frame and four support beams. The frame is fixed to the posts with a screw connection; the support beam can be fastened with metal corners. All stages of installation are verified using a building level or square.
- If you make an additional connection of the support posts with slats from the rear wall and the ends of the bed - attic, the reliability of the fastening will significantly improve. A kind of lower harness is carried out at a level of 30-40 cm.
- A loft bed invariably contains enclosing elements. The approximate height of the side is 0.4 m. The frequency of the barrier depends on the age of the child - the younger the age, the higher the density of the vertical posts. For small children, you will also need to make intermediate longitudinal fences.
- The next labor-intensive stage of designing a loft bed is making a staircase. Depending on the chosen scheme, it can be inclined or strictly vertical. The gaps between the horizontal bars should correspond to the height of the child.
The final touch is a decorative coating. In addition to the traditional varnishing, painting the loft bed with bright colors will help make the loft bed the accent of the room. The original design of the bed is presented below:
How to make a bunk bed safe for children
In the article “Why a bunk bed or loft bed is dangerous,” I tried to explain in as much detail as possible all aspects of the above issue. If you carefully read this material, then, I think, you should have understood that for all its advantages, the main one of which is the absolute saving of space in a child’s room, this piece of furniture is quite dangerous for the younger generation. If, in spite of everything, you still decide to purchase a bunk bed , then you simply must do everything possible to ensure that the danger is minimized. For my part, I will try to help you with this.
- Let's start with the material. Ideally, of course, it should be solid wood. Nature itself, so to speak, will “cradle” your child. I think everyone has heard about the dangers of chipboard. Of course, solid wood furniture costs much more than any other, but who saves on children and their health? If you still have no choice, then be sure to ask the seller to show the hygiene certificate for the chipboard from which the bed you like is made.
- Under no circumstances should a child under three years of age be placed on the second tier. This age is a kind of milestone in the development of children’s consciousness. It’s probably not for nothing that all construction sets and toys containing small parts have a clear age limit. The situation is similar here: after three years, a child has a much better developed sense of self-preservation - the possibility of an accidental fall is reduced significantly. However, attention!, your child will never be 100% insured.
- There must be a high fence around the perimeter of the second tier. You understand that this will reduce the risk of accidental falls during sleep.
- If the fence consists of several elements, make sure that the distance between them is not too large, so that the child does not accidentally get stuck in the hole.
- Never allow children to play on the “second floor”, no matter how much they ask you to do so, no matter how fun it is. Most falls from heights occur during games, not sleep. And then, purely for hygienic reasons, it’s worth giving up this pastime. After all, the child will bring dust and dirt into the bed on his feet and clothes.
- When buying a bunk bed, carefully inspect the stairs that your child will climb up. Very often injuries are associated with it. The steps should be as wide as possible: firstly, this will help the child feel more stable, and secondly, there are often drawers for storing things inside. The steps should be comfortable, not slippery: do not consider wooden rungs or metal pipes at all. There should be no gaps between the crib and the step where your foot could get stuck. Let there be fewer steps, but the child’s foot should fit completely on them.
- The ideal option for placing a ladder in a bunk bed is to secure it at an angle (this will make going up and down it more comfortable). If you have the opportunity to attach a ladder to both sides of the bed, this is excellent, especially if the bed occupies the central part of the room, because this will allow you to climb to the upper tier from both the right and left.
- The presence of railings is a strong argument in favor of a model you like. Often, by grabbing them at the last moment, the child can avoid injury.
- Avoid beds where the ladder pulls the top and bottom sides together; they are very dangerous.
- The bed you choose should not have any sharp corners that you could hit.
- In the store, try to “rock” an already assembled model you like, so you can draw conclusions about the quality of the assembly and the furniture fittings used by the company.
- Give preference to a bunk bed model whose steps are equipped with lighting. At night, this will help your child not be afraid when going down or going up.
- If possible, purchase a mattress that is not very high; this will make the sides higher and, accordingly, reduce the likelihood that the child will fall in his sleep.
- In order to avoid competition about where someone should sleep, establish a clear order, never deviate from it, so as not to cause resentment in one of the children.
- Psychologists are not very good about the fact that one bed “hangs” over the other. According to their research, this can negatively affect the psyche of the child who sleeps below. Consider models when the beds face in different directions. It is possible that the upper bed will “lie” on top of the wardrobe. Then, firstly, you will have one more place to store things, and secondly, the bed will receive another point of support, which will make it more stable, and therefore safe.
- Place pillows or a mattress on the floor, even if a fall, God forbid, occurs, this precaution will soften the blow.
- I strongly advise you to consider the option of a two-level pull-out bed. In my opinion, it has many more advantages over a bunk bed, you can read about them in the corresponding article.
- There should be no sharp corners that can be hit, as well as paper clips, bolts and other connecting materials.
- An important indicator is the distance between the tiers - it should be enough so that an adult can sit freely on the bed below. Only in this case can you be sure that children will not hit the top crossbar during play.
Bed assembly
The mattresses must be measured and the plywood backings cut to size. A margin of 2 cm should be provided so that it is convenient to cover the mattresses with sheets. After marking, you can proceed directly to installation work.
First, 2 side frames are made. For this, a beam with a cross section of 5*10 cm is used, which is fastened with screws. A board (15*2 cm) is screwed to one of the frames. Moreover, the joints must be both strong and neat. Self-tapping screws should not pierce through wooden elements, protruding with their pointed ends outward.
The second frame is similarly equipped with a side. It is made from a board with a cross-section of 20*2 cm. For the legs of a bunk bed, a 5*10 cm beam is used. Their length must correspond to the size of the second tier of the structure.
Holes for screws are made in the vertical bars located on the legs. The screws are screwed in:
- at the location of both tiers of the structure;
- in the side frames.
Small recesses are created in the legs with a drill. The washers and heads of 6 faces should fit into them. Screws are screwed into all holes. The recesses with their heads are sealed with putty.
The instructions for assembling the bed provide for the correct positioning of the structure in relation to the wall. If the wall is ordinary, then it is better to use a laser level to level the bed. For plasterboard walls, holes are drilled into vertical profiles.
It is necessary to install transverse slats under the mattresses. This ensures the creation of a reliable and comfortable bottom of the mattress. It is especially important to do this efficiently on the upper tier so that the mattress does not fall on the child lying below. We carry out this operation by attaching transverse mattress strips to longitudinal bars. The screw fastening pitch is 25-30 cm.
Both mattress box designs must be covered with laminated boards. These boards are attached using special screws with countersunk heads. Sides can be used as an additional element. They will prevent the baby from falling out of the crib.
The assembly diagram of the structure is completed by attaching plywood sheets and stairs. Their high-quality fixation is carried out using Euroscrews.