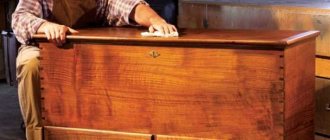
Double-column climbing conductors with pneumatic clamp
Designed for drilling workpieces of various shapes. Replaceable adjustments are installed on fingers 1 (cylindrical and cut), a plate with conductor bushings is installed on the upper fingers 2 .
The workpiece is clamped by lowering the top cover 3 connected to the rod 4 of the pneumatic actuator located in the lower part of the housing. 5 is used for control . Rod stroke ~ 8 mm.
The force on the rod with an internal diameter of the pneumatic chamber of 140 mm and air pressure in the network piz = 4 kgf/cm2 is ~450 kgf.
Dimensions in mm
| A | IN | N | H1 | h | h1 | C | C1 | D | D (add. off according to C) | L | |
| min | max | ||||||||||
| 70 | 90 | 50 | 80 | 160 | 12 | 6 | 125 | 38 | 210 | 13 | 280 |
| 100 | 120 | 80 | 120 | 205 | 15 | 8 | 180 | 53 | 270 | 16 | 350 |
Up
General information about conductors
Today in our article, we will talk about the types of conductors, their scope of application and the ability to make them yourself.
Types of conductors
It should be noted that these devices are used not only for drilling holes, but also when milling, turning and trimming are performed.
Let's look at the main types of devices.
Invoices
This type of jig is placed on top of the workpiece. It can lie either freely or be pressed using bolts or clamps. They are valued for their simplicity of design and low cost.
Rotary
The device body is equipped with bushings that adjust the rotation axes in horizontal, vertical and inclined planes. These models of jigs are designed for drilling cylindrical products.
Sliding
The name speaks for itself, the jig is not attached in any way, it is simply placed where the hole needs to be made.
Tiltable
Capable of making holes in several planes.
Stationary
They do not have rotating elements and are capable of moving the part and processing workpieces of the same type.
Universal
These conductors have a function such as readjustment. This allows small businesses to quickly and conveniently switch to the production of a new product.
Description of conductors
Let's start with the concept of a jig - this is a so-called template, the use of which allows for comfortable and ultra-precise drilling.
Moreover, you can drill either perpendicular to the surface or at any angle. If you use a conductor, then you do not need special qualifications, make complex calculations, mark where the holes will be, which saves a lot of time.
Areas of application
As we can see, due to the versatility and simplicity of their design, conductors are widely used in various fields of activity.
Mechanical engineering
In the mechanical engineering industry, they are used for drilling holes in various workpieces made from common materials. Conductors are used that repeat the drawing with exact observance of all dimensions. Also used when drilling holes of mixed type is required.
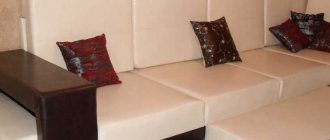
Furniture manufacturing
The most widespread use of conductors is in furniture production. Furniture conductors are used for installing fittings, assembling furniture and many other technological processes.
At the same time, furniture assembly is neat, precise and fast. A large amount of furniture contains dowels, which must be installed very precisely and there is no need for a conductor.
The most common jig for dowels is doweling. They mainly use overhead conductors made of lightweight materials.
Construction
Another area in which jigs are widely used for drilling holes is construction. They are used to drill technological holes in building structures, for example, when installing sandwich panels.
Solves a wide range of problems, especially in drilling metal pipes. Allows you to clearly maintain perpendicularity when drilling. Also used when drilling holes in tiles.
Main advantages of use
You can buy a conductor or make it yourself.
But before choosing a model, you should decide for what tasks it will be used and, based on all this data, you should choose the type and design of the tool.
So why should you use jigs for drilling holes:
- Intuitive use that does not require professional skills.
- Low price of the device, as well as the possibility of self-production.
- Saves a lot of time.
- There is no need to mark the surface to be treated using building levels.
- Maintain precision when drilling.
A jig for drilling holes is an integral part not only of production, but it will also be useful in home life.
Jig conductor with pneumatic clamp
Installation and securing of the workpiece is the same as in the previous jig. Pneumatic piston drive 1, together with the distribution valve, is moved to the side. Lifting and lowering of the cover 4 is carried out through the gearing of the column 3 with the roller 2 .
The clamping force at air pressure in the network piz=4 kgf/cm2 is 550 kgf.
Up
Scope of application
It should be noted that the drilling jig is used almost everywhere where there is a need to regularly drill holes. These areas could be:
- furniture manufacture. When making furniture, it is very often necessary to drill holes for fastening materials, fittings and accessories. The further appearance of the furniture, its presentability and marketability depend on the accuracy and correctness of the hole made;
- construction. When carrying out construction and repair work, it is often necessary to drill walls, pipes and other surfaces. Without templates, this is very difficult to do, and correcting subsequent errors will take a lot of time. Thanks to the templates, all drilled holes will have the desired shape and be at the desired angle;
- mechanical engineering. Working without templates here is also quite difficult, since all blanks and parts undergo standardization, that is, they all must have the same dimensions, the same position of some parts, including holes;
- mass production. Stamp production also requires the unification of some components. Templates simplify tasks in this regard. You can be sure that all holes drilled will be the same size and the same slope, or will be directly perpendicular to the surface;
- household. You often have to repair something at home, so the need arises to drill holes in walls, parts or some workpieces, where the particular accuracy of the holes is very critical.
Nowadays, conductors are produced both universal and specialized for specific areas of work. Some are inexpensive, so there is no need to make such products yourself.
Jig with pneumatic clamp for drilling holes in cylindrical workpieces
The workpiece is mounted on prism 1 . To adjust to a given distance from the mounting end to the center of the drilling, use the adjustable stop 3 . Clamping is carried out by lowering the conductor plate 2 , connected through guide columns with a movable pneumatic cylinder 4 . 5 are used to return the plate to its original position .
- The diameter of the processed workpieces is 8-22 mm.
- The largest drilling diameter is 6 mm.
- Clamping stroke 12 mm.
- The clamping force at air pressure piz=4 kgf/cm2 is ∼160 kgf.
Up
Purpose
This device is required to guide the drill with high precision to a given location, while ensuring the straightness and accuracy of its passage along the entire depth of drilling the hole. When working with a hand drill, it is quite difficult to maintain a given direction. If it is necessary to make a series of holes at a certain distance from each other, you have to make markings for each of them. The template for furniture has through holes for the insertion of a drill, the locations of which correspond to the drawing of the product.
In the absence of a conductor, you have to resort to a more labor-intensive method - marking marking lines. A core is a depression on the surface when struck with a hammer on a special cone called a center punch. When installing the conductor above a given point, you can start working without capping. The drill will hit the desired point accurately and does not deviate from the specified direction.
The conductor is used at the stage of assembly, fastening fittings and other technological operations. If it is necessary to make several rows of holes according to a template, the jig saves significant time. A jig is practically irreplaceable when the holes are planned in a rounded shape. When pressed, the end of the drill jumps off from the place indicated in the drawing. The jig is fixed to the part and performs the job accurately.
Metal structures are used for almost any furniture except wood. They are often pipes through which a series of holes must be drilled. In this case, when manufacturing the conductor, special attention should be paid to securely fastening it to the metal pipe. As a rule, the drilling angle should be 90˚. A rarer and more difficult option is “oblique” drilling. In this case, the length of the fixing elements should be adjusted. It is impossible to drill tangentially just by holding the drill in your hands. Working with a furniture jig makes this process a breeze. The height should be set. In this case, the workpiece is pressed tightly against the stop. The holes are precise and at the required angle.
The furniture jig for drilling should be held on the part, no matter how well it is secured. This is especially worth doing at the beginning. Otherwise, there is a possibility of displacement due to vibration.
A significant advantage of using a template guide for furniture products is that the holes are coaxial. When using a conductor, there is no need to make calculations and mark locations for holes. This reduces labor intensity and reduces operating time.
Double-column conductors with mechanical clamp
Installation and securing of workpieces are similar to the previous one. The workpiece is clamped by lowering the top cover 1 using handle 2, locking in the lowered position with a cone lock.
| A | A1 | B | IN 1 | N | H1 | H2 min | WITH | C1 | C2 | d (additional deflection according to C) | |
| min | max | ||||||||||
| 75 | 170 | 120 | 155 | 60 | 90 | 40 | 145 | 75 | 125 | 38 | 13 |
| 105 | 215 | 170 | 215 | 90 | 130 | 55 | 200 | 110 | 180 | 58 | 16 |
| 140 | 120 | 240 | 290 | 125 | 175 | 70 | 265 | 150 | 250 | 70 | 20 |
| 185 | 350 | 320 | 380 | 170 | 230 | 80 | 330 | 200 | 335 | 85 | 24 |
Up
Rock jig with mechanical clamp for drilling holes in cylindrical workpieces
The workpiece is mounted on prisms 1 and 2 . Supporting prism 1 is movable. To adjust to a given distance from the mounting end to the drilling center, use stop 3 .
- The workpiece is clamped by lowering the conductor plate.
- Locking with a cone.
- Dimensions of blanks: diameter 12-30 mm.
- The shortest length is 15 mm.
Up
Manufacturing of the conductor body.
First, you need to make the case itself. There is no need to explain anything specifically about the body, everything is elementary. The cross-section of the body is the letter “P” with one end (closed) wall. This wall will be used as a stop and will set the zero point, the starting point for drilling. When drilling, the stop is pressed against the end of the part. Main dimensions:
- The external size of the conductor is arbitrary.
- The upper part, in which the bearings will be seated, is made of 16mm MDF, the remaining parts are made of 10mm MDF.
- The distance between the two sidewalls (where the workpiece will be placed) is 16.5 mm, which corresponds to the actual thickness of the plate plus a small gap for ease of installation and removal of the jig.
- The distances between the centers of the bearings and the stop: 50, 70, 100 mm are the most common in furniture practice.
To assemble the case, it is necessary to accurately cut all four parts (top, two sides and one end), it is recommended to take measurements with a caliper. Next, holes are marked and drilled for the screws that will fasten all the parts together. The housing is assembled using PVA glue.
The distance between the side walls of the conductor is 16.5 mm (for laminated chipboard with a nominal thickness of 16 mm).
Bearing seating.
After the glue has dried, we proceed to marking and punching the holes for the bearings. We try to perform this operation very accurately! To drill holes for the bearings, we will need a drill press or drill mounted in a rack.
It is very difficult to perform precise drilling by hand, but with some skill it is possible. We mark the centers of the bearings with a pencil and punch them. Using the core, we drill three through holes with a diameter of 2 mm. We clamp a feather drill (punch) into the drill chuck; the diameter of the punch should be equal to the outer diameter of the bearings.
We drill two blind (non-through) holes for each bearing on each side of the previously drilled through hole. The depth of drilling with a hammer (the penetration depth of the central tenon is not taken into account) should be approximately 1 mm greater than the height of the bearing.
As a result, we should get six mounting holes (three on each side) for the bearings. You can try to insert the bearings into the seats; the bearings should fit freely, but without noticeable play. After fitting, you need to lubricate the outside of each bearing with glue and seat it in its place until it stops.
If “Superglue” is used (it quickly absorbs and dries), then this operation is performed using a rubber mallet.
Conductor on top. Distances between bearing centers and stop.
Making an adjustable stop.
To be able to drill at any arbitrary distance from the stop (not only 50, 70, 100 mm), it is necessary to supplement the jig with a simple adjustable stop - a long screw.
We drill a through hole in the center of the end stop with a diameter 0.5 mm smaller than the outer diameter of the furniture fitting (see photo). Screw in the foot. We screw a long screw into the foot, not forgetting to first screw the nut onto the screw and put on the Grover washer.
Now, by changing the screw screw depth, you can set any drilling distance from 0 to 100 mm.
Furniture footwear. To screw the fitting into the conductor body you will need a hex wrench.
The adjusting screw of the jig is screwed into the furniture fitting.
Conductor. Side view.
Conductor. Inside view.
Drilling a hole in the end of the chipboard using a homemade jig.
Drill overhang. Drilling can be done to this maximum depth. The length of the drill used and the depth of its attachment in the drill chuck must be selected taking into account the thickness of the jig (that is, almost the total height of the two bearings).
If desired, the surface of the jig can be sanded with fine sandpaper, primed and painted (for example, with spray enamel).
Practice has shown that the accuracy of drilling with a jig is no worse than +/-0.5mm and largely depends on how much the actual thickness of the material (chipboards) differs from the calculated thickness.
In any case, an error of a maximum of half a millimeter is not critical for end drilling in the manufacture of cabinet furniture.
Source: https://zakatayrukava.ru/mebel/stankiiinstrumenti/18-konduktor-dlya-sverleniya-v-torec.html
Portal type conductors
Replaceable adjusting devices and a plate with conductor bushings are installed on the fingers. Clamping is carried out by lowering the top cover, locking with cones. Provides reliable fastening.
Dimensions in mm
| A | B | H | H1min | l1 | C | d (additional deflection according to C) | L | L1 | ||
| min | max | |||||||||
| 160 | 130 | 60 | 100 | 218 | 170 | 95 | 140 | 16 | 230 | 310 |
| 200 | 160 | 95 | 150 | 268 | 210 | 120 | 170 | 280 | 370 | |
Up
Dowel hole jig
The jig for drilling holes for dowels is one of the simplest templates in its design. However, you should know that such templates should simplify the work of the master, and not complicate it when he is forced to use complex instruments.
Dowel hole jig
Used for assembling furniture. Should allow simultaneous drilling of holes without changing the device. For manufacturing, different materials are used that have different strength characteristics. The most durable unit can be considered a steel unit.
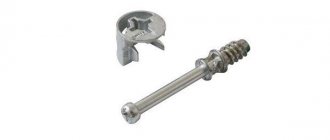
Jig for drilling holes in bolts, studs and shafts
Designed for drilling small (up to 5 mm in diameter) holes. Block 5 , depending on the diameter of the part, has two prismatic sockets. To install to a given length, the block can be moved along the guide grooves of the housing 4 . Pin 1 serves as a stop. Its length position is adjusted with a nut. The eccentric 2 , which clamps the part, is adjusted in height with a bolt 3 .
Up
What are they?
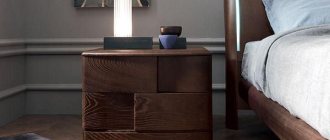
Jigs and templates are devices that help make precise and even holes in furniture elements, which greatly facilitates the work. They are required for the manufacture of bedside tables, coffee tables and other furnishings for the home or office. When creating furniture, the craftsman has to perform many repetitive actions related to marking and drilling. Using furniture jigs and templates speeds up this process. The devices have the following advantages:
- thanks to the templates, it becomes possible to obtain precise holes for confirmation;
- the tools do not require a point for the drill;
- any furniture will be assembled several times faster;
- you can make a certain number of holes without previous markings.
A template for furniture is a plank with a hole and sleeves, the gap between which may vary. The radius of the connectors will also vary. Having attached the device to the part, the master makes holes with the required girth and pitch.
Some devices help facilitate the process of making openings and assembling. Others are needed to simplify markup. According to the method of application, furniture jigs are divided into marking and drilling jigs. Often devices are purchased in stores, but sometimes they are made in-house. The best basis for creating a device would be a square from a carpentry kit or several rulers made of durable metal.
During assembly, a rack and sheet template is used to mark the furniture. The first is most effective when marking long parts - more than one meter. The latter are better suited for small elements. There are also combined templates that have the characteristics of both varieties.
Design features of furniture gas lifts, nuances of selection and installation
Drilling
Marking
Template for furniture
Stand with an overhead jig for workpieces that do not have mounting holes
The overhead jig is installed on two fingers using folding washers. The workpiece is clamped between the jig and the plate. The clamping is carried out by lowering the conductor plate, locking in the lowering position with cones.
Up
Advantages and disadvantages of a furniture jig
Even a simple device in the form of a strip with a stop greatly facilitates and speeds up the process of making holes of the same type
Furniture jig devices have a number of advantages.
- With the help of templates, precise inclined and straight drilling for confirmation is carried out.
- The use of the tool does not require previous calculation and marking of points for the drill, which facilitates the assembly of furniture.
- With a furniture fixture, products are assembled faster.
- You can drill several holes at once without making markings.
An overhead jig with a turret head is suitable for drilling standard holes for dowels of any size
Among the disadvantages of furniture jigs, only one is noted - the expensive price of carpentry equipment. Therefore, many professional carpenters make jigs for assembling furniture with their own hands.
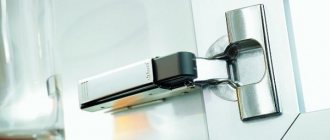
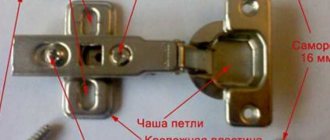
Furniture conductor (minifix) assembly diagram
How to choose the right furniture jig
The Assistant marking jig is a multifunctional jig device that, when using appropriate bushings, can be used not only for marking, but also for adding holes
A device for assembling furniture products greatly facilitates the work process for professional craftsmen and allows them to make precise markings for drill holes. Every specialist prefers to purchase high-quality equipment.
The Dubel-Profi conductor is an inexpensive but functional device for home use, which includes various devices that simplify many operations.
How to choose a furniture jig for furniture assembly.
- Consider what type of tool you will need to complete the job.
- Carefully inspect the product you are purchasing and study the markings.
- Choose products made from quality materials. For example, stainless steel.
- Give preference to tools made by trusted global manufacturers.
The Condor jig allows you to drill perpendicular holes of the required diameter by choosing the distance between them and changing the bushings included in the kit
By choosing a reliable device, furniture makers will be able to work much faster, which is important in the modern world.
This universal jig is designed for drilling holes for minifix, confirmat, rafix and door hinge
Stands for overhead conductor with hand fastening
The workpiece can be installed directly on stand 1 or on an intermediate spacer. The overhead jig is centered along the mounting diameter dC3 of pin 2 and is held in place by a quick-release washer when fastened. The jig and the workpiece are secured simultaneously by lowering a finger connected through a helical clutch to the roller carrying the handle 3 .
Locking with a cone lock.
Dimensions in mm
| D | H | h | d (additional deactivation according to C) | d1 | b | |
| min | max | |||||
| 125 | 75 | 20 | 75 | 20 | 12 | 21 |
| 200 | 90 | 20 | 85 | 25 | 16 | 21 |
| 300 | 105 | 25 | 120 | 28 | 20 | 25 |
Up
How to make a conductor with your own hands
Since there are many varieties of conductors, we will consider the original design and the analogue, respectively. So, let's begin.
Jig for perpendicular drilling
Its main purpose is to produce holes in thick workpieces at an angle of 90. In essence, it is a set of bushings combined in one body. Usually these are overhead conductors, which are widely used in furniture assembly.
Just place the device on the surface and you can start drilling right away, without punching. There is one drawback: the device should be held tightly, especially at the beginning of work. Because vibration can cause the device to shift.
This type of conductors can be made with your own hands.
- As a base, you can use a wooden block, a piece of textolite, or reinforcement with a square section of 10x10 mm.
- We treat the surface well, clean it and begin marking.
- Please note that the center of the holes should be 8 mm. from the edge of the workpiece. This is due to the fact that 8 mm. this is half the thickness of a chipboard sheet.
- According to standards, there should be exactly 32 mm between the centers of the holes.
- After that, we make holes with a diameter of 5 mm in these centers.
A homemade jig can be used, but for more convenient use, a stop should be designed; for this, metal 23-25 mm wide is used. and 1 mm thick, after which the sheet is bent at an angle of 90 and attached to the jig. Also, bushings of different diameters can be inserted into the base of the conductor.
Conductor for pipes and cylindrical blanks
Everyone knows that making a hole in a sloping surface is problematic; the end of the drill constantly jumps off. This type of conductors is fixed in a given position and allows you to work with high precision.
This type of conductors can be made quickly and independently.
- To do this, we need a block of hard wood, loosened diagonally. And we attach a piece of plywood to the edge of the block using self-tapping screws.
- Then we make holes of the required diameter in the wooden block.
That's it, the conductor is ready for work. To make the holes less likely to break, they can be reinforced with metal sleeves, which are made from round pipes of different diameters.
Jig for drilling holes at an angle
This type of drilling is rarely used.
Suitable when it is almost impossible to hold a drill or screwdriver at the desired angle.
It should be noted here that in metal products this type of hole is made only with a milling cutter. As for wooden products, there are ready-made solutions in the form of kits.
It’s easy to use these jigs; we press the workpiece tightly to the base, set the specified height, and as a result we get smooth and beautiful oblique holes at an angle. Yes, if we don’t need a through hole, then don’t forget to put a stop ring on the drill itself.
Making this type of device on your own is difficult and problematic. There are quite simple methods and options, but they are not very accurate. So, for example, a drill is placed on a prepared inclined surface and our workpiece is drilled at the resulting angle, as we understand, the accuracy suffers greatly.
Jig for drilling holes for dowels
Their main purpose is to maintain the alignment of the holes, into which dowels will subsequently be installed. That is, when you apply the jig to both sides of the product, you get a perfect joint.
As you understand, this type of conductors can be made independently. If you have a flow of workpieces with the same geometry, it will be convenient for you to use an overlay template. It is advisable to use hardboard or other transparent material (plastic) as a template.
We mark and drill holes. It is advisable to drive brass or copper tubes into the holes so that the drill does not break the calibration hole.
Universal device
When you use workpieces of various shapes and sizes, you will need a universal fixture. The most interesting thing is that this device can be made from scrap materials.
- For this we need plywood, about 15 mm thick.
- We make three identical blanks.
- We make holes along the edges into which dowels are installed as legs.
- We make one hole in the middle, which we reinforce with a metal tube.
- We make three metal strips with symmetrically located holes; they will serve as a shoulder. These shoulders are responsible for the linearity of the holes of the future conductor.
- We make cuts in the plywood blanks and install metal shoulders, securing everything. Our universal self-centering jig is ready.
Stand for overhead conductor with pneumatic mounting
Installation of blanks is similar to the previous one.
Fastening the overhead jig - from a pneumatic drive.
The axial force on the pneumatic actuator rod at an air pressure in the riz network of 4 kgf/cm2 for a stand D = 190 mm is ~260 kgf, for a stand D = 315 mm — ~400 kgf.