General information
Looking at photos of handmade kitchen tables online, you involuntarily think about what it should be like, from what material, what size. Below we will try to understand these issues.
Before you start creating a table, you need to decide what it should be like and make preliminary calculations. It is also worth deciding on the number of seats, counting several spare ones for guests.
If you always have a large number of people, then you should take care to accommodate them all and stock up on places.
It is necessary to take into account such calculations as the distance per person (at least 60 cm), respectively, this indicator is multiplied by the number of people who will sit at the proposed table. Where will it be located in the kitchen? Will there be additional elements in it?
Size and location are important components for designing a future piece of furniture. An acceptable width is considered to be from 80 to 1 meter 10 centimeters, if it is narrower it will be more difficult for you when serving.
Taking these parameters into account, you can create a beautiful table with your own hands.
From tiles
You can make a kitchen table from ceramic tiles with your own hands. Wood or plywood can be used for the base. An adhesive composition is applied to the plywood countertop, with which the tiles are attached. The design is practical - it is easy to wash, there is no need to use oilcloth. But the mass of the entire structure is large, so problems with transportation may arise.
Determining the shape of the table and place in the interior
There are only two most important recommendations for placing a table in the kitchen - it is not advisable to install it near the stove, or under the air conditioner.
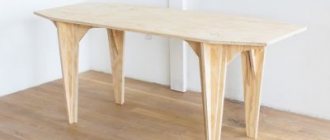
The table should be located in the middle of the kitchen. The overall appearance of the kitchen will depend on the shape of the table. The most universal option is the rectangular shape of the table; they fit harmoniously into any interior.
The oval shape of the table also has its advantages - it has a beautiful appearance, there are no corners (this is important if you have kids), and it is a more suitable option for holiday gatherings. The average width of such a table is 140 centimeters. The only disadvantage of this option is its small capacity compared to the rectangular shape.
There are different types and designs of kitchen tables. Below we will look at some of them in more detail.
Tools and materials
Different materials are used to make dining tables. The most popular options are:
- tree;
- MDF;
- chipboard;
- furniture board;
- plastic.
Wooden structures are a classic choice. The most durable, durable, environmentally friendly, but expensive material. Such furniture will harmoniously fit into any interior. However, it is characterized by massiveness and heavy weight, which complicates transportation.
The most economical options include tables made of MDF. Budget material can be given different colors, even simulating the texture of natural raw materials. A product made from MDF can also decorate almost any interior. The surface is resistant to mechanical stress and humidity, but if water gets into the joints, deformation of the base may occur.
Chipboard is also characterized by a budget price, but is not of high quality. Furniture made from this material will not last long, since chipboard countertops quickly deteriorate from external influences, humidity, and are not resistant to scratches and impacts.
Furniture board is a material made from different types of wood by gluing timber. It is cheaper than natural raw materials, and compared to laminated chipboard or MDF, it is more resistant to wear, practical, durable, and repairable.
You can distinguish furniture board from other materials by the characteristic checkerboard pattern of glued bars.
Plastic is a fairly popular and relatively inexpensive material. You should not choose the cheapest raw material for the countertop; it can be environmentally unsafe and harm human health. Plastic products are characterized by light weight, ease of maintenance, and a wide color palette. They are resistant to sunlight, water, and temperature fluctuations. This product will last quite a long time.
Using different materials, you can make more complex and interesting models for the kitchen with your own hands. Exclusive furniture will become a real decoration of any interior. The set of tools depends on the model and complexity of the product. First of all, you should stock up on a ruler, a pencil, a drill, an electric jigsaw, a screwdriver, a hair dryer, a screwdriver, and a grinder. For more complex options, additional equipment may be needed.
Features of making your own manicure table with a hood
Tree
MDF chipboard
Furniture panel Plastic
Tools
Making a drawing of the future table
Having decided on the size of the future table, you can move on to creating it and planning what material to make it from.
It is necessary to make a sketch of the future table; to do this, you need to indicate on it its overall dimensions and individual elements. It's worth thinking about ways to fix it.
Let's look further at an example.
For example, let's take a medium-sized table. To create a table, you need materials such as the tabletop itself (1 meter 20 centimeters by 60 centimeters), transverse lintels (40 by 2.5 centimeters), longitudinal lintels (100 by 2.5 centimeters), legs for the table (4 pieces, each 70 centimeters high).
We recommend watching
We make a kitchen countertop with our own hands - a step-by-step description of production and features of design choice (video + 75 photos)
- Assembling cabinet furniture with your own hands - types of fastenings, basic rules and step-by-step description of furniture assembly (90 photos)
Which sofa to choose for the kitchen - selection for the interior, the best combinations and placement options (115 photos)
To make boards, you need to prepare the boards to size. It is worth thinking about fixing future necessary nodes.
To work, you will need construction tools, materials for measuring and cutting, and paint and varnish materials. After preparing all the necessary tools, you can begin the step-by-step creation of the future table.
Decoration
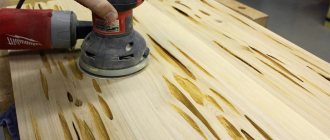
If you are thinking about how to make a new one out of an old kitchen table, get a minimal set of tools. The restoration process is labor-intensive, if you do everything manually - you need to completely remove the layer of old varnish to get rid of cracks and damage. This can be done with a sander or manually with sandpaper.
After cleaning is completed, you need to inspect for cracks. If there are any, then they need to be erased. The entire surface is degreased and re-treated. You can give it a semi-antique look with your own hands. To do this, the tree is artificially aged or burned with an open fire.
We are working on creating the future kitchen table
Below we will consider in detail the instructions for creating a kitchen table.
First you need to decide on the countertop. What kind of thing will it be, sliding or not? In a sliding version, the tabletop will be more practical.
Taking into account the parameters of convenience and durability, it is worth choosing a material that is least likely to be subject to deformation due to constant exposure to moisture, temperature, shock, etc.
In this case, an excellent option that will satisfy all these criteria would be a stone or ceramic coating.
We recommend watching
- Instructions on how to make a coffee table with your own hands: step-by-step description of how to build high-quality furniture (120 photos and videos)
DIY mirror decor - the best design ideas and tips for creating a stylish decoration with your own hands (130 photos and videos)
How to make a cat house with your own hands - 110 photos of original ideas and solutions. Tips for choosing and using scrap materials
It is important to understand that this coating will not look the same in all interiors.
Chipboards are a more practical and versatile material for countertops. They can be of two options, both of them are suitable for creating a tabletop. If this material is properly processed, it will serve you for a long time.
The only disadvantage of this material is that it is not moisture resistant. But it is resistant to mechanical damage and detergents.
An environmentally friendly material for creating a countertop will, of course, be wood. But in operation it requires a lot of effort - protection from moisture, mechanical damage, and on top it must be protected with paints and varnishes.
The number of legs will depend on the shape and size of the table. Often four legs are required, attached to the sides of the tabletop. It is worth making them strong and durable. You can make them yourself or choose ready-made options.
We recommend watching
- How to make an ottoman with your own hands - step-by-step instructions and basic options for how to build an ottoman (100 photos)
- How to make upholstered furniture with your own hands - basic principles of furniture construction and instructions for beginners (98 photos)
- Instructions on how to make a table with your own hands - tips on choosing the design, size, shape and type of table (95 photos)
There are options for making a table on one leg, the bottom is fixed using a cross-shaped strap. There may be two legs located at the edges of the tabletop and connected to each other by a jumper.
It doesn’t matter how many legs you choose when creating a table, as long as they fit and look beautiful in the end.
The tabletop must be connected to the legs using the lower crossbars. They will give the structure reliability and durability.
You need to cut the parts to the size of the table using a jigsaw. Then we sand the cut areas with a machine. We glue a special edge along the ends of the product.
We assemble it starting with the legs and crossbars, then fasten the tabletop using corners. We put the legs from below in special covers, and hide the screws for fastening with the help of special plugs.
From the windowsill
If you are planning to make a table from a window sill in the kitchen, you need to evaluate its advantages:
- Saving room space.
- The tabletop is easy to install, you just need to follow the instructions.
- Aesthetic pleasure - such tables look attractive and unusual.
- Energy savings - there is enough light, since the entire working surface is located near the window.
- Wide selection of design solutions.
- Low cost of the finished structure.
A window sill table also has a drawback - if you like to change your interior frequently, then you should not use such table designs.
Brief summary
The kitchen table is an important piece of furniture for any kitchen. You can make such an item with your own hands. To do this, you need to decide on the material, size and shape of the future product.
With the help of simple instructions for creating a table, you will create the option that best suits your interior and will delight you when eating.
Review of materials for making your own table
A kitchen table can be made from any materials - metal, glass, ceramic tiles, but most structures are made from wood. Making a kitchen table from wood is a classic. But this material has a drawback - scratches, chips, and abrasions may appear on it.
All these problems can be solved - restoration is carried out, during which the old coating layer is removed, repairs are made and the surface is cleaned. Finally, tinting and varnishing are carried out. When using the product, the main condition must be observed - treat it with care.
Photo tips on how to make a kitchen table with your own hands
Choosing an oval table by color and design
These characteristics are crucial, as they allow you to create a harmonious and original interior. An oval table correctly selected in color and design will decorate and transform any kitchen.
A good table is a decoration for the kitchen
When choosing an oval table based on shade and design, you need to consider the following points:
- The style of the kitchen interior should be taken into account. For example, wooden furniture is in harmony with the classic style; a glass or metal table of unusual shape and color is suitable for the high-tech style.
- An oval table must be combined with all the other furniture.
- When choosing a table, you should take into account the color of the floor and wall coverings, as well as the shade of the curtains.
The color of the table must be combined with the rest of the furniture.
Design features of oval tables:
- For kitchens in country, classic, Provence and shabby chic styles, lacquered wooden models are suitable, perhaps with carvings or patterns, natural wood or white.
- You can highlight the kitchen dining area with a table made in bright colors - green, blue, yellow, orange.
- Glass tables with bright prints look very bright and original.
- Decorative elements such as carvings, floral patterns, geometric patterns and so on will help decorate the table.
Dimensions
Most often, the dimensions of an extendable table are selected based on the area of the room in which it will be used. In addition, the expected number of guests who will sit at it is taken into account (it is optimal if there is approximately 60-70 cm of table space per person).
The standard height of the dining table is 73 cm, but if necessary, you can slightly change this parameter to suit the individual needs of the family.
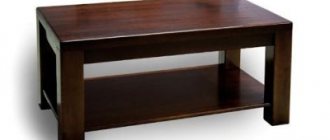
Reliability of the base
To create a beautiful picture of the furniture, the tabletop must be harmoniously complemented by the base. The stability of the furniture is ensured by one, two or four supports:
Small tables with one support look elegant and flirty. And the white oval model will visually look even smaller. It’s comfortable to sit at such furniture, and it’s easy to get up - nothing interferes with your legs and the chairs can be arranged in any order. Manufacturers produce both folding oval models and regular ones with a solid tabletop. It is important not to lose sight of the fact that only wide and strong bases will provide structures with stability . Most often, folding models have massive metal bases. The length of the oval tabletop in folding models increases slightly (by about 20-30 cm). It can be successfully combined with a kitchen soft corner - a person sitting in the corner will not experience discomfort.
Royal luxury in the interior
The base of two legs with a crossbar has a more classic look. This design with a large number of carved decorative elements looks organically in heavy products made of natural wood. The support, designed in the form of a complex frame, looks laconic and minimalistic.
The four supports of the oval table are a reliable classic that guarantees its stability. Bent legs will give the furniture a sophisticated look, while straight supports look strict and laconic.
The bases are made of metal, wood, stone. Metal bases give the products a unique, original look. Designs in which the tabletop is made of another material (glass, wood, a combination of glass and wood, plastic) look interesting. The combination of a glass oval tabletop and metal legs looks laconic and simple. Wooden legs bring a feeling of warmth and lightness to furniture.
Option for a large family
The original forged base looks like a real independent interior decoration.
Tables with similar supports fit organically into the style of classics, art deco, country, and Provence. Most often, a forged base is equipped with a glass tabletop. Hand forging is an expensive pleasure. Craftsmen take into account the wishes of the customer and create truly unique masterpieces.
A significant drawback is that the legs of an oval table can seriously scratch floor coverings, especially laminate, parquet, and linoleum. Therefore, they immediately acquire overhead elements for the legs.
Small option in a set with chairs
Dowels, confirmations and dowels
Traditionally, wooden furniture is assembled on dowels. The dowel connection is invisible and cheap; Just in case, let us remind you what it is and how it is done, see fig. To connect wooden parts, wooden dowels are used, which dry out along with the connected parts; The laminated chipboard, which practically does not dry out, is connected with plastic dowels. Corner plastic dowels are rarely used, because... often break. Connections with wooden dowels are usually glued.
Dowel connection
It is often difficult for novice craftsmen to achieve accurate markings for the dowel connection. Tricks, such as marking with bitten nails (item 4 in the figure), do not always help, and it is impossible to remake an incorrectly marked dowel connection; both parts go to waste. Therefore, it is better for beginners to assemble their first products using Euro-furniture screws - confirmed ones. This is more expensive, but does not require special skills, because... the confirmation hole in both parts, compressed with a clamp, is drilled in one go, see fig.
Furniture connection by confirmations
Parts made of laminated chipboard or dense thin-layer wood, connected with confirmats, last for many years. All the designs described below can be assembled both on dowels and on confirmations. However, in the latter case, the following rules must be observed:
- Use furniture grades for wood, not plumbing grades for plastic. They differ at first glance: furniture slots have a hexagon slot, and plumbing slots have a Phillips screwdriver.
- The diameter of the body of the confirmat without thread when attached to the end should be no more than 1/5-1/3 (as an extreme case) of the thickness of the attached part.
- The height of the confirmation neck should correspond to the thickness of the main part.
- The penetration of the threaded part of the confirmat into the attached part must be at least 5-6 full diameters of the confirmat.
- The hole (blind hole) for the confirmat is drilled to its full length with the head.
- Use only a twist drill for wood.
- The main drill must be inserted into a mandrel that exactly matches its diameter and screw size.
- Drill holes for confirmations with a main drill of a diameter equal to the diameter of the confirmation by thread.
In practice, it is not difficult for even a perfect “teapot” to fulfill these conditions:
- Based on the thickness of the part, we determine the diameter of the body of the confirmat without thread;
- There is a lot of information on confirmatories on the Internet, from which you can, knowing the diameter of the screw body, the thickness of the main part and the drilling depth, determine the required standard size. It is better to immediately open pictures for the request “furniture screw (or confirmation) drawings dimensions”;
- We are looking for a retail outlet where the seller, when asked to show furniture confirmations, shows them exactly;
- We say: “I need so many of such and such a standard size and a drill with a mandrel for them.” They may offer a solid drill just for this confirmation, it will be cheaper.
Plastic dowels with a round head and a cap
And a little more about dowels. It is best to place a detachable (freely applied) tabletop of a classic kitchen table on them. Incl. and for such purposes, plastic dowels with a round head or dowels with a head and different types of corrugation on the long recessed and short protruding parts are produced, see fig. on right. Thick tabletops are attached first, approx. from 20 mm; the second ones are thinner.
Assembling the table from prepared parts
The first stage is cutting and cutting out 2 pieces of the tabletop. If necessary, finish the ends and cover the surface. At the inner end of each part, 2 holes (8-10 mm in diameter) are drilled for the dowels of the removable elements.
Then a U-shaped box is made from the sidewalls, the corners of which are fastened from the inside with an aluminum corner. So that the box can move above the base, the reverse parts of the guides are fixed to the inside of the side parts of the body.
A tabletop is installed on top of the box. These elements are fastened together using aluminum corners.
Now you can proceed to installing the insert. The sliding mechanism, which is most often made of aluminum, is best secured with self-tapping screws, for convenience, turning the table over and placing it on the tabletop. The guides of this device are screwed to long frames, and the sliders are screwed to one of the 2 parts of the tabletop.
- DIY cornice: a detailed description of how to design and decorate a stylish interior element (80 photos)
DIY folding chair: 110 photos, drawings, diagrams and sketches of convenient and easy options for creating portable chairs
- Do-it-yourself pouf: step-by-step instructions on how to build a stylish and original interior element with your own hands (105 photos)
To remove the insert when not needed, 2 slats are attached under the tabletop, which will hold the insert, hiding it inside the table structure.
The design of the sliding table can be changed if instead of 4 supports you use 2 wide ones or even leave one massive leg with a cross or platform. Also, these elements can have different shapes, for example, they can be made from figured or chiseled ones.
Preparing the main elements
The main elements are the tabletop and legs. The good thing about wooden dining table components is that they are environmentally friendly, reliable, durable and practical. Nevertheless, this material is most often used.
The tabletop can be made of either natural wood (oak, pine, walnut) or laminated chipboard (laminated chipboard).
Hallways 2021: TOP-200 photos of the best new products and modern design. Options for the ideal combination of color and style of furniture in the hallway- DIY stool: manufacturing methods and instructions for creating simple and stylish models (90 photo ideas)
- Do-it-yourself door finishing: 115 photos of the best options for entrance and interior doors
You can make table legs yourself or purchase ready-made ones. Finished legs are round, square or carved. In addition, metal versions of this part are also available for sale.
Appearance of sliding tables
This section presents numerous photos of sliding tables of various shapes, sizes and designs. As you can see, such a piece of furniture can easily fit into the interior of any room.