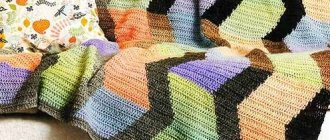
Square cover for stool
Dimensions: 50cm by 50cm.
We will need:
- yarn, 100% acrylic, color selection according to your wishes - only about 100g;
- hook No. 2.5.
Description
We begin to knit a cover for a stool by crocheting a chain of 5 VPs. We close it into a ring with a connecting post. Next, we knit the cover according to the instructions in the pattern:
- 1st row: 3 VP lifting, 2 double crochets in the 1st VP lifting, 2 VP, * 3 double crochet. with nak. in the ring, 2 VP* - from * to * repeat twice. Only 4 times. Complete the row of connections. column.
Next, knit according to the pattern for the 5th row. inclusive.
Change yarn colors randomly in each new row. Crochet 9 squares and connect them together in the last row.
Tie the cover on the stool around the perimeter in a circle with 1 post next to it with capes. Thread an elastic band or cord between the double crochets.
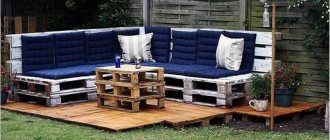
Square
This chair or stool cover can be crocheted from leftover threads. It is only important that there is enough of the same light yarn for the side stripes. To knit this product, you will need a hook approximately 4 mm thick.
This product is formed by intertwined knitted strips of different colors.
They are knitted from dc.
They can be created from yarn of various colors. The number of such fragments is determined by the parameters of the corresponding seat, here 22.
Now half of these strips are folded into one sheet. The edge is tied on one side. Art. is done. b/n.
The edge design can be seen in the photo below.
The remaining strips are tied in the same way.
Then the fragments of the two panels are woven in a checkerboard pattern. As a result, one square canvas is formed, consisting of squares.
It is tied around the perimeter, turning into a solid rug.
That, in turn, is tied along the hem using a st. b/n. Then 2 ch insteps are performed with a crochet hook. The next row is worked with dc. To prevent the cape from sliding on the chair, you should knit it tightly and do not add additional stitches in the corners.
The perimeter is tied and the process is completed with a series of arches of 3 ch, the same must be done through 4 columns.
The fringe is made, as in the photo below.
You can make a different design for the cover on the stool. Join not 11 fragments, but 4, tying them into separate small sheets.
Chairs with similar covers will enliven any room.
Red stool cover with embroidery
Size: Ø28cm.
We will need:
- yarn, 100% cotton, 100g per 392m, red melange – 100g;
- the same, red – 20g;
- some white and orange yarn;
- hook No.3.
Description
We begin to knit a cover for a stool by crocheting a chain of 2 VPs using melange yarn. We close them in a circle SSt. Next we knit:
- 1st row: 1 single rise, 5 sc in the resulting ring. Finish the row using conn. Art.;
- 2p.: 1 VP lifting, 1 RLS in VP lifting, * 2 SC in the next row. RLS previous R. from hook* – from * to* repeat 4 times, 6 times in total. Finish the row using conn. Art.;
- from 3rd r. on the 28th row: perform RLS, evenly increasing their number in each row. on 6 columns. Every r. finish SS. Cut the thread;
- RUR 29: connect red yarn, 1 st. lifting point, 1 sc in the previous sc. R. from the hook. Finish the row using conn. Art.;
- 30r.: 1 c. p. rise, 1 sc in the sc of the previous row. from the hook, SST;
- 31r.: 3 c. p. rise, 1 sc in the sc of the previous row. from the hook, SST;
- 32r.: 3 c. p. rise, 1 sc in the sc of the previous row. from the hook, SST.
Assembly and finishing
We carry out embroidery according to the pattern using a stem stitch. Thread the elastic band through the double crochet row 32.
Case made using biscuit technique
Making a cover using the biscuit technique is a sign of superior craftsmanship. The seat of the cape is made of small fluffy cushions (ottomans) sewn onto a dense base.
There are several options for sewing covers for stools using the biscuit technique:
- making each ottoman separately and then joining it to the base fabric;
- making a row of ottomans directly on the base fabric (cut the fabric into squares of the desired size and color and sew them together into strips).
Both options allow you to choose very beautiful color combinations. Using ottomans of different sizes makes it possible to make a cover of any shape. Thick cotton fabrics - calico, poplin - are used as the base. The pads themselves are made from scraps of more beautiful fabrics, filled with padding polyester or holofiber, and trimmed with decorative cord or ribbons. The cover, made using the biscuit technique, can be either long or very small, and can be attached to the base of the stool using an elastic band sewn along the edges.
Brown stool cover
Size: Ø28cm.
We will need:
- yarn, 100% cotton, 100g per 392m, brown melange – 100g;
- the same, gray – 20g;
- some white, red and orange yarn;
- hook No.3.
Description
We begin to knit a cover for a stool, like the previous knitted covers, by crocheting a chain of 2 VPs with melange yarn. We close them in a circle SSt. Next we knit:
- 1st row: 1 single rise, 5 sc in the resulting ring. Finish the row using conn. Art.;
- 2p.: 1 VP lift, 1 StBN in VP lift, * 2 StBN in the next. StBN previous R. from kr-chka* – from * to* repeat 4 times, 6 times in total. Finish the row using conn. Art.;
- from 3rd r. on the 28th row: perform RLS, evenly increasing their number in each row. on 6 columns. Every r. finish SS. Cut the thread;
- RUR 29: connect red yarn, 1 st. lifting point, 1 sc in the previous sc. R. from the hook. Finish the row using conn. Art.;
- 30r.: 1 c. p. rise, 1 stbn in sc of the previous row. from kr-chka, SST;
- 31r.: 3 c. p. rise, 1 stbn in sc of the previous row. from kr-chka, SST;
- 32r.: 3 c. p. rise, 1 stbn in sc of the previous row. from kr-chka, SST.
Assembly and finishing
We carry out embroidery according to the pattern using a stem stitch. Thread the elastic band through the double crochet row 32.
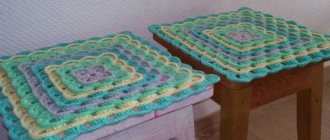
Case made of motifs
Dimensions: 27cm by 27cm.
We will need:
- yarn, 100% cotton, 150g per 225m – white, lilac, violet colors – 150g each;
- hook No. 3.5.
Patterns:
- for the main motive we dial 2 air. p. and crochet from the 1st r. on the 14th r. scheme;
- for leaves we collect 2 air. p. and crochet from the 1st to the 4th r. cx.
Description
We need to connect nine motifs along cx. and connect them into a common square canvas. It is advisable to tie the finished product, like all stool covers, in a circle. We crochet 16 rows of sc, alternating colors:
- from 1st to 3rd r. – purple yarn;
- from 4th to 6th r. – white;
- from 7th to 9th p.m. – purple;
- from 10th to 12th p.m. – lilac;
- from 13th to 15th r. – white;
- 16 rubles - purple.
We knit 8 leaves according to the pattern, alternating the colors of the threads.
You can decorate the covers with tassels, ruffles, etc. We suggest crocheting a chain of VP with a length of 32 cm using three threads (lilac + white + purple). Insert the knitted cord into one side of the cover and sew a leaf on each corner. For the remaining parties we repeat the algorithm.
How to crochet a cape with your own hands
Before starting work, you need to decide on the shape of the future product. It can completely cover the entire sofa or without armrests; it can be intended only for the seat or, conversely, only for the back of the sofa.
Knitting with your own hands is a fascinating and interesting process.
In addition, the cape may not be attached to the furniture in any way or may have an elastic band around the perimeter. An option with Velcro fastening is also possible. You also need to choose a fabric and color that suits your interior.
High-quality knitting threads provide good results.
Some designers advise, on the contrary, to play with contrast - for example, for a white interior, knit a blanket from gold or blue yarn, and for a light brown interior, use dark red or green threads.
A modern throw is considered the ideal solution for any sofa.
Preparing for knitting
Search online on websites or forums for patterns for crocheting a sofa cover and you will see that you can use different patterns. Their choice is quite wide - from the simplest to the quite complex. Therefore, both experienced and novice needlewomen will be able to choose an ornament that is suitable for their level of skill.
For crocheting, the most universal pattern is considered to be squares. Firstly, it is not difficult and can be performed by a person with any level of skill and technique. And secondly, this pattern is suitable for interiors of most styles.
For modern modernism or minimalism, a bedspread of restrained colors and not too pronounced texture is suitable.
First, we recommend trying to knit a rectangular-shaped throw for a standard sofa.
Important! When you measure the sofa, take into account its height along with the legs.
A more complex option is a cover for a corner sofa. With this option, we recommend knitting two rectangular parts first, and then connecting them.
Knitting motifs are the most popular.
If you compare some description for a sofa bedspread with crocheting patterns for a chair cover, you will see that the difference is only in size.
Knitting technology
Let's look at how to crochet a sofa cover with a pattern of squares for a regular rectangular sofa in stages:
- Choose a type of yarn. In our example, it will be 100% acrylic with a nominal yarn thickness of 100 g / 210 m;
- More beautiful products are obtained when using multi-colored threads, so for our cape we will take threads of two colors - green and yellow;
- Calculate the required number of skeins. For our cape you will need 14 skeins of 100 g of each color;
- Choose a suitable crochet hook. To make a cape, it is best to use hooks of medium thickness;
- Tie 32 squares according to the pattern (16 pieces of the same color), tie each of them around the perimeter with single crochets. The number of squares (motifs) depends on the size of the sofa and the size of the side of the motif itself. In our case, its side is 25 cm. Thus, the length of the cape will be 8 motifs, and the width will be 4 motifs;
- With exactly the same pattern, you need to knit 4 triangles of each color with the side of the base of the triangle equal to the side of the square;
- It is necessary to connect all the motives with each other. To do this, fold them in pairs with the right side out and connect them using a single crochet hook, resulting in a beautiful ribbed seam on the front side. To connect with an invisible seam, fold the motifs with the right sides inward and connect them with half-columns. Combine the triangular motifs with the squares at the bottom of the cape, forming a scalloped edge.
A cover for a sofa or chair not only decorates the furniture, but also protects its upholstery from damage, dirt and wear.
Exactly the same principle is used to crochet a chair cover. This completes the main part of our bedspread.
Final stage
At the final stage of work, it is necessary to decorate the resulting cape. For example, you can decorate it with fringe or make decorative tassels.
Decorative tassels will decorate your blanket.
In our example, triangles were made at the bottom of the cape, to the tops of which we will attach tassels made from threads. Making fluffy and short tassels is very simple. To do this, take a regular book and wrap yarn across it. On one side of the book, cut the yarn, and on the other side, pull the resulting bundle with thread and tie it beautifully.
There are many patterns and patterns for knitting, both simple and complex.
When knitting, you can use bouclé threads or grass yarn. Their special texture will help hide unevenness or mistakes made while knitting. This is especially useful for beginner knitters.
Openwork covers
The covers have a diameter of 28cm.
To knit openwork covers we will need:
- yarn of any composition, preferably with the addition of synthetics;
- hook according to the thickness of the threads.
Description
We begin knitting covers by forming a loop. To do this, wind the yarn around your finger, forming a ring. We knit 3 air into it. lifting loops and 31 StS1N. We complete the row of connections. stlb, tighten the end of the thread. Next, we continue crocheting according to the pattern up to 15 rubles.
Separately, we make a cord from VP and insert it into the 14th row of the seat, then tighten it.
Popcorn covers
We will need:
- yarn, 100% acrylic, thick, color - according to your wishes;
- hook according to the thickness of the yarn.
Description
We will knit according to the pattern, alternating colors of our choice. We start by setting a chain of 8 chains.
We close it in the SSt ring and then knit:
- 1st row: 3 single lifts, 4 dc in the ring.
To form the 1st cone, we take the circle out of the working stitch and first insert it into the 3rd stitch of the lift, then return to the working stitch. loop. We stretch it through the 1st. We have a cone made of columns.
This pattern is called "popcorn".
Then *4 chain stitches, from ring 5 DC, insert a crochet into the top of the 1st stitch, then into a working stitch, pull it through the top of the 1st stitch*. Repeat from * to * twice more. We finish row 4 in/p, sl st to the top of the 1st cone.
For the 2nd r. We do 3 high-rise lifts. In this row, from each arch we knit 2 cones, between which there are 4 v/p, on the sides of the square we knit 3 v/p. The first bump consists of lifting loops and 4 dc, all other bumps are made of 5 dc.
At 3 p.m. from the corner arches we knit 2 cones, between which there are 4 v/p. On the sides of the square there are 3 v/p, cones from the arch, 3 v/p. We complete the row of SST at the top of the 1st cone.
We continue to work on this principle. From the corner arches we knit 2 cones, between them - 4 v/p. On the sides we make one bump from each arch after 3 points.
Having finished making the seat to the desired size, we knit two rows of cones without any increases at the corners; in the last row, knit the cones through 2 stitches. We get a narrowing of the cover, which will allow you to fix it on the stool after stretching it.
Round version of the product
The design of this case is very simple, so even for beginners it will seem like a very easy job. It is important to put your soul into every business and follow the instructions provided in this master class.
A little tip for beginners: we will knit this cape from the center, and you need to cast on a certain number of circular rows. This method helps to get rid of the yarn that remains after the next knitted masterpiece. It is best to take yarn whose thickness will be 100 meters per 100 grams. Sometimes you will have to use an even denser thread - 50 meters per 100 grams. But the thread cannot be changed throughout the entire knitting.
What we need to prepare for knitting such a cover:
- yarn;
- hook number 6.
Related article: Lace fabric, linen curtains with lace
Many of those who are just starting to try their hand at crocheting are faced with the fact that when they make a mistake they have to unravel the product. To prevent this, you must strictly follow the provided diagram. In addition, we will knit the upper part from lush columns, these are several unfinished columns, in this case one yarn over is made on the base loop, and then everything is knitted together, and then separated from each other by air buttonholes that make up a chain. Let's see how it looks on the diagram.
To form a fold, you need to knit several double crochets, so we will get an even side. It is best to make the side higher so that it bends right under the stool cover, so our cover will not move out of place. To do this, you need to knit in the last row *double crochet, chain crochet* or* two double crochets and one chain crochet*. There should be holes into which we insert a lace or an elastic band. Knit to the size of the stool, and then make a side.