Installation rules: all the nuances of installation
So, we purchased convenient plumbing fixtures that fully meet the owners’ needs in practicality and appearance. By the way, stainless steel sinks are popular for kitchens today. Firstly, they are affordable, light weight, and durable to use.
The universal color “metallic” can be combined with a variety of color schemes in the room.
Installation is quite simple, there are only two stages:
- Assembling the sink cabinet;
- Installation of an overhead stainless steel sink on a cabinet.
The sink is an indispensable attribute of the kitchen. You can easily install it yourself - you do not need to have special knowledge and skills.
Useful little things
Finally, here are some useful tips that will come in handy with various fastening methods.
- Untreated ends of plywood or chipboard will quickly swell. They must be protected from moisture in any way. Usually paint, varnish or drying oil is used; The minimum number of layers of paint and varnish is three.
The photo shows a special primer for protecting the ends of wood. For our purposes it is quite suitable.
Hint: in order not to wait several days for the coating to dry, it is better to use nitrocellulose-based paints and varnishes. Each layer dries in no more than half an hour. Do not forget about ventilation of the room: the fumes are toxic.
- It is also better to oil the block that is placed under the edges of the sink. Wood is less hygroscopic than chipboard, but it may very well rot.
- It is advisable to use screws with an anti-corrosion coating - yellow or silver. Otherwise, over time, rusty streaks may appear on the walls of the cabinet.
Installing a sink: what is needed for this?
How to attach a stainless steel sink to a cabinet so that it holds well and the installation itself does not take too long? To do this, you need to have accessories and tools, thanks to which installing the sink on the cabinet will not be much of a problem.
You can attach a sink with sealant without additional equipment if it is light. If the overhead sink is heavy, then installing it on the sealant will lead to the collapse of the structure. In this case, it must be fastened with self-tapping screws.
The classic tools and accessories used for such purposes are:
- Drill, screwdriver;
- Screwdrivers;
- Ruler;
- Pliers;
- Drills (for wood);
- Self-tapping screws;
- Sealant (we will pay special attention to it later);
- Masking tape;
- L-shaped corner.
The above items are also suitable for installing a sink on a countertop.
But experienced craftsmen only need a sealant and corners.
How to install an overhead sink
How to choose and install an overhead sink
The sink is a very important attribute in the kitchen. There are a large number of types of these products, one of which is the overhead sink. Several methods can be used to attach it. In addition, you cannot do without special knowledge and tools.
The main feature of overhead sinks is their successful combination with various kitchen designs. The obvious advantages are the low cost and ease of installation of the sink.
As for the disadvantages, these include the small thickness and space between the cabinet. The presented products can be used for a set that is composed of separate modules, and the sink is not a single part of the work area. This type of sink should be installed in the corner of the room.
Stainless steel sinks
To produce such a product, a copper alloy is used, which prevents washing from corrosion and the effects of food acids. The main advantages of a stainless steel sink include:
- light weight, thanks to which transporting the sink will not be difficult;
- if used correctly, the overhead sink will last a long time;
- hygiene;
- acceptable cost.
This type of washing is not without its drawbacks. These include low levels of sound insulation when in contact with water. But low-quality stainless steel sinks, which are produced using a thin steel sheet, have this disadvantage. To eliminate this problem, you need to buy a sink with an underfloor bowl so that its depth is sufficient.
Composite sinks
The material used for the production of this version of sinks is filler. It is held together using a polymer binder. Granite chips, fiberglass, and quartz sand can be used as filler. Thanks to the filler and the dye used, it is possible to achieve the required shade of the overhead sink.
The advantages of this type of sink include the lack of absorption of food dyes, unlike enameled surfaces. Granite sinks are not afraid of the harmful effects of aggressive substances. There are no scratches on their surface, therefore, the appearance will be observed for a long time. If we talk about the disadvantages, composite products are not cheap, but they also have a longer service life.
Enameled
This type of overhead sink is a thing of the past. For their production, metal treated with a layer of white enamel is used. This option is considered the most impractical, since cracks appear on the surface very quickly. Enameled sinks cannot withstand food dyes, as a result of which a yellowish discoloration often appears on their surface. It is necessary to use such products when the kitchen set is made in light colors.
Installation process
In order for the sink installation process to go quickly and efficiently, you need to choose the right sealant. This will allow you to reliably and permanently protect your sink from prolonged exposure to moisture. In addition, to successfully install an overhead sink, you will need the following tools:
- electric drill;
- Screwdriver Set;
- pliers;
- silicone sealant;
- ruler;
- wood drills;
- self-tapping screws;
- masking tape;
- L-shaped fastener.
The video shows how to install a stainless steel sink on a cabinet:
Tabletop installation
For these purposes, it is important to adhere to the following action plan
- It is necessary to draw the contours of the future sink on the countertop. For this spruce, a regular pencil will do. Be sure to take care of the indentations from the front and rear edges of at least 5 cm. After this, you can take measurements where the bowl will be concentrated. Using these measurements, it is worth drawing the outline of the hole for the sink.
- the line along which the cut will take place should extend 1 cm outward from the sides of the bowl. Make a hole at one point of the contour. If the shape of the bowl is in the form of a rectangle, then the hole should be made in the corners of the designated contour.
- Attach masking tape to the outside of the outlines. Thanks to it, it is possible to protect the tabletop from damage that a jigsaw can cause to it. In the process of cutting the opening, it is necessary to screw self-tapping screws into the cut to a small depth. Thus, it is possible to protect the inside from falling. The element to be removed should also be secured from below with support.
- Treat the ends of the table top along the saw cut using silicone sealant. This way you will protect your products from moisture. Application of sealant is also possible along the drawn perimeter.
- Insert the sink and installed mixer and siphon into the prepared opening. Secure it to the tabletop using clamps. These fasteners are included in the plumbing fixture complex. All that remains for you is to connect the mixer to the water supply and drain the product through the sewer siphon.
- Prepare the place where the bowl will be installed. It is worth turning it upside down and tracing the outline with a pencil. You can cut the hole using a jigsaw.
- To prevent the embedded part from falling prematurely, it must be secured with 2-3 self-tapping screws.
- After this, try on the sink to the resulting hole. If it is placed normally, you can attach it to a set, equip it with a siphon or mixer.
- Attach the faucet to the bottom using nuts and washers. Screw flexible hoses into it.
- The siphon is assembled using union nuts. When the sink is equipped with an overflow, it is also worth connecting it to the siphon. The finished sink is installed in a prepared place, and then connected to the water supply and sewerage system. Seal all existing spaces with sealant.
- We screw in the screws 5-6 mm.
- We hang a mounting bracket on them (with the inner corner part facing the cabinet).
- We tighten the screws, but not completely, leaving room for adjustment.
- We place the sink on the stand so that the powerful main fastening screw is fixed in the very depths of the metal corner.
- We clamp the screws all the way and make sure that they are securely fixed. We fix the sink with glue.
Installation of an overhead sink is possible using glue. But this method is only suitable if the underframe almost perfectly matches the sink itself. It will be placed on top, and the ribs will “sit” on the cabinet.Advice! Do not skimp on the sealant on the entire contacting surface. It plays the role of glue and will additionally protect the joints from moisture penetrating into them.
Installation using wooden blocks
You will have to think about how to attach an overhead sink to wooden blocks if you do not have fastening corners at hand or if defects are found on the surface of the cabinet frame. So what do we need?
- bars of suitable size;
- small nails or screws.
Here's a video of attaching the sink to the countertop from below:
The process of installing an overhead sink on a cabinet
In this case, the DIY installation process is carried out as follows:
The video shows how to attach a countertop sink to a cabinet:
Overhead sinks can be produced in various sizes. All of them are standardized to the perimeter dimensions of the kitchen cabinets produced. The most popular sizes include:
Overhead sinks are a very convenient product to install and use. Thanks to the wide range, every housewife will be able to choose the best option for her kitchen set. The reasonable price allows almost anyone to purchase the product.
How to install an overhead sink.
The overhead sink got its name due to the installation method and is a product that completely covers the cabinet intended for the sink. Most often there are overhead sinks made of stainless steel, but there are also overhead sinks made of porcelain stoneware, ceramics, and artificial stone. At the same time, on three sides, in front and on the sides of the overhead sink, there are special, slightly protruding sides designed for installing a sink, and on the back side of the overhead sink, instead of a side, there is a raised edge, which is necessary to prevent water from getting behind the cabinet with the sink.
The choice of an overhead sink depends primarily on the size of the module under the sink. The overhead sink can be sold either separately or together with the cabinet. The cabinet for an overhead sink is a kitchen module without an upper partition, internal shelves and a back wall, for the possibility of connecting to communications. The front of the sink cabinet is closed with one or two facades.
One of the advantages of overhead sinks is ease of installation. At the same time, the installation of an overhead sink can be done independently, without the help of specialists.
Installation of overhead sink.
Before installing an overhead sink, you need to assemble the support cabinet under the sink and then install the sink. It is advisable to hang the doors on the cabinet after installing the sink.
Direct installation of an overhead sink can be carried out in two ways: using sealant and using self-tapping screws. Installing an overhead sink using only sealant is possible only if the sink is light. If the overhead sink is heavy, it should be secured with self-tapping screws.
installation of overhead sink
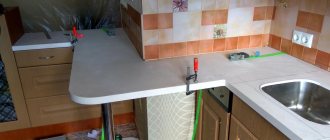
After the sink cabinet is assembled, special fasteners should be attached to the module. They may be included or must be purchased separately. The fasteners are L-shaped plates with oblique holes. You will need 4 of these fasteners.
Attach the fastener to the top edge of the cabinet from the inside and make a mark in the oblique slot with a pencil. Remove the mounting plate. Step back 5 mm above the bottom of the mark and screw in a self-tapping screw no more than 16 mm long. Install the mount onto the screwed-in self-tapping screw. Repeat the procedure with all the mounting plates, distributing them evenly across the cabinet. In this case, the height of the holes for the screws should be the same everywhere.
installation of overhead sink
Before installing an overhead sink on a cabinet, it is recommended to attach a siphon and mixer to it, as it is more convenient to do this on an uninstalled sink.
Next, you should coat the upper ends of the walls of the module under the sink with a layer of sealant, this will save the material of the cabinet from swelling and deformation caused by moisture.
Then comes the installation of an overhead sink on the cabinet. This must be done carefully so as not to touch the sealant. The screws on the fastenings are shifted until the overhead sink is completely pressed against the cabinet. When tightening the fastening plates, a small amount of sealant may be released; this should be wiped off with a dry cloth.
installing a kitchen sink
The final stage of installing an overhead sink is connecting the siphon to the drain pipe, connecting the flexible faucet connection to the water supply and installing the doors on the cabinet under the sink.
How to install and secure an overhead sink
If this is your first time encountering the question of how to attach an overhead sink, then these instructions will definitely help you. Believe me, installation of the overhead version is much easier than the mortise version. Here you don’t have to arrange a seat in the tabletop itself. All you need to do is fold the frame from the side façade panels, attach the front door, and install the selected sink directly on top. But let's look at everything step by step.
Preparation for installation
Before installing an overhead sink, you need to carefully install outlets for each siphon and mixer on it. When the structure is fixed on the cabinet, this will be much more difficult to do.
Chipboards require additional protection. If the upper ends are not treated with silicone, then a water-repellent barrier will not form and over time the frame will simply swell and deform.
The process of installing a mortise sink into a countertop can be reflected in the form of a step-by-step diagram:
Step 1:
Contouring the seat. We make a template from dense material in the shape of the purchased sink, leaving an allowance of 1-2 cm, and try it on the countertop.
Step 2:
Position selection. Using a template, we determine the exact configuration of our element on the tabletop. When choosing a position, we take into account the general organization of the space adjacent to the sink, and think about how convenient this or that position is. We outline the stencil.
Step 3:
Protecting the countertop. We will treat the space around the intended hole with masking tape to prevent scratches and other damage.
Step 4:
We are working on the landing zone. Using a drill, we make the starting points for cutting (2mm drill), connect them with a chisel and turn them into a gap. We cut along the contour with a jigsaw, keeping the cut perpendicular.
Step 5:
Installation. Apply sealant to the resulting cut and, pressing, insert the sink. Removes excess product, let the composition set for 10-12 hours, connect the water supply and sewerage.
Using mounting brackets
Installing an overhead sink requires a little less time and can be done using special metal corners. They usually come with it. In total, you will need at least 4 mounting plates, which will be fixed on the outside of the cabinet using self-tapping screws. Since the wall of the stand cabinet rarely exceeds a thickness of 18 mm, the screws in the set are 16 mm long.
The step-by-step process looks like this:
furniture corners;
The first step is to build a mounting platform in the form of a rectangular frame. It will serve as the top frame of the stand. It is he who will smooth out all the unevenness. The assembled bars are sent to the box of the overhead sink and fixed there with steel corners around the perimeter. And we place the resulting structure directly on the stand. We will secure it using the same corners, but from the inside to the walls.
Final work
Important! If, after reading the instructions, the entire procedure is already clear to you, then you can proceed with installation, otherwise we recommend watching how to attach an overhead sink in the video tutorial.
At the final stage, all that remains is to attach the siphon to the sewer pipe. And we connect flexible hoses from the mixer to a source of cold and hot water supply. Now you can safely open the shut-off valves and use the mounted device. For really lazy plumbers, there is another way out. Fasteners for an overhead sink may look like ordinary hooks for hanging it on the wall. But in this case, appropriate holes must be made on the back panel of the sink. And you can simply place the cabinet separately under the sink.
- How to attach an overhead sink How to attach an overhead sink You can attach an overhead sink without a cabinet directly to the wall. For…
- How to install an expansion tank? Installing a heating system in a house is a complex task and requires careful approach and attention. Many boiler rooms...
- How to install a sliding interior door? If you are the owner of a small apartment, then apparently you should take care of installing an interior sliding door,…
- How to install a washbasin? In order to install a washbasin, you can, of course, use the services of a locksmith. But if you don't want...
Selecting a sealant
The sealing material plays a major role in installation work. The following types of products are available on the market:
- Silicone acrylic;
- Elastic silicone;
- Polyurethane silicone.
When purchasing, you need to pay attention to the features and characteristics of the sealant: shrinkage, adhesion, purpose.
Apply the product to a dry, clean surface to ensure maximum adhesion. If the surfaces are not fully prepared for sealing, then moisture may penetrate into the cracks, which can lead to the growth of fungus and mold.
Typically, elastic silicone sealing material is used. It is easy to use and quite reliable.
Wash basin
All types of ceramics and polymer concrete are quite fragile, which, willy-nilly, has to be compensated for by the significant thickness of the bowl walls. The practical consequence is solid weight: when you turn the tap or mixer handle, the sink does not move and does not come off the edges of the cabinet. That is why the standard mount for the washbasin is often not included in the factory configuration.
However, the accidental application of significant force can still cause the washbasin to move and even fall with one edge into the cabinet. Fixation is not necessary, but desirable.
Sealant
The easiest way to prevent a sink from moving horizontally is to seal it with silicone sealant; It also seals the seam between the washbasin and the back wall.
A couple of tips regarding choosing a sealant:
- It is worth purchasing not a universal one, but a plumbing one. As a rule, this type of sealant contains antibacterial additives that prevent the development of fungus and the appearance of black spots on the seam.
- It is better not to buy the cheapest types of silicone sealants from little-known manufacturers. In our case, a high degree of adhesion to a smooth surface is important. It is adhesion that is primarily affected by price: cheap sealants adhere to difficult surfaces much worse than expensive ones.
High-quality sanitary sealant from Ceresit
Nageli
Most washbasins are equipped with mounting grooves designed for fixing to brackets. As a rule, these grooves fit exactly at the ends of the side walls of the cabinet. In order to prevent horizontal movement of the sink, it is enough to provide the cabinet with several protrusions in the appropriate places.
How can I do that?
- Wooden dowels are seated with glue in pre-marked and drilled holes. A nuance: it is better to make dowels of variable diameter, thinner at the bottom and thicker at the top. The instructions are due to the fact that the thickness of the laminated chipboard in the walls of a standard cabinet is only 16 millimeters, and a thick dowel with significant lateral force can easily be torn out along with the meat.
- Improvised dowels can be made by screwing screws into the ends of the walls (with pre-drilling, of course). Previously, two plumbing gaskets for screw mixer taps are put on each of them; If it is necessary to reduce the outer diameter, the rubber is trimmed with a sharp knife.
For such fastening, the grooves in the washbasin must be at the ends of the walls
Summing up
Advantages of installing a sink yourself:
- There are tools in almost every home; attaching an overhead sink to a cabinet can be done using almost improvised means;
- You can save on the cost of a professional plumber by doing the steps yourself;
- If the plumbing product did not come with any fasteners, then purchasing them is not a problem.
If you cannot install the plumbing yourself, it would be better to turn to professionals.