Wooden chairs often have one or the other joint unstuck, and the chair begins to sway. Without spending a lot of money, you can repair old furniture before it completely falls apart.
Unlike modern plastic ones, old wooden chairs consist of many parts connected with glue. Over time, some of the adhesive seams may come apart. The fact is that when wood dries, it shrinks. As a result, the connections become loose or even separate. In addition, the glue may dry out and no longer hold the parts.
However, this does not render the chair itself unusable. The skillful hands of a home craftsman may well save him.
The easiest way to repair chairs is when the four legs are inserted directly into the seat, which consists of one thick board. The rocking leg is pulled out, the old glue is scraped out without any residue, then fresh glue is applied to the leg and it is inserted back into the seat.
It will be more difficult to repair chairs with a drawer under the seat or chairs with crossbars inserted between the legs. There are a lot of tenon joints with glue here. Therefore, the chair should be disassembled with great care.
If only one seam has come apart, then drill a thin hole in this place from below or behind (so that it is unnoticeable) and through it use a disposable syringe to inject glue into the damaged area.
How to glue a chair leg
1.
Carefully remove the leg from the nest, being careful not to split the wood.
2.
Remove old glue and apply fresh glue.
3.
Place a weight on the seat. Remove any excess glue that appears.
Old chairs, made of solid wood at the end of the last - beginning of this century, usually have simple connections between the front legs and the seat. They are simply tenoned into the frame under the seat. A chair of this design always becomes loose easily. Even if such a defect has already been eliminated once, a new repair will be required in a few years. After all, the chair is subject to load not only from above: it is moved, tilted, rearranged, which is why simple adhesive seams are destroyed. Here the leg literally becomes a lever, which sooner or later will definitely separate the adhesive seam. To make the whole structure stable again, remove the wobbly leg from the frame and then re-glue it.
At the upper end of the leg, completely remove the old glue with a knife or chisel, being careful not to scratch the wood.
Damaged trunnion
If the trunion (the upper, sometimes tapered end of the leg that is inserted into the seat socket) is slightly damaged, make a “bandage” from a strip of paper that should not be wider than the length of the trunion. For greater stability, coat individual turns of paper with glue. Finally, glue the leg into the cleaned socket on the underside of the seat.
How to strengthen a chair
Any furniture requires repair from time to time.
For example, chairs become loose and break very quickly. How to strengthen a chair so that it can serve you for a long time? For example, you can do this. Attach a metal contour under the seat from the inside using self-tapping screws or self-tapping screws. They will not be visible from the front side, but the chair will be quite strong.
Here's another way to strengthen your stool. If the chair legs are inserted directly into the seat, you can simply glue them with a new layer of high-quality universal glue. Let it dry well and use it for a few more years.
If the legs are not inserted into the seat, but are held together by crossbars, you can carefully drill a hole in the back or bottom and pour in glue using a disposable syringe. Or just fasten it with long self-tapping screws.
If the leg has a damaged pin, or is simply loose, you need to make a kind of bandage out of strips of paper, glue it and dry it. Then glue the leg into the seat.
To strengthen a chair with bent legs, you need to lubricate all contact points with glue one at a time. Then the chair will not wobble after repair.
And now I propose to look in more detail at one of the ways to repair a chair. To do this, you need to prepare a special wood glue or universal glue. You will also need an awl, sandpaper, a knife, and matches. Let's get started.
- If necessary, you need to remove the seat from the chair. Sometimes this requires turning the leg if the connection is grooved. Disassemble the chair completely if necessary.
- Next, to strengthen the chair, you need to clean all the grooves. There could be old glue left there. Use sandpaper and a knife. Also remove any remaining old glue from all parts of the chair.
- Apply a thick layer of glue into the grooves and on the crossbars. The glue must fill all the voids; this is the only way to achieve high-quality adhesion of the parts.
- If the hole for the leg is too loose and wide, glue some wood chips or matches into it.
- Now put all the parts of the chair in place. The crossbars must be hammered in with a wooden hammer so as not to damage the surface of the chair. It is important that there are no gaps between the crossbars and legs.
- Excess glue must be removed with a knife. To strengthen the chair, you need to thoroughly dry all adhesive joints. To do this, you need to leave the stool for at least a day.
- Additionally, you can strengthen the pins in the grooves of the chair with nails.
- It is better to carry out work in a well-heated room in winter, when the wood is dried as much as possible. In summer, such work may be ineffective; the fastenings will quickly weaken.
In this way you can strengthen a chair of any design.
Similar articles are available for you:
- It's better to do the repairs yourself
- How to hammer a dowel nail
- How to straighten the threshold
- How to make a weld
How to insert a wedge
If the swinging parts cannot be separated, try to spread the chair frame as far as possible and squirt glue into the groove.
However, if it is possible to pull out the parts, be sure to use it, because in this case the connection can be given additional stability by inserting a wedge. At the end of the axle, make a slot with a saw, into which then drive a thin wedge that barely protrudes beyond the end of the axle. It is easy to make from scrap wood. It will expand the trunnion slightly, resulting in a strong connection to the walls of the hole.
Pull the parts as far as possible and inject fresh glue into the tenon socket.
A narrow wedge will widen the trunnion and the connection will be stronger.
Features of work
Scheme for repairing an old wooden chair using hot water.
If the axle is very dry, then you need to insert a wedge into it. First, the part is removed from the groove, then its upper edge is split with a saw, and a wedge is inserted into the resulting gap. It should be thin and not very long so that it protrudes just a little from the surface of the trunnion. It is best to use wood chips as a wedge. As a result, the trunnion will be expanded and the connection will become more reliable.
If the pin has dried out, but is held firmly by the glue, then getting it out of the groove can be quite difficult. In this case, you need to try to move the parts of the chair as far apart as possible and inject glue into the resulting space. However, it is recommended to remove the leg from the groove.
You may need to soften the glue to release glued parts. If you are repairing a chair with slats between the legs, even strong seams will need to be separated. It is recommended to use steam on a strong adhesive joint. Steam is effective even for properly closed adhesive joints. To create a directed flow of steam, you will need a thin rubber hose (6-7 mm in diameter), 2 pieces of metal tube of suitable diameter, a stopper and a kettle. You need to put tubes on both ends of the hose, insert one of them into the hole drilled in the cork, and the cork into the spout of the kettle. Such a simple device will allow you to direct steam to the seam.
Related article: Instructions on how to insert glass into an interior door
Before steam treatment, it is recommended to place a chair as close to the stove as possible; access to the treatment area must be provided. After cooling, the steam will turn into water, which it is advisable to remove. Do not allow it to come into contact with other wooden parts or upholstery. It is necessary to carry out steam treatment with gloves. You need to put at least one on the hand that will hold the hose. This will protect you from exposure to high temperatures. Typically, 1-2 minutes of steaming is enough to separate the wood elements. They can be re-glued only after complete drying.
Glue the drawer
This is what the connection between the drawer and the back (above) and front (below) legs of the chair looks like.
A more labor-intensive method is gluing a chair, in which the drawers located under the seat are inserted and tenoned into the legs, and to increase stability, all corner joints are secured from the inside with triangular or trapezoidal blocks made of solid wood. Here you are faced with a rather complex connection, where it is not enough to separate just one glue seam. In other words, in such a chair it is impossible to separate one part and re-glue it: the entire drawer frame must be separated, or at least one corner of the chair frame must be completely opened.
Angled connection
If you use force, you will break the thorn of the tsar, or even break it off completely. This is where hot steam comes in handy.
Make sure that the frame is subsequently glued at exactly the same angle.
Thin wedges can be inserted into the large tenons on the sides to ensure a tight connection to the chair leg.
Repair of chairs with fixed corners
Methods for repairing frequently occurring chair destruction: 1 - destruction of the leg; 2 - destruction of the king; 3 - replacement of the destroyed section of the leg; 4 — replacement of the tsar pin; 5 - elastic crack tie with tenon reinforcement with an insert; 6 - sealing a wide crack with a bet.
Repairing chairs in which the drawers at the bottom of the seat are connected to the legs with a tenon joint is quite labor-intensive. Such designs provide additional corner fastening elements - solid wood lumps. They can be in the shape of a trapezoid or triangle.
With such a connection, separating 1 adhesive seam is usually not enough. It is necessary to disassemble at least 1 corner, and in some cases, the entire frame. Do not use force to disconnect such a connection. In this case, the tsar pin can be damaged or completely broken off. You can glue the parts by steam softening the glue. When gluing back, it is very important to maintain the angle. Small wedges can be inserted into the tenons on the sides to seal the joint.
In some cases, it is necessary to strengthen the chair frame.
This may be necessary if the seat panel is not firmly and securely fastened to the frame. To strengthen such a structure, it is necessary to screw a triangular or trapezoidal chock on the inside of each corner joint. Over time, under high loads on the chair, even such strengthened joints can become loose. In this case, you will need to tighten the screws or replace them with new ones.
Related article: Kitchen stone backsplash - durability and beauty in the kitchen
Sometimes you need to replace the lumps. This is necessary if they are cracked, splintered, separated or split. The new parts must completely match the old ones in shape. In addition, it is very important to adjust the side surface of the chocks to the frame. If the new chocks do not match the old ones, then the entire frame may be warped. The chocks must first be glued inside the frame, and then additionally secured with screws.
After gluing the frame, it must be secured with clamps. It is not recommended to create very high pressure, so as not to squeeze out too much glue from the seams. Tensioning will take about 12 hours. It is very important to maintain the correct angle for the chair and prevent it from distorting. The tension pressure should be uniform.
Thus, repairing chairs with your own hands can be done even by an inexperienced craftsman, who will adhere to accuracy and precision in his work. Do not apply too much force to the frame of the chair, as this may damage its parts. Some adhesive joints may require steaming to release.
Strengthening the corner joints of the chair frame
On some upholstered chairs, the seat panels are not tightly connected to the frame, and as a result, it loses the necessary stability. This defect can be eliminated if triangular or trapezoidal solid wood chocks are tightly screwed to the frames that form the internal corners of the frame. This will strengthen the frame, it will remain stable even if the chair, for example, tips over or begins to be moved.
If the chair is used frequently and is heavily loaded, the reinforcements may also become loose. In this case, replace the old screws with new ones: they should be slightly thicker than before.
Drill holes in the corner chocks and frames so that the heads of the screws sink into them.
For corner chocks, choose screws of such length that they, without going through the frame, provide sufficient strength to the joint.
State of the chocks
It is better to cut a new log from well-dried hardwood.
A careful inspection of the old chocks will help you determine whether they need to be replaced or whether it is enough to scrape off the old glue and apply fresh glue, and then screw in new screws. Be sure to replace cracked or split logs with new ones, which must be cut out of hard wood exactly according to the shape of the old ones, then glued into the drawer frame and screwed with screws. You should ensure that the side surfaces of the cuts of the chocks fit exactly to the frame of the chair. Even a tiny discrepancy can lead to skew of the entire frame.
Tension
Adhesive joints must be secured with clamps, clamps or cords until the glue has completely dried.
The glue must dry under pressure. Therefore, it is recommended to tighten the newly glued frame using clamps, clamp vices or cords and keep it that way for about 12 hours. At the same time, you should not create too much pressure, otherwise a lot of glue will leak out of the grooves. After some time, loosen the tension a little.
Make sure that when tensioning, the chair frame is at the correct angle and is not distorted. This requirement is easy to fulfill when repairing ordinary chairs. The situation is more complicated, for example, with English chairs or rocking chairs. However, at least the front of the chair can be controlled using a plumb line. Please also ensure that the newly glued parts are connected without excessive tension and with uniform pressure, as well as that the angles correspond exactly to each other. Otherwise, the chair may warp under load, and then the seams will come apart.
Chairs made of wood dry out over time and begin to wobble. It becomes impossible to sit on such a chair. Don't rush to part with these interior items. Perhaps you have a reason not only to repair the chairs, but also to turn them into the highlight of the interior.
- How to repair dry wooden chairs
- How to renovate old furniture
- How to restore upholstered chairs
How to repair a chair leg
You have a broken chair leg and the question arises what can be done. A good chair made of solid wood is not cheap, and besides, dining chairs usually come as a set, a set of several items. Having a set of the most common electrical tools for woodworking, it is not so difficult to make high-quality furniture repairs at home.
As a matter of fact, such repairs can be done using hand tools, a hacksaw, a plane and chisels. But it is better to use a hand router and a circular saw. You will also need wood glue, hardwood slats, paint and clamps. We carry out all repairs ourselves, step by step.
The chair is almost intact, with a good varnish coating and not loose. The only but serious problem is a broken leg. There are such cases, it’s just that a texture node was hit unsuccessfully and the strength was broken, an awkward movement and this is the result. This chair costs a decent amount, so it makes sense to do the repairs yourself.
The leg broke exactly according to the texture and it is enough to simply align the parts along the break. Apply wood glue to the ends, connect the fragments and compress well using clamps.
If the ends are aligned strictly in place along the fracture, then, in principle, the gluing is quite high-quality. But the problem remains, if the texture in this place is weak, then who can guarantee that the leg will not break again next to the gluing.
Using a hand router, we make a groove on the edge of the part, 10-13 mm deep. , 10 mm wide. , length 100-150-200 mm. . We measure the width of the groove with a caliper and cut the die of the required thickness on a circular saw. The flat tenon should fit snugly into the groove on the leg, but not too tightly. Otherwise, you will hammer and break all the furniture.
The depth of the tenon is taken with a reserve, the excess is cut off after gluing. If the leg is straight where it breaks, then cut the bar to length and begin gluing. If the leg in this place follows an arc, then it is necessary to mark and trim the lower edge of the die so that when compressed, the lower edge of the tenon fits tightly to the bottom of the groove.
In addition, we round the ends of the tenon along the arc that the cutter leaves when cutting out the groove along the edges. Be sure to apply glue inside the groove and on the surface of the tenon. We press the die into the groove and compress it with clamps. It will be better if the excess glue is squeezed out, so it will fill all the gaps and inconsistencies. Remove excess rhinestone glue with a dry cloth.
After the glue has set, remove the clamps, cut off the excess tenon with a chisel and carefully sand the seal. Please note that for reliability it is better to glue two spikes on opposite sides of the leg. Another related article is how to repair a chair.
Using acrylic paints or varnishes, select the desired shade and tint the glued insert part.
It can be difficult to compress the fragments when gluing for the first time, you start to get nervous and nothing happens. Therefore, take your time, first assemble the leg without glue, prepare clamps to size and pads to protect the material during compression. And only when everything is set up, apply glue and compress the part. Work quickly, but calmly, without jerking, and quality repairs are guaranteed.
First stage of work
Carefully inspect the wooden chair from all sides. To fix it, you will need to disassemble the piece of furniture into its components. Remember its design. It is best for a novice craftsman to photograph the chair from all sides, so that later he can know exactly where and what part is attached.
Turn the chair over and look at the fastening of the soft or hard seat. It can be secured with bolts, or it can simply be inserted into the grooves. Pull it out and set it aside.
Separate the legs and remaining crossbars of the chair from each other. If there are screws anywhere, remove them. Disassemble the remaining connections using a hammer and a wooden block. Apply all blows to the chair only through a block so that you do not form dents or chips on the wooden surface.
Clean all grooves from any glue residue. Use a screwdriver, an awl and sandpaper. Examine the wooden spikes. If any of them are damaged, remove them with pliers. Lubricate the recess with PVA wood glue and insert a new one. Clean the remaining spikes with sandpaper.
To repair chairs, use PVA carpentry or furniture glue. They contain special additives that, after the glue dries, maintain the elasticity of the connection. When using the chair, the wood will not be destroyed.
Master class on restoring a chair with your own hands (step-by-step instructions with photos)
Are the tools ready? Chair and are you ready? Forward!
1) Let's see how the chair was fastened together. First of all, you need to disassemble everything that “moves”:
- Where there are screws, carefully remove them,
- We carefully remove the wooden dowels on the legs with a drill (we just drill them out),
- Very carefully pull out the nails (if the chair was knocked together).
2) We number all the details that exist. Necessarily. The numbering goes from the legs up. Accordingly, you should have at least 10 parts, depending on how the chair was made:
- legs,
- Crossbars for legs,
- Seat,
- Two slats for the back,
- The back itself.
We carefully inspect all parts for cracks (you can’t see everything at once, don’t worry). If you doubt your memory, take a regular photo when restoring furniture. It helps, honestly.
3) Glue all the cracked parts together. Excess glue will be removed after sanding.
To ensure that the parts stick together well and are guaranteed to last longer, we compress them with clamps
4) We pay special attention to the repair of the chair seat:
- We simply trace the old plywood seat onto a new sheet of plywood, carefully cut it out with a jigsaw,
- Glue the foam rubber (also cut to the shape of the seat) onto the new plywood seat as carefully as possible.
- Be sure to secure the foam rubber along the edges with a furniture stapler and leave it to dry for a day.
If you want to make the seat softer, then you attach each new layer of foam rubber along the edges, without gluing it.
We throw out the old seat.
4) After gluing the parts, carefully sand them with a grinding machine and sandpaper (round and small parts cannot be passed through with a grinding machine). Remove any remaining fine dust with a slightly damp cloth. We inspect everything again for cracks. Here is a video on restoring an old chair from one home craftsman, you might be interested:
5) Finishing the seat. Restoring an old chair is no less important than the repair process. We staple the tapestry on the widest part of the seat, pull it forward very tightly, and fold the edges under the seat. There should be at least 5 cm of fabric along each edge. We fasten the fabric with a furniture stapler at a distance of 1-2 cm. We repeat the procedure on all sides of the seat.
The result is a kind of drum, inside of which there is not emptiness, but foam rubber.
Continuation of the video from a home craftsman, do-it-yourself seat restoration:
6) We cover all the parts with stain, and after a day we paint them with 3-4 layers of varnish so that the chair does not become covered with cracks the first time a guest sits on it.
7) Assembling the chair. When gluing the parts, we do not spare the glue; we very carefully wipe off the excess and remove it with a slightly damp cloth.
We reinforce the connecting parts of the seat and legs, crossbars and backrest with metal corners mounted on screws!
Nails do not have the desired “longevity” effect.
 We cover it again with a layer of varnish to hide the unevenness and that’s it - your chair is restored and ready for use again!
End of the video on chair restoration from a home craftsman:
As you can see, everything is very simple. The main thing is not to rush, to approach all stages of restoration carefully, and not to miss the details. And then everything will work out, the restored chair will be better and more beautiful than the new one!
Chair assembly
Lay newspapers or plastic wrap on the floor. Thickly coat the grooves and tenons with PVA glue and assemble the chair structure. Press each joint firmly so that the adhesive comes to the surface. First remove the excess with a knife blade, and then immediately wipe with a damp cloth.
If the groove has become loose and has become too large for the tenon being inserted into it, drive another wooden splinter, toothpick or wooden skewer into it, coating them with glue.
Secure the assembled frame of your wooden rarity tightly with a rope and leave to dry for a day or two, depending on the ambient temperature.
Seat update
While the wood frame is drying, work on the seat. Remove the upholstery from the upholstered seat. Look at the condition of the foam. Remove it if necessary. Cut out a new piece of foam and secure it to the seat using double-sided tape.
Place the old upholstery on newspaper and trace it with a pen. Cut out the pattern and transfer it to the new material. If the fabric is thin, make a backing for the foam from another dense material. Assemble the seat. Cover it with new fabric, securing it on the reverse side with staples from a furniture stapler.
Renew a dried out wooden chair frame. Remove the old varnish coating from it using a sander and sandpaper. Fill any old chips with wood putty. Prime the surface, and after drying, apply several layers of varnish with intermediate drying. Place the seat back into place.
Repair of minor damage
Small defects do not require complete disassembly of the product. To renew your paintwork or repair minor cracks and chips, you need to follow a few simple steps.
If the product is still strong and does not wobble, then it is enough to renew the surface. For this:
- the upholstery is removed;
- the old layer of varnish or paint is removed;
- the surface is sanded and primed;
- a new layer of paint or varnish is applied;
- The upholstery is installed after drying.
Minor defects include cracks, chips or holes made by insects:
- If the width of the cracks is less than 0.5 mm, clean them from dust, fill them with glue and wrap them with paper tape.
- If the cracks are larger than 0.5 mm, they are filled with glue and secured with a clamp or clamp.
- Chips and holes are sealed with a mixture of glue and sawdust.
How to repair a broken leg
Repairing broken legs is a common furniture problem. If the element breaks exactly according to the texture, and when combined, all the parts fit perfectly, then it is necessary to apply wood glue to the ends and compress it well using clamps.
How to fix the leg of a wooden chair if it was originally attached with glue, but is now loose? To do this you need:
- remove the leg from the hole;
- remove remnants of old glue;
- apply a new layer of glue to the base of the leg;
- install the part into the hole;
- secure with a weight, placing it on the seat. Excess glue is removed.
It is recommended to use PVA-based glue for repairing the legs of wooden chairs. It must be water- and light-resistant, and also have high adhesive strength.
Reunion of a “clean” fracture with a hidden key
Drilling holes for the key
Place the furniture (in this example, a chair with a broken leg) at a comfortable height, with the broken end facing up. Attach it to a workbench or sawhorse if it is unstable, and clamp the broken part in a vise, also with the broken end facing up. If the fracture is “clean”, it will be enough to drill the holes exactly in the centers using a drill, using a keyed clamping device, as shown in the picture. If the shape of the break (fracture) or the furniture itself prevents the use of a keyed jig, you will have to locate these centers visually. Using a small drill, drill a pilot hole in each piece; then drill the final holes with a drill bit exactly the same size as the key that will fit into the hole. Clean the holes from any fragments formed during drilling with a vacuum cleaner, or turn these elements upside down and knock out the fragments.
How to make a key peg
Insert a small key into each key hole and mark their depth (see figure on the left). Cut the correct diameter key for a tight fit with a length slightly less than the total depth of the holes. Slightly bevel the ends of the dowel with a file or sandpaper and make grooves on its sides for channels through which the glue will spread.
Connecting elements
Place glue in one hole and on one end of the dowel; Drive the key into the hole with a hammer until the very end (see picture on the right). Then place the other broken piece onto the exposed dowel without glue to check that the broken ends are aligned exactly. If not, work one side of the key with a file or edger to align the pieces. Once they're aligned, put glue on the other end of the dowel, in the other hole, and on the broken ends, then nail the pieces together firmly. Wipe off excess glue.
Fastening with a clamp
Install a girdle clamp from one end of the broken part to the other, perpendicular to the break as far as possible (picture on the left). If the clamp cannot be installed strictly perpendicular, and it pulls the elements out of the frame, install a second identical clamp at a right angle to the first, connecting the new clip to any part of the furniture opposite it to pull the elements back into the frame (picture on the right) .
Repair of rickety furniture
If the chair begins to wobble a lot, the problem may be under the seat frame or in the leg area. Let's look at detailed instructions on how to fix a loose wooden chair with your own hands:
- We change the upholstery. We remove the old layer and change the foam.
- We inspect the surface for minor damage and repair it.
- We lay the new upholstery on the seat and nail it to the wood with nails or a construction stapler.
- If the legs become loose, renew the glue in the holes.
- If one seam of wooden furniture with a drawer has come apart, you need to make a hole at the bottom or back and pour glue into the damaged area.
- If the trunnion is damaged, it can be repaired using pegs or a bandage made from strips of paper.
Basic repair rules
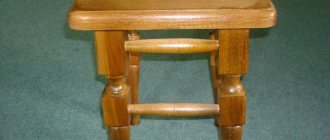
The easiest design to repair includes 4 legs, which are inserted into grooves in the lower surface of the seat, which is one solid board of sufficient thickness. Stools are made using the same principle. In this case, it is enough to remove the loose leg and clean out the glue from the recess so that the surface becomes clean. After this, you need to apply a portion of new glue to the leg and insert it back into the groove.
Design of a simple wooden chair.
A more complex design is represented by chairs with crossbars between the legs or a drawer under the seat. This design contains a large number of tenon joints, which are fixed with glue. In order not to damage the parts of the chair, you need to disassemble it very carefully. If the glue seam diverges only in one place, then it is not necessary to completely disassemble the chair. You can make a hole in the damaged area using a thin drill from the inside (to maintain an aesthetic appearance) and pour glue into it. It is possible to use a syringe to inject glue.
Related article: How to make a time relay: the two best ways
If the trunnion (the tenon on the top of the joint leg) is damaged, you can use a piece of paper to seal it. In this case, the strip of paper must be folded several times so that it is no wider than the pin. This will seal the connection. It is better to coat the paper with glue so that the connection with its use is stronger. After making such a unique bandage, you need to glue the leg into the socket in the seat.
Repairing a chair with curved legs must be done especially carefully. It is recommended to glue the legs one by one. If you try to glue all the legs at once, it will be quite difficult to get the chair in the correct position.
What to do if a squeak appears?
Loose and creaking furniture can last for a long time if the cause of the problems is removed. To do this, you need to carry out a small repair of a wooden chair with a backrest, which does not require special equipment.
First you need to determine where the squeak appears. This may be play in the slats or crossbars at the attachment points. To eliminate the defect, it is necessary to replace loose nails or introduce glue into the gap.
If the squeak remains, you will need to disassemble the product and remove the loose fasteners. All grooves and tenons need to be treated with glue, then assembled and allowed to dry completely.
The chair is wobbly (do-it-yourself chair repair)
The chair is wobbly (do-it-yourself chair repair)
Post by gjeglov » 04 Apr 2021, 11:23
I bought 2 chairs for the kitchen that seemed to us to be of good quality. Time passed and one of the chairs began to wobble, it looked like someone liked to swing on its back legs, now the chair wobbles even with a light touch. I watched a bunch of videos regarding repairs, a lot of “slag” ranging from “-glue it with epoxy” to “-put it on a self-tapping screw.” I’ve already had this experience; after self-tapping screws, even if you disguise them, the chair in the future becomes, in most cases, unrepairable, and with epoxy, repeated repairs become much more difficult.
Has anyone had personal experience in repairing chairs? Please share.
The chair is wobbly (do-it-yourself chair repair)
Message by Happy1 » 04 Apr 2021, 11:56
The chair is wobbly (do-it-yourself chair repair)
Posted by onozdrachoff » 04 Apr 2021, 13:31
The chair is wobbly (do-it-yourself chair repair)
Post by Serj » 04 Apr 2021, 14:15
The chair is wobbly (do-it-yourself chair repair)
Post by veles » 08 Apr 2021, 06:58
The chair is wobbly (do-it-yourself chair repair)
Post by Serj » 08 Apr 2021, 22:21
The chair is wobbly (do-it-yourself chair repair)
Post by NataliaJ » 09 Apr 2021, 17:59
How to repair a wooden chair with your own hands?
How to repair a cracked Viennese wooden chair with a backrest with your own hands? To do this, it is necessary to inspect and identify all defects. After determining the number of problems, you should perform:
- complete or partial disassembly of furniture;
- restoration of the frame and connecting elements;
- seat repair;
- sanding and painting the product;
- product assembly.
If wooden chairs have dried out, this is not a reason to throw them into a landfill. You can solve any problem yourself. You can repair cracked chairs with your own hands (videos can be found on the Internet, where they tell in detail and show how to repair loose chairs, as well as fix other problems in furniture). And if you don’t have the patience and time, you can always turn to the services of a master.
Benefits of DIY restoration
The advantages of restoring chairs with your own hands at home are as follows:
- Saving. First of all, there is no need to make new purchases. New furniture is expensive, even for a small set you will have to pay a large amount. Secondly, if you turn to specialists, they will charge a high price for their work. It’s cheaper to spend a little time, put in a minimum of effort and update an old chair yourself.
- Possibility of adapting products to the interior. In most cases, furniture produced in the last century does not correspond to the design of modern products and interior decoration. By selecting the necessary materials for remodeling, you can organically fit the updated products into any interior.
- Preserving the memory of deceased relatives who owned interior elements during their lifetime. This approach is the most optimal, since chairs can be easily repaired, repainted and upholstered to suit a new interior.
- Changes in design and design. You can update stools with your own hands by adding colored or transparent inserts, carved and even forged elements. The transformed furniture will look unusual and original, arousing general interest.