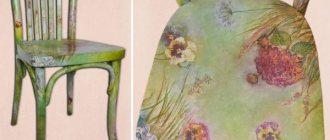
Wooden chairs fit perfectly into the interior of a study, a relaxation area near the fireplace, or a reading corner. Wherever you place this piece of furniture, it will create a zone of comfort and coziness.
Natural materials used in its production bring freshness to indoor spaces and make outdoor recreation areas, gazebos, and verandas more comfortable.
You can make a decent wooden chair for your home or cottage with your own hands, with minimal woodworking skills. You just need to use the most common tool, which almost every home craftsman has, and follow the tips given below.
What kind of chairs can you make with your own hands?
Before you start working, you need to clearly understand what types of wooden chairs can really be made at home:
- soft. Convenient option for home. For manufacturing, you will need to assemble a frame on which the soft upholstery will be attached;
- sliding An excellent option for saving space in the house. Their design is somewhat more complex than that of an ordinary wooden chair;
- folding. Just right for going out into nature. The complexity of manufacturing is compensated by its functionality;
- Kentucky. A simple construction of materials will require only bars. Wire or pins act as fasteners;
- on wheels - an option convenient for the elderly and disabled. The most critical stage in manufacturing will be the correct installation of the wheels, because such a chair should move effortlessly.
You can slightly modify an ordinary chair by attaching a high back to it. Both hard and soft models are made, it all depends on the imagination and skills of the master.
Sometimes you want to make a rocking chair with your own hands. The main difficulty here is preparing the arched base. But this problem can also be solved.
Main material
The reliability of the future chair, its stability, and ability to cope with loads and various climatic conditions will depend on the choice of wood and the method of final processing. You can use an old chair or armchair as a base, having previously disassembled it into its components, or, conversely, modify existing furniture.
A material such as chipboard, which is used to make furniture, is not suitable for chairs, especially garden chairs. The reason for this is limited moisture resistance. In addition, chipboard is significantly inferior in strength to laminated and solid wood.
Natural wood is an absolutely harmless, environmentally friendly material, although not the cheapest. Wood is best suited for making a chair with your own hands. Before starting work, the bars and boards must be inspected for cracks, knots and other defects. Next, the material is sanded, a protective coating is applied, and after that, assembly can begin.
Note! Among all types of wood, preference should be given to alder, ash, birch or oak.
The reason is simple - the unusual pattern of the fibers is combined with the durability and wear resistance of products made from them. It should be added that chairs made of such wood, when properly processed, do not crack over time and do not creak.
Wood is popular in furniture production not only because of its beauty and naturalness. It easily tolerates loads and shocks and is practically resistant to plastic deformation. The only disadvantages are flammability and deformation under the influence of moisture. The last problem is again solved by competent final processing.
Manufacturing stages based on the model
The creation of a chair must be approached responsibly and thoughtfully, taking into account the slightest nuances. Then the result will surpass the factory options, since the quality will be incomparably higher, and the product itself will last a very long time. The manufacturing process differs depending on the selected model.
Traditional
A classic upholstered chair that combines robust construction with high comfort, suitable for any home. Unlike sofas, it can be made faster and easier, but only with the right approach. Work should be carried out in a separate area where there is no expensive flooring or foreign objects. In addition, you need to take into account the formation of debris during wood processing and the need for further cleaning.
Types and models of Ikea children's chairs, the best designs and colors
When the place is prepared and safety precautions are observed, you can begin the procedure for creating a chair with your own hands:
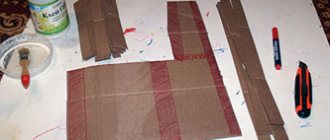
- Using pre-prepared cardboard templates, future frame elements are placed.
- A jigsaw (grinder) is used to cut the component elements along the marking lines.
- Processing is carried out with a grinder to smooth out unevenness and roughness.
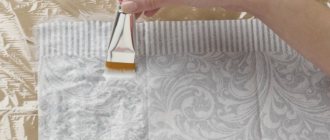
- The future upholstery pattern is marked on the fabric, cut out with allowances of 1 cm, and stitching is done.
- Furniture foam rubber is divided into pieces of the required size, and the canvas is stuffed.
- The soft elements of the armrests are wrapped in foam rubber, the material is secured using a stapler. If there are decorative wooden armrests, they are attached to the top with self-tapping screws.
In order for the chair to serve for a long time even in a room with a high level of humidity, the frame must be treated with bioprotective compounds. They will prevent deformation of the material, eliminate the occurrence of fungus and the appearance of insect pests.
The finished chair can be decorated according to personal preferences if desired. For example, cover medium-sized buttons with fabric and place them on the back and seat in a checkerboard pattern. This is a standard technique, which will nevertheless give the furniture a more comfortable look.
Simple chair for the garden
Having decided to make a chair for the dacha with your own hands from wood, having selected the drawings, you should not immediately take on complex projects. The first pancake is often lumpy, and to get the hang of it, you can try to implement the simplest options.
The simplest chair for a summer house consists of curved sides, bases, drawers and slats for the seat. Moreover, the only difficulty lies in cutting out the sidewalls. For production, plywood and wooden planks are used.
The sequence of actions is as follows:
- The sidewalls are cut out with a jigsaw from 30 mm thick euro plywood. Next, the parts are chamfered with an ordinary grinder or a manual milling cutter, after which the future spars are processed with emery cloth;
- the drawers (crossbars holding the sides together) are cut from the same plywood. The result should be 3 parts with dimensions 1200 x 100 mm. Sandpaper comes into play again;
- for a seat that smoothly flows into the back, you need to cut 35 identical strips 1200 mm long. The material will be timber with a section of 50 x 25 mm. The parts are chamfered and the surface is sanded with sandpaper;
- Next, you need to tie the sidewalls together with drawstrings. To do this, points are marked on one of them in three places, which are transferred to the second sidewall. Using an 8 mm drill, drill through holes at the designated points. Using a 5 mm drill, counter holes are drilled at the ends of all frames. Confirmats are used to connect elements;
- It's time to attach the bars that will form the seat. To do this, drill 2 holes on each side of all the blocks, and use self-tapping screws for fastening. To recess the fastener heads into the wood, the holes are pre-countersinked;
- All that remains is to treat the surface of the chair. To remove all cracks and dents, the wood is sanded. Next, the surfaces are treated with fine sandpaper, after which the wood is coated with a primer. The final stage is 3 thin layers of varnish.
Such a homemade chair for a summer house does not require much effort or complex measurements and calculations to make. However, the end result will be a truly chic piece of garden furniture. Experienced craftsmen can try making a more complex garden chair from bent plywood. This is where both experience working with wood and a truly creative approach to the process will come in handy.
How to make a designer wooden chair for a summer house with your own hands (31 photos)
Make yourself comfortable. On a cult chair. And contemplate the beauty of nature. The Adirondack chair is a symbol of luxurious and comfortable country life. You don't even have to buy it - now you can make this wooden chair for your garden and home with your own hands! Furniture as a cult: the legendary Adirondack chair
Sitting on the Adirondack chair, American fishermen slowly fish from the Hudson River, sitting on it, drinking cool cocktails in Haiti, businessmen tired of the hustle and bustle, reclining in this chair, enjoying the sunset on the Cote d'Azur, aristocrats - Europeans.
And so it has been for more than 110 years. Today, this comfortable chair is used all over the world, but only those who know its history stroke the wood of its wide armrests with special trepidation and admire its thoughtful design. One day back in 1903, a certain Thomas Lee went on vacation to a beautiful place in the Adirondack Mountains in New York State. While enjoying life in a summer house surrounded by nature, he one day realized that what he needed was a comfortable chair. So that you can take it to the river or just sit near the house. So that there is somewhere to put a cup of coffee or a glass, so that you can sit in it with a pillow more comfortably and for a long time. And he made himself such a chair... from 11 rough boards found in the barn. When his friend, a local carpenter, saw this simple furniture, he appreciated it. And even in 1905, he quietly received a patent and put the chair into production, and for the next 20 years he sold comfortable dark brown and green chairs throughout the country. Gradually, the Adirondack began to be copied all over the world. Jokes aside, interior designers today continue to admire this chair. Reinterpreted designer models of the same “Adirondack” from Gino Levi-Montalcini, Gerrit Rietveld and many other designers are known. Today we will try to make an Adirondack chair with our own hands! To make a designer chair for a summer house, you will need Prepare materials and tools:
- boards 6 meters: thickness 25 mm, width 14 or 15 cm - 2-3 pcs.;
- wood screws 40 mm - packaging;
- wood screws 70 mm (for perpendicular connection of boards) - packaging; drill;
- drill ∅ 3 mm;
- screwdriver;
- carpentry clamps (preferably);
- square;
- roulette;
- meter ruler.
It’s great if you have a jigsaw, a circular saw and an electric plane at home, but if you rarely do carpentry work, just order a cut from a workshop (often such workshops operate at construction supermarkets). As for the boards, everything is very conditional: you can make everything from the same ones, or you can take a board 1.5-2 cm thick for the back and seat, but for the legs and lower crossbars you can take boards up to 7 cm thick. You can generally take boards from old pallets. When cutting, sometimes you have to cut out a lot of knots - in this case, you will need a little more wood. In a word, just show the drawing below in the workshop and tell us about your wishes for the final look. And of course, if the boards are not planed, ask for them to be planed and chamfered: you should take home smooth, beautiful details. Wooden chair: cutting and installation
There are now many variations on the theme of the Adirondack chair.
We chose the simplest basic model. In the drawing, the lower supporting beams are made with a bend, but for simplicity you can cut them out as solid parts. Let's start assembling. To prevent the boards from cracking, before screwing in the screws, you need to drill holes for them with a drill: a 3 mm drill. We screw in the screws, you can also coat them with universal sealant glue - very convenient. At the assembly stage, it is better to use clamps or call someone to help you. In order not to confuse you with long descriptions of which part to screw to which, here is a video: Making an Adirondack chair This shows in detail the installation of a slightly more complex model with a curved seat and a rounded back, but the assembly principle is the same. Play the video several times and repeat the sequence. All that remains is to properly sand the wood and paint it. Furniture for the garden and home: 3 tips from Belinka
Armchairs, as well as other furniture that can be used both indoors and outdoors, are very comfortable.
To make it last as long as possible, follow 3 rules: If the furniture will be used near water or in a humid climate (for example, you have a summer house by the sea), choose fine-pored wood: larch, oak, as well as the resistant core areas of coniferous wood are suitable. In drier climates, you can use other types of wood, or even use beech and hornbeam for shipping pallets and crates. If you want to either display the tree outside or sit in it in the house, it would be ideal to cover it with Belinka Tophybrid glaze for external and internal work; Toplasur is also quite suitable. If you want to completely paint over the wood structure and give it a bright color, use Email Universal paint. Remember that if the tree is exposed to moisture (street, damp room), it must be covered with antiseptic primer. If the furniture is always in the living room, nursery or bedroom, primer is not needed. Ready!
That's it: place a couple of small pillows on the chair, pour lemonade into a glass and enjoy nature in comfort!
Classic Adirondack chair
General drawing of the project
The detailing of the American garden chair includes 33 elements.
Most of the parts have a simple rectangular shape. Making this garden chair with your own hands will not be difficult even for a novice craftsman, having at his disposal the presented drawings. Drawings of figured parts: List of parts and dimensions of blanks Step-by-step guide on how to make a garden chair Cutting out parts.
Start by creating rectangular elements by cutting the boards to the dimensions shown in the table with a jigsaw or band saw.
Using a 1:1 drawing, transfer the contours of the shaped parts onto the wooden blanks, check them with the dimensions in the diagram, and only then cut them out with a jigsaw or band saw. Pay special attention to the quality of the bevels made in parts No. 1 and No. 3; These are best made using a plunge-cut saw. Grinding.
The cut edges on all parts are ground and rounded manually or mechanically.
For convenience, paired elements are connected together during grinding. The surfaces of the parts are treated in the same way. The last pass is made with P 180 abrasive. To avoid wasting extra time and effort on sanding, apply the markings to masking tape glued to the parts. Assembly.
Start by creating the base by connecting the side piece (#1) to the front (#2) and back (#3) legs.
Next, proceed to install cross members No. 6, No. 4, No. 5 and top cross member No. 7. Screw all the back slats (No. 8) in sequence, observing the intervals indicated in the diagram. Next, screw all the seat rails (No. 9) at intervals of 8 mm. Mark the location of the supports (No. 11) and secure them. Install the armrests (No. 10) and secure them with self-tapping screws. Rounding of the back slats.
The rounded upper part of the back is a characteristic feature of all modifications of the Adirondack.
To create an accurate and symmetrical rounding of all slats, use the following tip. Secure the rope strictly in the center of the outer seat rail, fixing a pencil at its end (as shown in the photo). Having chosen the optimal radius, draw a semicircular marking on the slats. Cut them with a jigsaw and sand the cut edges. Do-it-yourself Adirondack garden chair or Second life of foundation formwork Several photo ideas for furniture design in the Adirondack style
Material taken: Here
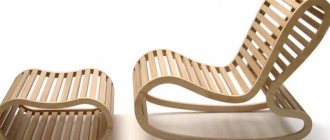
Features of a shell-type chair
When making a shell, you will need skill in using a jigsaw, the ability to transfer the dimensions of parts from drawings to the material, and experience in deforming plywood in order to bend it in the correct shapes and directions.
Note! When cutting out parts, it is important to achieve smooth movements of the jigsaw, which is quite difficult for an untrained person.
When making a shell chair without experience working with bent plywood, you can use pieces of scrap wood to train your hand for practice. To fasten the parts of such a chair, wood glue is mainly used, and clamps are used for fixation. You can use self-tapping screws as fasteners, but in this case you will have to drown their heads in the wood fibers.
Once the bent plywood shell chair is fully assembled, all bumps and chips are sanded, after which the surface is cleaned of dirt and dust. To give the product an aesthetic appearance, it is coated with several layers of varnish.
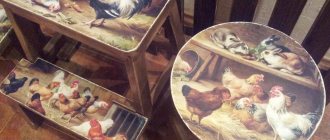
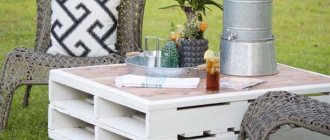
Application of pallets
To make some chairs, there is no need to look for drawings or practice wood processing. It is enough to take wooden products as a basis, which almost no one pays attention to. One of them is a pallet, or pallet, a rigid wooden container for transporting goods. A chair made from pallets will really look unusual and creative. Another advantage of using this product is the high quality and strength of the wood from which it is made.
The pallets are dismantled and all the nails are taken out. The elements of the future chair must be sanded, and then the tray must be assembled in the reverse order.
The seat of the chair is formed by stacking pallets on top of each other to the desired height (usually 2 pieces are enough). The backrest also serves as a pallet, fixed perpendicular to the seat. By sawing the pallet crosswise into 2 parts, you can use it as armrests.
Before assembly, the parts are varnished in several layers. To ensure that the back and seat are not hard and look really chic, foam pillows in some unusual covers are placed on them.
Solid wood chair
Making any furniture from solid wood at home will require a lot of time and effort from the craftsman, as well as the availability of special tools and equipment. In fact, the array can be used by beginners in their work, but the same chairs without the use of finishing techniques will look, to put it mildly, boring. But if you decorate the products with various cuts and use wood carving skills, you can achieve a good look.
To fasten parts made from solid wood, one of two main methods is used.
Bonding - gluing elements together with edges pre-processed on a jointer. This option is the simplest. To connect two parts, you need to form a ridge on one of them, and a groove on the other. As an option, two grooves are made into which the strip is inserted. The second method is docking. Wood glue and wooden dowels are used.
Tools and materials
The tools you will need to prepare are:
circular saw;- plane;
- milling cutter;
- wood hacksaw;
- screwdriver;
- drill;
- sander;
- clamps;
- tape measure and pencil.
Materials needed:
- 30 pieces of hardwood veneer measuring 2.4 by 6 cm;
- screws;
- sandpaper;
- glue;
- furniture varnish;
- drying oil;
- scotch.