After purchasing household appliances, many boxes of durable cardboard remain, which can be used as materials to create original furniture for the interior.
In addition, this is a great way to develop creativity and have fun with the whole family. In this article we will talk about making a cardboard cabinet with your own hands.
Tools and materials
Cardboard, despite the strength of the material, is not as stable and rigid as, for example, chipboard or wood, so the design has its own characteristics of assembly and connection of parts.
When creating a cabinet from cardboard, metal fittings are not used, since fastening to the material with screws or confirmants is simply impossible.
Reference .
It is quite difficult to make hinged or sliding doors that would cover the shelves for a cabinet made of cardboard. For production you will need:
ruler;- stationery knife;
- scissors;
- grinding bar;
- scotch;
- glue for cardboard;
- glue gun (preferably);
- pencil or marker for marking;
- brushes (art and for glue);
- twine or fishing line.
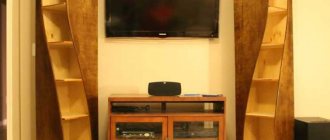
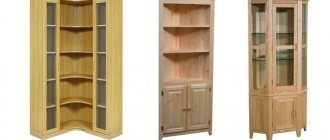
The design, the assembly instructions for which are discussed in this article, is a shelving unit with open shelves and several drawers. This wardrobe is perfect for a children's room or bedroom in the Provence style, for a country house. If the presence of a large number of open shelves is undesirable, the lower level can be closed with small curtains made of fabric to match the color of the body or with an extraordinary pattern.
The material used is:
- corrugated cardboard (three, four or five layers);
- paper for pasting;
- decorative elements (paper, fabric, buttons, ribbons, paints and much more).
DIY making
In order to cut parts and gluing and assembling elements, you will need a fairly large free area.
The approximate dimensions of the cabinet (they depend on the size of the cardboard boxes) are 900 mm * 450 mm * 1500 mm (width, depth, height).
It is better to use a solid base for the cabinet . If you have a large refrigerator box at hand, you can use it as a frame into which individual elements will be inserted. Otherwise, each part of the cabinet will be connected to the other using glue.
To ensure the stability of the structure, as well as to make the cabinet walls more dense and reminiscent of standard furniture, it is better to glue two sheets of cardboard together.
Cutting parts from cardboard boxes
Use a utility knife to cut parts for the rack. The cabinet is roughly divided into three compartments: upper open shelves, a middle part with drawers and lower open shelves. The product has a symmetrical structure, so the upper and lower parts are allocated an equal number of centimeters in height - 650 mm, and 200 mm are allocated to the middle part.
Important . The thickness of the walls and partitions should also be taken into account when marking the rack. In these instructions, the dimensions are given taking into account these values, but the net size of the shelf depends on the thickness of the cardboard, which ranges from 5 to 10 mm!
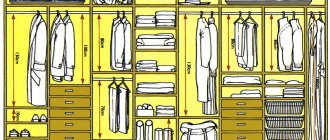
To assemble the cabinet you will need the following parts:
- double body of the product;
- four horizontal internal shelves;
- three vertical internal partitions (one of them serves as a divider for drawers);
- two fronts (internal!) for drawers with rounded slots instead of handles;
- four barrels of drawers;
- two rear walls for sliding parts.
For better fastening, drawers must be made internal , as if recessed into the walls of the rack. This part must be made with the tightest possible fit so that they do not fall out of the cabinet.
Gluing
Each part must be cut out in two copies, which are then glued together.
The trick that will allow you to quickly assemble the structure is to ensure that the internal parts of each element are 5-10 mm (i.e. the thickness of the cardboard) smaller than the external part .
For example, parts are attached to the cabinet body from the inside, the distance between them in height is 10 mm. They also glue the parts symmetrically onto the transverse wall of the rack, which divides it into two equal parts. This creates grooves into which shelves can be easily inserted directly. This option does not require special furniture corners or other fastening methods.
Advice . The glued elements must be allowed to dry. It is better to dry some parts under a press and in a ventilated dry room.
After all the parts are securely glued, the edges must be sanded so that small nicks do not interfere with the subsequent connection.
Assembly
After gluing the main parts, you should get the elements of an almost finished cabinet. On the inside of the body, five parts should be glued vertically, between which horizontal shelves are inserted.
On the upper and lower inner parts there are two elements each where vertical shelves will be placed.
In its principle, a cardboard cabinet is reminiscent of a construction set that many probably had in childhood, where each part serves as a support for the other.
Before driving each individual part of the rack into the groove, the edges must be coated with an even layer of glue . The same applies to the assembly of boxes - the edges of the side elements are glued together, and the bottom, attached after, reliably fastens the parts together.
Advice .
To make the edges and corners of the structure look neater, they can be covered with thin paper. It is also better to glue the joints between the longitudinal and transverse shelves with paper for better stability of all elements.
Design dimensions
The doll's wardrobe differs from the real one only in size. It also has shelves, drawers, and a clothes rail. It is important to consider the location of the furniture. If the doll has its own house, the size of the closet should correspond to it. Heavy bulky plywood structures can only be placed on the floor.
It is also necessary to consider what kind of children's toy the furniture is made for. The height of the cabinet for Barbie and Monster High, which are now particularly popular, will be about 28–30 cm. The largest doll is Anabelle, she will require an option with a height of 40–45 cm. In the latter case, it is recommended to use a boot box or small household appliances.
To establish product parameters, you can measure doll clothes. The section where the bar will be for it should be 3 cm higher. The width of the furniture is calculated depending on the planned number of compartments, as well as the space allocated for it.
Master class on making frameless furniture with your own hands at home
For Barbie and Monster High
For Anabel
Decoration
After receiving the finished product, the most interesting thing remains - to make it bright and unique, harmoniously fitting into the interior. The most popular methods are painting, pasting and applying decorative patterns. Let's take a closer look at each of them.
Pasting
This method can have several options:
pasting with corrugated paper with further application of acrylic paint (the cabinet will have a heterogeneous texture, three-dimensional, with an additional layer of protective coating);- pasting with self-adhesive film (the simplest and most reliable option; the film does not wash off or get scratched);
- pasting with magazine pages (a rather fragile option, it is recommended to apply a protective layer of varnish to protect the surface and give some shine to the product);
- wallpapering ; _
- wrapping with gift wrapping or decorative paper.
You can combine these materials in any order. For example, use film to make the body and shelves white, and apply drawings or even photographs to the back walls and drawer fronts.
Advice . If the room already has furniture with a wood texture, you can choose a film of the appropriate color so that the shelving does not stand out from the overall interior.
Decoupage
This decorating technique will add a special twist to a cabinet in the style of shabby chic or Provence.
Small drawings placed on the walls of the rack, on one or two shelves, on the fronts of drawers will significantly decorate the future piece of furniture.
As a visual element, you can either use a blank from a craft store, or find it yourself in magazines and catalogs.
scheme is as follows:
- Preparing the surface for application (priming with water-based acrylic primer).
- Gluing decoupage decor.
- Intermediate coating with a protective layer of varnish.
- Adding decorative motifs.
- Finishing, fixing varnish.
Features of operation
Despite their apparent external density, cardboard products are flammable pieces of furniture. Cardboard, glue, and paper can easily catch fire even from a small spark.
In addition, high levels of humidity and constant temperature changes will lead to rapid deformation of the structure.
Important . The bathroom, kitchen and balcony are completely unsuitable for using cardboard cabinets.
A cardboard cabinet will last the longest in a well-ventilated, dry area. In addition, the available materials and simplicity of design make its parts easily replaceable. If suddenly one of the shelves begins to sag or become loose, you can make a box according to its internal size, decorate it in an original way and simply insert it into the structure.
If you are considering making cabinets from other materials, we recommend considering furniture board, chipboard and drywall.
Fabric storage box: how to sew?
What you will need to make the box:
- Cardboard box
- A piece of fabric with this calculation: for 25 cm of box area we take 2 m of fabric
- Belts for making handles
- Nails, bolts, glue
- Tools: scissors, ruler, screwdriver
We suggest you read How to embroider trousers: 10 options to increase the size
Materials and tools for making a box
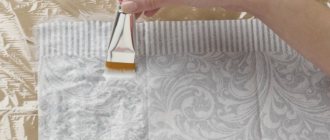
- Let's prepare the fabric for cutting: iron it thoroughly with an iron.
Let's start cutting the fabric
- Let's start covering the box with fabric.
- Draw a rectangle of the desired size on the fabric. Let's cut it out. In our case, the sides of the rectangle are 65x108 cm.
Wrap the sides of the box with fabric
- We bend the edges of the rectangle inward and iron it thoroughly. Place the box in the center of the cut out rectangle with smoothed edges. The open side should be 13 cm from the edge of the fabric part.
- We spray glue on both sides - right and left. We begin to press the fabric tightly against the cardboard. Immediately remove any air bubbles that have formed.
- We continue to glue the box using the same principle. We unfold it and proceed to the inside: cut the fabric and press it to the cardboard after spraying glue inside.
Carefully fold and glue the excess fabric
- For ease of use of the box, we prepare handles from a belt. We make holes in the belt with a drill. We secure the handles with bolts.
Attaching the handles
- We measure a few centimeters diagonally at the corners and secure the pins here. After this, we cover the pins with a gold marker. Storage boxes are ready!
We fix the pins in the corners