Incorrectly adjusted and unadjustable door hinges for a long time can bring a lot of problems to the home owner: from an unpleasant squeak for the ears to difficulties opening and closing the door, which ultimately leads to deformation and distortion of the entire structure. To avoid consequences, adjustment of door hinges should be carried out immediately when the need arises. Setting up will not take much time and will not require any special skills - you just need to understand the design of the loop and read the article.
Any hinges can be adjusted with just a screwdriver
Door hinges: what are they?
But in order to perform such work as adjusting the hinges of plastic doors, you should know what type of hinges are installed and only after that can you begin repairs. The range of door hinges offered by the market is very diverse. The choice is made according to many parameters: the design features of the door itself, its weight, installation location, customer wishes, compliance with certain stylistic requirements set by the interior, as well as the material from which they are made.
Simple hinges are usually installed on interior doors.
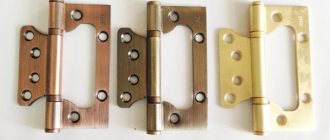
Hinges can be overhead, mortise, screw-in, hidden, bar and some other types. For relatively light doors, ordinary overhead hinges are suitable, but for heavier ones, you should choose mortise hinges. To ensure the opening of pendulum structures in both directions, bar hinges are installed, for plastic ones screw-in hinges are used, and hidden ones are absolutely invisible in the closed position, which is especially important for entrance doors. On massive metal doors, hinges with a support bearing or ball, made of durable brass alloy, but more often of stainless or carbon steel, have become widespread.
This is interesting: Door opening limiters: types and characteristics, installation features
Various doors
Depending on where the door is located, it comes in different types: interior, balcony and entrance. They differ not only in their scope, but also in the material from which they are made. The front door is mostly metal or wood, as it must reliably protect against cold and noise that can penetrate into the apartment or house. As for the balcony door, today many people prefer plastic options, as it has a lot of advantages. But for doors between rooms it is better to choose wood or other material.
The fundamental point for these structures is their installation. It must be done correctly and efficiently. But, as practice shows, even compliance with these requirements will not guarantee their long service. Over time, problems may arise in their work. They are mainly caused by the fact that the structure sags and an imbalance appears in the mechanisms. But there is no need to be upset. The situation can be corrected. It is enough to adjust the hinges.
How can you determine for yourself that everything is normal?
The criteria for proper operation of door hinges are:
- easy, effortless opening/closing;
- uniform adhesion of the door leaf to the frame around the entire perimeter;
- maintaining a stable position;
- absence of any friction between the door and frame;
- precise operation of the clamping mechanism and, as a result, no gaps.
If at least one of the conditions is violated, this is a signal that the hinges need to be adjusted, as this affects both the service life and the operation of the door. If no measures are taken, then in the future this can lead to noticeable sagging or displacement of the canvas and the box relative to each other, which can lead to repair work of a completely different complexity and cost. And if small deviations are found, then this can be completely corrected either by specialists, or even on our own - you only need to make some adjustments and adjust the hinges.
This is interesting: Insulating a wooden door with your own hands: types of insulation and procedure
How to properly adjust the hinges on a metal entrance door?
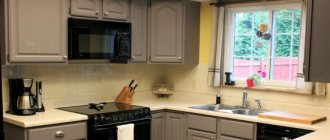
In the photo, adjusting the hinges of interior doors
Lubrication as the basis of any adjustment
In this case, it is not so important what kind of doors we are talking about; if the structure begins to creak, something needs to be done about it. There can be 2 reasons for the squeak:
- You are very lucky, if the structure is poorly lubricated, you can eliminate this misunderstanding yourself and quite quickly. You can read about different types of door lubricants and the subtleties of using certain compounds “here”;
- The second reason for the squeak is an unbalanced mechanism and here fine adjustment of the door hinges is required, but in any case the mechanism must be lubricated before it.
Universal lubricant.
Keep in mind that if you have recently installed your iron door and the warranty has not yet come out, you should not bother adjusting the doors yourself, call a specialist, but again, do not delay in calling the specialists, otherwise a slight squeak may “crack out” into a major breakdown.
A loop that is not lubricated and adjusted in time can lead to disastrous consequences.
If it is clearly visible that the hinges are completely rusty, and in addition to squeaking, they also move poorly, there is no need to try to force them out or knock off the rust, there is such a good remedy for this as WD40, spray it a couple of times and in half an hour things will go faster.
The easiest way to care for regular male/female garage hinges (as in the photo). Ideally, it is better to remove the door leaf, but the metal structure is heavy and it is problematic to do this alone, so you place some kind of beam under the leaf and, leaning on it, slightly lift the door with a crowbar, after which you pump lubricant into the hinges.
The easiest way to remove old grease is with a rag or sponge.
Many people advise blowing the hinges with air, for example with a hair dryer, in order to remove old grease; this activity is ineffective and often useless. It’s easier to take a clean rag and wipe everything you can with your hands, it will be more helpful.
Adjusting the front door begins with removing old grease and applying new one.
Features of adjusting hidden hinges
For entrance doors, two types of hidden hinges can be used: adjustable or non-adjustable. In the second case, their repair is impossible - they should simply be replaced, although given their high reliability, they do not fail so often. But adjustable hinges are more convenient to use. If there is a vertical displacement of the door leaf, you need to move the hinge slightly in the appropriate direction.
The hexagon is used to loosen the outer loops first: top and bottom, and then the rest. Then - in-depth, in the end part. After this, the central screw is adjusted - it determines the width of the gap.
Note!
After that, all screws should be tightened in reverse order.
The mounting height of the blade is adjusted using end screws: to raise it, release the top one and clamp the bottom one, and to lower it down a little, vice versa.
Types of door structures by opening method
- Swing products. Such canvases can open both in both directions and in one. They are the most popular among other doors. Hinged doors can be external or internal, solid or glazed. They are made from any material, therefore, the designer’s scope in door design is enormous. The only drawback of swing doors is that they require space to open.
- Sliding products. With the help of sliding doors you can remodel your apartment, house or even office. Most often they are found in wardrobes. Another big plus is that when installing them, you can save considerable space in the room. They can be both internal and external. The canvases move parallel to the wall or go inside the wall. Fastening occurs on the lower, upper or both guides. If the door is fixed only on the top guide, then in the event of a draft the door may “walk”, therefore, it is more reliable on two guides. When finishing sliding products, more modern materials are used.
- Stable products. Stable doors consist of two halves, upper and lower. Each has its own hinges and locks.
- Folding products. Folding doors are a good option for small spaces. Such designs save living space; in addition, they are less expensive than, for example, sliding ones. Plastic is mainly used as the material for their manufacture. They open easily, similar to accordion-type trolleybus doors. Most often used as doors to a dressing room or pantry.
- Swinging products. Swing doors swing open in both directions. They can only be found in specialized stores, since they are not very popular in our country.
How to properly adjust the support loop?
If doors are installed using metal door hinges with support balls or bearings, they are adjusted with a screw at the top. The canvas can be lifted by tightening the screw - in this case, it will rest against the ball. As a rule, the need for such an operation is due to the fact that the metal is gradually subject to abrasion, which leads to sagging of the door.
It is imperative that during preventive adjustments, the hinges must be cleaned of dust, dirt and lubricated. To do this, unscrew the screws completely and drip lubricant through the holes. Naturally, after this the screw is screwed back in.
The photo shows the adjustment of hidden hinges
Adjusting overhead loops
Overhead hinges remain a popular option for hinge systems. These mechanisms are adjusted in different planes. It all depends on the individual settings.
If the metal blade has a vertical skew of less than 5 mm, it is adjusted with a special adjustment screw, rotating it with a hexagon, after first removing the decorative trim from the loop.
To lower or raise the door, remove the detachable strip from the bottom end. There is another adjustment screw located here. By rotating it with a key, the blade is raised by approximately five millimeters or lowered by 2 mm.
The adjusting screw on the upper end is designed to adjust the blade and remove the gap within 2 mm.
If a full adjustment of up to 5 mm is required, the blade is completely removed. The part of the hinge screwed to the door block is adjusted until the required location is reached.
Loop adjustment diagram
Such debugging work is in most cases carried out with doors that operate simultaneously in several planes. If this is an interior door, then such complex labor-intensive work is not required.
Anyone can adjust the door. You just need to follow a certain sequence of such work. All the methods described above will help you.
You will learn how to adjust hidden hinges on an interior door from the video.
Voted over 277 times, average rating 4.8
Comments
Unfortunately, there are no comments or reviews yet, but you can leave your...
Add a comment Cancel reply
We recommend reading
Hinges, Fittings Basic functions and characteristics of swing door hinges Each of us can remember old films in which the hero of the film is ...
Hinges, Fittings How to choose hinges for a plastic door, their characteristics Hinges for doors are a piece of profile fittings that ...
Hinges, Accessories How to make a hidden hinge last a long time and work properly? The popularity of hidden hinges is due to undeniable advantages. ...
Hinges, Accessories How to cut hinges with a router and what devices are used? When installing new interior doors, many are faced with...
Features of adjusting metal-plastic doors
These types of doors, although they do not have many of the disadvantages characteristic of wood products and associated with deformation of the leaf or, most often, the frame, also require periodic maintenance of the hinge group. Often, the cause of poor hinge performance may not be sagging of the door itself under its own weight, but a malfunction of the mechanism. As a rule, three hinges are installed on plastic doors that can withstand the weight of the door, but if there are only two of them or the fittings are of low quality, then sagging of the leaf may occur.
There are no particular differences in adjusting the hinges of external or interior metal-plastic doors. The difference lies in their thickness, which is determined by the number of chambers and the method of opening. It makes no sense to equip interior doors with a folding mechanism, and its presence on the balcony door is an additional convenience for ventilating the room. [rek_custom1]
This is interesting: Do-it-yourself installation of interior doors: preparing the opening, installing the door and trim
Hinge installation methods
Depending on the direction in which the door will open and the mounting sides are distinguished:
- left-handed,
- right-sided,
- universal.
Universal ones are convenient because they can be attached from any side, but this complicates the process of installing and dismantling the canvas itself.
Each of the described types has its own installation nuances. The simplest are card models. The most difficult thing to install is hidden hinges.
The first step in installing hinges with your own hands is marking. To do this, you need to retreat 20 cm from the bottom and top of the door leaf and mark the starting lines with a pencil. Next, depending on the direction of opening the door, attach the hinges to the marks made, outline the outline and mark the points at the attachment points.
At the same time, to ensure free movement of the fittings, the rods should not touch the door leaf, but you should not push them too far either, this will worsen the strength of the fastening. You should also carefully inspect the insertion points for the presence of knots; screwing self-tapping screws into them can lead to distortion or split the door leaf, so the hinges must be moved 2-3 cm down or up from the problem area.
After this, it is necessary to assemble the door block and make markings on the frame in the same way, while maintaining a gap of 2-3 mm between the frame and the door leaf. It is most convenient to do this when the door has not yet been installed, otherwise the leaf is fixed in the opening using wedges.
Depending on the size and weight of the door leaf, it may be necessary to install a third hinge. In this case, the insertion is not made in the middle, but with a slight offset to the top hinge in order to regulate the load exerted on the fittings by the weight of the door leaf. As a rule, for doors up to 80 cm wide, up to 2 m high and up to 50 mm thick, two hinges are sufficient.
Adjusting hidden hinges on metal-plastic doors
Concealed door hinges installed on these products may require adjustment. They are quite common, but have some design differences from hinges for entrance doors and, accordingly, are adjusted differently. For products made of metal-plastic, this type of hinge is made of a complex alloy, tsamak, which is characterized by high strength, which guarantees high reliability and wear resistance, for example, the “open/close” cycle has indicators of over 200 thousand times. Similarly, as for metal entrance doors, not all hinges can be adjusted, but for those that can be adjusted, the plan of action is absolutely similar.
The photo shows hinges for metal doors
Installation of hidden canopies
Hinges can be either universal or with a specific opening side
The canopies themselves are a rather original design. The main mechanism is placed inside the frame and door. Both halves are connected by a U-shaped lever, which, when closed, is hidden inside the box. The mechanism is adjusted using screws.
Hinges can be either universal or with a specific opening side. Universal ones are more convenient in terms of selection, but less reliable. It is better to take hinges with a certain opening; an experienced store consultant will quickly determine which awnings are needed.
In addition, loops are divided into:
- adjustable
- not regulated
Overhead hinges for doors made of metal-plastic
Features of the adjustment.
If the door is equipped with an overhead hinge (one of the most common options), its adjustment can be made in both two and three planes, depending on the functional features. Vertical misalignment of up to 5 mm is eliminated by adjusting the adjusting screw using a hexagon. In order to get to it, you need to remove the decorative trim from the hinges.
If there is a need to raise or, conversely, lower the door, you should find another adjusting screw at the bottom end, hidden under the detachable strip. Using the key, the door is raised up to 5 mm or lowered by 1-2 mm. The screw at the top end allows adjustment to approximately 2 mm. And when a larger adjustment is needed, up to 5 mm, you will need to completely remove the door and part of the hinge attached to the frame and adjust it.
This is interesting: Door upholstery: popular finishing methods, materials and tools for DIY finishing
The latter option is mainly used for doors that open in three planes. And adjusting the hinges of interior doors made of metal-plastic does not require such complex work.
Iron door adjustment
Adjusting plastic door hinges
The hinges of a plastic door have a slightly different structure than for heavier structures, and therefore the order of their adjustment changes. In practice, the most common need for horizontal adjustment is that the hinges move out of their places under the influence of the weight of the door leaf. This annoying problem has the following solution:
- Remove the protective pads from the two top hinges.
- Find a horizontally located long screw and, using a hex wrench, begin to tighten it smoothly until the door reaches the desired position.
- This action should be carried out with all installed hinges if there is a need to move the entire door leaf.
View of a plastic door hinge after removing the trim
Vertical adjustment
Sometimes vertical adjustment of the hinges may be required, which is done as follows:
- Remove the cap from the adjustment screw located at the bottom of the hinge (sometimes this cap may not be present, so this step is not necessary).
- If the door needs to be lifted, make the required number of turns clockwise.
- To lower the door leaf, rotate the screw counterclockwise.
To check the need to adjust the door leaf, place a sheet of paper in the gap between the door and the leaf, then close the door. If the sheet is pulled out with different forces in different places of the door, you need to adjust the hinges.
Aluminum door hinges
The popularity of aluminum products is ensured by their beautiful aesthetic appearance, durability of the material, and low weight. Therefore, increased demands are placed on door hinges made from it, especially considering that, with rare exceptions, their adjustment is impossible. Of course, hot-pressed aluminum, which is used to make hinges, is a durable material with high wear resistance.
It is not recommended to install products made from low quality materials on these doors.
Note!
The likelihood that aluminum door hinges will need to be replaced is very high.
Even a slight impact of the door on the frame or slope can cause a crack or breakage. That’s why non-adjustable hinges are installed on such doors: if they are of high quality, they last a long time and reliably, but if they are of poor quality, they cannot be repaired, much less adjusted.
Marking the door for installing hinges
Before marking, you should decide exactly how many hidden hinges will be installed on the door. If the sash is of medium weight and consists of wood, you can use two hinges, but on a heavy steel door it would be a good idea to install three or even four hidden hinges to reduce the load on each of them individually and extend their service life.
Marking the sash
The process is quite simple:
- Mark a distance on the door leaf 200-250 mm from the top and bottom edges and put dots in these places with a pencil.
- Next, place the centers of the hidden loops at these points and trace them along the contour.
- If you plan to install a third loop, it should be mounted strictly in the middle between the two outer ones, and the fourth – in the center relative to the two adjacent ones.
It should be remembered that it is necessary to outline two contours - the inner one for the loop, the outer one for the lining.
After the door frame and leaf have been correctly marked, you can safely pick up the tools and start inserting
Marking the box
This is a more complex task, the correct execution of which is carried out as follows:
- Place the door leaf in the opening of the door frame, and using a building level and wooden pegs, secure it in a strictly parallel position to the frame and perpendicular to the floor.
- Mark at the end of the door frame the places for inserting hinges opposite the similar ones located on the door leaf.
- Place the hidden loops at the marked points and circle. The door can be removed.
After the door frame and leaf have been correctly marked, you can safely pick up the tools and start inserting.
How to care for furniture hinges
Of all the listed gaps, the frontal size is considered the most important. If you do not control its size, then, in addition to a poorly opening door, more serious shortcomings may await:
- Premature wear of hinge parts; due to increased force, the rotary axes wear out in literally a year or two, even on expensive branded products;
- On wardrobes, doors become deformed and take on a curved or barrel-shaped shape.
By themselves, metal hinges for kitchen furniture are considered quite reliable, provided that the doors are adjusted correctly. If you adjust and lubricate the rotation axes once a year, the resource will last for at least 10-15 years. The only “enemy” of furniture canopies is a gas stove. When gas burns, a certain amount of very viscous tar-like substances is formed, which are easily deposited on metal surfaces. Therefore, the hinges in a cabinet located close to the hob often get stuck, and, as a result, the doors open with increased force.
How to adjust furniture hinges
To properly set up the operation of the canopy, you first need to check the position of the cabinet itself. Doors on the facade will help sag under their own weight or due to skew of the body. To do this, we check the position of the box with a level and level it either by altering the suspension on the wall, or by trying to adjust the height of the legs.
Any mortise hinge has at least three position adjustment screws. In general, the system allows you to adjust the position of the door, its displacement by 2-4 mm vertically, horizontally and in depth. Since there are usually two loops, the angular deviation can also be corrected. A more detailed description of the screws for adjusting furniture hinges is given in the video:
But you can also use the diagram below.
How to adjust furniture hinges vertically
In all training manuals and manuals, it is usually recommended to begin adjusting the door position by eliminating the most obvious problems with the hinges. If the screws are not screwed deep enough or are loosened at both fastening points, then one half of the facade will simply drop a few millimeters lower relative to the other.
In this case, you will need to unscrew the screws, place a piece of a match or toothpick in the hole and tighten the fasteners.
If the fastening is in order, you can adjust the height of the sash by unscrewing the screw 1-2 turns. Next, we will raise the cabinet door level with the other half, fix it and at the same time raise the “butterfly” hinge to the same height. All that remains is to tighten the fasteners with a screwdriver, use a ruler and a level to check the accuracy of the installation.
How to adjust furniture hinges horizontally
Since when opening a cabinet a person usually grabs the corner of the door with his hand, the main part of the load falls on the nearest hinge. As a result, the door may warp, the upper parts of the two doors will collide head-on, and a huge wedge-shaped gap will form between the doors below.
In this case, you have to adjust the horizontal displacement along the front on one of the hinges, usually the top one. To level the position, you will need to unscrew the adjusting screw, which is located first from the end, as in the diagram.
Basic adjustment when installing the door
Even before completing the installation, the master must correctly assess the position of the sash in the box. This is a very important task, since some of the mounting components cannot be adjusted after installation. At this stage, the size of the gaps between the leaf and the door frame is checked, after which they are sealed with construction foam.
How to adjust an interior door during installation? This is usually done by adjusting the box beams. First, the quality of the sash movement (opening and closing) is checked, and then the optimal distance from the leaf to the frame bars is determined.
The inability to ensure correct operation of the door usually occurs in cases of violations in the connection of the lintel with the counter beam. A plane, file or other coarse abrasive will help to achieve the correct geometry. This eliminates the unevenness of the distance between the base of the door and the frame from different sides. At the final stage of fitting, you should also check the horizontal and vertical position of the structure using a level.