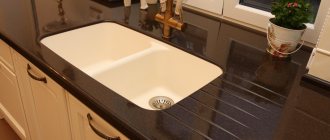
How to install a sink yourself
Anyone can install a sink on their own. This is very easy to do if you prepare first and study the instructions. Installation begins with preparing a plan and markings. Then comes the work of cutting out the main hole and installing the structure. During work, it is important to observe safety precautions, since the work will be carried out with sharp tools.
How to make a hole for a sink?
To make a hole in the tabletop you will need an electric jigsaw. It is suitable for countertops made of wood and chipboard. If the countertop is made of durable materials, then a jigsaw will not cope. First, prepare 4 holes with a diameter of 1 cm in the corners of the rectangle, without crossing the marking line. Then a file with the required tooth length (2 mm) is put on the jigsaw. To avoid chipping on the front surface, choose the opposite direction of the tooth.
Holes are made on the left and right, and then the wooden plank is pulled in with self-tapping screws across the sawn lines so that the cut part does not fall prematurely under the force of gravity. The cut out part is carefully removed, and the exposed edges of the hole and irregularities are coated with liquid silicone.
How to cut a hole for a sink in a countertop
Before you start cutting, you need to choose the right place on the countertop. It is selected taking into account the distance for draining water through the sewer pipe and the location of the water supply connection.
To make a hole correctly, you need the simplest tool.
It is better to cut at some distance from the location of the refrigerator and stove, since you will be working with water in the sink. Contact with it may have a negative impact on the devices. It should, as it were, divide the kitchen into several zones.
The question of how to cut a countertop for a sink is not very difficult.
If you place the sink below the countertop, that is, lower it a little, then it will look very beautiful and interesting. To do this, cut a hole slightly larger than the size of the structure being installed. But you will have to use additional tools for such a unique installation. These can be special fastenings from below under the tabletop.
This arrangement looks very impressive, but will additionally require the use of a special tool.
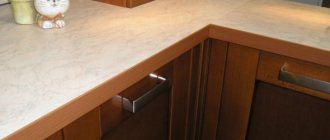
Positioning flush with the surface is the standard option. The difficulty lies in the fact that it is necessary to cut out the correct recess, which will clearly coincide with the dimensions of the sink. The thickness of the side should be close to the hole in the tabletop.
In this situation, it is very important to correctly make the required recess equal to the thickness of the side.
Another non-standard way to cut a hole for a sink is when it is located slightly above the level of the countertop. The hole is simply cut to half the size of the sink. This is the simplest option that does not require much effort or ability.
Performing markup
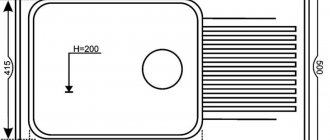
To make the markings, a paper template is pre-made that will match the size and shape of the sink. To do this, measurements are taken from it and transferred to paper.
The next step is to simply work with the finished template. It is carefully cut along the contour. The main thing is not to go beyond it, otherwise you will have to make another template. Then it is applied to the surface of the tabletop and outlined from the front side.
It is necessary to retreat 10-12 mm from the resulting contour and draw a contour of a smaller diameter.
If the sink is of a non-standard shape, then you can use another diagram on how to cut a tabletop for a round sink at the drawing stage. This happens in the following way:
- The structure is released from film packaging.
- It is laid bottom up on the material that will act as a template.
Important! The material must be hard and large so that it is convenient to cut and subsequently use it.
- The location is aligned and outlined along the contour of the side.
- The distance from the wall of the bowl to the side edge is measured. You can use a larger step.
- The obtained measurements are transferred to the drawing.
Turn the sink over and trace the outline with a simple pencil.
Required tools and materials
During the work process you will need quite a lot of tools and devices. It is important to prepare all this in advance so as not to be distracted from the work and complete it efficiently. List of materials and tools that will be needed in the process of cutting out a place for the sink and installing it:
- Jigsaw.
- Drill with various attachments.
- One square.
- High quality line.
- A simple pencil.
- Furniture corner.
- Mounting system for sinks (you don’t have to buy it if it’s included with the sink).
- Transparent silicone sealant.
- Sink seal.
- If necessary, additional materials and parts are purchased that are missing from the sink kit.
- Siphon.
- Connecting pipe for sewerage.
- Various fittings (mixer and submersible).
Cutting a hole
Work on cutting out the hole for the sink is carried out with extreme caution. The bottom of the sink will subsequently be placed in this hole. The quality of the work performed will depend on the correctly constructed circuit. If the stage was initially completed according to all the rules, then no problems should arise. The process will go smoothly, and the result will please you.
We will make a cut along this contour.
You can cut a hole in the countertop for the sink according to the following action plan:
- According to the markings, one through hole is drilled in the surface of the tabletop. It should be located directly along the contour line of the bowl. The drill for this purpose is taken to be at least 1 centimeter. A jigsaw file is inserted into the hole that has just been drilled, and only after that you can go along the entire contour, carefully cutting it out.
- To obtain an even cut of the edge of the recess, it is carried out closer to the inside of the contour. It is important not to practically touch the line, but to go next to it, but without a strong indentation. If the sink is square, then you need to make holes in the corners of the drawing in advance. This will make sawing much easier. To prevent chips from appearing on the tabletop, you can glue it with construction tape. If the line is no longer noticeable, then it is drawn directly on the tape.
- Since the material will begin to fall when sawing, it is better to support it with something. This will secure the process and make the cut much neater. If you are not doing the work alone, you can ask a partner to hold the tabletop while you cut. Afterwards, the cut out part is removed with a slight movement. Everything is cleaned of any dust that has formed.
We process the ends with sandpaper.
Important! Cutting the hole is the most crucial moment. The operation of the sink will depend on it in the future.
Sink installation
Before installation, you must check everything for quality and consistency. If there are any irregularities in the cut, they are eliminated immediately. Everything is tried on again and tested for strength. After this, the sink is installed. It is carried out using liquid silicone.
On the back of the sink we apply sealant and glue the sealing tape that comes with the kit.
It is necessary to step back a few millimeters from the line of the edge of the hole and begin to apply silicone. This is done in the form of a flagellum; the thickness of the silicone should be slightly higher than the side of the sink. Afterwards, it retreats from the first coating by another 1 centimeter. The action is repeated again according to the same principle.
We install the sink into the countertop and treat it with sealant.
Within half an hour, the silicone should harden a little. You can check this carefully with your hands. It shouldn't stick. Then you can try on the sink. It is inserted into the hole and pressed tightly to the edges. The silicone flagella should take its shape and hold together a little. The structure is left in this position for 10-15 minutes.
Afterwards, the sink is dismantled to check the silicone for stability. It should remain intact and not be disturbed in shape. If this happens, it’s time to proceed to the next equally important step.
After installation, tighten the fasteners. The bolts must be pulled diagonally.
Learn more about installation methods
As we have already said, installing a kitchen sink involves two options:
| Overhead |
The disadvantage is the humidity that invariably forms between the unit with the sink and the adjacent cabinets. |
| Mortise | Installation is much more complicated and it will be very difficult to do it yourself. This method is favored by a variety of shapes and types of sinks. For example, it is possible to install models made of stone, plastic, stainless steel, copper, brass, and round, rectangular, corner, asymmetrical sinks. |
It is possible to embed a sink into a countertop in different ways; in this case, not only your desire plays a role, but also the design capabilities of the set.
Based on this, it is possible relative to the surface:
- flush with it;
- easily above or below it.
Advice: when purchasing the model you like, we recommend that you immediately clarify the placement of the sink bowl and what specific fasteners need to be used for it. Pay special attention to the last point, since often the quality level of the bowl significantly exceeds the proposed fastenings, based on this it is worth choosing the appropriate ones.
Preparation for installation
Installing a sink is the last or final stage of assembling the water use unit in the kitchen.
Based on this, you should prepare for it thoroughly:
- First, be sure to supply water to the installation site.
- Make a sewer drain.
- In addition, you should take care of the tools, where the jigsaw plays the main role. You can purchase it or rent it for a couple of days; at the same time, buy new files for it so as not to experience inconvenience during work.
Advice: the price of even the most expensive ones from the most famous brands, for example, Bosh, will not hit your budget, but the process of cutting out space for the sink will go like clockwork.
- In addition, do not forget to purchase silicone transparent sealant, and it is better not to pin your hopes on the self-adhesive foam rubber edging offered in the kit. It is not good because moisture will slowly accumulate in it, which will soon begin to emit an unpleasant odor, instantly destroying the countertop under the overhead sink. We simply recommend not to use it at work.
- When purchasing a kitchen sink, determine whether it comes with a template or stencil that will help you cut it into the countertop. In most cases, it comes as a package, so don’t rush to tear it apart, look to see if there is a pattern on the cardboard. If not, then we will tell you below how to mark a place on the surface by applying a sink to it.
- The siphon, supply and drainage pipes are not included in the sink kit or are very rare, so do not forget to buy them additionally.
Advice: do not fix the countertop to the cabinet of the kitchen unit, if there is such a possibility, in this case it will be easier to work with an overhead sink, but in the case of a built-in sink, this is a prerequisite.
Making space for an overhead sink
There is no difference what configuration the sink will be, the instructions will be exactly the same:
- Before cutting out a sink in the countertop, choose a place for it. In addition, make sure that:
- there was a free approach to it by water and sewer pipes;
- there was a distance of at least 60 mm from the edge, otherwise the narrow layer could be broken;
- The supporting structures of the cabinet were not located under the tabletop; they cannot be cut during work, otherwise the reliability of the set will decrease.
- Make a template on thick cardboard or use a ready-made one placed on the product packaging. The second option is to turn the sink over and use a marker to trace an outline along the countertop. Then step back 10 mm inward and make a copy of the contour along which you need to cut.
- Cut out the space for the sink along the outlined contour. At the same time, don’t worry if there are chips on the tabletop where the drink was.
Tip: secure the cut site with masking tape from below, so that when you approach the end of the cut, the material does not fall and damage the tabletop, or use the “help of a friend” so that he supports it from below now.
Take an electric drill with an O 10 mm drill and drill a hole in the tabletop at the inner mark to insert a jigsaw file into it. After this, take your time and carefully cut along the line.
- Process the resulting cut. First clean it of dust and fill it with silicone so that it does not absorb moisture.
Installing a sink in a cabinet
- Put on the fasteners , but do not fix them at all, so that you can tighten them over time.
- Install the faucet on the sink , if provided.
- Apply silicone sealant to the inside of the sink and install it on the countertop.
- Moving the structure, find out the appropriate position for it and tighten the fasteners completely.
- Remove any fresh sealant that has protruded around the perimeter, and until it has hardened, do not use the structure . Use it also to process possible gaps.
Features of communication connection
The next step will be to attach the fittings to the countertop for the subsequent process of installing faucets and hoses. For convenience, the siphon is attached to an already installed sink.
The sink should include specialized loops for screw clamps; they will be shaped like the claws. With their help, you can tighten the sides of the structure to the tabletop much more tightly and reliably. Do not tighten the fastening devices with screws with great force. If you overdo it, the sides of the sink may bend upward.
The location for the cutout is selected taking into account the minimum distance for draining water into the sewer and connecting the water supply.
Installation of sink and connection of communications
Here again you will need liquid silicone. Stepping back a couple of millimeters from the edge of the hole, we apply the silicone in a thickness just above the side of the sink. Stepping back from the first one another centimeter, we apply another flagellum.
After half an hour, the silicone will dry and stop sticking to your hands. Then you need to insert the sink into the hole and firmly press the edges so that the silicone strands take the shape of the sink, and leave for a few minutes. Then the sink is removed and the silicone is checked. If it is not broken, then everything is in order, and the sink will have a reliable additional side.
Installing a stone sink
The process is as follows:
- A recess is being prepared for the sink in the countertop. Then it is turned over with the wrong side up. The sink is also turned over and marked around the hole in the outer contour of the side.
- By examining the markings, the most suitable groove is found. The edges of the stone sink are placed in it. A part of the array is selected in several stages, and the sink is tried on.
- The edges are sanded. Glue is applied. It is necessary to fill the groove with it. The connected parts are pulled together. All this should dry for 12-14 hours.
- The edges of the sink are filled with epoxy. After drying, they are leveled.
- The bowl and tabletop are connected. The siphon and mixer are attached.
After reading the detailed instructions, the question will no longer arise: how to cut a countertop for a sink. The work will go quickly and without problems.
VIDEO: Installation of a washer video. Embedding the sink into the countertop.
Small diameter holes (up to 10-12 mm) in wood and chipboard are most often drilled with ordinary metal drills. They cope with their task quite successfully. But if every millimeter is important for the position of the hole, then you need to use special drills.
When entering wood, a metal drill may deviate slightly to the side, even if a recess is made with an awl at the site of the future hole.
In general, drilling wood can be done even with an ordinary nail or a piece of wire with a flattened end. Special drills for wood have to be resorted to only when it is necessary to drill a hole of large diameter, or when increased demands are placed on surface cleanliness and accuracy. There are several types of such drills:
- spiral (a);
- twisted or single-spiral (it is sometimes also called spiral) (b);
- feather (in);
- annular (crown) (d);
- Forstner cylindrical drill (d).
Wood drills are made from alloy tool and carbon tool steels; metal cannot be processed with them.
Twist drill
drill holes of small and medium diameter. It can easily be replaced with a metal drill bit, although the hole will be cleaner if you use a wood twist drill bit.
Single twist drill
It has a sharp cutting edge and a screw shape that removes chips well. It is used when you need to get an accurate deep hole with a clean surface of the walls.
Feather drill
They are usually used when drilling holes with a diameter of 10 to 25 mm, although there are drills with a diameter smaller than 10 and larger than 25 mm. This drill is the simplest in design and the cheapest, so it is reasonable to use it in all cases where high demands are not placed on the quality of the hole. The disadvantages of a feather drill include poor direction, low diameter accuracy, rough surface of the hole walls, and the need to periodically remove chips by stopping drilling and removing the drill from the hole. The advantages are simplicity and low cost.
Crowns
used when drilling large diameter holes - up to 100 mm or more. The kits contain one mandrel with a shank and a centering drill and several bits that are inserted into the mandrel.
Forstner drill
has a centering point and a sharp scorer. Thanks to the latter, it is distinguished by precise cutting geometry. Typically used for drilling blind holes to precise dimensions in softwood, chipboard or laminate for the installation of furniture canopies.
Forstner drill bits can be short or long pointed.
It is more difficult to make a blind hole for a hinge in a thin door with a Forstner drill with a long point, since the point can make a through hole. But a drill with a short tip is more prone to moving to the side. In addition to differences in the length of the tip, the Forstner drills shown in the photo above differ in their maximum rotation speed. So a drill with a short tip has welded knives made of high-speed steel and is suitable for working at high speeds, and a drill with a long tip has a maximum rotation speed when working with soft wood equal to 1000 rpm.
There is another device for cutting large holes - this is a ballerina
, designed for cutting large (up to 300 mm) holes in thin pieces of wood, chipboard, fiberboard and other materials.
The ballerina consists of a centering drill and two cutters that are used to cut out a circle. The displacement of the cutters along the guide sets the diameter of the circle being cut. To rotate the ballerina, use a brace or drill with a low speed. You can also rotate it manually.
How to drill wood and chipboard
To prevent the drill from going to the side at the very beginning of drilling, you need to make a small depression in the center of the future hole with an awl.
Drilling wood is carried out at low and medium speeds of the drill. The main problem when drilling through holes is chipping at the drill exit. There are two ways to deal with them. First drill a thin hole and drill along it from both sides of the part to the middle with a drill of the final diameter. In this way, it will be possible to avoid chips that occur at the exit. The second method is to firmly press a piece of wood onto the side where the drill comes out, which is removed after drilling. To make the drill perpendicular, jigs are used. The latter are especially convenient for making holes in cylindrical parts.
Drilling chipboard requires special attention due to its fragile structure. The presence of laminated or veneer coating complicates the task. To avoid their peeling, use drills with a sharp edge (in particular, a cylindrical Forstner drill) and a backing plate at the exit. To mark holes, be sure to use an awl.
When using the content of this site, you need to put active links to this site, visible to users and search robots.
Plywood (and to a lesser extent other sheet materials such as chipboard or oriented strand board) has significant decorative potential. If you have a fairly simple tool and certain skills, you can cut almost anything out of plywood. But in order for the parts obtained as a result of such carving to look quite presentable, the master should have a few tricks in stock. We will talk about them in our article.
When starting to work with sheet materials, many craftsmen only have an idea of how to cut in a straight line. Therefore, the question of how to cut an even circle from plywood can confuse many. And indeed, a regular or circular saw cannot cope with the task. Figure cutting is most often done using the following tools:
- The simplest device used for sawing. With the help of a jigsaw, even the most delicate work can be done with your own hands, but for thick material or long cuts it is practically not suitable.
- Jigsaws. Here you can use two types of devices: a regular one, with a vertically positioned file;
- artistic, in which the role of the cutting element is performed by a steel blade.
Regular jigsaws will come in handy when working with thick ones. But if you are looking for a way to cut letters out of plywood or make other complex elements (for example, parts of a children's construction set), then it is best to use a model with a band saw.
Advice! Naturally, for each type of jigsaw there are several types of files and blades. The correct choice of cutting element is a necessary condition for high quality of the product.
- In addition to jigsaws, you can use a furniture router for curved cutting. Despite how difficult it is to operate, it is many times superior to most models of plywood saws in terms of the quality of the holes it makes. Using a router you can.
Also, do not forget about available devices, but we will talk about their use in the appropriate section.
Cutting from plywood has several nuances that the master needs to take into account:
- Firstly, you can only cut on dry material. High humidity leads to an increase in the resistance of plywood, therefore, with excessive force, either the veneer will begin to delaminate or the file will break.
- You need to change the saw or cutting blade immediately after the first signs that the teeth have become dull appear.
- If we are cutting from plywood using a jigsaw, then to obtain cleaner edges, the main cutting lines should be placed along the grain of the veneer. But with hand files it is easier to work across the grain: there will be slightly more chips, but there is less risk of the file getting pinched or moving away from the intended line.
Advice! When transferring designs for cutting from plywood onto the workpiece, try to place the template in such a way that the elements to be removed fall on areas with defects: knots, chips, stains, etc.