A compact and durable folding table for the balcony is a tempting idea for many apartment owners. It is easy to do it yourself if you have the necessary materials and drawings.
Foundation calculation
Try a new product
Try for free Find out more
Before you start making a balcony table, you need to choose the right type. This is important, since furniture that fits optimally into the space can significantly increase the functionality of the loggia, and the layout method affects ease of use.
Practical use of the table: pros and cons
The folding table on the balcony is a standard transformer. This quality largely determines its merits. If there is no need for a table, it is fixed on the wall, freeing up space on the balcony. At the same time, the piece of furniture does not require additional storage space.
Depending on the size, configuration and placement of the table, several people can use it simultaneously. It allows you to turn the loggia into an additional recreation area. Tea drinking, a beautiful panorama, fresh air contribute to a pleasant pastime. If necessary, the folding table can be used as a workplace.
A significant advantage of a folding table is the ease of its manufacture. Having basic construction skills, it is easy to calculate the dimensions of individual components and install the product. If desired, you can make an exclusive design option that will decorate the balcony.
With all the obvious advantages of this subject, objectivity requires noting the relative disadvantages. To take full advantage of the practical bonuses of the table, the balcony must be insulated. Otherwise, most of the time the product will stand idle folded. In addition, the design creates additional surfaces on which dust and dirt accumulate. If there is no glazing or windows are often opened on a glazed balcony, you have to spend more time on cleaning.
Buy or make it yourself?
To resolve this issue, it is necessary to weigh the pros and cons. A ready-made table does not require developing a project or spending time on assembly. All that is required from the owner is to install the structure. This option is suitable for busy people, as well as those who cannot make the product with their own hands. Another plus is that in the store you can choose an interesting copy, decorated in an original design. However, in this case you will have to spend much more money and be content with the dimensions proposed by the manufacturer.
By assembling a folding table for the balcony yourself, you have the opportunity to save money. An individual approach is also a big advantage. Furniture is made to the required dimensions, measuring them with the area and shape of the balcony. In this case, the folding tabletop always fits organically into a small space without blocking the passage. But when deciding to install it yourself, you need to find time to work and master basic carpentry skills.
Suitable dimensions and shape
The shape, as well as the size of the folding structure, directly depend on the area of the room and the style in which the balcony is made. If the loggia is small, preference is given to countertops that occupy no more than a third of the total space. It is extremely important that the passage remains clear.
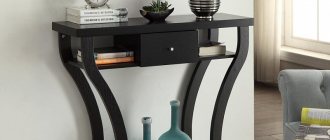
Structures made of rattan, wood and plastic will look great on a small balcony. Owners of spacious loggias can safely choose products with forged elements.
If the balcony has a rectangular shape, a long and narrow table will look great on it. In a square room with a large area, round structures can be used. Square folding structures can also be installed here.
A compact table is often placed next to a corner bench made in the same style. This way you can create a cozy area for relaxing or working. The tabletop can also have an angular shape. This solution is considered one of the best for very small balconies. At the table located in the corner you can drink a cup of tea, work on the computer and just relax.
Finding a suitable table for the loggia is not a difficult task. Everyone can cope with it. It is not at all necessary to seek help from a designer for this purpose. The main thing is to determine exactly why this furniture is being purchased and from what materials it should be made. After that, you just need to choose the ideal design and install it on the balcony. As a result, a very cozy corner will appear where you can spend time comfortably.
0
Types of tables
Balcony tables differ from each other in size, shape, material, and folding method. The shape of the tabletop can be rectangular, square, semicircular, triangular. The most popular dimensions of a miniature folding table for a typical loggia are 60 x 40 cm. The height at which the tabletop is fixed is approximately 70-75 cm. For work tables, the length and width can reach from 80 and 50 cm, respectively. Such specimens are suitable for spacious loggias, which can be converted into an office.
There are several types of tables based on the type of transformation. Each case has its own method of attaching and transforming the tabletop:
- Classic version with hinges. The canvas is fixed to the wall using loops. When unfolding the table, pull out the legs from the recesses and place the tabletop on them.
- Frame-based design. The tabletop and folding frame, consisting of one or two elements, are secured to the wall with hinges. The product is larger in size.
- Side table. The folding table has an additional storage compartment. Such a piece of furniture is multifunctional, but takes up a certain place on the balcony.
Required materials for installation
Of course, you will need an electric jigsaw, which allows you to evenly cut wood or other material. If you don't have a jigsaw, you can use a hacksaw as a substitute. However, it should be noted that after the hacksaw, the material requires additional leveling.
It will be necessary to process the edges of the cut materials. This work is performed with a special manual milling machine, which is also capable of drilling holes and making various decorative patterns.
Processing and grinding of surfaces to the required smoothness will be carried out using a grinding machine.
If you chose chipboard or plywood as the main material, then you will definitely need a screwdriver. It will significantly speed up the assembly time of the product.
A tool that you clearly cannot do without is a drill. It is with the help of a drill that all the necessary holes will be drilled to secure the folding table.
Related article: Do-it-yourself clotheslines for the balcony
You need to stock up on a tape measure, a pencil and a ruler - things that are probably in every home. In addition to them, it is advisable to have a water level.
Making a folding table on hinges with a support
To make a transformable table, you can use various materials: wood, plywood, chipboard, MDF, plastic, metal. The most popular raw materials are wood and chipboard. Since the loggia table does not have complex structural elements, its assembly is quick. Moreover, each material requires certain nuances of work. Having chosen natural wood or chipboard for installation, you need to prepare the following tools: a jigsaw, a hacksaw, a hammer drill or drill, a screwdriver (it can be replaced with ordinary screwdrivers), a pencil, a ruler, a level.
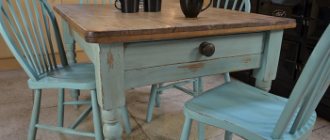
Made of wood
To make a folding table for the balcony with your own hands, you first need to decide on the shape of the tabletop and its dimensions. For a strong and durable wooden table, choose a canvas about 3 cm thick. Lining is also suitable for the job. A drawing is made on paper with the main parts drawn, dimensions and attachment points indicated.
When making a table, first the tabletop is cut out according to the given parameters. To do this, its outlines are marked on a piece of wood. If the table is semicircular, then first draw a straight line equal to the length of the product. Then, using a compass, draw half a circle from its center.
As a compass, you can use an improvised tool made from a strip equal to the radius of the table. One end of it is loosely secured with a nail in the marked center of the line, and a hole is made in the second end and a pencil is inserted there. Next, use a jigsaw to cut out the shape along the marked line. The top surface of the table must be perfectly smooth. To do this, it is polished.
The end of the cut workpiece must also be processed with a grinding machine so that the edge does not have sharp jagged edges and is perfectly smooth.
The second stage is preparing the support. Most often it is a triangle. To make sharp corners more aesthetically pleasing, they are slightly filed. If desired, the stand can be decorated, for example, by cutting round holes in it. Next, cut out a strip that will be fixed to the wall and hold the support.
When all the main blanks are ready, they are coated with paint or varnish. Water-based or enamel-based paints are suitable for wood. While the table parts are drying, cut off the required sections of the piano furniture hinge. This can be done using a hacksaw.
Connect the fixing bar and the support with loops. The connection line with the support is marked on the tabletop. Fix it to the bar using butterfly loops or a piano loop. Mark the line for placing the support on the balcony wall. Before final fastening, it is important to try on the table on the balcony. At the final stage, fix the stand strip to the wall using self-tapping screws.
From chipboard
Making a similar design with your own hands is also possible from chipboard. This material is easy to process and practical to use. To make a folding table, you need two laminated boards and four butterfly hinges. Two identical blanks are cut out of chipboard, the size and shape of which are chosen at your discretion. The ends of the cut panels are carefully processed with a milling cutter and fine sandpaper.
One copy is a finished tabletop. The second is a blank for support. The middle is cut out of this panel so that the remaining part looks like the letter “U” with a width of approximately 10-12 cm. The lower edge of the cut out “door”, which will serve as a support, is cut off obliquely. This is done to make opening the support easier. At the edges of the tabletop, frame and supports, mark the places where the hinges are attached.
Next, the process of making the table includes installing all the hinges. When the folding table is ready, the place of its attachment is marked on the wall of the balcony. Check the horizontal level and secure the structure with dowels or anchors. At this point, the process of installing a folding table for a loggia can be considered complete.
How to make it yourself
As a rule, a simple folding table for a balcony does not have very complex elements in its design, so even a novice craftsman can make it. Since most of the balconies in our apartments are not at all impressive in size, it is necessary to make good use of all the free space.
First, you need to choose a model, determine its dimensions and the material from which it will be made, think over the fasteners and select the color of the future product. Any work begins with competent calculations, so it is necessary to make a drawing of the future product and calculate the required amount of consumables.
The future table should not be too heavy, so it is better to use high-quality plywood or chipboard to make it. To work you will need:
- selected wood material;
- hacksaw or jigsaw;
- electric drill;
- screwdriver or screwdriver;
- self-tapping screws and utility hinges;
- sandpaper;
- antifungal composition;
- mounting angles;
- protective varnish or paint for wood.
The folding table consists of a main tabletop and an additional folding part, sides, legs, main support and ties. To place it on the wall, first markings are made and a horizontal corner of a size slightly smaller than the prepared tabletop is fixed with self-tapping screws.
To attach the base, you can use any household loops.
Next, we will analyze point by point all the stages of assembling a simple folding table made of plywood:
- We draw a tabletop on a sheet of plywood (it’s better if it has rounded edges) of the required dimensions and carefully cut it out with a jigsaw or hacksaw.
- We draw a rectangle with a length equal to the length of our table top and a width of 10 - 12 centimeters and also carefully cut it out.
- All parts must be thoroughly sanded until smooth and all remaining wood dust must be thoroughly removed. Particular attention should be paid to the edges of the tabletop.
- All finished parts of the future table must be treated with an antifungal compound and covered with several layers of wood varnish.
- We install a metal corner where the table is attached to the wall of the house. It is very important to securely fix the fasteners in several places.
- We fasten the sawn tabletop to the corner with medium-sized utility hinges;
- After this, we need to secure our table unfolded. For this, a support foot is used, which can be made from an ordinary metal pipe. It is necessary to cut a small recess inside the tabletop to better fix the table when unfolded.
Installing a table with a folding footrest
The folding model takes up a little more space on the balcony. Therefore, this choice requires preliminary measurements of the loggia so that the finished table does not interfere with the placement of other balcony items. To work, you need to prepare the following parts and materials:
- Wood boards.
- Connecting dowels.
- Loops - “butterflies”
- Mounting rail.
- Support corners.
First, prepare the support posts. For them, eight planks are cut from the board. Four of them will be vertical posts, the rest will be connecting jumpers. Two frames are assembled from blanks. To do this, 8 mm holes are made in the boards, into which two dowels are driven with a rubber hammer. The fasteners are pre-coated with glue.
To make the frame of the footrest stronger, after connecting the elements, it is additionally tightened with clamps and wait until the glue has completely dried.
A narrow strip is attached to each frame along a vertical stand on hinges. Mark on the wall the locations of two corners on which the tabletop plank will rest. After the corners are fixed with self-tapping screws, proceed to installing the table frames. They are attached strictly vertically between the corners close to them. To do this, each frame strip is screwed to the wall with self-tapping screws.
According to the planned dimensions, a tabletop is drawn and cut out of the canvas. External corners are rounded if necessary, and the edges are milled. A strip is cut from the smooth edge of the tabletop, which is then attached to the corners. Before this, the bar and the main part of the table are connected with hinges. The last step is to fix the tabletop to the wall of the balcony.
Folding chair for balcony
A reclining chair for a balcony is just as necessary as a table. If you constantly take out your home furniture for tea drinking or work, it will most likely quickly become unusable due to temperature differences, as well as humidity and street dust.
The principle of making a folding chair is the same as that of a table. If the table is made with your own hands, then making chairs on both sides of the table will not be difficult. You can use the same pattern as for the table, slightly reducing the dimensions. In this case, you will get an original set of furniture for the balcony.
A folding chair on the balcony will be an excellent addition to the table
For convenience, you can make soft fabric pads stuffed with foam rubber, attaching a regular underwear elastic sewn crosswise to one side.
This design makes it easy to attach a soft seat to the wooden base of a chair.
The only inconvenience of such furniture is its annual removal for the winter. If you leave a table and chairs on the balcony in frosty weather, their service life will be only one or two years. And the cost of furniture made by yourself will be an unnecessary waste of time, energy and money.
How to care for a table on the balcony
Furniture items on open and closed balconies require regular maintenance. A wooden folding table on a loggia must be coated with a protective compound during the production process. Over time, varnish or paint loses its aesthetic qualities. This is facilitated by temperature changes, humidity, and dust. Therefore, the old table covering is removed with sandpaper and a new one is applied.
It is necessary to take care of the interior item between repairs. A folding table requires regular removal of dust, dirt and moisture from the surface. The product must be protected from exposure to aggressive liquids and mechanical stress. When creaking occurs in the fasteners, lubricate them with machine oil.
How to make a table for a balcony with your own hands
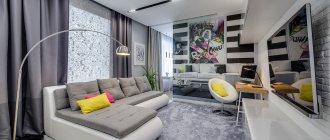
Most apartment owners are thinking about how to make their home spacious and their balcony more functional and beautiful. How to make sure it doesn’t turn into a boring and abandoned room. After all, how wonderful it is to wake up in the morning and drink a cup of coffee on a cozy balcony or after work to take a break from the bustle of the city, sit alone and read a book.
To do this, it is necessary to arrange the balcony so that this place is truly intended for relaxation. There are many options for decorating the interior of a loggia; it can be furnished with modern and comfortable furniture, but the main thing is not to clutter it. Since this room has limited space, you can install a small folding table here.