Anastasia Isakova 04/02/2017 We do it ourselves Leave a comment 42,590 Views
Little girls love to play with their dolls. They are trying to arrange the same home for them and make fashionable outfits. But when a child gets ready for bed, he also does not forget about his toys. Your favorite doll, given for your birthday, also wants to sleep. Of course, it’s easier to ask parents to buy a bed for dolls, but why spend money if you can make it yourself? Let's figure out how to make a bed for dolls, what materials can be used and how to decorate the miniature bed.
Preparation of materials
Before you start making a bed, you need to look for suitable materials. Take out your “wealth”: scraps of fabric, beads, buttons, bows from hairpins, ribbons. All this will come in handy. You also need to decide what you will use to make a bed frame for dolls with your own hands. The most suitable material is corrugated cardboard or a shoe box. Foamed polystyrene will also work. Home appliances are often packed in it for safekeeping.
Now you need to find foam rubber. If you don’t have a suitable piece in the house, you can buy it, you only need a little bit. It is advisable to purchase thin double-sided tape, prepare scissors, PVA glue and thread.
Comfortable crib for Monster High
It's hard to imagine a modern little girl who wouldn't have a Monster High doll. But these funny creatures also love comfort, so you can’t do without a crib for them. Moreover, you can do it together with your child.
Materials:
- corrugated cardboard;
- thin cardboard;
- thin and thick cocktail tubes;
- kebab sticks;
- colored self-adhesive;
- pen;
- pencil;
- a piece of padding polyester;
- a small piece of fabric;
- stationery knife;
- scissors;
- glue;
- 4 plastic bottle caps;
- 4 rhinestones.
Furniture for the fashionista Monster High
First, let's figure out how to make a bed for Monster High dolls. The dollhouse and bed for this fashionista should be beautiful and impressive. Made from cardboard and decorated with beads and ribbons, the doll and baby will love the crib.
How to make a bed for a Monster High doll:
1. Take a lid from a cardboard shoe box, cut a strip from the box itself, the width of which is equal to the side of the cardboard lid. The length of the strip should correspond to two long and one short sides of the side of the lid.
2. From a piece of thin foam rubber, cut a strip that is the same in width and length as the previous piece. After this, glue the foam rubber to the cardboard strip using PVA glue. Glue double-sided tape onto the resulting part. On its adhesive side you will need to glue pieces of fabric corresponding in size to the blank with foam rubber.
3. After the workpiece is wrapped in fabric, the constrictions should be made. To do this, in the center of the strip with foam rubber, starting from one edge, we thread a needle and thread, then wrap it around the edges and thread the needle again in the center, in the same place. Thus, you need to make constrictions along the entire length of the workpiece. The edges of the protruding fabric need to be sewn to the foam rubber. Sew beads for decoration in the places where the puffs themselves are made.
4. Now we make the back. To do this, cut two rectangles of the same size from corrugated cardboard and glue them together. Also, cut out the same rectangle from a sheet of thick paper and roll it into a tube. This tube will serve as a back bolster. Glue the resulting part to the edge of the cardboard back. Glue double-sided tape along the edges of the part; secure a piece of fabric to its adhesive base, wrapping the back around the edges.
5. Take a cardboard lid from the box and cover its sides with white cloth, outside and inside. On one side of the side of the lid, attach the previously prepared soft back with a bolster. We also attach the finished foam tape around the perimeter.
6. Cut a rectangle from foam rubber according to the dimensions of the backrest. Glue it onto a thick base (also onto a rectangular cardboard). Cover with fabric and make constrictions, decorate with beads. Glue the finished soft part to the front part of the back of the crib.
7. The do-it-yourself doll bed is almost ready. We cut out the foam rubber, make a mattress, and cover it with fabric on top. We sew the blanket and pillows separately.
You will like the crib, the fashionable toy will be able to complain and relax on a cute bed. Any children's furniture can be made in a similar way. For a more detailed master class, watch the video below.
On video: how to make a bed for a Monster High doll.
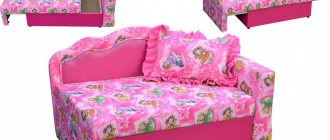
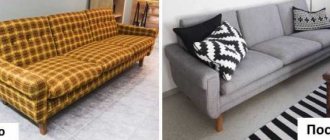
I made it from what I had... A sofa for dolls from what was at hand
Good day, dear guests and residents of the site) The problem with furniture for dolls is well known. If it is possible to get it for small dolls, then for taller dolls, namely 50 centimeters, it is almost impossible.
I invite you to a master class (I dare to speak in this way about my “furniture” handicraft), let’s see together what I “made up”)
My burning desire to arrange the life of dolls pushed me to create another sofa for dolls (and I already had sofas in my practice)). The dolls are not small, namely Gotz , with a height of 50 cm, the calculation was for them, furniture was required for such height)
Before it dawned on me what I would actually “sculpt” a sofa from, I was thinking about where to go to have such a sofa made, and I imagined (with some horror) how much such a sofa could cost?..
The clink of coins and the crunch of bills from the wallet could not be heard, everything there was quiet and frozen, otherwise the money would go into hibernation))), so it was necessary to look for other ways, since the desire and thoughts of a sofa for dolls excited me even in my sleep))
I pestered my husband to build me a frame for a doll sofa from some kind of boards, from plywood, but my husband has no time... I understand this, of course, but I also understood that I would have to wait three years for what was promised)) I myself have a saw, a jigsaw and I haven’t learned how to use other instruments yet... Ehhh, apparently I’ll have to learn that too)))
And so - I came up with an idea)) No need for pieces of wood, no need for saws, nails, screws! Hooray! Moreover, I once did something similar, but all I have to do is change the size of the furniture, make it bigger)))
Let’s start the master class!)) Of course, I didn’t discover America, but everything is in order, how and what I did) I hope that my experience and ideas will be useful to you)
What did I use to create my sofa? And everything that is at hand, that is in every home) What you can’t find, you can buy - the costs will be small)
I took a shoe box: a box from men's shoes, NOT SHOES!), this is a good box format)) And the box is very strong, which we really need) Shoe size 45!)) Dishwashing sponges and cardboard tubes, like like paper towels. You can also see a laptop on the table, but we only need it to go to Beybiki and show what we got)))
We will also need padding polyester, thin foam rubber, cardboard (I used unnecessary boxes), glue (I took Moment Crystal glue), tape, cord (thick thread) for fastening the parts of the sofa, a large needle and also rags for cleaning the floor. New!))) Such rags are sold in any household department))) We won’t wash the floors, although you can if you need it urgently)) But I was planning to use the rags to sew bags for pillows and sofas) I simply didn’t have any other fabric that it wouldn’t be a shame to use them, the pillows will be covered and we don’t need any particularly good fabric), but I had these household rags, so I used them) Of course, you’ll also need fabric to cover the sofa) Oh, and the fabrics I wasn’t there, but I came up with something, since I won’t be able to get to the store soon, I know for sure))
So, where did I start assembling the sofa? From the armrests) I tried on what height and length they should be (depth?.. I don’t know which is correct)), and made these armrests from dishwashing sponges, gluing them onto cardboard of the size I needed.
These are the blanks we got.
Please immediately take into account that on the box (on the seat of the future sofa) there will be a padding polyester pillow. Dolls can’t sit on a hard sofa, it should be soft and cozy, like on a real sofa)
In the armrests, also take into account the height (diameter) of the cardboard tubes we have, we will also attach them to the blanks for the armrests of the sofa.
The tubes were glued) Why did I also use tubes? In order to give a figure to the armrests, it seemed to me much nicer and more interesting) It doesn’t matter if you don’t have such tubes: the armrests can be straight) In principle, the sofa can be without them at all)
Once again we try on what happened) I initially made a mistake, I made it a little low, I just didn’t take into account the fact that the seat with a pillow would be higher, so I had to build up the armrests from below again with the same dish sponges.
We will attach the armrests to the sofa with the cardboard side, let it be soft on the outside)
Then I took the lid from the box, sewed a fabric cover for it (I have a household rag)), pulled it over the lid, and stuffed it with padding polyester. Fill with padding polyester as much as you see fit, depending on how voluminous you want the back of the sofa to be.
Then I sewed a stretched and padded cover with the box lid itself.
I have such a bobbin with cord (thread), I used a tapestry needle for embroidery with ribbons. A needle with a blunt end, they also come with a sharp end, but using a needle with a blunt end you have practically no chance of hurting yourself))
You can make small holes in the lid in advance using an awl or something else to make the needle pass through more easily. That's what I did)
Next, you need to attach the back (lid of the box) of the future sofa to the base of the sofa, to the box itself) Again I marked holes for the passage of the needle, used a ruler to mark so that everything matches on both the lid and the box)
Sew it on.
Sew it however you like, the main thing is securely) I ended up sewing it with a cross stitch. When you start sewing, leave the long end of the cord on the side where you started, we will need it in order to then tightly tie both ends of the cord when your cord comes back at the seams)) First I made stitches in one direction, then in the other)) I tied the ends of the cord (rope) together. I don’t know if you understood my point))
In order for the back (lid) to hold even more firmly, I took tape and attached the cover (back) to the base of the sofa with it, glued it with tape behind the back of the sofa)) Well, why not the solution?)) By the way, when did I start sewing on the lid from the box to the base, I also attached it to the back with tape so that it wouldn’t move or move, it would be easier to stitch)
We attached the lid and sewed another pillow, filling it with padding polyester. We put it on the seat of the sofa. I didn't attach anything to it. When covering a sofa with fabric, the pillow will not go anywhere, it will be in place) If this still bothers you, then you can attach it. For glue?.. In general, you can figure it out)
Now let's return to the blanks for the armrests. Let's soften them)) I took the foam rubber from the pads on the chairs (stools), it turned out to be not thick and was perfect for my idea) I'm in no hurry to throw away the pillow case) Maybe it will come in handy in the future?))
This is how I wrapped the blank for the armrest. The outside will be soft, the tube will also become softened))), but we don’t need the side (the side with the cardboard), which will be attached to the very base of the sofa, soft.
The view of the sofa emerges)
The tubes on our armrests are hollow, we need to somehow strengthen them just in case) Therefore, I successfully used scraps from household rags from which I sewed bags) I twisted them tightly and inserted them into the tube. It fit tight, which means it’s good) This is what we need)
You also see in the photo two strange blanks made of cardboard) What are they and what are they for?) We will attach such parts to the armrests - in front, on the “face”, so to speak, and in the back)) We will need 4 such blanks. To make them, we first outline the figured “face” of the armrests on cardboard) We cut out the parts and work with them further)
I made two such blanks soft, only on one side, using the same foam rubber as for the armrests. You can soften all four pieces if you wish, but I didn't need to.
Glue the part to the foam rubber. Cut it out.
We need to cover all four blanks with fabric. That's what we do. We trace them over the fabric and attach the fabric to the pieces. I first sat it on glue, and after it dried, I stitched it with thread. Don’t try too hard to do it carefully, everything will hide where it needs to be)) The foam on the part should be on the front side, don’t get it mixed up) We have cardboard on the inside) We will use this cardboard part to attach the part to the armrests of the sofa.
My pieces are covered with different fabrics, but this is only because I was sorely lacking this very fabric and had to combine them. In principle, combinations can be desired from the very beginning)
Details on one side and on the other. What happened) The “top” of the part is gathered on a thread, pay attention)
Now let's start covering the sofa with fabric. We apply our fabric, outline the width and length. For the back of the sofa, we immediately mark on the fabric how much we need to sew to make it look like a bag on the back. We sew such a bag-cover up to the level where the base of the sofa is, then the fabric goes down to the floor freely, it also lies on the seat of the sofa. I hope I'm telling you clearly))
This photo shows a little bit to what level the cover bag will be sewn and how the fabric diverges - down and to the side.
I had to sharpen the fabric at the back to the required length, as there was tension with the fabric) It’s good that I found a cotton fabric that perfectly matched the main upholstery in color) And the sofa upholstery itself is nothing more than kitchen towels) New, of course) I like their texture I liked it and thought that the towels were perfect for upholstering a sofa) One thing was bad - the towels did not meet the required sizes)) I had to tinker) So stock up on fabric))
Rear view of the sofa. The bag-cover is turned inside out, that’s why the color of the fabric used to extend the cover is faded))
At the same time, I immediately marked the places where I would sew the corners on the bag-cover.
Another fabric was placed in front of the sofa. Firstly, it looks nicer and more natural, and secondly, I needed a strip of the main fabric. This is exactly what the exchange took place - a strip of companion fabric (companion towel))) for the upholstery of the sofa, a cut strip - for me)) A piece of the main “upholstery” fabric was used to cover two of the four parts for the armrests) There was only enough for two details) When there is enough fabric - such “wisdom” is only optional)
When the bag-cover was already ready and I put it on the sofa, the sides of the sofa remained “naked”. I fitted the upholstery fabric, smoothed it gently)) and glued it with Crystal Moment glue. Then I sealed the sides with tape, it seemed like I was additionally fixing the edges of the fabric))
This is the view)) don’t let it scare you) This is where the armrests will be attached)
Naturally, we measure and try on the fabric for upholstery of the armrests. Here too I had to combine and stitch due to the lack of main fabric.
I sewed something like a “sleeve” and pulled it over the armrest.
The sofa is almost ready) I sewed up the “sleeves” on the armrests and tightened them as much as possible) This is how everything looks now) The armrests themselves are already attached. I attached them to the sides of the sofa using a tapestry needle (or any large needle with a large eye) and a cord (rope, thick thread). I carefully pulled the cord inside the box (the base of the sofa) and tied it. I didn’t photograph this stage, but I think everything is clear with this part of the work)
I folded the edge of the fabric that goes along the bottom, tucked it inside the box, glued it with Moment and then secured it with tape. I did this both in front of the sofa and in the back.
View of the box (base) from the inside.
All that's left to do is attach the shaped parts to the armrests of the sofa. I glued them with Moment Crystal glue.
Front view of the sofa.
Rear view of the sofa.
Side view of the sofa.
Everything is neat with us, the upholstery is in order)
That's it, the sofa is ready) Let's create an ambience)))
And as a bonus, photos of the sofa with dolls) They happily tried out the new furniture)
We apologize for the photographs, we took them late in the evening and there was not enough light)) There was no other free time, and impatience is a great force))
In the photo - Llorens dolls with a height of 35 cm) By the way, the girl in pink is new to us))
A couple of Huangchiks fit in too))
Well, and a photo with your beloved Gottziks, for whom this sofa was started)
The sofa is ready and my dolls can make full use of it) But I have some ideas for decorating the sofa) If they come true, we will definitely show you the improvements)
I would also like to note that our sofa remained hollow, i.e. The “box hole” is not closed by anything.
Here is the sofa inside)) That same “black hole”))
I didn’t do anything intentionally, I didn’t glue cardboard on the bottom or anything else, the sofa suits me just the way it is) And besides, under the sofa you can put some doll things, their toys, clothes, and so on)
Thank you all for your attention) I will be glad if you yourself apply this method of creating a sofa for dolls in life) And of course I will be glad to see your sofas) Interesting!)))
I wish everyone fruitful creativity, new ideas and their implementation) Don’t forget to share with us)
Bye everyone) See you later)
Other options
There are other options for making a bed for a doll. It can be either a classic model - single, double, or bunk. We offer two options for how to make a sofa and a crib.
Sofa for a doll
How to make a sofa for a doll with your own hands? The best material for the frame would be foamed polystyrene; it is lighter and more rigid. But it doesn’t matter if you don’t find it. A cardboard frame with foam rubber and fabric will look no worse.
You need to start making your sofa by determining the dimensions. Try to base it on the height of your favorite toy or use patterns from the Internet, where you will find a hint on how to make a sofa for a toy house. In the case where the base of the frame is polystyrene foam, the back, sides and bed are cut out separately. You can also use regular sponges for washing dishes, covering them with a cloth.
Then a layer of thin foam rubber is glued onto the blanks, and fabric on top. You can connect parts of the product not only with PVA glue, but also use decorative needles with a bead-shaped head. This will serve as an additional decoration.
When the main material is corrugated cardboard, the back and sides can be cut from one piece. To keep the shape, the cardboard is additionally glued with pieces of paper, folded, and allowed to dry.
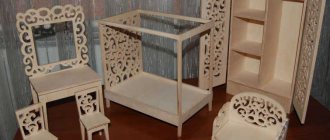
Two-tier model
A bunk bed is made from two shoebox lids. First, a frame is made from rigid wire or wooden planks, then it is wrapped in fabric. It is better to involve parents in the manufacture of such more complex structures. They will also enjoy this activity. An adult, he remains a child at heart.
These are the main recommendations. You can decorate furniture based on materials and imagination. These are sewn, glued beads, buttons, small bows, and ribbons. Pay special attention to the blanket or bedspread. Use frills, leftover lace, and braid. Complete the furniture set with an ottoman and an armchair made from the same materials.
In the video: DIY bunk bed for a doll.
Making a cradle from cardboard
It’s easy to make a doll bed from cardboard with your own hands. But before you start making a bed for a doll from cardboard and wooden blocks, you need to purchase the necessary materials and tools:
sheets of cardboard;- wooden block;
- PVA or universal glue;
- tape measure;
- scissors;
- paper for making drawings;
- special knife for wooden surfaces;
- paints and brushes;
- elegant thick fabric to decorate the headboard and footboard of the bed;
- beautiful wrapping paper or leftover wallpaper;
- foam rubber or synthetic winterizer;
- various beads and jewelry;
- all kinds of scraps of chintz fabric.
To make a cradle for a baby doll from cardboard, cut out all the details that were drawn in advance. To create patterns, be sure to measure toys: a doll or a teddy bear, and based on their dimensions, make drawings of the details of the future crib. Then, according to the patterns, all the details are carefully cut out with a stationery knife.
The crib consists of a cardboard headboard and footboard, and the bottom is made of a wooden block. A block of wood is glued to the headboard and footboard. All fastening seams can be additionally decorated with strips of beautiful thick fabric or wrapping paper, which are glued on top of the seams. To make the toy look even more attractive, fabric or paper strips are decorated with all kinds of beads, guipure ribbons, and painted.
What else can you do?
When dad is involved in the process, models for toys can be made from plywood and wood. However, this can be a fun activity for the whole family. While dad is busy cutting out the frame elements, mom and daughter can work on the bed and bedspread.
Children's upholstered furniture made from dish sponges is original and simple - they are bright and multi-colored. You just need to cut it out and size it. Craftsmen also weave the side of a doll's bed from wire, creating this kind of miniature of a forged bed. It looks original and beautiful.
In general, this is an interesting and exciting activity, making a bed for dolls with your own hands. Parents are often involved in the making of toy furniture. They do this with no less enthusiasm than children. For some people, homemade products become a hobby. Making products with your own hands is a three-in-one pleasure. Joy for a child, a place to sleep for a toy, the possibility of psychological relaxation for adults.
A simple bed for a doll made of cardboard (1 video)
What material is best to make it from?
The material from which a doll's crib is made can be absolutely anything. It all depends on what is currently available at home, and on the imagination of the parents and child.
Wooden shields
If you approach the issue thoroughly, then such furniture can be made from wooden panels no more than 2 cm thick, so that the product is not too bulky. The advantage of wood is that the resulting bed looks neat and beautiful and is likely to last a long time. Panels are sold on any construction market at a very reasonable price.
Plywood
If it is not possible to purchase a wooden shield or you do not have the skills to work with wood, you can make a sleeping place from plywood. Plywood is affordable and easy to cut and glue. The resulting furniture can be quickly painted in absolutely any shade or decorated with inserts made of beads, beads or shells.
Step-by-step instructions for creating a doll bed from plywood can be seen in the video:
Cardboard box
Cardboard is a universal material for children's crafts, since it is accessible to everyone. It can be easily obtained from common household items: shoe boxes, appliances, and even groceries. You can often get cardboard boxes for free from the supermarket.
It’s easy to make a doll’s crib from a box, but it will also be easy to break. For a bunk bed, it is better to use both cardboard and plywood.
Matchboxes
It is easy to make a frame from matchboxes: to do this, simply glue them together step by step using PVA glue. Externally, the structure will not look very beautiful, but it can be covered with fabric or covered with self-adhesive paper. Before you start assembling, it is better to take used boxes and draw a diagram.
Polystyrene
If you recently bought household appliances, you might have saved a box from the store along with polystyrene foam, which can be used to make a sofa bed for a baby doll. Polystyrene is not very durable, but due to its solid structure, it makes interesting products without glued parts.
Foam rubber
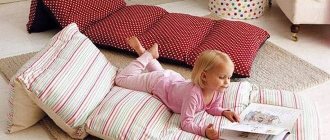
Foam rubber is best used only as a component, since it is too soft for a frame. But if there is no alternative, it can be used for the entire product. By the way, for such a soft sofa bed, ordinary dishwashing sponges, pre-covered with fabric, are ideal.
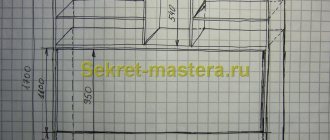
DIY crib: step-by-step master class
To make a beautiful sleeping place for B arby, you will need:
- cardboard (preferably corrugated);
- album sheets;
- PVA glue and Moment;
- scissors;
- wire;
- regular and double-sided tape;
- fabric or self-adhesive colored paper.
Designing a children's bed consists of several stages:
1. On a landscape sheet you need to draw a model of the future sleeping place and decide where the headboard will be. The sizes can be any and depend on the size of the doll.
2. Using ready-made corrugated cardboard templates, cut out several parts. The strength of the future product depends on the number of elements.
3. After this, using Moment glue you need to connect all the parts to each other.
4. Then you need to take 4 pieces of wire of the same length (about 50 cm, but depends on the size of the crib), put them on cardboard glued in layers and secure with tape.
5. Then fill the surface with the wire with PVA glue.
6. After this, you need to put the remaining cardboard on top and glue it.
7. The semi-finished product must be placed under a press (any heavy object).
Basic sewing rules
After choosing old things that will become the basis, you need to make patterns and get down to business. To do this you need to know the basic rules:
- be sure to overcast the edges of cut fabrics;
- sew products only inside out;
- choose thin threads No. 40;
- make patterns according to the height of the baby doll, bed.
Important!
To the dimensions of the pattern you need to add 3 cm for seams.
We present a size chart of the most popular types of dolls.
| View | Standard toy size (height cm) | Length of sheets, duvet cover cm |
| Barbie | 27-29 | 30 |
| Big doll | 45-50 | 52-53 |
| Average | 33-40 | 42-43 |
| Small | 25-30 | 30-33 |
| Baby Bon | 43-45 | 47 |
Using this table, draw the pattern, adding another 3 cm to it for the crotch seam.
Now let's take a closer look at the different textile details.
Beautiful embroidered handmade bed linen for dolls
How to sew a pillowcase
Select the desired size of fabric, cut out two parts from the fabric, sew around the perimeter, leaving about a 10 cm gap
Fill the future pillow with ball filler
This is one of the most difficult parts. The catch, first of all, is the small proportions. The doll pillowcase will turn out to be quite small, so you need to work carefully.
We sew up the connector with hidden stitches and get a small pad
We will sew a standard pillowcase with a turn up. Measure out the square (rectangle) of the required parameters and make the appropriate marks.
Centering the design, cut out the fabric for the pillowcase, take a ruffle or braid, step back 1-2 mm from the edging of the ornament and adjust it inward
Apply the future scent on top about 30% of the width of the pad, bend the edge
Advice!
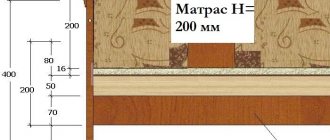
The pillow should be 3 cm larger on all sides than the space occupied by the baby doll's head.
Turn it over and, focusing on the contour, grind the part, retreating 1-2 mm
We also sew the wrong side of the pillowcase along the perimeter, focusing on the outline of the ornament, and first bend the bottom edge
Next, put marks similar to the first dimensions. The third segment should be equal to 1/3 of the full measurements.
We overcast the internal seams, turn them inside out, sew on beautiful buttons and make loops for them
Now cut out the resulting segment, sew a gap to the main part (which was 1/3 of the pillow). Then fold the resulting rectangle (or square) in half and sew on both sides. The pillowcase is ready.
sheet
We make a sheet, add 5 cm to the size of the mattress on each side, bend the edges
With this subject things are easiest. The sheet should be 2-3 cm larger than the doll's bed (depending on the height of the bed).
All you have to do is measure the dimensions of the bed, cut a rectangle of the appropriate size, and hem it around the perimeter.
If desired, you can add ruffles and fringe.
Do I need a duvet cover?
Selecting fabrics for making a patchwork quilt
The question of a duvet cover often arises here. Is it needed? The answer depends on the blanket you have. If it is tight, a cover will come in handy. If it is thin, this part of the textile is superfluous.
We cut out the central part of the blanket - some beautiful block, embroidery, an interesting fragment
We edge strips around the perimeter of the picture
It is best to get a winter blanket by making a cover for it, and a summer blanket that does not require this detail.
The duvet cover must match the size of the duvet. Measure it and make a pattern according to the measurements obtained. It is best to make a case with a lock on the side or a slot on one side.
Cut a strip from another fabric, make two squares and cut them diagonally
Sew a 3 mm allowance around the perimeter
Align the edges, assuming a 7 mm allowance
Measure two identical rectangles. Fold it in half and sew both sides. Leave the third stitched or sew a lock there.
We take two squares from another fabric with a side of 25 cm, cut them diagonally, stitch them on the sides
Sew a very thin lace trim around the perimeter
Important!
The slot is left along the width of the product, the zipper is inserted along the length.
We take a very thin padding polyester to fill the blanket and make a “sandwich” of fabrics
We make a stitch along all the contours and an additional seam next to the lace braid
Now you can sew bedding for your doll yourself. If desired, they can be decorated with additional elements.
We come up with options for stitching different fragments of the blanket
We make an edging along the contours with a stitch, which will create a bulge
These can be stripes, stickers, embroidery, stones, rhinestones - anything that can be found in the house. Don't forget to consult with your child which decoration he or she will like best.
Beautiful ready-made bedding set for a doll's crib, made by yourself