Benefits of homemade furniture
Homemade sofas will always have a number of advantages over industrial furniture:
- Craftsmen have the opportunity to independently select the model, size, shape and type of construction.
- A huge selection of available materials for work.
- A large collection of video tutorials, step-by-step instructions on how to make a sofa with your own hands, and ready-made drawings are freely available.
- No special training in the basics of construction work is required. It is enough to be able to hold a jigsaw, grinder, welding and a small set of other tools in your hands.
- Upholstered furniture made by yourself will always be much stronger than production furniture, since the craftsman carefully checks and evaluates the quality of fasteners and impregnates surfaces with antiseptic solutions.
The design of handmade furniture deserves special attention: needlewomen in the family can sew soft, comfortable pillows and removable covers. And the masters themselves organize stencil painting, pasting with PVC films or wood burning.
Furniture options and making them yourself
To make the gazebo more comfortable and suitable for relaxation, you need to install furniture. If you do not want to spend a large sum of money on its purchase, you can build it yourself.
The creation technology is quite simple, if you select the right materials and draw an approximate drawing. First of all, you need to prepare the parts, and then proceed with installation.
Did you know? The most expensive piece of furniture is considered to be a chair made by E. Gray, worth $28 million. It is made of genuine leather, and the decor is complemented by a pair of marble dragons.
Sofa
To make a sofa for a gazebo, prepare the following list of tools:
- drill and axe;
- hammer;
- marker and tape measure;
- screws, nails and self-tapping screws;
- sanding material;
- carpentry glue.
The materials used are stain, paint and two pallets (dimensions 120x80 cm). It is better to buy pallets in construction stores so that they are not rotten or deformed. Clean the wooden surfaces from dust and sand them from nicks. Treat the material with a moisture-resistant paint coating, which will increase the service life of the product outdoors.
Here you can read about how to decorate a chalet-style gazebo.
Step-by-step manufacturing and assembly instructions are as follows:
- Break off the supports from the pallets.
- Cut the shield to the required size and assemble the base of the sofa.
- Attach legs from dense wood. Determine the height yourself.
- Build the back of the sofa using the second pallet.
- Fasten both parts together with self-tapping screws and wood glue for greater strength.
- Attach the armrests.
The final finishing consists of painting. After this, you can cover the sofa with covers that are made from strong and durable fabric. Microfiber and corduroy are best suited for these purposes.
Chairs
You can also use pallets to create chairs. They are characterized by durability, so they can easily withstand a person.
Find out also which is the best polycarbonate to choose for covering a gazebo.
To make a chair from scrap materials, you will need the following tools:
- screws and saw;
- small bars that will be used for armrests and legs;
- plywood and hinges;
- metal corners;
- tape measure;
- screwdriver and electric drill;
- gloves and safety glasses to prevent blisters and splinters from getting into your eyes.
First of all, you need to cut the pallet into 2 parts. They should be the same so that there is no sharp transition between the seat and the back. Go over all surfaces with a sander, removing nicks and roughness. This will prevent injuries from occurring while you rest.
Installation of the seat and backrest consists of connecting the two parts of the pallet using screws and tightening them tightly with self-tapping screws. You can secure them with double slats to make the structure more durable. Thanks to this, people will feel safe during their holidays.
Important! If you want to make the chair mobile, then use casters.
Manufacturing and installation of legs consists of the following steps:
- Make the bars short but wide. The optimal height is 30 cm and width is 10 cm.
- Attach them to the bottom of the structure using metal corners.
Attach armrests and cover the chair with paint or varnish. Additional layers will increase the life of the furniture and also make it brighter. The finished chair will be much more comfortable if you cover it with a soft blanket and lay out pillows in colorful shades.
Shelf
To place a large amount of dishes, decorative items and other things in the gazebo, you can equip it with shelving. Thanks to their compactness, they will not take up much space. To make a shelf, use the following materials: boards, impact-resistant glass, pallets, etc. All parts of the structure must be fastened together with screws and nails.
Pay attention to the information on how to make and install polycarbonate sliding windows for a gazebo.
For the tools you will need to create a beautiful shelf, use:
- jigsaw;
- grinding machine;
- electric drill;
- screws and self-tapping screws;
- paintwork;
- paint brush;
- construction corner;
- manual frezer.
Before you start creating a shelf, you need to decide on the place where it will be placed. After this, select wooden boards so that they are the same shade. Lay out the materials on a flat surface and transfer the markings to them according to the previously created drawing. Saw the prepared boards into parts, which will then need to be connected to each other. Sand the parts with a sander and varnish.
We invite you to familiarize yourself with information on how to furnish a gazebo in a loft style.
The step-by-step assembly technology is as follows:
- Place the bottom board on a flat surface.
- Mark where to drill the holes.
- Draw a line parallel to the edge, 8 mm away from the cut line.
- Mark points 5 cm from the edge of the board on the drawn line.
- Make holes for self-tapping screws in the marked places.
- Carry out similar actions on the other side of the board.
- Connect the bottom part of the shelf to the top using self-tapping screws and side boards.
You can use gold or silver stripes as decor for shelves. They are glued to the outside of the structure using glue or double-sided tape. Also, there are several recommendations from experts that you can listen to: gold goes well with light shades of wood, and silver goes well with dark shades. Often, various designs are applied to the sides of the shelf using paint.
Here you can learn how to make a gazebo table with your own hands.
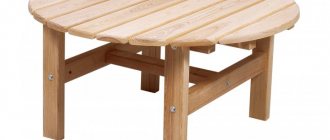
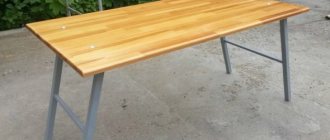
Table
To make a wooden table for a garden gazebo, you will need the following materials:
- dry board (15×5 cm) about 20 m;
- self-tapping screws;
- grinder equipped with a grinding wheel;
- drill;
- saw.
First you need to prepare the boards. To do this, they are marked and cut, following the expected dimensions of the future table. Summer residents advise making 18 equal parts. After preparing the boards, they should be dried in the open sun (about two days). This will allow for high-quality sanding. To make a tabletop, connect 5 boards together, placing them parallel to each other. Fasten with four slats (5x5 cm) into which the legs will be attached.
Pay attention to the information on how to use logs in landscaping.
The distance between the edge of the table and the block should be 30 cm. After completing all the steps, proceed to installing the legs. They must be strong to withstand the appropriate load. It is best if their length is 50-70 cm and width - 8-10 cm. To strengthen the legs, you can use an additional board, which is attached with self-tapping screws. Its optimal length is about 170 cm. When the structure is assembled, sand the corners and tabletop to avoid nicks.
Armchairs
To make a gazebo chair, prepare the following tools:
- electric saw and hand router;
- screwdriver and screws;
- drill;
- glue;
- boards.
Important! Use wooden plugs to hide screws.
Step-by-step creation instructions:
- Make four legs out of the boards. Two of them should be 5x7 cm in size, and the remaining ones should be 6x5 cm.
- Separately build the backrest, armrests, jumpers and slats.
- For straight sections, use an electric saw, and for curved sections, use a jigsaw.
- Attach the armrests to the legs using self-tapping screws.
- Sand uneven parts with sandpaper.
- Connect the side parts of the backrest to the first seat bar.
- Screw the upper part of the backrest to the base with screws.
- Sand all parts of the chair.
Wooden pallets
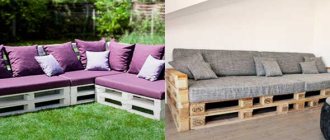
Convenient shape, suitable dimensions, ideal basis for assembling most models. Due to the wooden surface, it requires preliminary impregnation to increase the service life of the furniture. Perfect for making a corner sofa with your own hands.
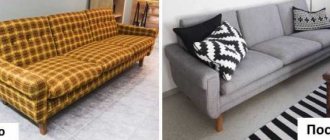
Sofa made of pallets
Today, it has become very fashionable to make wooden sofas from pallets. This material is very easy to obtain, and its strength fully meets the requirements for making a small sofa, and the external decoration will help make it comfortable and attractive. The work will require several pallets, depending on the selected size of the sofa. The main thing is to sand them first, removing splinters and roughness from the surface, and in addition you can even varnish them. This way they will look more aesthetically pleasing in visible areas and will be protected from fungus.
You can assemble a sofa made of wooden pallets with your own hands in just a few hours. Exterior finishing will also take time, but this process is more interesting, since the result is already visible. Such sofas are suitable for small spaces, as they can be made even for two people. They are made for terraces, balconies, gazebos and other temporary places for people.
Profile pipe and reinforced iron
Metal frames are certainly the most durable structures among all known models. In addition, it is much more convenient to assemble frames for a sofa bed from metal pipes with your own hands. Accessories for moving mechanisms can be purchased at construction supply stores.
Real works of art are made from reinforced iron. An interesting idea is a combination of two materials: a frame made of pipe, embossed side stops made of thin reinforcement.
Sofas are assembled from sheets of plywood, frames from plastic bottles are glued together. The sofa made from a large log of wood, made by hand, has an original design.
A huge collection of available materials allows you to make the best choice, because most materials can be found in the household of every craftsman.
A simple garden sofa made of wooden beams.
This sofa can be made with basic power tools in less than 5 hours. Modern outdoor sofas can be quite expensive and unaffordable. This sofa is made from a wooden beam, a couple of boards and some pillows that were bought at IKEA , it turned out to be quite strong and beautiful. In the end, a gray stain was used to add color and it was advisable to cover the sofa with a special varnish for outdoor wooden furniture. All steps are demonstrated in detail in the video below.
Choosing filling for the sofa
Any furniture should be comfortable and soft, so you should think about the composition of the filler in advance. Choose soft upholstery based on the following requirements:
- Strength of the material.
- Resistant to cleaning and cleaning. Country and garden furniture always has a risk of accidental contamination.
- Porosity. The selected material should not retain unpleasant odors, maintaining natural air circulation through the canvas.
Of course, user friendliness is equally important. Modern fillers that more or less meet the required requirements include:
- Foam rubber.
- Polyester.
As a more expensive option, special memory foam is used, which is used for the construction of orthopedic furniture.
Note!
Do-it-yourself screen: a step-by-step master class for creating it yourself. Types of screens, manufacturing materials + design ideasDo-it-yourself installation of interior doors - preparation of the structure, selection of doors, installation step by step + instructions from professionals
- DIY shoe rack - types of designs, manufacturing materials, step-by-step master class with simple diagrams and drawings
Some tips regarding soft elements
It is important to remember that the comfort of use of the product largely depends on these elements. So stick to the following:
1. To ensure that the seat lasts as long as possible, choose the padding material with the highest rigidity. It can be softened with an additional layer of the same padding polyester placed on top.
2. To prevent soft pillows from always trying to “run away” somewhere, sew small ribbons to them. Using them you can fix the pillows.
3. We obtain the backrest angle required for convenience using the same pillows. We make the top thinner and the base of the pillow thicker (several layers of paralon are glued together).
The product, of course, will still need to be coated with varnish or paint, but the main work will already be over. All that remains is to enjoy the high-quality and inexpensive renovation of the interior.
Selecting upholstery material
Another important criterion for independent work is the choice of textiles for upholstery. Every housewife will appreciate the presence of a removable cover, because carrying out high-quality cleaning (ongoing or as needed) will become much easier.
Textiles must be sufficiently durable, porous, and resistant to shrinkage after washing. Today, the following materials are used for upholstery of sofas:
- Genuine Leather.
- Leatherette.
- Tapestry.
- Chenille.
- Jacquard fabric.
For sofas that are built into private houses or apartments with their own hands, more expensive materials are used: velor, velvet. When working, it is better to use options for removable parts that can be easily removed and washed.
Choosing suitable types of furniture
Photos of handmade garden furniture can be found in large quantities on gardening websites. There are a lot of people interested in such topics. Of course, this can be considered an excellent, economical way to decorate your country landscape.
This is highly relevant for those who like to combine relaxation and interesting work and at the same time prefer not to spend financial resources on purchasing purchased furniture.
From the photographs you can not only select the necessary types of furniture, but also understand the procedure for its manufacture. Instructions and recommendations for such work are always accompanied by visual views of the process. Moreover, on the Internet there are also diagrams and drawings on how to properly make garden furniture, which make it easier to complete the work.
The basic procedure in the manufacture of corresponding products is the process of connecting certain furniture parts from different sides and at different angles.
That is why the availability of photographs, diagrams and drawings of the selected models, including basic skills in handling tools, is a huge help in shaping the landscape design of the site. A good help to subsequently have a comfortable stay.
Images, plans, as well as step-by-step making of garden furniture with your own hands, revealed in videos, are usually found on the Internet. Today, the World Wide Web is the main primary source. At the same time, it should be noted that there are quite a lot of printed publications on this topic.
Classic linear sofa
The simplest model for independent work. It has a simple frame, and ready-made drawings can be found in the public domain.
Note!
Do-it-yourself sliding wardrobe - manufacturing manual with a full description of the stages, types of structures, choice of manufacturing materials (photo + video)Do-it-yourself carriage screed: step-by-step instructions for creating it yourself, diagrams and drawings for beginners, selection of materials and tools (photo + video)
- DIY stool - types of stools, manufacturing materials, step-by-step master class with simple diagrams and drawings for beginners
Sofa ottoman
A distinctive feature of this design is the absence of a backrest and armrests. All the craftsman needs to do is build a frame, lay down the filling and sew a removable cover-upholstery.
Materials and tools for work
After choosing a sofa model, you need to organize a workplace. This should be a site of sufficient size with high-quality lighting. You will also need the following set to work:
- Wooden beam.
- Wooden pallets.
- Profile pipes or PVC pipes.
- Fasteners (screws, thermal washers, metal corners).
- Welding and grinder for metal work.
- Planer for sanding wooden surfaces.
- Antiseptic and moisture-resistant impregnation compositions.
- Anti-corrosion compounds for metal.
- Decorating compositions.
- Accessories for rotating mechanisms (mounting folding beds).
- Textiles for soft upholstery.
- Cutting and sewing kit.
- Filling (foam rubber, polyester).
- Drawings for work that can be found on the pages of practical interior magazines.
Before starting construction work, you can watch video tutorials on assembling a sofa with your own hands.
Which material is better?
Furniture varies both in appearance and quality. In most cases, owners are guided by the rule: “Whatever is free or cheaper - everything is for the dacha.”
If you are not satisfied with this approach and you want to take a “humane” approach to this issue, then you can consider a number of materials from which furniture can be either simple and beautiful or elite with bells and whistles.
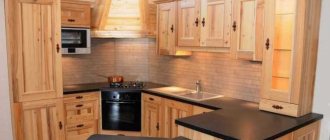
Tree
The vast majority of furniture is made of wood. It can be solid - timber, logs or solid wood, or chipboard - chipboard, OSB, MDF and the like. The variety of shapes, sizes and decorative elements is so large that it is not possible to list them.
Oak
A noble and elite material is solid oak, from which wood craftsmen are ready to create a beautiful tabletop. Benches, chairs or benches can also be oak. This material is considered really elite and very cool. It looks very impressive in any gazebo.
From pallets
Pallets are a very popular material among summer residents. If they are positioned correctly in the gazebo, all imperfections are hidden and the appearance is put in order, then they will look great. In addition, these pallets are much cheaper than full-fledged furniture.
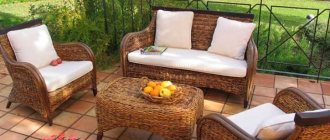
Rattan
An interesting material for creating furniture is rattan - dried stems of a tropical palm tree. A cheaper analogue is artificial rattan, from which even gazebos are built.
The price for this furniture is quite high, because rattan is a premium material, but it looks amazing. Sets of tables and chairs look very stylish and will fit beautifully into most luxury country house interiors. It will look ridiculous in cheap gazebos.
Preparation of the drawing
If desired, there is always the opportunity to use ready-made drawings and original designs for assembling sofas of a wide variety of models and types of construction. In the case of making a homemade plan, it is necessary to display a number of parameters:
- Dimensions of supporting structures.
- Features of the frame assembly.
- Fastenings (external and internal parts).
- Folding mechanisms, including installation points for movable fittings.
If there are additional elements (boxes and storage compartments, armrests, headrests), they should be depicted on the diagram.
We develop drawings of the sofa with our own hands and make a list of what is needed
New fashion trends will favor people who are just starting to learn something. The trend is simplicity of models and mixing of styles. Therefore, even the simplest option will look attractive, and will not be a black sheep compared to the rest of the furniture.
Here is an example for assembling a sofa drawing with your own hands, which is easy and simple. If you have your own thoughts on this matter, feel free to transfer them to paper. For this option you will need the following:
- Beams and boards of different sections;
- Self-tapping screws and tenons;
- Screwdriver;
- Tape measure and pencil;
- Wood putty;
- Paints and varnishes.
drawing of the sofa discussed in the article
The total length and dimensions of the beams that will be needed to assemble the version of the above photo:
1. Section 40/20 mm – 12.8 m (20 segments of 64 cm each). 2. Section 40/40 mm – 4.2 m (4 segments of 60 cm, 2 of 90 cm). 3. Section 40/60 mm – 1.9 m (1 segment). 4. Section 40/200 mm – 8.4 (2 segments of 56 cm, 4 of 182 cm).
The length of the screws is determined by the location of their insertion. They should go right through the block that lies on top and go deeper into the bottom one by at least 2 cm.
You can do without spikes, but then we recess the caps in visible places, after which the place is sealed with putty of a suitable color.
assembling sofa No. 2 according to the drawing, stages 1-4 assembling the sofa according to the drawing, stages 5-8
Assembly of the structure
The main stage of work is carried out after preliminary surface treatment. Metal parts are coated with an anti-corrosion compound, wooden parts - with antiseptic solutions. Instructions on how to make a sofa with your own hands:
- Wooden pallets are attached to each other using self-tapping screws and metal corners.
- The frame made of wood slats is fastened according to the prepared diagram.
- Profile pipes are assembled into a single structure by welding.
- It is important that the back and seat are made in the form of a solid canvas or in the form of frequent slats.
- Sheets of soft padding are laid on top of the frame (seat and back).
- You can additionally attach the filler with screws to the frame.
- A cover is pulled over the padding material.
The removable cover can be sewn separately.
Master classes on making creative models
Homemade garden furniture has a number of undeniable advantages: a laconic, yet unusual and stylish design, the absence of fragile or easily dirty parts, and reliability. In order to successfully implement your own or borrowed project, it is not necessary to achieve high surface quality. Much more important is originality, the unexpected use of familiar objects in a new quality. Below are several interesting options that can serve as an example or impetus for developing your own garden furniture projects.
Bench made from old chairs
Old chairs that have served their purpose can still perform their main function for some time, only in a slightly different capacity. They make simple, convenient benches for the garden, which even inexperienced home craftsmen can assemble. To make such furniture, you can simply connect several chairs assembled in a row with one common seat. Or use the second method of creating a bench, when the base is two chairs facing each other. Their backs in this case play the role of armrests. Assembling such a garden bench is somewhat more complicated, since it is necessary to remove the drawers and make longer common crossbars.
You can approach creating a product even simpler. In this case, you will not have to remove the front legs, which will increase the strength of the structure and speed up the process of assembling the bench. The back of a piece of furniture can be made from a wooden strip attached to the upper parts of the armrests. After this, fill it with a plywood board, or install several horizontal planks to form a supporting plane.
Summer cutting table made from pallets
Pallets are convenient and affordable blanks for creating any home improvement items. They make successful furniture, easily transformed or disassembled into separate fragments. A simple garden cutting table can be made from three pallets, two of which are installed on an edge - they serve as supports. The third is fixed at the top and represents a lid (table top).
This design is as simple as possible, but the main drawback is instability. Meanwhile, creating a more durable connection is inconvenient and impractical, since this will result in the mobility of the furniture and the ability to quickly disassemble the summer country table being lost.
Experienced craftsmen advise using a slightly different option for assembling the cutting surface, which is practically devoid of the disadvantages of the method described above. Such a homemade product is good because it allows both rigid connection of pallets with subsequent grinding and finishing, and simple stacking of them on top of each other until the desired height of the product is obtained.
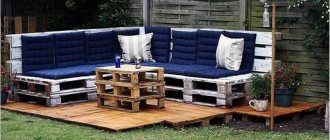
In addition to tables, sofas or armchairs are made from pallets. The assembly process is not difficult, and the surface relief can be made the way the owner wants. A common solution is sanding and painting the product. Alternatively, you can leave the pallets in their original condition to emphasize the camp style of the furniture.
Making your own garden furniture from scrap materials
Folding table with benches
A good option for making furniture for a summer house is a folding table with benches. If necessary, it can accommodate several guests; if not needed, the furniture can be folded and put away in the barn. You can make a separate table with folding legs and two benches, or you can assemble a transforming structure, where a bench with a back turns into a table with benches on the sides.
A ready-made drawing of a folding table with benches allows you to consider the operating principle of this garden furniture and avoid errors during assembly.
Ordinary furniture bolts are used as hinges. The back of the bench “tips over” onto the seat, one half of which slides back and turns into a second bench. You can make all load-bearing furniture elements from wood or use a rectangular metal pipe. The choice of base depends on what tools and skills the master has.
The tabletop and seats of the product are in any case made of wood. The easiest way is to use boards with a thickness of 25 mm (“inch”), which must be planed and carefully sanded. It is recommended to choose deciduous wood - poplar, birch, aspen or alder. If softwood boards are used - pine or larch, you should carefully inspect them for resin pockets. They will release resin that will stain clothing or get on your skin. It is not practical to use such blanks for making garden furniture yourself.
A completely wooden country table is assembled using self-tapping screws, only the moving parts of the product are attached to furniture bolts. If the supporting structure is made of metal, the assembly is carried out entirely on threaded connections.
Drawing of a set of wooden elements for the manufacture of a transforming bench Typical drawing of a transforming bench
Bars for legs
Frame boards
We screw the legs to the slats We connect all the elements with self-tapping screws Wooden element A finished wooden transforming bench, assembled and disassembled
Hanging chair made of hoop and rope
This version of garden furniture is suitable for macrame lovers. The main supporting structures are two hoops connected at an angle to each other. One of them forms the plane of the seat, and the second is a unit that combines the back and armrests of the product.
The hangers are made from nylon cord, braided using the same technique as filling the seat and backrest. For the seat, a hoop with a diameter of 70 cm is used, for the back - 110 cm. The length of the hangers for the garden chair is chosen based on the existing conditions. Typically, the support is thick tree branches or (more often) horizontal beams installed on supports between two adjacent plants, buildings or other structures. To make a chair you will need to prepare:
- about 900 m of cord for weaving;
- slings for suspensions (about 12 m);
- metal-plastic pipes - about 6 m.
The production of the structure occurs according to the following scheme:
- The hoops are made from a metal-plastic pipe with a diameter of 35 mm. The length of the workpiece is calculated using the school formula (for hoops of the indicated sizes 110 and 70 cm, you will need 345 and 220 cm of pipe, respectively).
- The ends of the blanks are connected with inserts made of wood or plastic, which are fixed with self-tapping screws.
- First, the surface of the hoops is tightly wrapped with cord. Then the area of the smaller one is filled with mesh.
- After this, both hoops are connected so that on one side they are connected tightly, and on the other they form an angle of lifting the backrest.
- Next, the side vertical surface is filled with weaving, the method and pattern of which are selected to suit your taste. The slings of the hanging garden chair are braided in the same style as all other surfaces.
For the seat of a hanging garden chair, it is worth making a soft, removable cushion; it will simultaneously serve a decorative and practical function.
Universal bench-stand for summer residents
The universal “upside-down” bench is a favorite piece of country furniture for all those who like to grow gardening plants. The product serves as a good assistant at work, as a means of relaxation, and can perform other functions.
Requirements for bath furniture, arrangement and design of the steam room
In one position, such a country bench is an ordinary seat, and if you turn it over, a comfortable knee rest appears. For production, wooden boards or polypropylene tubes are used. The choice of material is determined by the preferences and skills of the dacha owner. Assembling a wooden universal bench is not difficult:
- Three blanks are cut out - a seat and two side supports.
- The bench parts are assembled using glued dowels or metal corners. For reinforcement, it is recommended to glue wooden bosses to prevent the structure from swaying diagonally.
The disadvantage of a bench made of wood is the lack of elasticity and rapid loss of rigidity of the joints, which is why most dacha owners prefer plastic products. To assemble a “changeover” from polypropylene, you will need to purchase 4 m of tubes with a diameter of 32 mm. In addition, you will need angles and tees (fittings) - 8 pieces of each. The assembly process is carried out according to the instructions:
- Using a hacksaw (or a regular saw with a fine tooth), cut six pieces of length 24 and 14.5 cm. Then 4 pieces each - 34.5 cm and 3 cm.
- Using a plumbing soldering iron, the middle part of the product is made - from 14.5 cm sections and two 24 cm crossbars.
- Then 4 vertical supports of 34.5 cm each are attached to them, onto which corner fittings with 24 cm crossbars are soldered.
- At the bottom of the bench, 3-centimeter inserts with fittings and the same crossbars (24 cm) are attached.
The last step is to install plywood platforms on the working surfaces. You can glue pieces of tourist foam to them to make it softer to sit on or rest on your knees. This garden structure is lighter, stronger and not susceptible to moisture.
Cut two trapezoidal legs Make holes for ease of carrying and operation Drill holes for the pins Make holes in the sides
Drive in the pins, coated with glue, and connect to the sidewalls
Finished bench
Installation of the moving part
More difficult work involves installing folding structures. Separately from the frame, additional panels are made, upholstered with filler and covered with a textile cover.
Grooves for movable rollers are laid along the inner surface of the frame. Rollers are mounted on additional panels, corresponding in size to the track of the built-in grooves.
Along the outer contour of the retractable panels, an additional handle or textile cord is attached, with which you can slide the panel onto the surface of the sofa, turning it into a full-fledged bed with sleeping places.
Assembling a sofa with your own hands according to a drawing developed earlier
Regardless of whether you are going to make a sofa with your own hands according to the drawing shown here in the photo or one that you came up with yourself, remember that the order of the work is always the same.
- First, the smaller parts of the product (sides) are assembled.
- Then we move on to larger elements, if there are any in the scheme (the back, which can be in the form of a separate part or internal storage boxes, etc.).
- And at the very end we put all the pieces together.
The example we have given must be assembled as follows:
1. We take two bars with a cross-section of 4x4 cm and a length of 90 and 60 cm. We move 15 cm from their edges and make a mark, move away from it another 20 cm and make another mark. Here we have marked the place for attaching the bottom bar, the dimensions of which are: 4 cm, 20 cm and 56 cm. We fasten them with 4 self-tapping screws. We repeat a similar procedure with the same set of elements.
2. We take a beam with dimensions of 4x4 cm and a length of 60 cm. One of its edges lies on the top of the shorter beam, and the second rests against the side of the higher one at a level of 60 cm. We secure it with two screws. And we repeat the process on the second side.
3. The sides have been assembled, now they need to be connected to each other. We move from the bottom up, from the front of the product to the back.
4. First, we use elements whose dimensions are: 4x20 cm and 182 cm long.
5. From the side of the shorter bars at the sidewalls, we retreat again 15 cm and measure another 20 cm. The first support rail will be fixed in this area.
6. Divide the sides in half (32 cm) and make marks. At this point the additional rail will be fastened. It is necessary to strengthen the structure and make the seat more rigid.
7. The back of the seat is strengthened in the same way as we did in step number five.
8. In the area of the back, we make a 15 cm indent from the outer seat rail and screw on the last remaining board of the four.
9. The top of the backrest is fastened using the last block with dimensions of 40x60 cm and a length of 190 cm.
10. Slats (4x2x64 cm) are attached along the length of the entire seat. The step between them is 4 cm.
Here is another example of assembling a small sofa according to the drawing
sofa No. 3 – stage 1 stage 2
stage 3
stage 4