Sometimes the old interior gets boring and you want to update the decor with new interesting elements. The question of how to update a kitchen set becomes very relevant in this case. Especially if the old kitchen furniture functions quite well, and there is no desire to change the set to similar analogues. There is no point in turning to specialist restorers when you can remake kitchen furniture with your own hands at minimal cost. Designers will reveal the secrets of a unique headset upgrade.
It doesn't take much effort to breathe new life into old kitchen furniture.
Accessories
Repair of kitchen units must first begin with an inspection of the hinges, guides, handles - all the fittings that are responsible for ease of use and functionality. It often happens that in the places where the mechanisms connect to the façade, the holes become wider than necessary or a part of the canvas is completely missing. Then the headset door becomes loose and lopsided. Dismantling and moving the fittings to a new location will help correct the situation. To work you will need:
- putty;
- screwdriver or screwdriver;
- putty knife;
- sandpaper;
- new fittings;
- varnish or paint to match the color of the headset.
Marking the hole for a new handle
Updating a kitchen set begins with dismantling the old mechanisms. It is better to remove the doors completely for ease of repair. Old holes are no longer suitable for fixing fittings, so they must be sealed with putty in 2-3 layers. It is better to choose an acrylic-based substance that matches the color of the facade for good camouflage. After the material has settled a little, it must be sanded with sandpaper so that there are no irregularities and bulges and opened with varnish or paint.
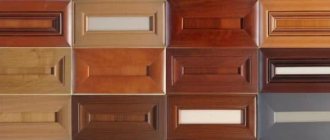
Next, you need to drill new holes and install the appropriate fittings. It’s not difficult to select it yourself: just show the old part to a sales consultant in a hardware store - and he will immediately offer a suitable analogue. In drawers, when the guides fail, it is recommended to update the roller mechanism with a new ball mechanism, because it is more reliable. If you need to update your handle, it is advisable to choose it according to style and material. For example, a plastic product looks out of place on a wooden kitchen facade, so it is better to opt for a metal handle with wooden or glass inserts.
Perhaps someone will like mortise handles, ideal for a modern style kitchen
Restoration of kitchen facades: decoupage method
You can update all kitchen furniture by repairing and decorating the facades. One of the popular and simple methods is decoupage.
For this, special napkins with a pattern or various clippings from newspapers and magazines, pieces of lace and designs on fabric are used.
The presented method of decoration fits well into the rustic style of the interior. How to carry out restoration using the indicated method:
- Remove the fronts from the cabinets and unscrew their handles.
- Eliminate minor defects.
- To remove varnish or paint from a surface, you must use a remover. To do this, apply it to the door with a brush and cover with film. After waiting for as long as stated in the instructions, peel off the coating with a spatula, removing the film as you clean. If it was not possible to remove the old coating in one go, repeat the procedure.
- Then treat the surface with fine sandpaper and wipe off the dust with a damp cloth.
- Now we need to paint the facades. To make the paint transparent, mix white acrylic paint and white acrylic varnish. The paint should be applied by moving the brush along the grain.
- The drawing taken for decoration must be carefully cut out with a stationery knife strictly along the contour. To paste patterns symmetrically, you need to control the distance on the surface using a ruler.
- Place the cut out design on the door and cover it on top with PVA glue. After it dries, walk over the surface with fine sandpaper.
- Then apply acrylic varnish, let dry and sand again. After this, cover with another layer of varnish.
Repairing kitchen furniture facades using the presented method is cheap and easy to do. But this does not affect the quality of work, and the updated headset will last for many more years.
Vinyl film
Pasting kitchen facades with self-adhesive film is the most budget-friendly option for updating an old kitchen set with your own hands. Manufacturers offer a wide range of self-adhesives of different colors and textures: matte or glossy, textured and smooth, with or without patterns. The service life of such coating is on average 3–4 years. The material is characterized by good moisture resistance and resistance to temperature changes. It is noteworthy that it is possible to update the kitchen façade using this method even on plastic coverings. In order to transform old furniture, you will need:
- scissors;
- plastic spatula or scraper;
- vinyl film;
- soft centimeter and ruler.
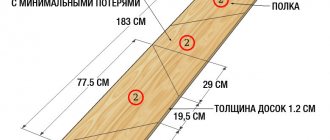
Before you restore your kitchen set, you should take measurements of all doors and cabinets in order to understand how much vinyl film you need to purchase to update your kitchen set. It is advisable to purchase a little more self-adhesive so that you can correct possible mistakes. Next, you should disassemble the facade and number each part to facilitate the final assembly of the set. Using a ruler, measure the required pieces on paper and cut with scissors. For ease of use, there are usually markings on the back side in the form of 1x1 cm squares. When cutting out parts, it is recommended to leave a margin of 2 cm on the sides and be sure to take into account the bends.
Cutting is usually done from the wrong side, where there are markings, but when adjusting the pattern, it is more convenient to cut from the front side
Before updating the facades of an old kitchen, you should thoroughly wash the surfaces of the furniture from grease and soot, otherwise the film simply will not stick. After washing, the parts should be degreased and allowed to dry completely. The next stage of work is directly pasting the film. It is necessary to remove a part of the protective layer from the wrong side of 5–10 cm and press it to the surface. The film must be immediately straightened and smoothed with a spatula or scraper so that there are no unevenness or bends. The resulting bubbles can be pierced with a needle. It is necessary to glue from top to bottom, gradually removing the protective layer and at the same time smoothing the self-adhesive. If something goes wrong, the film can be removed and re-glued, but not more than twice, since the adhesive will quickly lose its properties. The film is strongly attracted to the surface after 5–6 hours, so there is a chance to correct errors and update the headset at the proper level.
Restored kitchen facades with film-covered panels
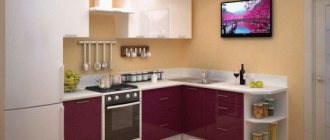
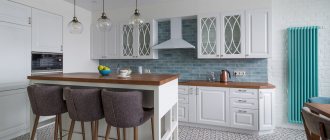
After work, the kitchen fronts can be installed back and the fittings can be screwed on. A bright, stylish set will certainly refresh the interior and add a touch of originality and style. You can take a pattern that imitates wood or marble, or you can simply choose a plain coating. Designers recommend combining 2 colors when gluing a set: for example, white hanging drawers and a brown lower tier. Photos of updated kitchen furniture with your own hands are presented on the website.
When is kitchen restoration necessary?
If your kitchen set still properly performs its stated functions, but you begin to notice that:
- the body of the furniture is still strong and meets all the necessary requirements, but the appearance of the furniture facades leaves much to be desired;
- individual parts of the furniture have become unusable due to external influences - the tabletop has cracked and deformed, traces of heat or grease stains have formed on the surface;
- the headset is simply outdated and boring;
- you do not have the opportunity to spend money on buying a more modern kit.
It is in this case that restoration is necessary. Repairing kitchen furniture with your own hands is a very real way out of the situation.
Decoupage
For an interior in an ethnic country style, Provence restoration of a kitchen set may involve the decoupage method, which is widely used by modern designers. Hand-made things are in particular demand because they reflect the inner world of the owner, her talent and skills. As a material, you can use fabric or oilcloth with a pattern or ornament you like, for example, “Gzhel” or “Petrikovskaya painting”. For work you will also need:
- spatula and paint brush with a long narrow brush;
- sandpaper;
- putty;
- PVA glue;
- solvent.
Preparing the facade for priming
Before updating the facade of the kitchen unit, you should sand the surface first with coarse-grained and then fine-grained sandpaper. A grinding machine will help make manual labor much easier. If there are cracks in the headset, they should be repaired with putty. After applying a thin layer, you need to wait until it dries completely and sand again so that the surface becomes smooth and even, without depressions or bumps. The solvent will help degrease the facade so that the future material is well attached to the panel. By the way, the decoupage technique can be used not only for wooden, but also for plastic and glass kitchen sets. It is necessary to treat only those parts of the surface where the new material will be attached.
Applying primer to the surface
After drying, you should glue the fabric with regular PVA glue, and then open the surface with acrylic varnish. For this, a narrow and flexible brush with long bristles is suitable so that there are no gaps or pale spots on the facades. The varnish is applied to the set in 3-4 thin layers. Each layer dries in about 1–2 hours, and the set will be ready after a day.
Applying a thin layer of decoupage glue
The rattan fabric on the facades looks very interesting. To work, you need to measure and cut the desired piece and soak the material in cold water. After half an hour, it will swell and increase slightly in size, which will make it easier to update the product. Wet rattan must be applied to the surface, smoothed, stretched and secured at the edges with a furniture stapler. This fastening is more reliable, but if desired, you can use superglue or PVA. After this, you should attach the planks along the perimeter, join them to each other at an angle of 45 degrees and nail them with nails without heads. Such moldings will cover visible fasteners and give the headset a holistic and harmonious appearance. After the rattan dries, it will look like a stretched string.
Restored facade with rattan inserts
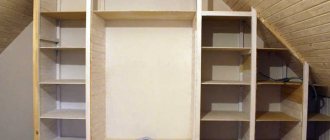
There is another interesting way to update your kitchen set with your own hands. If the hanging cabinets do not have doors or are transparent, you can upholster the interior of the kitchen furniture with fabric. The material should be selected from the overall concept of the interior so that it is in harmony with other elements. First, you need to take measurements of the cabinet and cut the fabric into the required pieces, leaving a small gap. Next, the fabric is tightly stretched at the corners of the niche and fixed with self-tapping screws or a furniture stapler. This restoration of kitchen furniture will make the room more comfortable and homely. In addition, dishes and decorative items on decorated shelves look very elegant than on a plain background, especially in Provence or country interiors.
Restoration methods
The general scheme of actions for the restoration of kitchen furniture and elements with your own hands includes the stages of dismantling damaged parts and structures, followed by restoration or replacement and return to place. The method is selected based on the degree of damage to the working surfaces and decor requirements. The emphasis is on restoring coatings using films, paint, and varnish. Both flat stickers and voluminous decorative inserts help you decorate furniture with your own hands and change the style of your kitchen set.
Replacement and repair of accessories
Restoration of kitchen sets, as a rule, is combined with checking the condition of the fittings and its complete or partial replacement. Handles, hinges, guides, dampers, retractable and lifting mechanisms, and railing systems are subject to inspection. In some cases, to improve their performance, lubrication, tightening and cleaning is sufficient; if the surface is severely loosened or damaged due to corrosion, the kitchen furniture fittings are completely changed. Unnecessary holes are covered with dense wood putty to match the main color.
Functionality of upholstered furniture for the kitchen, its main types
If there are doubts about the strength, this stage is entrusted to professionals; when doing it yourself, the work begins with inspecting the places where the fittings are attached. If necessary, areas are reinforced with plywood patches, natural wood inserts or epoxy resin mixed with sawdust. Whenever possible, restored kitchen furniture is equipped with fittings with built-in closers that ensure smooth closing of drawers or doors. External elements are selected in advance taking into account the future style of the kitchen unit.
Lubrication, tightening and cleaning
Replacement of fittings in case of severe loosening or surface damage
Use of vinyl film and interior stickers
This restoration method is valued for its simplicity and effectiveness; specialized films adhere well to furniture surfaces, protect them from external influences and look attractive. Pasting step by step includes the following steps:
- Measuring surfaces (ideally after dismantling them), removing kitchen furniture fittings.
- Leveling (if necessary), degreasing, washing, drying kitchen furniture.
- Open the films with 1-2 cm of margin at the folding points. To simplify this step, it is recommended to use a self-adhesive type with squares on the back side, a pencil and a stationery knife.
- Fixing the film on the surface of kitchen furniture using a plastic scraper. The protective part is removed gradually, 5-10 cm at a time, all areas are carefully smoothed out.
Whenever possible, these works are combined with updating furniture fittings. When restoring kitchen facades made of MDF with trimming, a construction hair dryer is used. For decoration in such cases, vinyl stickers attached using the above technology will be useful.
Surface measurement
Leveling, degreasing, washing, drying furniture
Open the films
Fixing the film on the surface of kitchen furniture
Decoration using decoupage technique
The essence of this technique is to decorate the surfaces of kitchen furniture with original paper or fabric applications and then cover the design with transparent varnish. Furniture decorated in this way looks spectacular in Provence-style kitchens, romantic or classic interiors. The work is carried out according to a simple scheme:
- The surfaces to be restored are thoroughly degreased, sanded if necessary and covered with primer or paint.
- From old wallpaper, fabric, napkins or special cards for decoupage, blanks for the future design are cut out with sharp scissors.
- The surface to be decorated is smeared with a continuous layer of glue, the blanks are lowered into cold water for a few seconds, straightened and fixed in the right places. The emphasis is on forcing out bubbles and carefully smoothing out the pattern.
- Elements of kitchen furniture are well dried and covered with 2-3 layers of varnish.
Pasted blanks can be combined into an artistic canvas, shaded with paints (including gilding), artificially aged, and made voluminous. Combining decoupage with other decoration methods is always welcome. In general, this technique gives unlimited scope for creativity, but requires time and patience.
Degrease the surface, sand, coat with primer
Cut out blanks for the future drawing
Immerse the workpieces in cold water for a few seconds
Lubricate the table with glue
Straighten and fix the workpieces in the right places
Dry the product, coat with varnish in several layers
Ready table
Photo wallpaper
This technique is not much different from the previous two; during its implementation, the restored surfaces are carefully prepared and covered with pieces of photo wallpaper. Washing varieties can be used without varnishing; simple ones, on the contrary, require serious protection. The emphasis is on:
- choosing the right pattern that is compatible with the decor of the countertop, aprons and kitchen interior;
- expelling air bubbles using a wing or a soft wide spatula;
- ensuring the correct conditions for drying the wallpaper: no drafts, temperatures above +5 degrees.
Features of the design of the kitchen cabinet-pencil case, advantages of the model
The decorative effect depends on the area and type of surface being restored. The smoother and larger it is, the better. Photo wallpapers are not recommended to be combined with multi-color coatings and textured surfaces.
Repairing or installing a new countertop
This element of kitchen furniture wears out faster than others and needs serious protection from external influences. Countertop repairs are performed using one of the following methods:
- gluing with film (relevant for elements made of composites, provided the product is in good condition);
- finishing with decorative self-adhesive film or pieces of ceramics (the tiles are fixed using special adhesives, special attention is paid to grouting the joints);
- varnishing or painting wooden surfaces;
- decoupage of polished surfaces;
- hiding decorative fillers (pebbles, cereals, semi-precious stones, buttons, glass elements, dried flowers) under a layer of epoxy resin or impact-resistant transparent glass.
Pasting with film
Finishing with ceramic pieces
Varnishing
Coloring
Decoupage
If you have no experience, you should work with simple wood composites. Replacing the table top occurs after dismantling the old part, cutting the new part, and processing the edges. Particular attention is paid to horizontal joints (if any), areas adjacent to the baseboard of the kitchen unit (this element is installed last) and cutouts for the sink.
The installation of countertops made of expensive materials that require special processing (glass, some types of composites, natural stone) is trusted to professionals. Products with glossy coatings that develop cracks due to improper distribution of loads also require a special approach.
Dismantling the old part
Cutting a new one
Edge processing
Installation
Replacement of facades
The need for a complete replacement of facades arises during the restoration of kitchen structures with old doors made of chipboard and MDF, covered with veneer, metal or old film, swollen due to humidity or the effects of time. New products can be purchased in the furniture department (relevant for sets with standard sizes) or made on your own. For this, chipboard, MDF, and furniture board are used. Work on changing the facades of kitchen furniture is carried out in the following sequence:
- old doors are carefully removed from the body, the fastening points are checked and, if necessary, strengthened;
- new doors are sawn, covered with film, painted or varnished, holes for fasteners are drilled after careful marking;
- the facades are fixed with screws, handles and other fittings are installed in the right places.
Due to high costs, this method is resorted to when it is not possible to restore facades in other ways. Replacing them allows you to change the style of the kitchen set completely; new parts can have any texture and configuration.
Dismantling of facades
Cutting new doors
Pasting with film
Drilling holes for fasteners
Installation of facades and fittings
Painting and moldings
For wooden facades in good condition, the best method is painting or varnishing. The work is carried out step by step:
- The old paint layer is removed from the surfaces using sandpaper, a sander or a hair dryer.
- The wood is dusted, inspected (irregularities and cracks are covered with putty), primed, dried well and cleaned with fine abrasives.
- Clean, dry elements are painted or varnished, dried and hung in place.
Reasons for the popularity of magic corners for the kitchen, selection criteria
When restoring the facades of kitchen furniture using this method, it is worth using paints in aerosol cans, sponges or soft brushes that do not leave streaks. Glass inserts are removed in advance or covered with tape, film, or thick paper. Smooth facades, if desired, are decorated with moldings - decorative overlays made of wood, plywood, polyurethane foam or wood pulp, fixed with special glue. An interesting effect is achieved by replacing glass with rattan inserts or gluing this material on top of wood.
The old paint layer is removed
The wood is dusted, inspected, and primed
Dry and clean with fine abrasives
The elements are painted, dried and hung in place
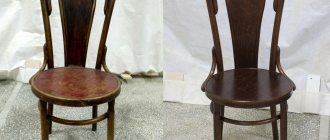
Updating chairs
To restore kitchen chairs or soft corners, you will need artificial leather (if possible, with minimal inclusion of PVC, which does not tolerate heat well) or another type of wear-resistant furniture fabric, dense foam rubber, special glue for gluing it, an anti-stapler or screwdriver for removing old upholstery, a stapler with wide staples (from 20 mm and above). If necessary, the frame of the chairs is reinforced with plywood; all wooden elements are impregnated with antiseptics, thoroughly cleaned and dried.
Work on changing the upholstery is carried out according to a simple algorithm:
- the old coating is removed, set aside and used as a pattern;
- the frame is inspected, strengthened, leveled using plywood (if necessary, the paintwork or laminated coating of the furniture is renewed at this stage);
- New patterns of covers are made from eco-leather, and trial fitting is carried out;
- the base of the chair is completely coated with glue and covered with foam rubber;
- The covers are carefully fixed with a stapler.
If it is necessary to change the old filler, foam rubber or synthetic padding in sheets are used. The selected material is cut to the size of the seat using a utility knife (scissors), then glued to the plywood base. After complete drying, proceed to changing the upholstery.
The restored soft corner or chairs can be optionally decorated with decoupage, rollers, multi-colored or textured inserts, ornaments made of foil or thin plywood, fringe or tassels.
Remove old coating
Inspect, strengthen, level the frame
Make new patterns for covers
Cut the foam
Glue to the base of the chair
Attach new covers
Assemble the chair
Painting and moldings
Peeling paint, cracks, chips - all these are the consequences of long-term use of the kitchen set. You can eliminate them and update the furniture yourself using regular painting. Designers recommend choosing auto enamel, which in terms of properties and characteristics is significantly superior to acrylic paint. The substance makes the surface more durable, moisture-resistant, wear-resistant and resistant to mechanical damage. The advantage of acrylic paint is its low price (100–400 rubles per 1 liter), while auto enamel costs 2–3 times more. However, the acrylic surface will deteriorate much faster, so before restoring an old kitchen set with your own hands, you should carefully weigh the pros and cons.
Car enamel in cans dries quickly and is more convenient to use than with a brush
To work you will need:
- sanding machine or sandpaper;
- putty;
- primer;
- solvent;
- wooden planks;
- paint or enamel matching the color of the original appearance of the product;
- brush or roller.
It is better to treat the surface of the panel with a grinding machine, but the relief milling will have to be cleaned manually
Before starting work, it is necessary to dismantle the facades and number each part of the set for ease of subsequent assembly. It is advisable to comfortably equip your workplace by covering it with newspapers or oilcloth so that paint does not get on the floor or other furniture. If there are decorative elements on the facades, it is worth sealing them with masking tape, like other fittings, including hinges. Then the surface should be sanded with a machine or sandpaper to remove old varnish or paint. If the set is covered with PVC film, it is recommended to use a hair dryer. This will melt the coating and make it easier to remove. While working, you must wear a respirator, since the smell from the film will be very pungent and toxic. Next, you should putty and prime the surface in two layers and leave to dry.
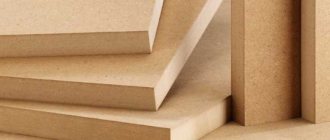
MDF or chipboard are porous materials that require priming before painting
During this time, you can prepare the moldings. They can be smooth, textured, with imitation stucco - it all depends on the desires and capabilities of the owner. The wooden panels must be sanded and joined to each other at an angle of 45 degrees to form an even rectangle or square. After this, they should be applied to the dry surface and glued with construction adhesive or secured with nails without heads. The facade is degreased with a solvent, and the painting process begins.
It is recommended to apply paint or auto enamel with a brush in one direction, or you can use a soft roller if the surface is large enough. To update the headset, you can use an aerosol, but during operation you must wear a respirator and goggles. After the layer has completely dried, the procedure should be repeated 1-2 more times. After a day, the parts can be installed in place.
The ends of furniture doors are painted especially carefully.
Varnishing, glisal or stain treatment
Sometimes ordinary coloring seems very banal - then glisal comes to the rescue. This is a thick translucent paint with a glossy finish. It must be diluted with water in the proportion specified in the instructions. The working technology is the same as conventional painting, however, while the layer is not dry, the surface of the set can be given an unusual texture. Using polyethylene or a damp sponge, move it chaotically along the facade, leaving behind fancy patterns and lines. If you don’t like some of the drawings, you can remove them with a roller. This method of updating kitchen facades with your own hands will appeal to lovers of decoupage and ethnic style.
Painting a wooden facade with glisal
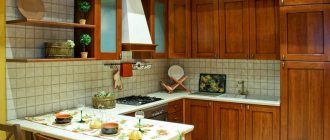
For a wooden set, regular varnish is suitable. Such restoration will help preserve the original appearance of the product without disturbing its structure and design. It is advisable to do the opening with varnish on the street or in a non-residential premises, since the substance has a sharp and pungent odor. The same goes for stain. This is a coating with which the set takes on a retro look. Aging furniture will also suit a Provence or country interior. Both stain and varnish are applied to a previously cleaned and sanded surface. After work, you need to leave the set to dry for a day.
Lacquered kitchen sideboard with painted elements on the panels
Tabletop restoration
The question of how to update a kitchen countertop is one that comes up most often, since the surface is systematically subject to mechanical damage and quickly becomes unusable. The most budget-friendly options include painting and varnishing, but a more practical method would be decoupage and finishing the set with ceramic tiles. It’s good if the material is combined with the finishing of the apron - then the interior will look stylish and harmonious. The tiles are glued to the base using a special glue, which firmly fixes the parts and dries quickly.
When it comes to restoring a kitchen table, varnishing and painting are also suitable here. If the product is made of fiberboard, you can use film gluing and decoupage techniques.
Small scratches and gouges can be repaired with wood putty.
Polishing the tabletop with a felt wheel
How to order restoration of facades in Moscow and Moscow Region?
It's no secret that a complete change of furniture has a disastrous effect on the family budget. However, if you want to bring life back to your kitchen set and save money at the same time, the kitchen facade restoration service performed by our professional craftsmen is suitable for you. Our clients choose us because we:
- We carry out all work on time;
- We offer affordable prices;
- we guarantee quality;
- We use only the highest quality and safest materials;
- We help with the selection of materials and components;
- We work on special equipment.
To place an order you only need to complete a few simple steps:
- Call us or send a request.
- At the agreed time, a surveyor will come to you, with whom you can discuss all the conditions.
- The order is executed efficiently and on time.
- You accept the work and pay for the order.
High-quality restoration of kitchen facades in Moscow and the Moscow region. All work, as a rule, is performed on site without the need to travel to the workshop. We take on urgent and complex orders. Don't hesitate to call and your updated kitchen will serve you for many years.