The first rule of assembling and installing kitchen units is timeliness. You need to start assembling the kitchen only when all the work on finishing the surfaces and covering the walls with wallpaper is completed, the process of installing electrical wires and water supply and drainage pipes is completed, and the design is not in danger of major changes and reconstruction.
Installing a kitchen with your own hands is an interesting and exciting task. But if you don’t have enough experience, this article will tell you how to properly install a kitchen and, moreover, assemble it into a single composition!
The process of assembling a finished kitchen
Assembling a kitchen set with your own hands sometimes takes a lot of time. This process is influenced by such factors as the integrity of the manufacturer . Sometimes the assembly instructions contain only general theses and do not take into account that such rules may not be suitable for the installation of various parts.
Incorrect location of factory holes is another problem associated with the question of how to assemble a kitchen set. Assembly is complicated by the fact that the cabinets are not always packaged separately. Some manufacturers wrap each board in packaging. There are times when some of the parts from the upper cabinets of a kitchen set end up in the box where the lower cabinets are located.
Some apartment owners strive to assemble a kitchen set with their own hands. Assembly requires a minimum number of tools , including a standard construction set (hammer, tape measure, nail puller) and electrical appliances.
Reference. A hammer drill is needed to drill into a concrete wall. Among its analogues, it is the most powerful device.
A hacksaw will be needed to cut the countertop and further install the hob or sink . With a screwdriver you can quickly screw a large number of fasteners into the facade, so the assembly process will speed up. The next tool is a hexagon, it is better to purchase a whole set with flat and cross heads. Screwdrivers of different diameters may be needed for assembly.
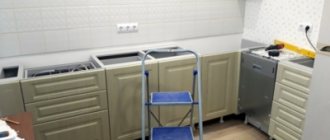
Installing the bottom row of the kitchen
Kitchen installation should begin from the lower tier. At this stage, floor cabinets, countertops, a sink are installed, and a wall panel (apron) is installed. It is important to remember that it is better to install doors on the upper tier after installing the module.
Floor stands
There is a water supply in the floor-mounted corner cabinet, so you need to make cuts for the water supply and other communications. The position of all components and their angle of degrees must be controlled using a building level and a square.
Instructions for assembling floor stands:
- Using self-tapping screws, install cross-shaped fastenings for doors to the side surface of the kitchen walls.
- Screw the roller guides to the inner side surfaces.
- Insert all wooden dowels into blind holes.
- Screw furniture screws into dowels.
- Screw on the adjustable legs.
- After making a mark on the wall, adjust the furniture to the height.
- Place the cabinets in their place against the wall.
- Tie all the cabinets together with self-tapping screws (3 cm).
Installation of countertops and sinks
At this stage it is necessary:
- Place the tabletop on the lower cabinets.
- Leave a gap of 5 cm between the tabletop and the wall.
- Measure the blade and make marks for cutting.
- Place the sink on the underside of the structure and trace the outline of the sink with a pencil.
- Using a drill, make several through holes along the drawn line.
- Using a jigsaw, cut a hole for the sink.
- File the cut area.
- Use fasteners to secure the tabletop to the cabinets.
- Cover the end with covers that are secured with self-tapping screws.
- Install a sink into the hole made.
- Attach the siphon.
Wall panel installation
To protect the kitchen work area from contamination, wall panels are used. To install them, it is necessary to mark the surface, install the frame, and cover the sheathing with panels.
The covering starts from the corner. The panels are installed from top to bottom.
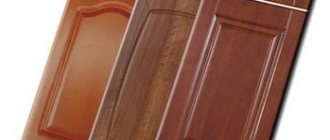
Door fastening
Door fixing guide:
- Screw the screws into the façade.
- Fix the cabinet hinges in special recesses.
- There should be cross-shaped plates on the inside of the case. Doors are hung on these plates. This also applies to glass kitchen cabinet doors.
- Tighten the hinges using a screwdriver.
- Check that the doors operate correctly.
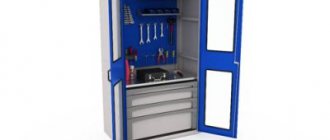
Assembling a kitchen cabinet and cabinet
We start creating a kitchen composition by assembling cabinets and cabinets:
- Using self-tapping screws, we fasten the fastenings for one or two doors (depending on the model) to the side walls.
- We fasten the runners for the retractable modules into pre-prepared holes. It is better to do this at the very beginning of the process, as difficulties may arise later.
- If you notice blind holes in the workpieces, this is very good. Feel free to insert wooden dowels into them! They are responsible for the even frame and make the structure strong.
- We connect the frame and tighten it using a hexagon and furniture screws. We close the hole in the screw with a decorative cover to match the color of the headset.
- We screw the legs, achieving a comfortable height.
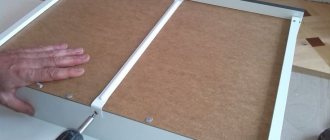
- After assembling the frame, cover the back wall with a sheet of fiberboard using small nails.
- If the cabinet is wall-mounted, install mounting hardware on the back wall. Adjustable awnings are used for this. They are attached inside to the side walls of the cabinet close to the upper corners.
Installation of doors and installation of handles on kitchen facades will be postponed for now..
Stage 1. Planning - drawing up drawings, thinking through the design, taking measurements
So, let's assume you have already planned the design, color, additional features (like the same drawers in the plinth) and place for your future corner set. Next you need to take measurements, and then design a drawing using the data obtained.
Before taking measurements, you should determine the configuration of the corner kitchen set, which may include:
- Corner sink and cabinet underneath;
- At least 2 cabinets to the left and right of the cabinet with the sink. They can be niches for installing a washing machine, dishwasher, hob, or they can simply be storage cabinets;
- Upper sections (2-5 or more cabinets);
- Places for stationary equipment - refrigerator, stove, etc.
Advice! Vertical measurements must be taken at three points - in the middle, along the baseboard, under the ceiling. This will help level out the difference in measurements due to the curvature of the walls.
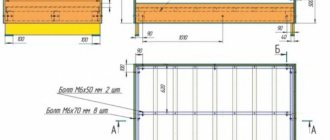
It is possible to design, complete the elements and assemble a kitchen, even if you only have a simple diagram drawn on graph paper or on a sheet of notebook in a square, where, for example, 1 square corresponds to 10 cm. But it is better to make a well-thought-out drawing, that is, a full-fledged three-dimensional color project using a special program such as “PRO100”.
When drawing up the drawing, you will also need to take into account the place where the gas pipe is inserted and the place where the hood is installed (passage of the air duct route). A diagram or drawing is created with maximum detail, after which a material cutting map is drawn up. And for this, in turn, a list of assembly parts for each module is required. As a rule, to assemble a cabinet you will need:
- Top;
- 2 side walls;
- Bottom;
- Shelves;
- Facades;
- The back wall is made of lightweight but durable chipboard;
- Edge (with a margin of 12%).
And, of course, the kitchen must have a countertop and an apron.
Assembling drawers
Having assembled the base of the cabinets and cabinets, we begin assembling the drawers:
- The assembly principle is similar to the operations just performed. We assemble the frame of the boxes from three components, insert wooden dowels that will tighten all sides. At the end, the hexagon is taken to work, which will tighten the structure with screws.
- We insert a sheet of fiberboard of a suitable size into the groove of the drawer - your drawer now has a bottom!
- We secure the façade using special ties.
- Find guides with rollers in the kit - they must be screwed to the bottom of the sides so that the rollers are at the back.
- Once you install the handles on the kitchen fronts, you can try to insert the drawer into the cabinet, lifting it up a little. Thanks to the rollers, the drawers should slide easily along the guides.
- Installation of door closers on kitchen drawers is optional.
Stages of assembling kitchen furniture
How to assemble kitchen furniture? The kitchen installation procedure is carried out in several successive stages. The process begins with assembling the box, after which the drawers are assembled and the upper cabinets are mounted. Only then are the lower drawers of the structure installed.
Box assembly
Furniture assembly begins with the formation of a box. To do this, follow the following steps:
- the side wall of the box is installed on a solid and flat surface with its end facing, and the fronts should be located at the top;
- the wall of the cabinet is correctly connected to the bottom, and only at a right angle, after which they are connected to each other, for which confirmations are used, and for Euroscrews in factory-made kitchens there are already holes;
- on the other side, the second side wall is fixed in the same way;
- two upper strips are mounted on each side of the structure if lower drawers are assembled, and a lid is installed for wall drawers;
- the cabinet is laid with the front facing down, after which its diagonal is measured using a ruler, since the values obtained in different cabinets are not allowed to differ from each other by more than 1.5 mm;
- the back wall is attached to the cabinets, for which staples or small nails are usually used;
- for floor-standing cabinets, legs are attached to the bottom, and they can be made of plastic or metal.
During work, it is necessary to check that the ends of all side walls of the boxes are flush with the bottom and lid, for which measuring equipment is used.
Installing the side wall
Installing a second side wall
Two top slats of the box
Cabinet Layout
Fixing the back wall
Assembling drawers
The next stage of kitchen installation is the correct assembly of the drawers, which are required in this design. Without them, any kitchen becomes uncomfortable and roomy. To do this, follow the following steps:
- a box is made, for which four planks are fixed to each other at right angles;
- all such blanks must have the same diagonal;
- guides are attached to the side walls of each resulting box;
- facades are fixed using screws;
- At the bottom of the drawer, special response latches are mounted, allowing you to attach the drawers to the guides.
Once the drawers are ready, installation of the upper wall cabinets begins.
Create a box
We fasten the guides
We fix the facades
Fixing the latches
Installation of upper cabinets
They must be securely and efficiently attached to the wall of the room. At the same time, using kitchen furniture for its intended purpose will not be difficult. This process is divided into successive stages:
- Initially, the attachment points of all cabinets are marked, for which the optimal height is set aside from the floor, which determines the distance from it to the bottom shelf of the cabinet;
- when choosing the optimal height, the height of the person who acts as a regular user of the kitchen is taken into account;
- the height of the tabletop is also determined in advance so that there is a distance of at least 0.6 m from it to the top cabinet;
- lines are drawn from the applied marks, indicating the locations of future fasteners, and with a level you should make sure that the line is perfectly straight;
- a hanging method is selected, for which standard mounting loops can be used, as well as a rail equipped with special hooks for fixing cabinets;
- for hinges, holes are made in the walls with a puncher, and fasteners are inserted into them;
- The cabinets are hung on the received fasteners, after which they are carefully aligned, which will allow you to correctly determine the location of the second fastener.
If you plan to lay any pipelines through the upper cabinet, then corresponding holes must be made in advance with a jigsaw for them in the rear wall.
Creating markup
Creating holes
Insert fasteners
Hanging cabinets
Installation of lower cabinets
The lower drawers of the set are usually installed after the upper ones are secured. Installation of kitchen furniture in this case is divided into stages:
- installation of the first cabinet begins from the corner of the room;
- the legs of each cabinet are adjusted correctly to avoid distortions;
- all cabinets are lined up;
- adjacent elements are tightened together using a clamp, and then a furniture tie is used.
The next stage involves installing a countertop, in which a hole for washing is first made using a jigsaw. The countertop should be properly aligned so that there are no distortions that reduce its service life and negatively affect the use of the entire kitchen as a whole. For a large kitchen, you have to use two parts of the countertop, and special metal strips are used to connect them securely and correctly. These connections must be treated with sealant. After the two elements are securely connected, they are attached to the lower cabinets, for which special furniture corners are used.
Pulling together the lockers
We display lockers
Adjusting the legs
Final stage
It is not difficult to install furniture in the kitchen yourself. After completing the main tasks, the final stages of work are carried out. You should be especially careful, since the appearance of the entire created structure depends on the processes implemented. Installation at this stage is divided into processes:
- in the place where the tabletop is adjacent to the wall, you must use a special plinth that closes the existing gap, since otherwise dirt and water will constantly penetrate into it, which negatively affects the service life of the entire set;
- the doors are fastened to all cabinets of the structure, and their adjustment is easily accomplished using special new hinges;
- pre-assembled drawers are inserted into the set, and various built-in appliances and furniture are installed;
- the kitchen must be well and efficiently lit, so at this stage various lighting and lamps in the set are additionally connected;
- the base strip is installed;
- we assemble and install the sink, after which it is connected to the necessary communication systems;
- The areas where the sink connects to the countertop must be treated with a high-quality sealant.
The procedure for installing a kitchen unit is considered quite complex, so in order to prevent possible errors, it is recommended to first watch the training video. Thus, the assembly of the most important kitchen furniture, represented by the set, can be done on your own. To do this, you must study the correct instructions in advance, watch a training video and use only high-quality materials and tools. This approach guarantees a durable and beautiful result.
Fixing the plinth strip
Installing the plinth
Door fastening
Sink installation
Kitchen installation sequence
It's time to learn how to install a kitchen. After assembling all the cabinets and cabinets, we begin organizing the kitchen, work surfaces and sink :
- Find a cabinet under the sink. This side cabinet usually needs to be installed first. Don't forget to drill the necessary holes in the wall for sewer lines.
- Then it’s time for all the floor cabinets. We adjust them in height so that the working surface is perfectly flat.
- Now you need to connect all the floor cabinets together. For this purpose, a special furniture screed is used.
Fastening the table top
When the set has already acquired its outline in the lower part, we will complement it with a tabletop:
- we mark the canvas as required by the dimensions of the kitchen, using a jigsaw we cut off all excess;
- don’t worry if there is a gap left between the canvas and the wall - it can easily be closed with a plinth;
- the gap between two cabinets, for example, in a corner kitchen, is decorated with a metal strip, which is attached to the end of the tabletop;
- in the area near the stove, it is also recommended to cover the ends with a metal strip, and where the effect of heat is minimal, you can get by with a regular furniture edge;
- it is glued using a hair dryer onto a previously cleaned and leveled surface;
- Treat any cracks accidentally formed during the assembly process with a moisture-resistant sealant - this will make your kitchen last much longer;
- The tabletop is always installed not flush with the cabinet fronts, but with a small allowance in front, about 3 cm.
First stage of work
First of all, you need to measure the dimensions of the kitchen and make a drawing. When the drawing is created, a list of installed equipment and furniture is compiled, and its arrangement is indicated on the drawings. An option for a small kitchen space could be like this:
- sink in the corner space, combined with a cabinet;
- a cabinet located above the corner sink;
- two bedside tables standing along the walls and adjacent to the corner sink on the left side and right side;
- two cabinets suspended above the bedside tables;
- a place where a gas stove will be installed, or a cabinet for installing a stove and oven.
To accurately represent the dimensions of the kitchen, you need to measure the length of the walls at several levels: at the top, under the ceiling, below, above the floor, and in the middle of the wall. The height of the walls is also measured: in each corner and in the middle of the walls.
It may turn out that the walls are not completely level, and this must be taken into account. The dimensions of the kitchen must be indicated on the drawing, and the dimensions of the installed kitchen appliances and furniture are also marked on it.
When designing a kitchen, be sure to focus on the accepted standard cabinet sizes. For floor ones they are:
- depth 600 mm;
- height 850 mm;
- width of double door cabinet 800-900 mm;
- the width of a single-door cabinet is at least 600 mm;
- the distance between the cabinet and the wall is 50-100 mm (the tabletop should extend to this distance against the wall);
- on the front side, the tabletop usually extends beyond the edge of the cabinets by 30-50 mm.
Wall cabinets also have their own standardized dimensions:
- depth 300 mm;
- height 700-900 mm;
- the distance from the tabletop to the bottom edge of the wall cabinet is at least 450 mm;
- there must be at least 750 mm of space from the stove to the hood;
- The width of each wall cabinet usually corresponds to that of the lower one standing underneath it.
Sink installation
By the time the kitchen is installed, you should already have purchased a new sink, if suddenly you decide to replace it too:
- mark the hole for the sink and cut it out using a jigsaw;
- when cutting, it is better to seek help from members of the household - the cut part will need to be held in order to avoid an accident;
- we fix the sink with special fasteners, which should be included in the kit;
- We treat the junction of the sink and the countertop with sealant - this way you can prevent moisture from getting into the gap.
Problems installing the headset
Depending on the type of kitchen space, when installing the set, some nuances may arise that will interfere with the work or disrupt the aesthetic appearance.
Gas pipes are quite difficult to move, so first calculate the pipe output for your stove
Gas pipes and meter
When installing a kitchen unit, you often have to deal with the problem of gas pipes and a meter, which spoil the appearance of the kitchen. In this case, the best option is to integrate them into a kitchen wall cabinet. You will have to remove the back wall and shelf of the cabinet and cut out the necessary niches in them.
Uneven floor
The lower kitchen modules of the set must be level; if the floor in the kitchen is very uneven, trimming the lower decorative plinth may be necessary. It is best to do this with a jigsaw; it gives a smooth and even cut; it is advisable to cover the cut edge with a water-repellent compound (sealant, paint, hydrophobic compound).
Windowsill
Part of the interfering window sill can simply be cut off or replaced with a narrower one. If the window sill is at the level of the unit, you can, on the contrary, expand it by replacing it and making it an extension of the kitchen countertop.
Unstable walls
A heavy kitchen cabinet can tear out drywall, it is advisable to strengthen the place for the furniture
Sometimes, during redevelopment, a situation may arise when wall cabinets in the kitchen have to be hung on plasterboard or gas silicate walls. In the case of drywall, you will have to additionally strengthen the place where the cabinets are hung. This is easy to do if you dismantle the wall and strengthen it in the right place using a wooden beam or profile.
Fastening wall cabinets
Attaching the kitchen to the wall begins with determining the height of the working area in the kitchen - it depends on the dimensions of the drawers and the level of the ceilings. The standard height of the kitchen from floor to top is 50-60 mm.
Advice. If the housewife is not tall, and also if the upper cabinets of the set open with closers to the top, it is better to install the upper shelves 45 cm from the level of the tabletop, but no less.
There are two ways to hang kitchen drawers with your own hands:
- Using a mounting rail: one part of it is attached to the wall cabinet, and the second part is attached to the wall. The result is a hook-and-groove system that is easy to use and provides a secure fit. You can hang the cabinet this way yourself.
- Upper cabinets can be attached to the wall or by conventional fastening - on furniture hinges. This leaves no gaps between the wall and the back of the cabinet.
The work must be done by two people , since the structure will be too heavy for one. Since modern fastening strips are quite expensive, budget hinges are used in classic furniture sets.
Fastening sequence:
- mark the line for attaching the cabinets at a distance convenient for the housewife from the countertop;
- make holes and secure the rail for adjustable hangers. It is more reliable to use fastening with anchors than with dowel-nails;
- hang the cabinet on the rail, hooking the hooks onto it, adjust the two bolts on the hangers so that the cabinet hangs level;
- start installation from a corner, use a false panel to hide the unevenness of the wall;
- After installation, if necessary, fasten the cabinets with ties.
Don't forget to make holes in the sides of the cabinets for pipe drainage if ventilation is to be installed.
How to hang a kitchen on drywall
You cannot screw a self-tapping screw into a plasterboard base, sincerely believing that it will hold . Gypsum is a fairly loose material, so you need to approach the installation of kitchen furniture on it wisely.
Important! Never use nails or regular screws to attach furniture directly to drywall.
The space formed between the wall and the plaster will not allow ordinary dowels to hold tightly. But there is still a solution! Depending on the chosen installation method, different tools and accessories may be required :
- roll-up dowels for drywall (for example, Driva);
- expansion anchors (for example, “Molly”);
- umbrella dowel;
- embedded timber;
- special tire.
Explore possible mounting options to choose the most suitable one.
Dowel "butterfly"
A butterfly dowel is a fairly simple device that is used for attaching cornices, baseboards, brackets, wall cabinets or lamps to a sheet of drywall.
It is a self-tapping screw, complemented by a plastic element that looks like butterfly wings. This is how the fastener got its name. When the dowel is twisted, the “wings” are straightened and pressed tightly against the back surface of the drywall sheet. Due to this, the load on the sheet is distributed more evenly, which significantly reduces the risk of damage to the material during installation work.
It is rarely used for mounting wall cabinets , however, if this happens, a metal profile is used to add rigidity to the structure.
Important! It is necessary to calculate in advance where the profile should be located in order to use it later for attaching cabinets.
You can find where the profile goes using a magnet . They move it along the wall until they find a guide. This way you can accurately determine the location of the profile and not miss when drilling a hole.
Metal dowel “Molly”
It resembles an umbrella in its principle of operation. Withstands significant loads - up to 35 kg. The step-by-step installation process is as follows :
- The diameter of the dowel (usually 8 mm) is drilled into the wall or ceiling.
- The sleeve is inserted into the hole so that the teeth located on the head cut into the surface - this will prevent the fastener from turning.
- Screw in the screw until the opening triangles dig into the drywall on the back side of the sheet, ensuring a secure fixation.
Important! “Molly” cannot be dismantled: to remove it you will have to break the wall.
The advantages of Molly dowels are obvious : due to the formation of a cone-shaped structure on the back of the gypsum board, they increase the support area and prevent the sheet from breaking under load. Disadvantages include high cost and the need for free space behind the plasterboard.
Installation using metal anchors
Such anchors are most often used when you need to attach something to the ceiling , so they can handle an ordinary cabinet.
Special extended anchors are used to reach the load-bearing wall . They go through the drywall and are attached to the main wall. This is reminiscent of fastening with regular dowels without using gypsum board. However, with this method, everything must be clearly calculated in advance so that along the way such anchors do not rest against the fastening used to create the frame for the drywall.
Reference. The advantage of such anchors is the ability to use screws with different heads: it can be a regular clamping screw, or instead of a standard head, a hook, ring or other element is used, which is best suited for installing cabinets.
First, markings are made and holes of a given diameter are drilled . Anchors can only be attached to a concrete or brick wall, the thickness of which should be 8 cm or more. The depth of the hole should be 5 cm. To this minimum depth, you need to recess the anchor into the main wall.
Before hanging a cabinet on a plasterboard wall, you need to install the anchor correctly . The studs are inserted into the prepared holes so that the anchor goes in first and the nut remains outside. If it's tight, you can hammer it in with a hammer.
The anchor screw is screwed in with a wrench . We listen carefully: during this clamping, the petals will open and rest against concrete or brick, this will be accompanied by a characteristic creaking sound. You need to do everything carefully so as not to damage the sheet of drywall. When the anchor is firmly fixed, you need to tighten the nut.
Wall cabinets are hung on protruding studs and then fixed.
Mortgage beam
Hanging kitchen cabinets using embedded timber is a fairly old technique . It is usually used in the kitchen, when they know in advance exactly where the furniture will be placed. The beam is installed in a frame made of metal profiles during its assembly, and is provided at the time of planning. The fact is that it is best to drive the wooden beam into the profile and install them at the same time.
Reference. The width of the beam for greater reliability of installation should be within 8-10 cm.
This method is very reliable , because the block is not only well attached to the frame (with the profile itself, nails or screws), but also is a reliable basis for fastening the cabinet.
Before hanging a cabinet on a plasterboard wall using embedded timber, you need to find it under a layer of finishing . You can look for a horizontal profile using a magnet, but it is advisable to think about everything earlier. After assembling the frame, it is necessary to measure at what height from the floor (ceiling) the center of the beam is located. Then this data will be used for high-quality installation.
There are several options for attaching to a wooden beam:
- we use ordinary wood screws to fix wall cabinets;
- we drill holes for the dowels, onto which we will then attach everything;
- We use special dowels with hooks for more convenient hanging.
Remember that you will need two such beams, since the cabinet is attached not only at the top, but also at the bottom . It's more reliable. One mortgage is needed if you are hanging a bookshelf or something similar.
Installing the mounting rail for the hitch bracket
It is not always possible to think in advance where everything will be in the room before the renovation work . Often the thought of hanging cabinets comes after the walls have been covered with plasterboard and the finishing touches have been completed. So the question arises, how to hang a cabinet on drywall in such a situation.
You can use special dowels , but not everyone will be able to carry out the correct marking so that each fastener is in a clearly designated place. Then it is necessary to use a horizontal bus. The essence of the method is simple: two rails are mounted on the wall, on which all the cabinets will then be hung.
The tire is a narrow metal profile of a special shape with many holes for self-tapping screws. Using these holes and self-tapping screws, the tire is attached to the drywall. You can buy several of these two-meter profiles, which is quite enough for your purposes.
Reference. In order to be able to fasten cabinets using this technology, they must be equipped with special brackets that can be hooked onto the tire.
The installation technology itself is quite simple:
- Markers are installed at specified heights on both edges of the wall. They will then connect into horizontal lines.
- Don't forget to double-check all distances between brackets and lines. The cabinet will be attached with upper and lower brackets to two rails at once.
- The level checks the horizontality of the lines.
- The total width of all kitchen cabinets is measured, after which the tire is cut to the specified size. It may be necessary to use two or three tires in one row. It all depends on the selected furniture.
- The tires are attached to the drywall with self-tapping screws.
- Now you can hang your kitchen cabinets on drywall. The brackets have adjusting screws so that the cabinets can always be adjusted to the desired position.
Although everything is attached to simple self-tapping screws, there are a lot of them and the pressure is evenly distributed over the tire . Moreover, the locker will be supported by two tires at once.
What is a modular kitchen?
A modular kitchen can be called a construction kit for adults. Typically, a manufacturing company produces several construction blocks within one collection. It is best to consider this concept with an example. Ikea was one of the first on the market to start producing modular kitchens, so in honor of respect, let's take it as an example, namely its Knoxhult series. It is available in several colors, consider gray - it’s in the photo.
Like any kitchen cabinets, modular ones can also be divided into upper and lower.
There are three types of wall cabinets:
- single;
- double;
- single narrow for hood.
And there are three floor cabinets:
- narrow, consisting entirely of drawers (40 cm wide);
- cabinet with doors, drawer and space for embedding a stove (width 180 cm);
- wardrobe with drawer and two doors (width 120 cm).
A modular kitchen is a new solution on the market, in which the buyer independently creates his own kitchen from blocks: this is what distinguishes it from a conventional built-in kitchen set.
They can be arranged in different ways: you can buy several floor cabinets with a width of 40 centimeters and be satisfied with only them. Such a designer makes the imagination work.
How to make doors
And now, the assembly of the kitchen set is almost complete. All that remains is to hang the doors :
- fasten the hinges with self-tapping screws into the prepared groove on the facade;
- secure the door to the cross-shaped plates that you screwed in at the very beginning and tighten the bolts;
- if the door position is uneven, adjust it horizontally and vertically using two bolts on the mechanism;
- The final stage is the installation of handles on the kitchen facades.
It will be interesting:
How to make a window sill table in the kitchen
All about sink cabinets for the kitchen
Installation of skirting boards
To ensure an attractive appearance for your new kitchen , you need to close the space between the new countertop and the wall.
Before deciding how to install a plinth on a kitchen countertop, you need to know that there are two installation methods : with glue (you can use silicone or liquid nails) and with self-tapping screws.
Installation with glue is easier and simpler, but has some disadvantages . The disadvantage of this method is that the baseboard is tightly attached. Therefore, if in the future you want to remove it, the planks will most likely break during dismantling, and marks will remain at the attachment site, which will not be so easy to remove. In addition, when installed in this way, there will be no niche to hide electrical wires, because the baseboard will fit tightly to the wall.
Reference. As a rule, the adhesive installation method is used for plastic, ceramic and stone products.
It is better to prefer installation on self-tapping screws if you need to quickly and carefully disassemble the baguette.
On glue
Installation of the plinth to the tabletop is as follows::
- The surface on which the baguette will be attached is thoroughly cleaned and degreased with an alcohol-containing product.
- Apply a layer of adhesive-sealant to those parts of the plank that will come into contact with the wall and countertop.
- We apply the plank to the wall and tabletop, carefully pressing and waiting time according to the instructions for the glue.
- Installing the corner element.
- We cut off the decorative strip, taking into account the fact that it should extend slightly into the corner.
- Place the edge of the panel under the corner insert and snap it into the grooves along the entire length of the guide.
- After installing the decorative trim, we install the end caps, inserting them into the mechanism.
Using self-tapping screws
In this case, the installation process involves the use of a screwdriver . Most often, the plinth is attached to the tabletop (if it is attached to an apron, it can become deformed at the slightest movement of the table).
To avoid installation difficulties, you must perform the work in the following order:
- We take measurements of the tabletop and cut a piece of baguette to the appropriate length using a hacksaw with fine teeth. We clean the cut edges with abrasive.
- To better seal and prevent moisture ingress, we treat the place where the baseboard will be located with silicone.
- We attach the base part (profile) to the installation site.
- Using a screwdriver, screw the screws into the plank and tabletop at a distance of about 30 cm.
- We install the front cover by inserting it into the groove of the base until it clicks.
- We close the corners with corner covers, and attach end caps to the edges of the baguette.
- We treat the joints of the connecting elements with silicone sealant.
Hidden wiring can be built into the baseboard.
Stage 5. Assembling the remaining elements of the kitchen set
After the corner cabinet has been assembled and installed, it will be possible to make the remaining elements using pre-made drawings. The sequence of actions in this case is as follows:
- To assemble the main box and side cabinets, the necessary parts are sorted and places for fasteners are marked in them.
- The panels are fastened together, legs and rails for retractable systems are installed. To make it easy to assemble elements with retractable guides, you must first assemble the three walls of the box, insert the fiberboard into the bottom, and then secure the facade through an eccentric tie - so that the sleeve in the side wall captures the screw head from the facade panel. The rollers on the guides must be located at the back - this is necessarily stipulated in the drawing. The already assembled box is placed in the closet, inserting it there at a slight angle.
Adviсe:
- Wooden dowels used as fasteners in blind holes are recommended to be installed with glue;
- The joints of the drawer walls can be treated with silicone so that the chipboard does not swell or crumble from moisture.
- Edge cutting can be ordered from specialized companies along with cutting, or you can do it yourself. Glue an edge of a suitable color to the visible ends of the chipboard, ironing it with an iron in the silk ironing mode, that is, on 2 k. Trim off any excess trim around the edges with a utility knife.
- Mark the countertop slab and cut it. The joints must be treated with sealant, and the ends are covered with a durable metal strip.
- Wall cabinets can be secured using a mounting strip - one part of it is fixed to the wall, and the second - from the rear wall of the cabinet. However, the drawings may also include the usual loops.
- Then you need to install the facades.
- All that remains is to install the sink and install the equipment in the niches.
- The final stage of assembly is the installation of decorative plugs for fasteners and a plastic baseboard that hides the gap between the wall and the countertop.
Support the project - share the material with your friends on social networks: