Arrangement of the feeder's workplace
If you have the right equipment, the only thing left for an ice fisherman to do is set up his workplace well. All elements of equipment used for fishing should be located literally at arm's length from a seated person. This will save him from having to get up often, exposing himself to the cold wind and being distracted from the process of fishing.
The main element of the arrangement is the feeder chair. After all, winter fishing is mainly a passive activity - a person has to sit in one position for a long time. At the same time, the load on the back increases, especially on its lumbar region.
Types of fishing "seats"
Before you start making your own fishing chair, you should decide on its type of design. It could be:
Folding chair . This product has two main planes connected on a loop. It can be made from any materials.- Chair with backrest . According to the classification, it can be: folding or solid. The second option is more durable and reliable, while the first is more portable.
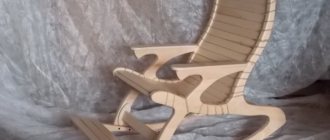
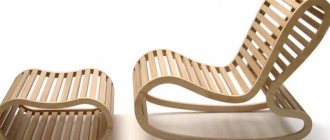
- Lounge chair . This is the most difficult design to make yourself. By type, it is divided into: prefabricated, solid, in the form of a clamshell. The easiest to manufacture is a monolithic product.
- Chair with shelves . This is a very convenient option for summer fishing. You can place fishing gear and clothes on it.
Attention : when choosing one or another type of feeder chair design, be sure to consider your strengths. If you don’t have any special skills in creating such items, start with a simple and practical model.
Industrial options for feeder fishing chairs
Important accessories for feeder fishing should be at hand: a bucket with bags of dry and home-prepared bait, a box with bait. Not all fishermen are willing to lay out their catch right on the ice at their feet.
Some people, having removed the fish from the hook, immediately put it in a small plastic container or bag. To do this, the container must also be placed near the seat itself, so that the necessary manipulations with the catch can be performed without getting up.
A seat with a folding attachment table and a body kit necessary for winter fishing makes any handling of fish, hook and bait convenient, minimizes time and effort for all auxiliary procedures, making it possible to concentrate only on the main thing - fishing. Even if something suddenly appears in the fisherman’s field of vision, he will not ignore it, while continuing to fish.
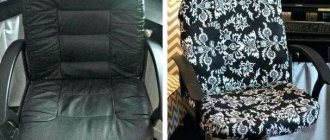
A more reliable option for storing individual accessories is in special pockets made in the seat upholstery. This is guaranteed to prevent a sudden gust of wind from blowing away the bait or bait.
In addition, putting all the necessary accessories into the seat pockets and removing all the necessary accessories from there is much more convenient than constantly bending low when everything is laid out on the ice. You can choose any other design of niches and pockets for accessories in the chair, taking into account your individual priorities.
Characteristics of the chair
The features of any element of a winter fisherman's equipment are akin to a traveler's equipment - in size it must be designed to be carried in a backpack or suitcase, quickly disassembled and folded, lightweight, and easy to use.
It would not be at all superfluous if its covering at least partially protects the rider from the cold winter wind - not every fisherman pitches a tent over the hole.
The feeder fisherman's chair should:
- be stable on ice;
- sit securely even on uneven surfaces;
- Additionally, have support for the back, since it is this part of the body that becomes numb when sitting for a long time over the hole in a monotonous position.
If the backrest reclines, the upper body support allows the person to assume a comfortable waddle position. A backrest-supported seat will certainly provide the fisherman with the opportunity to get the pleasure for which he leaves the cozy house in winter in any weather. It wouldn’t be out of place to mention your health, which, while fishing without minimal amenities, can cause damage, albeit small.
DIY feeder chair. Part 1
Having seen it one day at a neighbor's place on the ice, an ice fishing enthusiast becomes eager to have his own comfortable feeder chair. But the cost of even the simplest seats for winter fishing in ruble terms is now so substantial (from 7,000 rubles without body kit!) that if a person does not have a significant amount of free money, it is impossible to justify the purchase by any catches or desire for convenience.
Tools in your hands
It is quite possible to get a comfortable and reliable seat for feeder fishing without breaking another hole in the family budget - you can make it yourself at home. To perform this work, no special skills of a locksmith or a master of sewing on a sewing machine are required.
Everything can be done by a person with average abilities to design and make something; all he needs to do is be determined and stubborn.
After the design of the feeder chair has been thought out, the necessary sketches and outlines have been made, it is necessary to calculate the amount of materials.
If the dimensions of the product are approximately one and a half meters in height and half a meter in width, then you will need materials that can partly be bought in a store, and partly found at home.
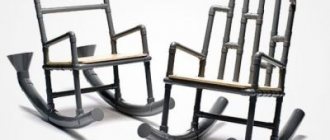
It is difficult to choose a more suitable material for the frame of a future chair than a profile pipe. The main advantages of this material:
- cheapness;
- high strength;
- weldability;
- ease of machining.
Necessary materials
Materials from which most homemade feeder chairs of simple designs are made:
- pieces of plywood 8 mm thick;
- steel pipes with a diameter of 20-25 mm with walls whose thickness is not less than 1.5 mm, cutting elements from these pipes for one chair will be: 55 cm - 4 pieces, 70 cm - 2 pieces, 30 cm - 1 piece;
- pieces of fabric with foam padding for covering the seat and back: 800×400 mm - 1 piece; 700×400 mm - 1 piece;
- bolts with nuts and wings of various lengths for assembling legs, seat and back;
- furniture bolts for connecting the seat to the back;
- steel plate for thrust bearings 3 mm thick;
- staples for a construction stapler 6 mm;
- primer and dye for processing the chair frame - in the minimum amount available on the sales counter.
For the feeder, the size of the seat-chair of the universal version is almost the same - 1.5 × 0.5 m. The given quantities and sizes of elements are based on a simple version without side armrests and an additional shelf for the legs.
If the craftsman considers these elements of the chair to be useful, then he will additionally need the materials of the listed nomenclature, but in a different quantity. Drawings of do-it-yourself corrugated pipe seats can be found in abundance on fishing equipment websites.
Foldable design
One of the most successful designs is a feeder chair with insulated foam upholstery. To stick foam rubber onto plywood, you will need titanium glue, and it is more convenient to prime and paint the finished frame using spray cans. It is better to choose a matte black paint color.
An important detail is that the chair for winter fishing must be foldable, since it will constantly have to be transported, carried, moved every time you go fishing.
It is permissible to make all frame elements from a round aluminum pipe of sufficient strength, in which case the chair will be much lighter. But welding aluminum at home is problematic.
Popular search queries for video clips on the Internet are: “Do-it-yourself feeder chair”, “Make your own feeder chair”, “Chair for a winter feeder”.
Finishing
To increase the durability of the feeder chair and maintain its presentable appearance, different coating options are used. They depend on the material used and can be as follows:
- Wood - treated with an antiseptic composition that actively counteracts mold and mildew. A primer and paint or varnish are also applied on top. This set of procedures will help increase the moisture resistance of the tree, as well as its resistance to temperature fluctuations.
- Metal - the main problem is rust, which destroys the structure of the pipes and the overall strength of the product. Therefore, anti-corrosion treatment is the main task; painting is also allowed.
- Plywood (chipboard) - you need to deal with this material in the same way as with wood; antiseptic treatment, priming and painting are carried out.
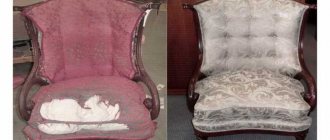
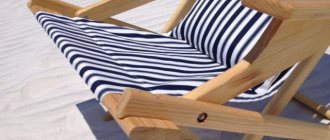
Characteristic features of relaxation chairs, types of products
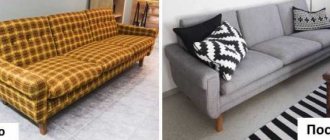
In order for a folding chair made by yourself to retain its appearance for as long as possible and remain reliable, you need to provide it with maximum care. After finishing fishing, the product should be cleaned of adhering dirt and dust, and wiped off any possible moisture. It must be stored in a dry place.
It is quite easy to make a feeder chair with your own hands. Although this task requires serious preparation and the availability of tools. When choosing the optimal fishing chair, it is best to choose a combination of a steel frame and textile fabric. It will be durable and resistant to negative external factors.
Treat wooden elements with an antiseptic and, if desired, paint them
Apply a special coating to metal parts to protect against rust.
After fishing, always clean the chair from adhering dirt and grass.
DIY feeder chair. Part 2
Even when the chair is ready, it is comfortable and the fisherman has sat in it enough at home, it is too early to take it fishing. For greater convenience, you need a specific kit for winter fishing.
These are additional accessories to the seat in the form of pockets for bait and bait, stands for the rod, a folding table for a thermos with tea and manipulations with the feeder and hooks. Only when everything is complete will the chair begin to “work off” the costs of its construction.
DIY body kit
Prices for feeder chair body kit elements on sale are steep. Buying the entire body kit as a set will be no cheaper than the chair itself.
Types of body kit include:
- rod stands;
- folding table with drawers for baits and groundbaits;
- special hanging bucket for bait mixture;
- pocket for thermos.
All these elements are not so complex that a person who made a chair with his own hands would buy them in a store. With such equipment, the fishing process is simplified.
Become a mechanic
Seeing the cost of branded body kit elements, the fisherman will only strengthen his desire to continue his plumbing activities. To make your own fishing seat kit, you will need the following materials:
- aluminum tube Ф25 mm, length 300 cm;
- fitting elements with which plastic pipes will be attached to the frame of the chair - 6 pcs.;
- pen for drilling plastic and wood Ф 26 mm;
- fastening elements for pipe blanks;
- drive-in nuts for furniture fittings may be useful;
- M8 threaded bolts;
- lightweight but durable plastic box;
- plastic clips for fixing pipe blanks.
The materials listed in the list do not cost a lot of money, especially since in many homes where furniture or plumbing is often repaired, they may be in abundance. From here, spare parts for the chair are then generated in case of breakdown.
We manufacture the body kit in the following order:
- We drill out the inner diameter of the tees to the diagonal size of the corrugated pipes of the chair legs.
- In the body of each tee, using a soldering iron, we fix a nut into which the M8 fastening bolt will be screwed.
- We drill holes in the legs. into which the mounting bolts will fit freely.
- We install tees and fasten them to the pipes with bolts.
- For each type of armchair body kit we make our own frame, which will allow you to install it on the side of the legs.
- We attach the bait box to the legs with clips that securely compress the corrugated pipe.
Attaching body kit elements to the feeder chair
To make a mount for fishing rods, it is enough to make a side branch from any chair leg. We also make a suspension for the bucket of food - we drill holes in the bucket for the clips and securely fix it.
Additional accessories
In addition to a luxurious chair with the necessary body kit, an ice fisherman will need various additional equipment. The main ones can be listed:
- drill for drilling holes;
- a sieve for scooping out ice crumbs from the holes;
- grip for large fish.
In different conditions of each specific fishing, the set of additional devices is different, and only the fisherman knows what he will need that day on a given body of water. It is convenient to transport all devices in a special box, which is convenient to carry along with the chair and gear.
Do-it-yourself body kit for fishing chairs and platformsText and photos – SkiP
After my wife gave me a feeder chair, I of course thought about a body kit. Since well-known manufacturers, even with the normal exchange rate of the ruble, were charging exorbitant prices, now a fishing kit is not a small expense item at all.
Buying used is also expensive. In our region they don’t sell this, but if you wait until someone in another city sells what you need, and then also pay for delivery, that’s all it will do.
I decided to start a collective farm of my own. I've been thinking for a long time about what is functional and convenient - this is a feederbox. Here you have a table, a box for transporting gear, a container with bait you can put there, and basically anything you want. I've been looking for a box for transporting dairy products for a long time, but it's not that simple. They don’t sell them individually anywhere, and my friends couldn’t help. I found a suitable box in Castorama, as well as all the other components for its assembly.
I got the idea for attaching to the legs on the D. Salapin forum from an author with the nickname ZAN. I needed: 3 meters of aluminum pipe, 25 mm plastic water fittings (2 angles, 4 tees), M6 furniture drive nuts, 26 mm drill, 25 mm pipe fasteners, and other hardware, seen in the photo.
You need to drill a hole in the plastic fittings to 26 mm for the legs. In those places where a non-removable pipe will enter the fitting, I used a 25 mm drill. Then we drill a hole on the side of the future fastener, for the drive nut. I couldn’t find any others and I had to grind off the teeth and reduce the size of the existing one. Using a soldering iron, heating the nut, we press it into the plastic, flush with the internal space.
Here is a photo of the design that I came up with for myself. Its advantage is that the frame is designed in such a way that it can be attached to the chair by two legs with one additional one, or by one leg of the chair with two additional ones.
At the bottom of the box, I screwed 4 latches under the pipe so that you can easily remove and install the box, as well as turn it over, depending on the installation of the frame.
I thought for a long time about how to make hinges for such a complex shape of the lid, but the solution was the simplest. A pair of through holes on the right and left sides, a hairpin, and stable loops are ready! ))
All that remains is to come up with telescopic stands for the lid to fix it at any angle, and find plugs for the legs. And either buy or make wing bolts for M6 yourself.
In general, the design turned out to be very reliable and stable. I'm happy with my homemade product! Field tests will show shortcomings, which I will definitely write about later.
Photo assembled:
Collapsible frame assembly:
Future plans include making LED strip lighting and pockets for small items on the lid.
From the remains of the pipe and fittings, I assembled this rod butt holder: