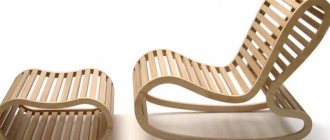
You can make it yourself from different materials: wood, plywood, metal, PVC pipes. In this article we will look at how to make a stylish and comfortable chair from a profile pipe.
Chair made of steel pipe
Before starting to manufacture a metal structure, it is necessary to make the correct calculations and drawings on paper
It is important to maintain an accurate scale. The easiest option is to make a rocking chair from a steel rod or pipe
Here is one option for which you will need steel rods or pipes with a diameter of 2 cm.
Tools such as a grinder, welding machine, and drill will be useful in the process.
Work order
Our chair will look like a simple chair, the only difference being that an arch will be attached to the bottom of its legs. This mechanism is called pendulum. The arc should be wide enough to make sitting in such a chair as safe as possible. The order of preparatory work is as follows:
- Cut the workpiece into 4 parts, 66 cm each. These will be the crossbars for the walls of the chair.
- Prepare 4 rods 30 cm long, which will serve as vertical posts for the front side of the product.
- Cut 2 rods 90 cm long for the upper connecting beams of both walls.
- Make 2 meter arcs for the support skis.
Here are approximate dimensions that can be changed at the request of the master. To make support skis, you will need a pipe bender. If you don't have it, you can use two nearby pillars or even trees.
When making an arc in this way, you simply need to place the pipe in the existing groove, insert a rod in the opposite direction and bend it to the desired radius.
You need to start assembling the frame from the sides.
The vertical and longitudinal beams are welded, and the support ski is attached in the same way.
When one side is ready, assemble the other. At the end, both sides are secured by welding with transverse rods.
When the welding work is completed, the fastening points are cleaned.
Then the frame must be washed, dried and primed in two layers. To make work easier, the chair must be suspended.
When the primer is completely dry, the chair can be painted.
Types of rocking chairs
The stores offer a wide range of this type of furniture, differing in material, type of design, upholstery, color, design and scope of application.
By type of structure
Glider - sliding silent structures. They are based on a fixed base, movement is carried out due to a pendulum mechanism. Very often, such models are recommended for rocking and feeding small children.
On runners: simple (arches, rocker arms), variable or elliptical. The simple type of chair is easy to manufacture and has one significant drawback - the ability to tip over when rocking. That is why it is better to make such models according to individual parameters (weight and height), according to pre-designed patterns.
Beginners should take into account that such chairs provide a low seating position to maximize the center of the resulting circle above the expected center of gravity.
Tumblers. Such chairs are most often used in household plots and gardens, as they can be installed on any surface and are characterized by the greatest stability. The seat and runners are a one-piece structure that does not collapse when moving back and forth.
Types of chairs
Today you can find a huge number of models of wooden rocking chairs of various shapes, sizes, breeds, styles and purposes.
Rocking chairs are:
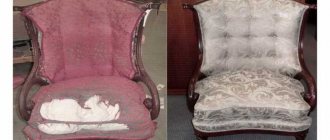
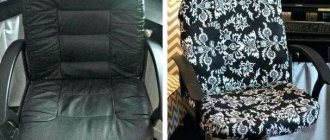
- Homemade. These chairs are needed for rest, relaxation and stress relief after a busy day at work. The frame of the structure is most often covered with soft fabric or covered with a beautiful cover. Such furniture can become a real piece of art and can decorate any interior.
- Office. Allows you to take a break during work to stretch and relax your muscles a little. Office rocking chair models often have elegant leather upholstery and can be equipped with wheels for movement.
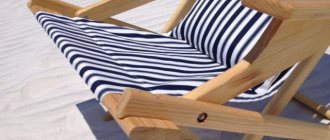
- Dachas. They are placed on the veranda of a country plot or inside a country house. Garden versions of rocking chairs look especially harmonious near a fireplace or stove. These structures also serve for relaxation and relaxation.
To make a rocking chair for your dacha with your own hands from plywood, you will need drawings and instructions from experienced craftsmen, as in the video below.
Depending on the type of chair design, there are:
- With radius runners. Swinging occurs smoothly and softly. For such an assembly, only a low landing is suitable, otherwise the rocking chair may tip over. If you need to increase the height, bump stops are simply installed on the runners.
- With runners of variable curvature. In such a chair, accidental tipping is excluded. The design is suitable for people of different body types.
- With a cradle. Designed especially for children. The chair is equipped with runners of variable curvature, is completely safe, swings gently and without jerking.
- Nirvana rocking chair on ellipses. It has elliptical runners, making the swing soothing, smooth and almost blissful. Strongly swinging is not recommended to avoid falling.
- Nirvana on springs. These chairs are characterized by soft rocking and safety. However, it is quite difficult to make them yourself; this will require wood species such as dogwood, teak or boxwood. Sometimes a rubberized strip of spring steel is used, which will eliminate scratches and dents on the floor.
- On runners with smooth breaks. This is a “3 in 1” rocking chair, it is multifunctional and can change position: from a regular chair to turn into a small lounger. The disadvantage of such structures is their large size, so they are unlikely to be suitable for small city apartments.
- Children's horse chair. This is the most comfortable and safe design for a small child with the right size of arms and backrest angle.
- Tumbler. In this product, the runners are also a seat. It can be placed both in the country house and in the apartment.
- Glider. This is a modern model of a rocking chair with a pendulum mechanism.
How does rocking happen?
Many people assemble rocking chairs according to ready-made drawings, but the products may not always fit the size of a specific person. Therefore, before starting production, you should understand the kinematics of this product:
- If a person stands upright, the center of gravity (CG) of the body is between the lower back and the sacrum inside the spinal column. If a person is in a sitting position, the CG shifts slightly forward and down. In rocking products, the overall CG is always shifted back and down to its original position. In this case, there is a slight error in the projection of the main center of gravity in relation to the supporting surface (floor, soil, etc.), which can be corrected at the end during balancing.
- The stability of the structure is most affected by the displacement of the overall CG relative to the vertical central axis (CO). If the CO coincides with the COG, this is a state of free balance, which is impossible to achieve in a rocking chair. If the center of gravity is greater than the center of gravity, there is a high probability of tipping backwards. It is necessary that the central center is 450 mm or more higher than the central central point (recommended excess is 600-700 mm).
In other words, the overall center of gravity of the rocking chair should be shifted from the seat to an angle intermediate between the back and the seat. The supporting legs are two arched strips, thanks to which smooth swinging is possible. The amplitude depends on the length of the runners.
Finishing
As for the finishing treatment of the metal frame, to increase its service life it is necessary to prime it and cover it with paints and varnishes in several layers. It is better to paint the product outside in the warm season . Each layer of primer is applied to the product after the previous one has completely dried. As a rule, the primer dries completely within 24 hours . If you chose a gray primer, then after applying the last two layers, the product can be coated with a matte varnish.
Tip : rocking chairs are also made of wood and plywood. And next to it you can put a glass table, coffee table or laptop table.
Choosing material
The choice of material from which a rocking chair is made depends not only on your own preferences, but also on the conditions in which the furniture will be used. Quite popular is a forged chair, which is assembled from metal rods and strips. Such a model is brought to life not only by forging, but also by conventional welding. A wrought iron chair is most often installed on the street, porch or spacious terrace. The material used is characterized by increased strength and long service life, in addition, it is not exposed to the negative effects of weather conditions.
However, metal chairs also have a number of disadvantages. They weigh too much, and therefore are not distinguished by any mobility. Manufacturing will be impossible without special equipment. Finally, for some people, forged structures do not seem comfortable at all. In this case, you will have to additionally purchase a soft mattress and armrests.
There is also the option of making a rocking chair from a plywood board. This option is the simplest and most cost-effective, accessible to anyone with basic carpentry skills. The advantage of this design is its low weight and the ability to bring any idea to life thanks to the linear dimensions of the plates and their varying thicknesses. To extend the life of a plywood rocking chair, additional processing is required using a polymer emulsion or acrylic-based varnish.
Wooden furniture is a fairly traditional option that looks appropriate both outdoors and in any interior. The wood itself is an environmentally friendly product that is easy to process and inexpensive. However, compared to the same plywood, the service life of such a chair will be longer. A chair made from profile pipes can serve for many years, including in conditions of constant outdoor use.
It is better to choose parts with an ellipsoidal cross-section and do not forget about the need to use a welding machine with a pipe bender. The finished structure must be coated with paint or varnish with anti-corrosion properties. To make the rocking chair comfortable to use, you will need to make the seat and armrests from boards or plywood, and then cover them with fabric or leather.
A rocking chair made of polypropylene pipes looks quite creative, but is not suitable for home use. Since the material is highly resistant to weather conditions, it can be used outdoors, taken indoors during frosts and hidden from direct sunlight. The individual parts of the structure are assembled using a soldering iron. The more connecting elements are used, the more stable the chair will be.
A rocking chair made from willow wicker looks very beautiful, but is quite difficult to make without certain weaving skills. However, the result is a lightweight and comfortable design that can be used both indoors and outdoors. You can also weave a rocking chair from bamboo, rattan or reed. Furniture made from cable reels turns out to be very unusual. This element is disassembled, after which a groove for the boards is cut out in the circles, and the rods are rearranged under the soft seat.
Some craftsmen use an old chair with runners placed on its legs. In such current styles as Scandinavian or eclecticism, rocking chairs knitted using the macrame technique are often found. Furniture is also assembled from pallets, polypropylene pipes, plastic pipes or PVC pipes. When choosing a material for manufacturing, there are several aspects to consider. As for wood, it is recommended to give preference to dense species, for example, oak, ash or larch.
Operating procedure
At the initial stage, it is necessary to prepare individual structural elements - parts. First of all, the preparation of metal components is carried out, since working with them takes longer. To make the workpiece, you need to cut off sections of the required length from the iron pipe, the value of which is indicated in the drawing. Since the chair is pendulum - adapted for swinging, the lower slats resting on the floor should have semicircular areas, which involves sawing off the primary workpiece with a margin of length, since it will decrease after giving it a semicircular shape.
You can bend the slats using a specialized pipe bender. If this is not available, you can bend it yourself. To do this, a piece of pipe must be clamped in a vice or between two stationary objects and begin to bend. To maintain uniformity, you need to perform the steps step by step: apply force to the bend, move the workpiece forward 10-15 cm, repeat the force. This must be continued until the corresponding semicircle is obtained. To achieve identity for both planks, you can fasten them together with tape. In this case, they should be located as parallel as possible relative to each other.
Next, the wooden planks for the seat and back of the chair are prepared. To do this, the main workpiece is cut into segments, the length of which is indicated in the drawings. The dimensional parameters of various elements - the main part, armrests and protective tabs on semicircular supports - must be identical for their group. After this, each component of the wooden frame is processed for the purpose of preliminary preparation. As part of these manipulations, grinding, jointing, drilling holes for fastenings, treatment with paints and varnishes and other actions are performed.
Frame
The frame is installed first. Using a welding machine, metal workpieces are connected. The work is performed sequentially, which allows you to achieve maximum symmetry and even shape. First, one side of the chair is welded. Solid posts are welded to the semicircular support. In profile projection, the resulting product will have the appearance of a trapezoid with rounded upper corners, and its base will have the appearance of a semicircle and edges protruding beyond the perimeter of the figure.
The production of the second half of the chair is made according to the template of the first. To do this, the first side is laid on a flat surface, and the blanks from which the second side will be welded are applied to the template in the appropriate places. At this stage, it is possible to correct the discrepancy between the dimensions of the parts and the deviation in the coincidence of their shapes. When both sides of the chair are ready, they must be connected using jumpers prepared in advance. The length of these jumpers must match the final width of the chair seat. When connecting two sidewalls, it is necessary to maintain perpendicularity and check for right angles between the workpieces. This will allow the assembly to be as smooth as possible.
Seat
The wooden strips used to form the seat and backrest are screwed to the frame. To do this, they must already have holes drilled in them at the appropriate attachment points. It is recommended to number the planks in the order in which they are located. After this, applying each workpiece to its location on the frame, marks are placed on it for drilling holes. You can complete the markings and then start drilling. Once completed, each plank is screwed to the frame using bolts. In this case, the fasteners are tightened until the bolt head drops below the surface of the wooden workpiece.
Painting
Coloring is done in stages. The metal frame must be painted before the strips are attached to it. This allows for more complete and high-quality painting. Wooden components are also painted in advance, but can be repainted after assembly. The color combination is selected in accordance with the stylistic characteristics of the room. In some cases, it will be advisable to varnish a homemade chair, which will prevent damage to the wood.
To learn how to make a metal rocking chair with your own hands, see the following video.
Design Features
The most important function of a rocking chair is its ability to rock systematically and with equal amplitude without losing balance. Therefore, an important part of the design is the moving element. Accurate calculations when creating a drawing are important here.
When planning the rocker-base, you need to take into account the size of the parts of the entire product so that the swinging arcs are sufficiently stable. This is achieved by their length, the width of the arc itself and the distance between them.
Considering the stability of the structure, you can add additional elements in the form of a book stand or decorative ornaments. There are also very interesting models with a sliding mechanism that allow you to turn the chair into a bed or hanging options.
Step-by-step instruction
Let's look at the assembly procedure point by point.
- We make skis. According to the vast majority, this is the most difficult stage. In practice, if you have a pipe bender, there are no problems. Simply cut 2 blanks measuring 1.3 meters and roll until you get a suitable radius and a distance between the edges of the skis of 96 centimeters. The skis must match completely, otherwise the chair will swing unevenly. You can compare the suitability of skis by placing them next to each other.
- Side panel assembly. According to the sketch, we weld diagonal struts to the ski. A cross member is fixed in the middle of the pillars - the seat guide. At the top point of the racks located diagonally, we weld the armrest.
- Assembling 2 side panels. Its assembly is carried out in the same way as the first one, only during installation we attach the structural elements to the previously manufactured part and make sure that they are the same.
- We connect the assembled sidewalls. We weld horizontal cross members in the front area of the skis. At this stage, we certainly use a square and control that the angle between the crossbars and the runners is 90 degrees.
- We weld the next cross member at the top of the racks located diagonally. The angle between this cross member and the diagonal posts should be 90 degrees.
- We weld the backrest guides. We weld two sections of curved pipe to the frame of the seat and to the armrests. The backrest guides must be parallel to each other so that the structure does not move later when facing with wood.
- Painting the supporting structure. We clean the assembled frame from visible traces of rust and prime it. After the primer has completely dried, apply 2 layers of paint with a break to dry the previous layer.
So, the base is ready, only the frame, despite the fact that it is well assembled, is a chair. What to do with an iron frame so that it turns into a comfortable piece of furniture? There are a number of possibilities for final finishing of iron furniture. For example, you can cut steel strips from sheet steel and weld them to the frame in the form of lamellas that will hold the mattress or pillows. The second, best option is to line the metal frame with wood boards.
Slats are cut from planed wooden boards and fixed transversely to the frame. For installation in a metal frame, holes with a diameter of 3 millimeters are first drilled. Lamels are laid on top of the prepared holes and fixed to the pipe with metal screws. After the chair is fully assembled, the covering of the supporting structure must be painted or varnished. The choice of final finishing technique depends on what materials were used for the cladding.
How to weave an original model?
A hanging chair made from a gymnastics hoop, created using macrame, will be an excellent option for a nest chair for the country house. For a chair made using macrame, you need to prepare two hoops with a difference in diameter of at least 30 cm, and more than 3 cm in girth. The hoop must have a metal base. You will also need thick clotheslines, a cord for braiding, two rods (if you need a “nest”, then there will be at least 6 rods, the joint winding of the hoops is replaced by fixing the hoops with a thick braid at the same distance), an awl, a tape measure, PVA glue, gloves, tape measure, weights for the canvas, decorative elements as desired.
The rope for making must be strong and smooth. The ends of the thread can be melted or coated with glue to prevent the edge from unraveling. The seat is made using a hoop of smaller diameter. Cross weaving is used with an upper transition over the 1st and a lower transition under the 2nd main thread, with a further upper transition over the 3rd and a lower transition under the 4th thread.
The step is no more than 1 cm. Or replace it with flat knots in a checkerboard pattern.
The finished seat will need to be braided with lace along the ends and tightened with knots. The same cord secures a hoop with a larger diameter, a distance of at least 15 cm.
The backrest is placed opposite the winding; the rise of the backrest is attached with rods. Its height is adjustable as desired. The rods are secured with braid. Next, the hoops are connected with Herculean or square flat knots.
If the level of macrame skill is high, you can use any other knots.
You can use decorative elements to decorate the chair. Fringe is made from loose threads. The finished chair is connected to slings. On the front part the line flow will be wider than on the back.