You don't have to spend a lot of money to buy luxury wooden furniture. It is possible to make such a product on your own if you look at the drawings, select lumber and have some free time.
Advantages of wooden furniture for relaxation
Wooden furniture is relevant at all times. It is different:
aesthetics;- naturalness;
- long service life;
- resistance to negative factors.
Wooden products attract people with their texture and interesting texture . Wood is easy to work with. It can be easily processed with both hand and power tools. If you have experience in carpentry, original and exclusive models are created.
In addition to the above advantages, it is worth adding that the tree can withstand heavy loads of up to 300 kg.
This material does not require careful maintenance. Help : with proper finishing, it is enough to wipe the product once a week with a damp cloth and hide it from rain and frost.
Manufacturing stages
The procedure depends on the type of model selected. Among the general stages are:
- cutting parts of the chair-bed strictly according to the drawing, grinding surfaces, trimming, drilling holes for corner fasteners and the transformation mechanism;
- assembly of the case, installation of folding elements;
- covering the chair with soft filling;
- textile covering.
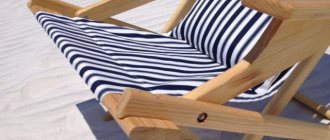
In the absence of experience, it would be better to make a chair-bed with your own hands as simply as possible - with a solid, stable body and a retractable or foldable sleeping part.
Cutting out the parts
At this stage, parts are cut out of the timber to assemble the frame of the chair-bed, and the sidewalls (armrests) are cut out of chipboard or its analogues with a thickness of 18 mm or more. Thin but durable plywood is sawn into squares that cover the folding parts. All parts are polished, impregnated with antiseptics, and dried. The stage ends with marking and drilling holes for self-tapping screws.
An important condition is that all parts of the chair are cut without deviations from the specified dimensions, with an accuracy of 1 mm.
Housing assembly
Work begins with assembling the base of the chair. After this, the back and 2 supporting sides are sequentially screwed to the bottom with self-tapping screws. Retractable or folding elements are assembled after checking the stability of the main body. The chair transformation mechanism is fixed last, in specially cleaned areas.
Work on assembling the chair body is carried out exclusively on a flat, stable base.
Sheathing
At this stage, the assembled structure is sequentially:
- It is pasted over with pieces of foam rubber from 2 to 10 cm thick.
- Sheathed with pre-cut textile blanks with a margin of at least 1.5 cm at the edges.
- Decorated with armrests (if available).
How to make a transforming bed with your own hands, detailed instructions
The work is carried out using glue and a furniture stapler. In most cases, the textiles are stretched over the parts with fastening to the bottom of the timber frame. At the request of the owners, the chair-bed is decorated with an additional removable cover, made upon completion of the remaining work.
Installation of the transformation mechanism
To assemble a chair-bed, any ready-made transformation mechanism can be used. Of the offered range (over 15 varieties), the models presented in the table are best suited for these purposes.
| Name, brief description | Maximum load, kg/ Availability of linen box | Layout method, advantages or limitations |
| “Dolphin” - a simple pull-out unit with a sun lounger in a hidden drawer | 200/no | The secret drawer and additional section are pulled out using straps. The length is limited by their size, the mechanism is better suited for sofas and corner models than for regular chairs |
| “Eurobook” is a reliable and simple mechanism with durable wooden guides, a system of rollers and wheel supports in the front of the chair | 240/yes | The seat extends towards itself after removing the back cushions |
| “Tick-tock” - with smooth guides, holding 2 identical elements (back and base) | 240/yes | Easy movement up and forward, with the backrest lowering into the vacant space |
| “Telescope” - a roll-out or retractable design that folds 3 connected pillows forward | 180/linen compartment is allowed only on wide models | The front section rolls forward, the headrest rises from the backrest, and a seat cushion fits into the free space |
| “HODRY” – draw-out mechanism with electric drive | Up to 200/yes | Transformation is performed automatically after pressing a button on the remote control |
The above list is far from complete. When assembling a chair-bed with your own hands, you can safely use the Sedaflex, Mixotoil, Spartak, Puma, and Accordion systems. The main criteria for choosing are cost, the possibility of using a linen box, the height of the steel space, and compliance with the selected dimensions of the furniture. You also need to pay attention to the admissibility of daily use (not all mechanisms are provided for, in some cases there is no need for frequent layout).
In primitive folding chair designs, the elements are connected using ordinary but reliable metal hinges.
"Dolphin"
"Tick-tock"
"Eurobook"
"Telescope"
"HODRY"
Choosing a wood species
The choice of wood when making furniture plays an important role. Each tree can be processed differently and has different textures and technical qualities. The following types of wood are suitable for this:
Oak. An oak chair will delight users with its high strength, wear resistance, and durability. It will harmoniously fit into a classic interior and will look noble and elegant in it .
A rich variety of wood colors allows you to choose an option for any interior.- Beech.
Beech furniture goes well with classic motifs. Due to the elasticity of the material, the product is given curved and complex shapes. Beech is easy to process. It sticks well and dries quickly. Its positive qualities include: wear resistance, strength, beautiful texture on cuts, the ability to maintain natural color even after varnishing. - Nut. This breed is distinguished by an abundance of shades from red-brown, light, greenish-gray to yellowish-gray. Black walnut, used in the manufacture of exclusive and expensive furniture, is considered the most valuable . Thanks to the solid texture, complex openwork carvings are made on the array. During the work process, no chips are formed on the wood.
Budget options include products made from:
Pines. This tree has good qualities and an affordable price. The material copes well with sudden temperature changes. Therefore it is suitable for making garden furniture.- Birches. Lumber lends itself well to processing, which allows you to create real masterpieces in the furniture industry. The chair can be decorated with decorative carvings, reliefs and ornaments.
- Alders.
It is easy to carve, dries quickly, polishes well and practically does not warp. But when used in the fresh air, the wood acquires a dark shade . Therefore, it is better to paint it with paint. - Ash. This material bends well, practically does not crack when dried, and when bleached it acquires the original shade of gray hair. But ash is poorly polished and is quickly damaged by wormholes . When making furniture items from ash, the wood must be treated with antiseptics.
Tip : to make a durable piece of furniture, it is recommended not to skimp on consumables.
How to make frameless furniture
A chair without stiffeners can be made from dense sheet foam rubber 10 mm thick (an alternative is polyurethane foam, struttofiber or natural latex slabs) and high-quality, but simple textiles. Additionally, 7 lightning bolts will be required for these purposes. Their length and number depend on the number of selected unfolding elements. You will also need braid (for edging the edges, selected at will), PVA glue for gluing rectangles or squares of foam rubber, strong threads and a sewing machine. The work is carried out according to a simple scheme:
- Squares or rectangles with a width of 80 mm and a length of 20 to 80 mm are cut out of a single piece of foam rubber (dimensions may vary depending on the purpose of the chair).
- The parts are coated with glue, connected and left alone until completely dry.
- Textiles are cut with a 1.5–3 cm margin for seam allowances. In areas where zippers are sewn in, the allowance is made maximum.
- The covers are sewn together by machine. Zippers are inserted in the center of the sides to be hidden after the chair is laid out. Experienced craftsmen recommend immediately making several types of covers from different textiles, including rough and replaceable outer ones.
- Foam rubber blanks are inserted into the covers, and an inconspicuous fabric handle is sewn to one of the sides.
- The parts are connected using strips of fabric, zippers or Velcro. The method of fastening the chair elements is thought out in advance, the gap between them is kept as small as possible. Its size has a direct impact on the visual appeal of the chair and the density of the individual pillows.
Tips for choosing a transformable wardrobe bed, design advantages
The given instructions allow you to make yourself a chair-bed, a sofa or similar transforming structures from type-set soft elements. The simplest alternative to such furniture is a sewn quilted blanket (futon) or a bean bag chair, made in the shape of a large rectangle. When folded, they are used as a seat, and when spread out, they are used as a place to rest or sleep.
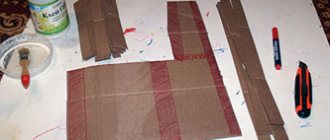
Chair parts are cut from foam rubber
Textile cutting is carried out
Covers are sewn by machine
Foam blanks are inserted into cases
Parts are connected
Drawing with dimensions
You can make a drawing of a future piece of furniture in different ways:
- find a suitable option on the Internet and modify it in your own way, using suitable dimensions;
- draw your own invented version by hand with all the calculations and dimensions;
- use a special computer program.
Before drawing up a drawing, it is necessary to decide in advance on the design, dimensions, location and materials of manufacture of the future chair.
Help : the seat and back of the product can be completely wooden or covered with fabric.
Drawing up a drawing
Ready-made drawings and diagrams can be found on various online services. Standard sizes of chair beds range from 60 to 140 cm in width, 170–200 cm in length, 10–40 cm in height. At the same time, compact modules with a width of 60–70 cm (80–90 including armrests), double sofa chairs with a berth of up to 120–140 cm, corner models with two backrests 100 cm wide are conventionally distinguished. The dimensions of the chairs are selected taking into account height owners and room sizes. In conditions of limited space, compact models look best; in rooms with high ceilings, placement of bulky products is allowed.
Types and dimensions of transformable beds for children and adults
If you have instructions with a drawing explaining what and how to assemble the chair from, with a detailed description of the parts, you should not deviate from the recommended dimensions. The slightest changes in the thickness of the materials used can lead to distortion of the structures. When choosing general sketches, the approach changes - the dimensions of the parts of the chair-bed are adjusted to each other, based on calculations. Detailing, special programs, and cardboard templates help to avoid mistakes.
Tools and materials
The tools are prepared:
- electric drill;
- screwdriver;
- sander;
- corner.
Materials needed:
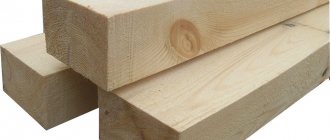
- wooden blocks with a cross section of 3 cm;
- plywood 2 cm thick;
- self-tapping screws;
- stain;
- varnish;
- brush;
- antiseptic.
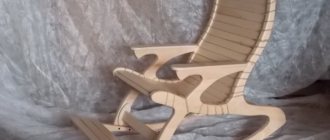
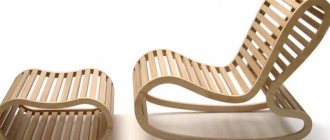
How to make a folding version?
The sequence of work is as follows:
The contours of the parts are applied to the prepared plywood.- The parts are cut out with a jigsaw strictly according to the markings.
- Wooden blocks are divided into slats. They will be used in the manufacture of the seat and backrest. Next, jumpers are prepared from boards of greater thickness.
- From the ends of the ribs, chamfers are removed at an angle of 45 degrees.
- To assemble the product, 16 slats and 2 thrust bridges are prepared.
- The seat frame is assembled from 2 plywood legs and 9 slats. The parts are connected with screws.
- Next, the outer slats are attached with two screws on each side.
- In the same way, the back of the product is assembled from two legs, seven slats, two thrust bridges, one upper bridge and one rounded edge with a hole in the middle.
Attention : the entire process of assembling the chair is checked with a square. The slats are set perpendicular to the plywood legs.
That's the whole process of making and assembling a wooden folding chair with your own hands. Now all that remains is to carry out the finishing touches and the product can be used.
How to make a bean bag chair with your own hands
The outer bag is made from high quality materials; if you ignore the requirement, the design will turn out to be weak, rather tacky, and short-lived. Considering that it takes a lot of time to build a homemade chair, it will simply be a pity.
Important! If there are cats and dogs at home, the material of the cover should not attract fluff and hair.
Synthetic upholstery is preferable to natural upholstery; it has good resistance to mechanical and other influences, is easier to wash, and is not prone to stains that are difficult to remove. The downside of synthetics is that they can irritate sensitive, baby skin. Light-colored fabrics are used only for those that are easy to wash, since the need for washing arises frequently. Strong threads are used to sew the bags.
Important! When choosing a pattern, take into account the size of the room; in a large one, a small pouf will get lost, and in a narrow and chambered one, a large bag will visually clutter up the space.
How to sew a bean bag chair for adults
Sewing a bag with your own hands involves several stages. There is nothing complicated, the main thing is strict adherence to the sequence of actions:
- Prepare a pattern, make sure that the measurements are optimal, select materials and colors.
- Draw the pattern onto the fabric using a marker or chalk.
- Sew the inner bag, insert Velcro or a zipper into it, and sew the bottom.
- Make the outer bag in a similar way, taking into account that it should have increased dimensions.
- Fill the inner bag tightly with polystyrene or other selected material. Ensure that the padding is evenly distributed over the entire area.
The last point is that it is advisable to carry out the work not indoors, since otherwise synthetic filler will accumulate in the room, and this is undesirable and is fraught with allergic reactions.
How to sew a beanbag for children
The first stage is preparing the pattern. Further algorithm:
- Fasten the parts together with needles, baste the seams on the sides.
- Make stitches on a sewing machine, iron everything thoroughly with an iron.
- Place the outer wedges on the blanks and sweep.
- Make an inner cover, provide a zipper on one side up to 40 cm in length, through which the filler will be filled. Finish the seams with an overlocker.
- Prepare a removable outer cover and sew a zipper up to 1 m in length into it.
- Turn a couple of covers inside out and sew the top to the outer one.
- Turn the face inside out and fill with filler.
It is advisable to add polystyrene foam balls from time to time. It is highly not recommended to install the product near heating devices. Contact with direct sunlight is undesirable, since it also changes the original performance properties of the products.
DIY bean bag chair
The ball is a bright and stylish model; it will decorate any interior in which it is used. First, they make patterns for the outer and inner bags - the patterns can be found online.
Progress:
- The parts are sewn together and a zipper is sewn in.
- They check the strength of the seams, the quality of the zipper, and its compliance with the dimensions of the model.
- Fill the case with filler and shake it to distribute it evenly.
The bags must be sewn together. The shape is made strictly round, like a ball
DIY triangular bean bag chair
The triangle bag is made according to the same pattern as other options, but the pattern should have stricter lines and a tapered top. Procedure:
- Prepare a pattern, transfer the patterns to the fabric.
- Cut out the blanks, sew the seams on a machine, and iron them thoroughly.
- When the inner and outer covers are ready, sew them together and check the strength of the structure.
- Fill the bag with the selected filling.
The top of the triangle needs to be filled in, otherwise it won’t “stand” clearly.
DIY knitted bean bag chair
If you have the desire and the appropriate skills, the chair can be made using knitting. This pouf looks very beautiful in any interior and can have different colors. The height will be lower than that of a chair and other furniture, the shape is usually like a cube.
Procedure:
- Prepare a pattern with measurements - this will be more of a plan for action.
- Take thick yarn and knitting needles about 15 mm. The composition of the yarn is not important, but it needs to be thick.
- Start knitting the cover, optimally with garter stitch, but other techniques can also be used.
- Close the finished fabric along the width with a needle or hooks.
- Stuff the material inside and sew it together.
Additionally, you can make a cover from knitwear. Instead of knitting needles, some craftswomen use a crochet hook.
DIY bean bag chair made from jeans
Old jeans are a practical option for sewing the outer cover of a homemade chair. If you don’t want to wear it, but it’s a shame to throw it away, you can give the item a second life. The fabric is dense, wear-resistant, so it will last a long time.
Procedure:
- Prepare a pattern - the shape can be any, triangle bags come out well from denim.
- Prepare tools and materials for working using the patchwork technique, since you will have to sew a lot of elements together.
- Cut the trousers into rectangles, there should be a minimum of scraps, and process the edges of the blanks using an overlocker.
- Sew the cover using pins, making the seams overlap. You can combine homogeneous pieces or play with contrast.
- Fill the capsule with polystyrene or other filler.
Done – close the previously sewn zipper. The main problem with jeans is that the fabric is very thick and dense, you will have to tinker with it longer than, for example, with oxford. They also use powerful lightning. But the efforts will pay off, the result will be stylish, bright and durable.
Finishing
After making all the parts and assembling them, the product is carefully polished. It should not have nicks or other defects . Next, the wood is treated with antiseptic agents, covered with stain and varnish in two layers. When using a piece of furniture outdoors, it is recommended to use moisture-resistant varnish.
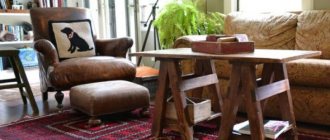
Tip : for outdoor use, chairs are also made from tires and pallets. And next to it you can put a folding picnic table or a convenient table for a laptop.
Photo
Folding chairs can be very different. The main thing is that they fulfill their direct functions: