0
10546
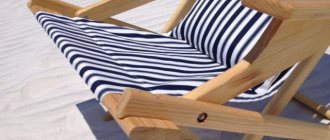
Lovers of comfortable outdoor recreation often equip their suburban areas with gazebos, hammocks, and swings. And relatively recently they began to use hanging chairs, in which it is convenient to relax reclining. They can be placed both outdoors and in the house. They provide relaxation and peace for the sitter, and in a large house they will certainly become an interior decoration. Making a hanging chair with your own hands is not at all difficult. To do this, it is often enough to use improvised materials and simple tools.
Pros and cons of the Nest swing
Advantages of this design:
- the opportunity to organize outdoor games;
- use different movement options - twisting, swinging in different directions, jumping;
- safety - impacts are softened by the soft upholstery of the rim without causing injury;
- entertainment for both one child and a group of children - the swing can withstand weight up to 100 kg;
- mobility and compactness;
- easy installation, cleaning, storage;
- accessibility for self-production, you can use available materials.
Disadvantages are minor:
- there is no backrest or safety devices, so you need to teach children how to ride correctly;
- age limit up to 5 years;
- support posts or beams that are strong enough to support the load are required.
What do you need for work?
If you know how to use a sewing machine, then making a hammock from a hoop with your own hands is not difficult. The idea is interesting and easy to implement.
Rice. 1. Hula Hoop Hammock
Before getting started, prepare:
- marker;
- scissors;
- trouser braid;
- measuring centimeter;
- padding polyester (for covering the hula hoop);
- a zipper as long as the diameter of the hoop;
- rope (for hanging the structure);
- a metal hoop that will serve as a frame for the miracle product;
- 2 pieces of dense fabric protruding around the circumference beyond the hoop by 25-30 cm;
- and the already mentioned sewing machine.
In our example, we use a standard hula hoop with a diameter of 95 cm. The textile fabric must be thick enough to support an adult; denim is very suitable for this purpose. You can also use quilted fabric for mattresses, raincoat fabric, burlap, not too rough tarpaulin fabric, etc. The diameter of the pieces of fabric should be 120-125 cm.
Note! This design can easily be turned into a cradle for a baby. A small mattress and pillows are placed inside, and the hammock itself is suspended on ropes of equal length.
Rice. 2. The hammock is no longer a place to relax, but a cradle for a small child
Design Features
Quite recently we wrote how to make a wooden swing with your own hands, today we’ll talk about a popular mini-attraction for children, which is a structure of a seat and suspensions that are attached at the top to support posts, beams or ceilings.
- The seat is oval or round, with mesh or fabric filling. Made from a metal ring of various diameters. For a small child, you can use a plastic hula hoop, but for adults, the hoop should be much more powerful. Weaving is made from strong cord, twine or rope. The mesh has a small cell so that the skater cannot fall into the hole.
- Slings - ropes, cords, chains. The stronger they are, the more reliable the swing. The set consists of several slings with carabiners according to the number of attachment points, of which, for safety reasons, there must be at least 3. Otherwise, the nest will be unstable and uncomfortable - the child may roll over and fall.
- Supports - horizontal beams, beams, large tree branches, as well as U- or A-shaped structures. The swing is suspended at the top point of the supports, which must be strong and securely fastened. When vibrations occur, a large pulling force occurs, so vertical or inclined posts should be dug into the ground and concreted.
The seat, slings and supports are connected to each other using durable steel rings or carabiners. If you make the Nest swing with your own hands and make it strong enough, even an adult can use it.
Step-by-step DIY process
So, let's start the workflow:
- We take a hoop, in our case it is a product with a diameter of 95 cm, and fabric (2 pieces, 120 cm in diameter).
- We place the hoop clearly in the middle of the fabric and apply a dotted line around the circumference with a marker and a centimeter, leaving a margin of 25 cm. You shouldn't make a model that is too deep. It will be difficult to get out of it.
- Trim off excess fabric with scissors.
- We do the same with the second piece of fabric.
- We insert a zipper into one of the segments, making a neat cut in the middle of the material with scissors.
- We fold two pieces of fabric face to face and sew them together using a sewing machine. The zipper should be open during sewing.
- We turn the sewn cover inside out and make 4 holes along the edges of the hula hoop according to the diagram. The rope will be threaded through these holes in the future.
- We process the edges of the holes on a machine using trouser braid (this will prevent the material from fraying and make the product decorative).
- We cover the hoop with filler (sintepon). Instead of padding polyester, you can use foam rubber or ordinary pieces of fabric. You can wrap the hoop with filler in any order. The main thing is to grab it tightly with a thread so that it does not unfold. This procedure is necessary to ensure that you can relax comfortably in the hammock.
- We put the cover on the manufactured frame.
Important! To sheath the hoop, you must use strong nylon or synthetic threads. It is better to sew the product several times and with small stitches.
The process of making a hammock is described in more detail in this video:
Making a seat
If you want to arrange a fun attraction for children, it’s easy to build a Nest swing using step-by-step instructions. This can be done in 1-2 days.
What materials will you need?
When choosing components for making a seat, you need to calculate the expected load. If 1 child will use it, its weight is assumed to be 50 kg. For a group of children or an adult, this parameter is much larger - 100-150 kg.
In the first case, the seat will need a steel gymnastic hoop with a diameter of up to 1 m. In the second, the number of rings should be at least 2-3. To give the necessary rigidity, they are connected with clamps, electrical tape or tape. You can make a mold from a metal pipe with a diameter of 25-32 mm by bending it and welding the ends together.
To weave a mesh you will need strong flexible twine, rope, cord or various combinations thereof. It is quite difficult to calculate the required amount; it depends on the type of pattern, weaving method and cell size. The consumption for the simplest “spider web” is 25-30 hoop diameters.
To make the seat frame soft and safe, you need to purchase felt, padding polyester or foam rubber to wrap the ring. For decoration, pieces of multi-colored fabric, preferably waterproof, such as raincoat fabric, will be useful.
Step-by-step guide to making a seat
If you already have a ready-made gymnastic ring in stock, you can immediately begin weaving the net. In the case where the frame is to be made of metal, you need to bend the pipe with a pipe bender, weld the ends, clean the seams and the surface of the hoop. It is advisable to cover the structure with 2 layers of primer.
Weaving can be done using various techniques - macrame, tatting with a diamond-shaped or square cell, crochet. The simplest option is the “spider web” network:
- Attach 4 pieces of twine to the ring at equal intervals so that they cross in the middle. There should be 8 sectors. This is the basis for weaving jumpers. The number of sectors can be increased and made from 6 pieces of rope, then the pattern will be denser and the cells smaller.
Important. When weaving, it is recommended to reduce the holes from the edges to the middle. In the center, the cells should be such as to prevent the child’s foot from falling through (approximately 3x3 cm).
- Mark sections of the fixed cord into segments and weave in a circle, connecting the jumpers to the base of the “web”. For strength, the knots can be stitched with thread.
- Attach strong steel carabiners to the frame in 3-4 places.
- Wrap the hoop in synthetic padding or foam rubber and decorate the top with colorful bright fabric. You can sew a removable cover with buttons or Velcro, or wrap it tightly with a thick cord.
For comfort, place a soft pillow or blanket. The seat is ready!
How to weave a swing-nest
The simplest weaving pattern, which even a novice master can do, is a mesh like a cobweb. It uses basic “threads” and a connecting cord. At the same time, you should choose a thicker and more durable cord for the base, and a slightly thinner one for the connection.
To work you will need:
- hoop, for heavy weights - two or three hoops connected with clamps or tape;
- rope (cord, braid) with a breaking force of 20 kg and a thickness of about 5...8 mm (for large users it is worth choosing a rope with a diameter of 8...12 mm);
- marker for marking;
- scissors for cutting cord;
- strong threads, preferably polyester or “denim”, thickness 0.5...0.8 mm and an appropriate needle.
Since sitting/lying on a rope net is uncomfortable, it is worth making a dense pillow with a slightly smaller diameter than the hoop (5...7 cm). It will require thick, preferably waterproof fabric and padding polyester/foam rubber/synthetic fluff/batting or any other filling material.
Step-by-step master class on making mesh
- The hoop (hoops connected to each other) are marked with a marker. For marking, the circle is divided into 6, 8 or 12 parts - as desired.
- At every second marking point, a doubled piece of rope is tied using a loop, the length of which is equal to two diameters of the circle plus 20...30 cm for fastenings.
- Secure the ends of the rope at the point opposite the base mark. It is important not to pull the cord too tightly; it should sag a little, but the length of both sections should be exactly the same.
- After this, using the same or thinner rope, the “web crossbars” are woven. You can connect the “beams” and “crossbars” with knots or simple twisting, as in the photo above. If desired, instead of the usual cord, you can use a homemade knitted “rope” from old T-shirts, tights and other things. She will have to weave more tightly, essentially creating a rug, but the color scheme will be interesting and there will be no need for a pillow. The difference from the master class proposed below is in the photographs - the crossbars are made of a very strong cord and after finishing the weaving are not cut off, as in Figures 11...12. It is advisable to additionally sew the junctions of the crossbars and radial cords - this will not allow the nodes to move during use.
- The edge of the hoop is wrapped with a strip of fabric or cord (knitted rope), which allows you to simultaneously hide all unaesthetic knots and soften the rigidity of the metal.
- Secure the ropes with loops or rings (carabiners) for hanging.
- Gather the suspension ropes into one or two (for a double fixation point) bundles, fasten them to carabiners or rings and attach them to the supporting structure.
It is better to make a seat cushion with ties that allow you to fix it on the hoop.
Swing dimensions Nest
When making a structure, it is important to ensure the safety of the user and prevent injuries. Drawings and diagrams of the Nest swing will help you determine the correct dimensions of the slings, as well as the installation option.
The minimum distance of the seat from the ground should be at least 40 cm. You should also not hang it too high - the child may fall and get injured. It is optimal to raise the ring by 40-60 cm.
A spacious, flat area is allocated for the Nest, preferably with a soft surface. There should be no obstacles along the entire trajectory of the swing - trees, bushes, large solid objects. Since lateral rocking is possible, the distance from the edge of the seat to the pillars is at least 90-100 cm.
The length of the slings depends on the height of the support beam. It is optimal to secure the structure 2-2.5 m from the ground. In this case, the length of the ropes or chains is 1.6-2.1 m. If the attachment point is too high, long suspensions will be required, swinging on which may become unsafe due to the large amplitude of movement.
How to wrap a striped gymnastics hoop
Among the colors of the stripes, choose those that will harmoniously fit into the girl’s image and the upcoming performance. To make a multi-colored hoop look beautiful, choose a medium stripe width.
If there are more than two colors, you should think carefully about the design and mark out the areas of the hoop where the different stripes will be located. This will help you maintain a symmetrical pattern on the piece. But you should not use a large number of variegated colorful ribbons as accessories for the hoop, such a product will not look beautiful, and its creation will take much more time and effort.
Suspensions and structural supports
I would like to try out the finished seat as soon as possible. But the most important step remains - securing the nest to the hangers and supports.
How to attach a swing Nest
A homemade attraction can be hung in the courtyard of a house, in a garden, on a veranda or in an apartment (in a mini version). Most often, structures made of wood or metal are used for fastening as they are the simplest and most affordable to manufacture. The seat is attached to the ropes using carabiners or strong knots. You can use another method - throw it on the hoop in a loop from a twisted suspension.
Hooks or rings must be firmly secured to the support beam. They must be powerful enough to withstand heavy loads. It is desirable that it be resistant to corrosion - galvanized or stainless.
Calculation of supports
The swing supports experience static and dynamic loads. The calculation is made based on strength and stability. The calculation algorithm involves collecting loads and applying various formulas and coefficients. For home use, this method is quite labor-intensive. The sections of beams and racks are taken with a margin of safety, which in principle is quite justified.
Here are the approximate dimensions of the structures that need to be maintained to build a do-it-yourself Nest swing with a load capacity of up to 200 kg:
- from wooden beams - posts and beams of at least 50x70 mm, and preferably 100x100 mm;
- metal structures - racks made of profile pipe 60x60 mm, beams 60x80 mm.
If the user weighs 50-100 kg, the cross-sections of the elements can be slightly reduced. The racks should be concreted to a depth of 50-70 cm.
Important. A multiple safety margin will allow you not to worry that the supports will not withstand the loads and will break.
General Tips
There are some recommendations for decorating - what you need to know before wrapping the hoop to do a quality job. In some cases, the hoop is decorated with a pattern using acrylic paints. But most often this is done with multi-colored tape or special tapes. Decorating with ribbons and tape is a simple and at the same time cheap option for decorating an item.
It is worth noting that the wrapping of a hoop for rhythmic gymnastics performs not only an aesthetic function, but also helps protect the object from any deformation. After all, plastic products are highly susceptible to changes in shape, and a curved ring will be unsuitable for performance. But you also need to remember that this decoration will add weight to the hoop.
Hoops that have undergone the wrapping process should only be stored in a case. Thanks to this, you can significantly extend the life of the hoop.
It is also recommended to store hoops in a vertical position, as they will slowly flatten when stored horizontally. The sun's rays also have an adverse effect on a plastic product; the hoop can become deformed from the scorching sun.
Beginners often make the same mistake - buying a metal hoop. This product is not suitable for professional rhythmic gymnasts due to the lack of necessary characteristics. You should only purchase a plastic hoop. The price for it varies greatly - from 100 rubles to several thousand.
Safety when using the swing Nest
To prevent fun entertainment from leading to bruises, abrasions or more serious consequences, you need to follow the safety rules:
- do not overload the swing;
- do not swing too much, the height of a possible fall should not exceed 2 m;
- hold with two hands;
- swing the swing while standing on the side;
- Do not try to brake sharply or jump off while moving.
The space around the swing should be left free; when swinging, children should not collide with other participants in the games. The optimal surface covering is sand or soil.
Important. Children should not be left unattended, and children under 5 years old are not recommended to use the attraction.
From what, with what and how to make it
Frameless models are sewn from thick fabric using various types:
- raincoat fabric;
- tarpaulin;
- burlap;
- parachute click;
- denim fabric.
Frameless models are also made using knitting or weaving techniques. Masters of wicker weaving can make a spectacular product from wicker by weaving a base in the form of a vertical basket or nest, which is made by a weaver bird.
Models with a rigid base are easiest to make with your own hands from metal-plastic pipes that bend easily. Hoops and arcs are bent from them, which are then covered with fabric or braided with a thick cord.
An aluminum gymnastic hoop can be used as a rigid base. In this case, the hanging cozy seat can only support the weight of the child.
In addition you will need:
- slings, thick ropes or metal chains;
- rings for attaching a hanging nest or cocoon to slings;
- materials for compacting and giving a certain shape and rigidity to a frameless seat: non-woven fabric, dublerin, braid;
- drill;
- screwdriver;
- hammer;
- threads with a needle;
- tailor's meter;
- scissors.
For reference! When working with aluminum pipes from which the frame will be made, you will need a pipe bender and special equipment. The wood base will have to be treated with a special protective solution, which will prevent moisture and pests from destroying the wood structure.
How to choose ready-made swings
Factory-made structures are reliable and meet all technical parameters. However, a quality product must be provided with the following information:
- manufacturer - indicate the name of the enterprise, official address, article number, GOST or TU;
- load capacity and other technical characteristics;
- recommendations for fastening and operation;
When choosing, the equipment and design are taken into account. Nest swings are available for sale in various colors, weaves, with a set of supports and fasteners.
Important. You cannot purchase “no-name” products without indicating the manufacturer or technical characteristics, even if their price is very attractive. The reliability of such swings is questionable.
Accessories
Professional hoops are produced by SASAKI, Chacott, Pastorelli, their price exceeds more than a thousand rubles, although simple ones are also suitable, starting from a hundred rubles apiece. You should also purchase the following set for the plastic hoop:
- storage case - it can be sewn from thick natural or synthetic fabric, but you need to make a high-quality fastener, so it would be more appropriate to buy it;
- a film with an adhesive surface, adhesive tape with a metallized surface is also suitable, the color scheme should match the image of the gymnast, especially her costume;
- acrylic paints;
- transparent tape - preferably narrow.
Ribbons can be purchased at stores that specialize in fabric sales. In sports stores you can buy special professional multi-colored tapes for wrapping gymnastic hoops. Specialized tapes are luminescent and glossy. Professional jewelry is sold in the form of sheets 20 by 60 centimeters, about 100 rubles per sheet, or in rolls of ten meters at a price of 250-1000 rubles per roll, and ten meters is enough for a hoop with a diameter of 90 centimeters, but it is better to take with a reserve - 11 - 12 meters.
It is best to take Sasaki tapes one centimeter wide, they are easier to work with. Although professional tapes are sold only in large sports stores, which means that in most cases you will have to be content with ordinary ones, which are sold in fabric stores.
Wrapping it with tape makes the accessory heavier, which means it will have greater inertia and will be able to fly higher. This helps you catch the hoop on time and will also give you more time for tricks. By decorating, you can bring the accessory to a standardized weight, and it should not be less than 300 grams. If during weighing the hoop weighs less than the standard, the athlete will be disqualified.
Let's start decorating
Stages of wrapping a hoop:
- Secure the end of the tape to the hoop with regular transparent tape.
- The winding should go at an angle of 45 degrees.
- Make each turn tightly, try to ensure that the tape does not overlap more than half of the previous turn.
- After finishing winding, cut the tape and secure the end with tape.
- Do not rush to secure the decorations with transparent tape; first, inspect and think about everything, since at this stage everything can be redone.
- Apply transparent tape along the entire length of the winding. To prevent the tape from creating bumps on the bends, you need to use tape as small as possible; it is more difficult to work with, but the result is worth it.
- It is necessary to wind transparent adhesive tape at a different angle than colored adhesive tape, since this way the winding is better secured and it does not move under loads. The angle should deviate slightly from perpendicular.
- You can wrap gymnastic clubs in the same way.
You can make a wrap in two colors - the easiest way is to simply paste over the inside of the hoop with a strip of a different, preferably contrasting, color. A two-strip pattern can be made by winding another pattern on an already created base, or when winding, alternate two tapes at the same time - the second method is quite complicated, get ready for difficulties in this seemingly easy task.
You can also wrap using a spiral technique or simply stripes. This type of wrapping is popular with older, experienced gymnasts who use ribbons with a hologram texture - silver or gold. Accessories with similar windings are the most spectacular.
Before applying transparent tape, you can make small patterns on the hoop using colored varnish, acrylic paint, or appliques made of fabric or colored paper. However, to stand out, ribbons of several colors are enough, which are wound in stripes so that a unique pattern is created. With practice, you can create attractive sports accessories that will highlight your individuality. And attracting the attention of judges means additional points and the opportunity to take a higher place on the podium. This sport is rhythmic gymnastics - beauty is held in high esteem here.