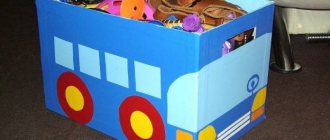
How to make a doll bedside table with drawers
You will need:
- Several boxes of matches according to the number of boxes.
- Cardboard strip, the width of which can cover the required number of boxes.
- Shiny foil.
- Scissors, glue.
- Several golden plastic beads according to the number of boxes.
Take the boxes and stack them lengthwise. You should have a table of the planned height. A few pieces can be removed or added, depending on the final idea. Glue the parts of the boxes stacked in a row. Take the cardboard, bend it in the right places, completely wrap it around the side where there are no drawers. Then glue the cardboard. When finished, carefully trim its edges with scissors and begin decorating.
Decorating a glamorous bedside table can be different. If you cover it with shiny colored paper, similar to multi-colored foil, it will create a glamorous look, especially if it is crimson, silver, or gold. If you want the bedside table to look like a real one, then use imitation wood, colored wallpaper with small patterns, or paper similar to them. This is sold in children's art stores.
Gently straighten the paper and apply glue to the reverse side. Spread it so that the foil becomes even. Then cover the back and sides with paper, level it until it dries. This is done with the side of a ruler or a blunt turn of the knife. Boxes can be decorated completely or partially. You need to stick paper on the sliding part, and if you want it to become completely colored, you can pull it out and cover it with paper on the outside or inside. The paper also needs to be leveled.
When it's dry, start working on the handles. Take a bead and drop glue on its base. Place it in the middle of the drawer drawer. Do the same with the rest of the beads, which should form an even row. They can be replaced with voluminous self-adhesive rhinestones. When they dry, the bedside table is ready.
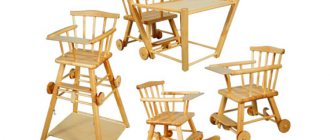
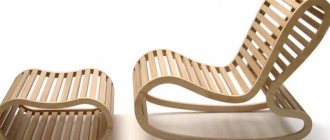
Making a chair for a doll
I am often asked to show how to make furniture for miniature dolls. Today I will show you how to make a chair for a doll with your own hands. It's not difficult, even a child can do it. First, we make a pattern. I specifically chose the simplest configuration, once mastered, you can easily make a chair of any shape. The details of the pattern lie on the markings, where each square is equal to 1 sq. cm. Therefore, it is easy to simply draw a pattern on a notebook sheet in a box, or print it on a printer in the scale you need.
We cut out the main part from cardboard in 2 copies. I take the cardboard from the packaging.
Next I glue the parts onto the fleece.
Then I cover the parts with fabric so that the fleece is under the fabric on the front side.
I glue the parts together and glue the decorative cord into the gluing area.
Doll coffee table
A beginner can do it. You will need:
- A square or elongated box for cream and soap.
- Thick tape, scissors.
- Colored paper like foil.
- Glue.
Take a cardboard box. Cut out the front and back parts from it. Then cover it with large tape from the inside, then from the outside. It is important that it lies without folds - the attractiveness of the product will depend on this. Then start decorating.
Carefully cut the paper to the width of the box. Then stick it on a layer of tape. The most suitable paper is with a self-adhesive layer, onto which you need to carefully apply glue and level the layer before it dries. Remove any remaining glue and dry the paper.
This piece of furniture can be used as a coffee table for Barbie or a hanging cabinet that is glued to the wall of the house or to place several items in one row. And if you combine it with glamorous bedside tables, you will get a beautiful wardrobe for Barbie. You need to add a few more elements to it. Then the furniture for dolls will be stylish and glamorous. It can be used to furnish a room in the same style.
Several rules for manufacturing and materials
It is important to note that to create chairs, sofas, and stools for your little favorite dolls with your own hands, you can use simple, affordable materials.
Metal and wooden structures are more similar to the original pieces of furniture. But for beginners, cutting wood or processing metal structures is quite a complex and time-consuming task. Therefore, the best and fastest solution would be a do-it-yourself paper chair for a doll. To do this you will need the following materials and tools:
The prototype for creating chairs for dolls with your own hands is the home designs of an armchair, stool and chair. First of all, we decide on the size, for which we can place the doll on some kind of box or box. To create complex structures, additional wood screws and braid may be required.
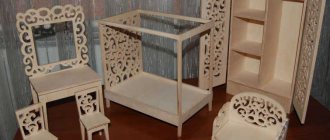
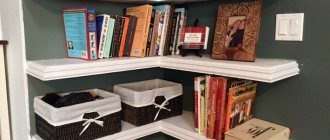
Wardrobe for dolls
You will need:
- 1, 2 bedside tables (see “How to make a bedside table”).
- 6 Barbie Coffee Tables (see Barbie Coffee Table).
- Large cardboard for the back wall.
- Cardboard for the cabinet door (this could be part of a cream box).
- Beads according to the number of doors.
- Silver foil that looks like a mirror.
- Scissors, glue and tape.
First, place the boxes across the cardboard area. This will be the back wall of the closet. Place the matchboxes in a row in the middle. Having determined the required quantity and proportions, get to work. Make a bedside table with drawers as in the description. The table, which acts as a shelf in a closet, needs some work. If at first it was necessary to cut out the front and back, now the back is cut out, and the front serves as a cabinet door. There is no need to cut it out. Cut it on three sides without cutting the door, and cover it with colored paper on the outside and inside.
When selecting parts, it is important that all boxes are the same height and width, then it will look beautiful and neat. When you have decided on the number of elements, trim off the excess. Get to work.
Identify an empty space. It must be covered in advance with silver foil that imitates a mirror. You can also paste a beautiful picture. It depends on personal taste. Experts do not recommend using two shiny textures in one set, and if you make all the bedside tables and cabinets from crimson shiny fabric, replace the mirror part with a beautiful photo. Paste it in advance. Hide the edges of the picture behind the cabinets.
When all the parts are ready, glue them to the back wall. If you want the doors to close easily, attach a sticker or a lock to them. One part is attached to the door, the other to the side wall. They are made from hooks and fasteners. They hold the door securely.
In addition to cabinets, tables and bedside tables, they also make upholstered furniture for Barbie. For example, a folding sofa. Such furniture for modern dolls will look bright and beautiful. And the material for design depends on your imagination. Here's how to do it.
DIY miniature furniture for a dollhouse
If you need furniture for Barbie dolls, then you can make do with scrap materials, building it with the help of short instructions with your own skillful hands. We present to you master classes on creating toy furniture from pieces of plywood, cardboard, clothespins and other useful items that you saved and did not throw in the trash.
Armchair
There are quite a lot of options for making doll chairs. In our master class we will look at basic methods that can be improved and supplemented with the help of your imagination. The simplest version of the chair is a homemade structure made from glued matchboxes, which can be decorated with pieces of fabric or wrapping paper. A Barbie chair made from plywood is more difficult to make.
Rocking chair
To make Barbie's doll life more fun, you can build her a rocking chair from clothespins. Only wooden clothespins will help with this, since they are easiest to separate into parts and fasten with PVA. You will need 12 clothespins, each of which must be disassembled into parts by removing the metal bracket.
By gluing together the narrow halves of four clothespins, you can get the back of a chair for Barbie, and by adding four more clothespins glued into a rectangle to the resulting center of the fan and gluing them perpendicularly, you can build a seat.
So that Barbie can swing, we complement the chair with triangular legs with armrests and runners. The back of the chair can be made using a technique different from the master class, as much as your imagination allows. Clothespins can be replaced with small pieces of plywood.
Soft chair
A soft Barbie chair can be made from plywood or durable cardboard. The plywood version is more complex to make, so in our master class we will look at do-it-yourself cardboard furniture for dolls. To do this you need to cut out the following from cardboard:
- back,
- seat,
- sidewalls.
They can be copied from large chairs to scale. After gluing the parts together, a layer of fleece is glued on top of the cardboard, and the selected fabric for upholstery is glued on top. Upholstered furniture for dolls can be supplemented with soft pillows made from the same fabric as the chair itself.
Armchair with hard sides
Armchairs made of plywood can become real mini-copies of furniture. They are a prefabricated structure, the parts of which are held together with glue or small nails and covered with acrylic paint. After this, foam rubber and a layer of upholstery fabric are glued to the plywood body. The sides of such a chair remain rigid.
Ottoman
Doll furniture such as an ottoman will not take much time to make, but will perfectly complement the decor. You can put a toy cup on the ottoman or fold a mini-newspaper. The easiest way is to make an ottoman from a deodorant cap, shaving foam or spray. The dimensions of the future ottoman depend on the diameter of the lid. A square ottoman can be made from a cream box or made from plywood. In our master class we will consider the first option.
An existing square or round mold must first be covered with padding polyester over the entire surface, except for the bottom part. You can stick a piece of cardboard or thick paper on the bottom part. In the case of a lid, you can leave it unsealed. A fabric cover, sewn to the size of the future ottoman, is put on top of the padding polyester. Such do-it-yourself furniture for dolls can be decorated at your discretion with ribbons, buttons or appliqués.
How to make a fireplace for dolls
You can build a fireplace for Barbie dolls from a small cardboard box or assemble it from individual parts. Consider a master class on creating a fireplace out of a box. For work you will need the following items:
- box,
- scissors,
- PVA glue,
- foam tiles (ceiling),
- red cloth,
- paints (gouache or watercolor),
- dry branches.
The box is placed on its edge, and a semicircular hole is cut out in the front part, like in a real fireplace. The edges of the hole can be decorated with white paper or painted with white paint.
To create the effect of bricks, ordinary foam tiles, cut into small pieces, will help (we will do without rulers and make the bricks less ideal). The pieces are glued to the surface of the cardboard by analogy with brickwork using PVA glue. After the toy structure has dried, you can paint the seams with contrasting paint (for example, brown).
We decorate the inner surface with red cloth and place chopped branches to represent logs. You can step away from our master class and make a fireplace out of plywood, and simply paint the inside with red gouache.
Whole picture
By placing do-it-yourself furniture for dolls (chair, ottoman) near the fireplace, you will get a beautiful composition for the living room. Such a toy environment, made according to our master classes, will become a wonderful resting place for a Barbie doll and will decorate a doll’s house.
Women's tricks
We recommend
www.toysew.ru
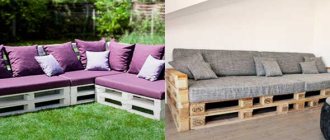
Folding sofa for Barbie
You will need:
- A large piece of thick cardboard.
- Several dish sponges, the same size.
- Stapler.
- Black velvet material.
- Upholstery material.
- Tape and Velcro.
- Scissors, glue and ruler.
Glue the sponge to the cardboard. Cut it to size. Do the same with the rest of the sponges. You will end up with three identical pieces. Wrap them with material and secure them with a stapler from below. Then take the material a little smaller than the size of the piece and stick it to the surface from the inside, hiding the traces of fastening. Before us are three identical parts.
We process the back. Cut it out of cardboard and put the material on top. Secure with a stapler. Glue velvet material to secure it.
Place the mattresses on top of each other and apply them to the backrest. Then glue the bottom mattress and secure with tape. Attach it around the entire perimeter of the mattress and secure it at the back with glue. Then wrap the tape around the top mattress. Spread the glue over the surface, except for the middle, which will be a loop. They pull on it to unfold the sofa. There is no need to glue the tape to the wall, because it is secured at the back with Velcro.
The sofa is ready. To unfold it, unstick the Velcro and pull the loop. Then fold it carefully and use it.
DIY doll chair
March 25, 2015
It’s difficult to find a house that doesn’t have chairs. A doll's house is no exception in this regard. I will tell you how to make a chair for dolls with your own hands from simple and accessible materials.
When making miniatures I try to adhere to the following rules:
- Materials should be simple and therefore accessible.
- Of course, miniatures made of real wood or metal will look more like the original, but how many master the art of wood carving or metal working? Therefore, I often use in my work what even beginners can handle - paper, cardboard, fabric, wire.
- Yes, it is much easier to buy a ready-made part or the most suitable material for a miniature than to rack your brains over what it can be replaced with or what it can be made from. I try to minimize costs and sometimes use completely “non-doll” things to create my miniatures. So, for example, a part from a watch can become a camera lens, parts from an old light bulb can become a miniature bottle, and a couple of beads can become doll cosmetics.
From the long introduction I’ll move on to a master class on creating a miniature of a chair.
The prototype was my home chair.
- First of all, I took measurements of my chair and scaled the resulting dimensions into a 1:12 miniature format. The diagram shows all my calculations.
- I made the chair legs from ordinary office paper, simply rolling a rectangle measuring 36 by 76 millimeters into a tube and fixing it with glue.
- The convex elements of the legs are strips of paper wound over the main “tube leg”.
- The seat, consisting of two parts, was cut out of cardboard. You can use thick cardboard of the required thickness, but I find it easier to cut out parts on thin cardboard, so I make several bases and glue them together, bringing them to the desired size.
- As you can see, there are pieces of wire sticking out at the top of the legs. This was done for the purpose of further attaching a spherical decoration to this protrusion. I'll tell you about it later.
- First, I glued the legs to the first part of the seat, and after complete drying, to the second.
- The crossbars on the back, cut out of cardboard, were glued to the upper sticks of the “legs”.
- After I glued the lower crossbars, the legs stopped moving apart and the chair became more stable.
- Well, the last detail is the back. It was also cut out of cardboard.
- I was in a hurry about the last detail. It remains to decorate the back with two spherical decorations. For these purposes, you can use beads of a suitable size or make them yourself from a napkin and glue. I went the second way. Finely tore the napkin and mixed it with glue to form balls.
- After complete drying, I started painting. I used gloss acrylic artist paint. Burnt umber color. Usually I try to prime before painting, but this time I decided that just applying one coat of paint would be enough.
- While the paint was drying, I started working on the upholstery. I needed fabric of a suitable color, thin foam rubber and cardboard. Instead of foam rubber, you can use felt folded in several layers. First I glued foam rubber onto a piece of cardboard, covered it with fabric on top and secured it with glue on the back side.
- I did not varnish the chair, so after the paint had dried, I glued the resulting pads to the back and seat.
The end result was quite a miniature wooden chair. Using this principle, you can make other furniture for dolls, such as a table or stool.
Other materials:
lenasha.ru
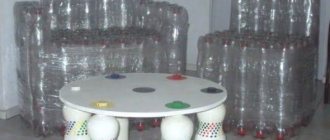
Fairytale glamorous chairs for dolls
They are easy to make from a regular Coca-Cola can, Fanta or Sprite. To do this, you need to cut the jar into many thin strips. It is better if someone adult does this, as it is easy to cut yourself on the edges of the jar. When the can is cut, you need to direct some of the strips upward (about 1/4 of the entire mass), and all the rest downwards. Then divide the bottom strips by the number of legs and get to work.
Measure out the number of strips that will go on each leg, then start twisting them on the sides. In this case, the middle leg should remain the longest leg, since it will become the main support of the leg, giving it its length. You can twist the strips in different directions, symmetrically or asymmetrically, depending on your design. When all the legs are ready, you can start working on the back. It needs to be twisted in the same way as the legs, from the edges to the middle, after which you can start decorating.
The chair looks unfinished without a seat. For it, you need to cut the sponge to the diameter, carefully rounding the top part. Cover with material and secure on the underside with glue. It is better to use superglue, which fixes metal surfaces. When the seat is dry, apply glue to the surface again and attach it to the chair seat. It will dry and you're done.
Several chairs will allow you to create fantastic attributes of a magic castle. The main emphasis of chair design depends on the color and texture of the seat upholstery. The darker it is, the more mystical options you will make. Dark shades of purple, emerald or blue are more suitable for the magical Monster High dolls than for the glamorous Barbie or the good fairy. Pink, cream, red tones will allow you to create a glamorous or vintage piece, complemented by a round silver table on a leg, and colorful fabric will create a unique antique flavor.