32255
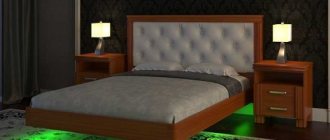
Beautiful furniture can decorate any interior and create a cozy atmosphere even with simple wall decoration. In the bedroom, a bed with a carriage frame looks chic and emphasizes the sophistication of the chosen style. Considering the rather high cost of the finished product, a volumetric headboard can be made independently at home. The bed will become a real highlight of the room; it will look cozy, rich and elegant.
DIY bed headboard
Do-it-yourself carriage screed for a double-sided headboard panel
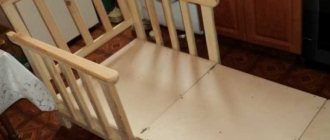
Carriage screed can also be used to update tired furniture. For example, you can update an old bed by making a headboard for it with a Capitone finish with your own hands. Of course, you will have to put a lot of effort into this, but the result will definitely justify it. Self-production has a number of obvious advantages over a purchased product:
- it is possible to realize an individual bed design that best suits the interior, to create a product of non-standard sizes and unusual shapes;
- you can independently choose the color, texture and quality of fabric, materials and accessories;
- significant savings compared to a finished product and a made-to-order product.
In order for a do-it-yourself bed to look perfect, you must strictly follow the instructions for making a carriage screed.
Homemade bed with carriage headboard
Design and combination with the interior
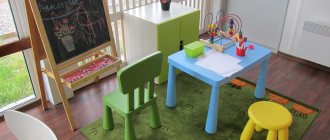
A bed with a soft carriage frame will add coziness to a bedroom with any interior and will be the main decoration there. The headboard can be a separate element and attached to the wall or form a single structure with the bed frame, made using the same technique. The colors are selected depending on the dominant color of the room, as well as the overall design. Beds with a carriage frame will fit perfectly into the following interior styles:
- Baroque. A pompous style, characterized by luxury and bright, rich colors. The back of the headboard must be in a curved massive frame, with a pattern. It is better to choose upholstery in blue, deep wine-colored velvet.
- Empire style The ideal bed would be a cream or beige color with a backrest in a gilded frame, with forged elements.
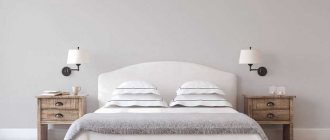
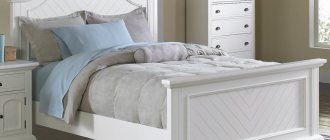
- Classic. Preference should be given to beds in white or light beige. The fittings must be upholstered in the main fabric. A little gilding on the back will add luxury and solemnity.
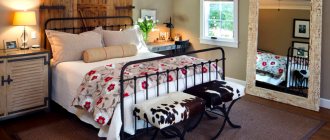
- Modern. A bed with a high back and rounded corners of the headboard is suitable. It is better to choose a calm, neutral color, focusing on the overall tone of the room.
Advantages of solid wood beds, popular models and designs
There are rules that all manufacturers of upholstered furniture with carriage screed adhere to:
- For a headboard with right angles, use a square or rectangular screed.
- For backs with curved lines, irregular or rounded shapes, the diamond-shaped technique is used.
It doesn’t matter which bed made using the capitonné technique you choose. Any of them will look decent in the interior, become its decoration, and add coziness and comfort. And for those who did not plan to change the furniture in the near future, there is the possibility of making a removable cover for the headboard, made using the carriage tie technique. Moreover, it is easy to do it yourself.
Baroque
Empire style
Classic
Modern
Sketch
Types of carriage tie patterns
First, you should decide on the decor pattern - rhombus or square, as well as the design and shape of the future structure. For the first experience, it is recommended to start with simple headboard shapes - a rectangle or square. Next you need to think about what material will be used for the upholstery. Here it is recommended to choose durable furniture fabrics that can withstand high loads during use, since thin fabric not intended for upholstery can tear even while tightening the buttons. The choice of color is at the discretion of the artist, but it is preferable to use plain fabrics. Large designs and patterns are deformed when reupholstered and can ruin the appearance of the product. If you plan to use covered buttons, then you should take care of this in advance - purchase a special press and make blanks, or order their production in a specialized workshop. It’s much easier with ready-made furniture buttons - you can choose them at a furniture fittings store.
Sketch of a future headboard for a bed with dimensions
Materials and tools
Materials and tools for making carriage screeds
After the sketch is made, you can proceed directly to the manufacturing process.
List of required materials and tools.
- A sheet of plywood as the base of the structure (of suitable shape and size).
- Furniture fabric (with a large supply, since when forming folds, a lot of it is used).
- Furniture buttons.
- Foam rubber with a thickness of 5 cm (according to the size of the headboard).
- Sintepon.
- Glue.
- Furniture stapler.
- Scissors, bookbinding needles, high-strength threads, stationery knife.
- Drill.
- A “tsifenbor” attachment for a drill (necessary for making even holes in the foam rubber).
When choosing foam rubber, you need to pay attention to its density, elasticity and purpose. The service life of the finished product depends on these parameters.
The choice of glue also requires special attention. It is highly recommended not to use adhesive solutions containing toxic and flammable components, such as trichloroethane and toluene. In addition to the obvious harm to health, the strength of their bonding also leaves much to be desired. It is recommended to use adhesives based on polyurethane, neoprene, butadiene styrene. High-quality glue for foam rubber must be safe for humans and the environment, form a strong seam, elastic and moisture-resistant, and be non-flammable.
High-quality glue for foam rubber
Preparing the base of the headboard
We cut the sheet of foam rubber according to our dimensions and begin to mark it with diamond elements
The first step is to draw a diagram of the future carriage screed on a sheet of foam rubber. The easiest way is to cut out a diamond template of the desired size and mark the entire sheet according to it. First, you should draw 2 axes intersecting in the center of the sheet - vertical and horizontal. Attach the diamond template with its center to the center of the intersection of the axes and thus outline the entire working area.
Use a Zifenbor bit to cut out shallow holes at the marked fastening points.
The tops of the diamonds will be the tension points for the buttons. In these places it is necessary to make round holes in the foam rubber. They are done using a special attachment for a drill - “tsifenbor”, however, if not available, it can be replaced with a metal tube of a suitable diameter. It is installed in the right place and straight slits are cut out by hitting the tube. As a last resort, they can be cut out with a stationery knife, but then the edges of the holes turn out uneven. This is not critical and does not affect the appearance of the product.
Press the mold with the tube and at the same time scrolling it, we make through holes
After all the slots are ready, you need to mark them on a sheet of plywood. To do this, apply the foam rubber to the plywood and mark points at the holes. Using a drill, drill through the plywood panel at each marked point.
We cut a sheet of plywood in accordance with the dimensions of a sheet of foam rubber and transfer the markings to the plywood
Using a drill, drill holes at the intersection points of the diamonds.
Next, you need to glue the foam rubber to the plywood panel, making sure that the edges and all holes of these two parts necessarily coincide. You should not use glue that corrodes the porous structure of foam rubber, otherwise the finished product will not last long. It is recommended to use special glue for foam rubber, which is safe for health and has high adhesion to various surfaces.
Glue the foam sheet to the plywood using furniture glue
Sometimes it is necessary to wait a certain time for strong bonding. The characteristics of adhesive compositions of different brands differ from each other. You should study the information on the label.
After the foam rubber is firmly glued to the plywood, you need to carefully cover it with thin synthetic padding. Secure the edges of the padding polyester with a stapler to the back of the plywood.
Glue padding polyester to foam rubber using rubber glue
Headboard for a bed using the carriage tie technique - master class
You must choose their sizes and location yourself. Actually, the type of our headboard will depend on this. Whether these are large elements or small ones, how they will alternate is up to you. And when you decide, reflect your “sketch” on foam rubber. We got 3 rows of 9 diamonds and 3 rows of 8 - that is, 51 elements.
The intersection points of the diamonds can be decorated with decorative buttons, or you can do without them. The latter option is considered to be more refined, but we will think that this is a matter of personal taste preferences.
Now, at the points of attachment of the thread for the drawstrings, which we have designated, it is necessary to make holes. To do this, use a special attachment for the drill - a dial. It can be replaced with any other object of a similar shape, if you first sharpen one of the sides in the form of a cutting edge.
We don't have a dial. On the Internet you can see how someone is trying to cut holes with a paper knife. However, the result leaves much to be desired - it is impossible to work with torn holes of any shape. What should I do? No problem! A set of culinary molds for canapés came to our aid, among which we found a mold of the required diameter. To give it cutting properties, we sharpened it with sandpaper.
To make a hole in the foam, gently press down on the mold and roll it at the same time. Now cut a sheet of plywood the same size as the foam mat. Place the two layers together and transfer the markings onto the plywood.
Drill holes in the plywood with a drill strictly in the center of each hole in the foam rubber.
Take the opportunity and check one last time whether you did everything correctly, do all the holes match? If so, feel free to move on to the next step - glue the sheet of foam rubber to the plywood so that it does not move during the process. Keep in mind that furniture glue sets quickly and you need to act quickly, otherwise after a minute, even with a strong desire, you will not be able to peel off the layer of foam rubber from the plywood.
It's time to start the most interesting stage - covering our headboard with furniture fabric. I’ll say right away that we could use padding polyester or batting on top of the foam rubber to give the carriage screed additional volume. However, we didn’t have one at hand and we managed without it.
Let me remind you that the size of the finished part will be 110 x 160 cm. However, we will need much more fabric based on tensions + allowance for fastening with staples.
Along the width of the headboard, the largest number of points for tensions is 4 (we calculate the supply of fabric at 4-5 cm per point, that is, 16 - 20 cm, depending on the type of fabric). In length, the number of dots in a row is 10 (fabric supply is 40-50 cm).
So, through simple calculations, we calculated that the piece of fabric should be at least 144-150 cm wide and 220-230 cm long. If the fabric stretches, you will need less; if the fabric is thick and dense, you will need more.
You need to start laying the ties on one side, gradually using the supply of fabric that we included in our calculations.
In order not to lift and turn over the headboard each time in order to fasten the thread on the reverse side, when forming drawstrings to fix the fabric, we use two needles at the same time. We thread a thread folded in half into two needles and insert them into the fabric with a certain distance from each other. Then we feel for a hole in the plywood and thread the needles into this hole.
We pull the thread on the reverse side and secure it with staples using a furniture stapler in the manner shown in the photo. This is necessary so that the thread does not weaken and cannot slip out during operation.
The photo shows how the work is progressing.
We advise you to first make tightening threads, and only then attach decorative buttons. This is because if you attach the tie directly to the button, its plastic leg may break and ruin the entire product. You can use special furniture buttons, but they are more expensive and it is not always easy to choose the right shade and size. Therefore, it is better to sew on buttons at the last moment solely as a decorative element.
All we have to do is decorate the edges of the headboard, securing the fabric with staples along the plywood from the wrong side. To hide excess fabric, we will form folds. To do this, we make a shallow cut in the foam rubber perpendicular to the edge and carefully tuck a fold of fabric into it. We fix it with staples on the reverse side.
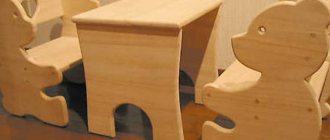
A little patience and diligence, and the technique is not as difficult as it seemed at first. Our work is ready! To complement the picture, you can make an attached bedside table from leftover foam rubber and upholstery fabric.
All that remains is to decorate the headboard with buttons and place it in a place of honor. Beauty - and that’s all! And we thank Elena Grebennikova for the informative master class.
Fabric covering
We cover the headboard with the main fabric, starting from the far left side
When the base of the headboard is ready, you can begin the process of covering the frame with furniture fabric. You should start from the extreme point of the head, gradually moving towards the opposite side. 2 needles with a strong thread are simultaneously inserted into each hole, pulled out, pulling the fabric, onto the back side of the plywood and secured with a stapler several times in a zigzag pattern.
We insert a piece of polyester thread into 2 long needles
Fasten with a furniture stapler in a zigzag pattern several times
As the fabric is laid, between the tension points, folds are formed from it in accordance with the intended pattern (diamonds, squares). When the entire pattern of the carriage tie is ready, you need to wrap the edges of the fabric onto the wrong side of the frame and secure it firmly with a stapler around the entire perimeter.
All folds are formed and firmly secured on the back side
We decorate the edges of the headboard and fasten the fabric from the wrong side
Decorating the headboard
Options for decorating carriage screed
Lastly, buttons are sewn into the holes, or they are attached in the manner described above, using two long needles that bring the thread holding the button to the wrong side. There is another method in which the folds are immediately attached to the button, but in this case there is a risk of breaking the pattern if it comes off during use.
Sew on decorative buttons, straighten out all the folds
After the front side of the back is completely ready, its back side is carefully covered with technical fabric (spunbond, calico).
A headboard with a carriage screed can be framed in a carved baguette or used without one. It can be mounted on the wall near which the bed will be installed, or it can be attached directly to the bed frame - this is up to the user’s choice.
Bed with baguette and decorative stitching
If desired, you can cover the bed frame with the same furniture fabric that was used to make the upholstered headboard. Thin foam rubber is placed on the bed frame and wrapped with synthetic padding. The prepared structure is covered with fabric, which is secured with a stapler along the inside of the bed frame. The outer side of the box, as well as the borders of the headboard, can be decorated with furniture nails or decorative cords.
With some skill, attentiveness and a creative approach, making a headboard with “Capitone” is not as difficult as it seems at first glance. But such a detail can become a bedroom decoration and a source of pride for its owner.
Finished headboard with carriage screed in the bedroom interior
Features and types of decor
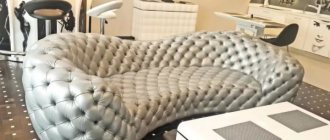
The carriage screed first appeared in the mid-18th century. It has still not lost its relevance and is rightfully considered one of the most luxurious types of interior decoration. Furniture covered with expensive fabric, with voluminous squares or diamonds, decorated with rhinestones or buttons, will not leave anyone indifferent and will decorate any room in the house.
France during the time of Napoleon III was distinguished by a special love for splendor and grace. It is not surprising that this type of decoration appeared there. The screed got its name because it was first used for interior upholstery, as well as for decorating carriages. Soon the technology migrated to the interiors of nobles and began to quickly spread throughout Europe.
In the 19th century, the Chesterfield sofa gained popularity. He still remains one of the most famous representatives of furniture made using this technique. It is difficult to find a more elegant and sophisticated piece of furniture that so well combines beauty with practicality.
Today, the technique of decorating capitone, as carriage technology is also called, has received much greater use. It can be seen on furniture, wall panels, as well as interior and decor items. It is recognizable by its soft fabric upholstery with buttons or furniture studs. The pattern of the screed can be square or diamond-shaped, less often a more complex pattern is used.
Pros and cons of three-tier beds, tips for selection and placement