Backlight options
Lighting can be internal, external and decorative.
Outdoor
Can be used:
- Separate remote lamps.
- Small sconces that eliminate harsh shadows on the face.
- Point mounted sources. This option well illuminates not only the mirror and what is reflected in it, but also the room.
Internal
In this case, the LED strip is built directly into the surface of the mirror. On top, in order to ensure dispersion, it is covered with white frosted glass. As a result, the lighting and mirror look like one. LED modules can be located on the sides, on top of the contour or along the perimeter of the mirror. The location is determined by the dimensions of the reflective surface. In some cases, the backlight is framed with an aluminum profile coated with gold or silver. This makes it possible to hide parts of the wiring and give the product completeness.
Decorative
The tape can be attached both to the mirror and to the wall where it is located. Minimum power LEDs are used here. Sometimes multi-colored ribbons are used, but in this case caution is important, as they can distort the image. The backlight can be supplemented with heating. In this case, films with an infrared heater are used.
Bath lighting
It is very important to properly equip the lighting of the place where water procedures are taken. For the bath, you can make one of the following types of lighting:
- LED around the perimeter;
- autonomous:
- built-in;
- decorative;
- in Japanese style.
Each type of lighting is suitable for certain procedures. To take a relaxing bath, you can add quiet lighting around its perimeter and hang a dim ceiling lamp above it. To create an unusual design in a room, you should use LED lamps with colored lenses. A more expensive option would be to install a bathroom with built-in lighting. However, the design of the room will look more luxurious, and in addition, it will save you from having to install light sources yourself.
If you plan to use the bath more often for more practical activities: washing, bathing, pedicures, bathing children, you should take care of brighter light sources that will allow you to clearly see the necessary objects. To do this, you can install ceiling lighting or wall sconces. It’s great if the lamp has the ability to change the brightness and direction of the light: then it can be used to illuminate different parts of the bathroom.
Options for lighting mirrors in the bathroom
All illuminated mirrors can be classified according to several criteria. One of the main ones is the quality of lighting, which is directly related to the type of lamps used.
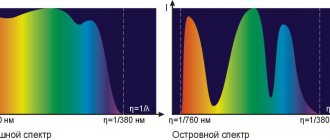
Luminescent
This type of gas-discharge lamps is attractive, first of all, due to its emission spectrum. Diffused lighting from a fluorescent device is close to the spectrum of daylight and is therefore comfortable for the human eye. The service life of these devices is one of the longest - up to 20 thousand hours.
High light output and efficiency are also undeniable advantages of this type of device. The disadvantages include a long period of flare-up, periodic flickering and, of course, mercury vapor, which is contained in the bulb of a fluorescent lamp. Breaking such a device indoors is very dangerous.
When connecting a device of this type to a power source, you must remember about the additional installation of a ballast (choke).
Halogen
Another type of gas-discharge light sources is halogen light bulbs. They are characterized by a high level of light output and last longer than conventional incandescent lamps. However, their main disadvantage is fragility. They are very sensitive to shaking, and the surface of the glass bulb should not be touched with hands.
LED
LED devices are most often used in backlit mirrors installed in the bathroom. They have many advantages:
- long service life;
- low power consumption;
- quick start;
- no flicker;
- easy connection (no choke);
- high luminous efficiency.
The main disadvantage of LEDs is their high cost. It exceeds the price of both fluorescent and halogen types.
LED lighting is often implemented in the form of a beautiful frame around the perimeter of the mirror. This solution not only harmonizes with the design, but also performs all its main functions.
How to make a mirror illuminated with LED strip around the perimeter with your own hands
The main thing to remember when installing lighting for a mirror in a bathroom is to use an LED strip with a terminal connection that provides increased moisture protection class IP 68. The basic principle of installing lamps is to position them in such a way that the light is soft and diffused, rather than directional.
Necessary materials:
- 4 boards of desired sizes;
- 18 pieces of E 14 cartridges with an outer diameter of 27.5 mm;
- fork;
- plug cable;
- switch;
- glue labeled “mirror” or liquid nails;
- furniture varnish or paint;
- wall mounting;
- corners;
- self-tapping screws;
- feather 28 mm;
- protective gloves for hands.
You can order a mirror without a frame at a factory or use it at home. Its thickness must be at least 4 mm.
DIY mirror frame
Step-by-step procedure for installing a backlit mirror with your own hands:
- it is necessary to create an approximate design drawing;
- symmetrically mark places for drilling holes for cartridges according to the created drawing;
- fasten the frame with aluminum corners according to the previously measured drawing.
How to connect a lamp or LED strip to a frame
The following steps will require 8 or 9 hours of work:
- drilling holes at marked points for light bulbs;
- if you plan to use ice tape, then you must first install the control unit on the hidden side of the structure, and stick the tape itself on the visible part along the perimeter of the mirror (along the contour);
- creating a chamfer 20 mm wide and 5 mm deep for subsequent gluing of glass;
- cleaning the chamfer with sandpaper.
Next, the structure is assembled into corners to check all dimensions. If the dimensions of all parts match, it is glued together with glue. It is recommended to paint the frame with furniture varnish or paint.
Lighting options and types of lamps
The lighting near the mirror in the bathroom, depending on the installation features, is divided into the following types:
- External. Lighting fixtures and frame are not structurally connected. Most often they are located on the sides of the mirror.
- Internal. Point sources are built into the back surface of the frame (or on top, on the sides, around the perimeter), providing uniform diffuse lighting. Most often, their position can be adjusted manually.
Step-by-step creation of a frame for a mirror with your own hands, decor options
Another option is colored decorative LED lighting for mirrors in the bathroom. It performs a purely aesthetic function. This design technique helps to create an unusual atmosphere and focus attention on a certain detail of the interior.
Internal
Outdoor
For bathroom lighting the following are most often used:
- External lamps with shades. Must be completely closed, almost flat, and fit securely to the wall. You will need at least two of them - they are placed on the sides of the frame. You cannot mount the lamp above a mirror - this will lead to darkness just where bright light is needed. The colors and shapes of the lampshades vary widely - from classic matte white hemispheres and cylinders to futuristic and avant-garde designs.
- Sconce. They protrude significantly forward compared to the mirror, providing a large circle of light. Their designs are also very diverse.
- Point devices (spots). They are favorably small in size, have a special frame that allows them to be mounted anywhere, and have a waterproof body. Most often they are already built into the mirror.
Sconce
Lamps
Spots
You should also know which lamps to choose for mirror lighting:
- Neon. They provide uniform illumination and can be installed even in hard-to-reach places. They operate silently, do not dazzle the eyes, heat up to a maximum of 40°C, and vary in light temperature. Disadvantages: fragility, risk of water getting inside. If one lamp fails, the two adjacent ones also go out.
- Luminescent. They provide light as close to natural as possible, are durable and economical. Disadvantages - when turned on, they begin to flicker when working, hum slightly, contain mercury (special disposal is required).
- Halogen. Waterproof, durable, provide maximum light output. But during operation they get very hot and cannot tolerate dirt, dust (they go out immediately), and even more so mechanical impact.
- LED. Mounted on any surface. They are distinguished by almost record durability (they do not lose brightness during the process), a variety of colors, and cost-effectiveness. However, they are not cheap. One LED lamp will not provide good light; for the bathroom they use a whole strip.
- Incandescent lamps. This option for the bathroom is strongly not recommended. They get very hot, are afraid of water, consume a lot of electricity, and are short-lived.
Straight and curved bevels on the mirror - what are they and what are they for?
Internal lighting is most often LEDs, external lighting is neon lamps. Due to the design features, fluorescent ones are built into a frame above a bathroom mirror and covered with frosted glass on top to ensure light diffusion. Halogen ones are installed in pendant wall lamps.
Neon lights
LED
Luminescent
Incandescent lamps
Halogen
How to install a mirror with built-in lighting yourself
Installing an illuminated mirror in the bathroom and connecting everything yourself is not a difficult task for someone who understands electrical wiring and knows how to use a drill. For those who have not dealt with such things, it is better to invite a specialist. If connected incorrectly, at best, only the backlight will be damaged. The worst case scenario is that there may be problems with the wiring.
If you have never installed a backlit mirror yourself, then it would be advisable to use the services of specialists.
For installation you will need the following tools:
- insulation tenant;
- indicator screwdriver;
- wire cutters;
- electric drill;
- dowels and self-tapping screws;
- screwdriver;
- building level, ruler and pencil.
Don't forget that the socket should not be located too far from where the mirrors are installed.
The installation and connection process itself is carried out in the following sequence:
- The first step is to decide on the location.
- Using a building level, draw a straight horizontal line on the wall, on which to mark the locations of the holes for fastenings (this is done in order to place the mirror perfectly level on the wall).
- Holes for fastenings are drilled. Dowels are driven into the drilled holes and self-tapping screws are screwed into them to hold the fasteners.
- The mirror is hung and the evenness is adjusted if necessary.
- Connecting the backlight wires to the power supply and grounding.
- The final stage is a control check of the work.
- If the kit includes shelves, they are mounted at the very end.
The cheaper the mirror, the easier it will be to install.
Materials and tools
The humidity in the bathroom is high, so the mirror frame and fasteners need to be moisture-resistant. Products made of plastic and stainless steel are suitable. The safety of the lighting system is important.
For it, choose lighting fixtures with a moisture protection class of IP67 and higher.
To install the lighting you will need tools, hardware and accessories:
- level;
- drill (impact) or hammer drill;
- drills (drill);
- plastic dowels;
- screws;
- screwdriver or screwdriver;
- roulette.
Rules for connecting the backlight
The type of illumination determines the order of further work. If the lighting fixtures come with a mirror (cabinet), then there are assembly instructions. Otherwise, the work plan is drawn up independently.
LED Strip Light
To install an LED strip, you need an aluminum profile and 1-2 12V power supplies. The profile removes excess heat, which extends service life. Without a profile, you can install SMD 3528 tape. It is low-power. The tape is sold in coils. The length of the segments is determined during installation. The lighting scheme includes:
- Dimmer;
- Remote Control;
- power unit;
- ribbon.
To connect the circuit elements you need: PuGV - installation wire, VVGng-Ls (1.5 mm²).
LED lights
Power to the high-power fixtures is supplied from a distribution box located outside the bathroom. The wires are connected with self-clamping terminals. For designer lighting of mirrors, less powerful LED lamps are used. There are enough batteries to power them.
Product operating instructions:
- insert batteries of the same capacity into the compartment;
- the battery cannot be revived by heating;
- Install batteries with the parameters specified in the operating instructions for the mirror (cabinet).
Fluorescent lamps
Power must be supplied to the installation location of the lamp. Installation of the product begins with assembly. The kit comes with detailed instructions. It lists all structural elements, provides a connection diagram, and provides detailed assembly instructions. The housings of modern lamps are universal. They can be mounted on any surface (vertical, horizontal). Marking of attachment points is done using a laser level or level. The fasteners are fixed with a dowel and a self-tapping screw with a press washer, and the body is fixed to them. The input cable is inserted in the required places. To control fluorescent lamps, a switch is provided in the circuit; for 2 groups of lamps, two-key models are used; for a single lamp (group), a single-key switch is sufficient.
With motion sensor
For convenience, motion sensors are included in the lighting circuit. Products with degree of protection IP65 are suitable for bathrooms. Mini sensors fit better into the interior. PD9-V-1C-SDB-IP65-GH is installed on the ceiling. This model has small dimensions - 36 * 52 mm. Using spring clips, the sensor is mounted in a lamp or suspended ceiling. It can be placed in the first humidity zone. During installation, high-quality insulation of the wires is performed and the operation of the sensor is adjusted. If there is no movement, the lights turn off after a certain period of time. When a moving object appears in the bathroom, light sources connected in the same circuit with the sensor turn on.
Motion sensors save energy by 40-80%. Increases comfort level. Classic switches are not needed. The lights light up when a person enters the motion sensor area. Installation instructions included:
- choose an installation location in the area where the mirror is located (cabinet);
- the lamp is attached to the wall or ceiling;
- connect the device wires to the electrical network wires;
- The twisted areas are wrapped with electrical tape.
This is interesting: Is grounding necessary if there is an RCD on the water heater?
Types of illuminated mirrors
Finding a backlit mirror that fits into the bathroom interior is not so difficult. There are many models on the market of different shapes with different design features.
With lighting and shelf
A number of bathroom mirrors are sold with a built-in shelf on which you can put hygiene products, bath accessories or cosmetics. Such models are very convenient in terms of installation, as they do not require separate fastening of elements. The structure can be installed with your own hands in literally 15-20 minutes.
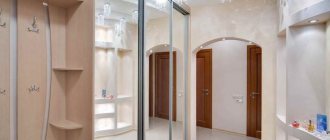
Mirror cabinet
A mirrored cabinet with lighting solves several problems at once: storage, reflection, increasing space. The large volume allows you to not only store cosmetics and bath accessories here, but also medicines, and most importantly, hide them from view and not disturb the design of the space.
A cabinet with mirrors can fit into any interior, however, when choosing, you must take into account that the material it is made of must have high waterproof properties.
Round mirror
Round and oval mirrors of various sizes and shapes are suitable for bathrooms with a classic design. Illumination, as a rule, “frames” the entire product and can be made in the form of a pattern or original ornament.
With light around the perimeter
There are many types of lighting installation, but the optimal location is considered to be around the entire perimeter of the mirror. This is the most correct lighting that will best perform its functions.
If such a possibility is not provided for by the design, then the lighting must be installed in the upper part.
With touch activation
Mirrors with touch control appeared on the market not so long ago. The backlight on them can be turned on by the control panel, touch or sound. The latest models provide a Wi-Fi connection, so you can activate lighting or music using a mobile gadget.
Composition from a mirror and sconce
Sconces - lamps located on the sides of the mirror not only provide the necessary lighting, but also decorate the interior with their appearance. They organically fit into bohemian and classic design, Provence and country styles, and also give the bathroom a unique coziness.
Magnifying mirror
A magnifying mirror is a woman’s indispensable assistant. It is convenient to do makeup, masks and any other cosmetic procedures. Men, using this model, can shave much better. Such a mirror is usually mounted to the wall.