/Accessories and decor/Lighting/
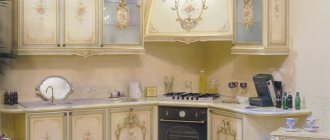
Proper lighting is one of the components of the effective design of any room. It is especially important in the kitchen, where the correct distribution of light flux turns cooking into a pleasant and comfortable process. All you need for this is a lighting design and calculation. One of the most interesting options in modern interiors, which you can implement with your own hands, is LED strip lighting.
LEDs are special semiconductors that emit light when electrical energy passes through them. LEDs can have different chemical compositions, which causes the brightness of the light they generate to differ. There is one more nuance - the installation of LED backlighting is never carried out directly, since this way the tape can overheat and break. A prerequisite for connecting LEDs is the presence of a stabilizer.
Advantages of LED lighting
LED lighting has a number of obvious advantages:
- Resistance to mechanical external damage;
- Durability – kitchen lighting strip can last 14 years or more even when working more than 15 hours a day;
- A variety of colors - kitchen lighting under cabinets can be made in white, red and orange, green and blue, purple and yellow. You can also choose LEDs that operate in the infrared and ultraviolet spectrum;
- Excellent lighting brightness, and the device does not require time to warm up;
- Affordability (due to distribution and popularization);
- Possibility to use tape with different radiation angles;
- Safety;
- Environmental friendliness;
- Undemanding to room temperature.
Methods and places for interior lighting in the kitchen
The number of crystals directly affects the number of colors in the ribbon. In general, LED strips can provide 15,000,000 shades - if they combine crystals of different brightness.
You can make LED lighting for the following purposes:
- Combined lighting for zoning, highlighting cabinets, niches;
- Illumination of paintings or other decorative elements of the interior;
- Illumination of the kitchen apron; lighting looks especially impressive if the apron is made of glass;
- Lighting inside drawers and cabinets;
- Highlighting stained glass or clear glass shelves;
- By installing lighting at the bottom of the bedside tables, that is, under the cabinets, you can create the effect of “floating furniture”;
- Lighting of several ceiling levels;
- Lighting the bar counter with LED lighting creates the atmosphere and style of a real bar.
Warm spectrum LEDs are installed for classic interiors, while in a high-tech style, cold light will be more appropriate.
Proper kitchen lighting. Recommendations from professionals.
Kitchen lighting. Recommendations from professionals.
Kitchen lighting has always been a very popular phenomenon, and with the development of lighting technologies, new opportunities for solving this problem are emerging. Not so long ago, spotlights, often used to illuminate kitchen units, began to lose popularity, and LED kitchen lighting is becoming increasingly popular. It can be divided into several components: contour lighting for kitchen cabinets, and accent lighting for the kitchen. We will talk about each of these options, how to make them correctly, what materials to use, what and how to install in this article, with visualizations, and all possible options. But first, we will talk about the main mistakes that people make when they decide to illuminate their kitchens with LED strips or light their kitchens with track lights.
And so, the main mistakes when creating kitchen lighting:
- Wrong choice of equipment, both LED strip and accent lights (track or spotlights). This is one of the most common mistakes; the wrong choice of LED strip can lead to excessive brightness and a blinding effect, unnecessary spots on the surface of the tabletop, and even breakdown of the entire equipment. And not choosing the right track lamps can be fraught with wasted money, since you will not get the desired effect, and in place of high-quality accent lighting, you will have to admire the track lamps purchased for quite a lot of money.
- Incorrect placement of equipment - this reason is less clear to people, since by placing the LED under the kitchen cabinets, making the wrong kitchen floor lighting, or pointing track lights at the wrong elements, you will still get some kind of lighting effect, but from what you can achieve - it will be very different, and the full potential of kitchen lighting will not be realized.
- Wrong concept for kitchen lighting. People choose a kitchen set quite scrupulously, based on their own preferences. And it is necessary to make LED lighting for the kitchen so that it matches the design of the selected furniture.
These mistakes are made most often and lead to poor quality solutions when creating kitchen lighting. Next, we will tell you how to properly make kitchen lighting, what options there are, and what materials to use.
Contour lighting of the kitchen with LED strip under the cabinets:
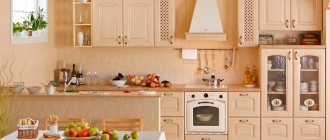
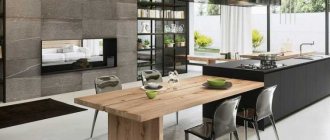
The pictures show two correct options that will make your kitchen unforgettable. There are basic rules for such lighting: 1. Be sure to use a light aluminum profile. It will not only protect the LED strip from moisture, extend its service life, acting as a cooling composite material, but most importantly, it will soften the rather rough light emitted by the LEDs. 2. Choose the power of the LED strip based on the size of the light aluminum profile, in this order, then your kitchen lighting will be as uniform as possible.
Let's look at these examples in more detail: In the first example, we see the corner lighting of the kitchen with LED strip. Such lighting ensures maximum flooding of the tabletop with light, achieving maximum brightness levels on it. In the example, we have a square light profile, with a glow in two directions. You can also use a semicircular one - it’s a matter of taste. The width of the profile is selected based on the required brightness, we recommend using an aluminum profile for the LED strip NUGL.1515R (rectangular) / NUGL.1515S (semicircular) (15mm width), NUGL.3030R (rectangular) / NUGL.3030S (semicircular) (30mm width ), and NUGL.5555R (rectangular) / NUGL.5555S (semicircular) (55mm width), each of these aluminum light profiles is equipped with a specific LED strip model. Contact our specialists and we will advise you in detail on the necessary equipment and configuration. In this type of kitchen lighting, only a matte diffuser should be used!
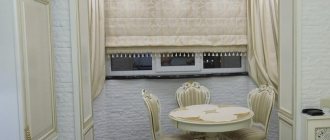
In the second example, we see the background lighting of the kitchen with an LED strip, creating a light gradient on the back wall. Such lighting should be less powerful, using a direct overhead LED profile of small width, for example NS.2525 and NS.3535 (25 and 35 mm, respectively). These profiles are also equipped with several options for LED strips, which we will always help you choose. In this kitchen lighting, you can use a transparent diffuser and an LED strip, with a small number of LEDs per meter. This solution is perfect for lighting a kitchen in a modern style. The main rule is that all contour lighting of the kitchen with LED strip under the cabinets should be done close to the back wall! Otherwise, the lighting effect will be, to put it mildly, poor...
Lower kitchen lighting, floor lighting:
If you decide to create lighting for the lower part of the kitchen, then you should adhere to one rule: the kitchen floor lighting should be background lighting. In other words, backlighting is soft light creating a fairly strong gradient on the floor. This lighting gives the effect of weightlessness, and it seems that the kitchen is floating above the floor. Achieving this effect is very simple, and it does not require complex and expensive equipment. To begin with, a necessary condition for such lighting is that the depth of the niche under the kitchen is at least 5 cm, ideally 10 cm. If you have the necessary space, then you can easily create kitchen floor lighting. In the niche, as in the previous version, we install a profile, and we can get two lighting options: the first, using the corner profile NUGL.1515 (only 15mm wide, no longer required for floor lighting), and then we will get the maximum weightless effect, making the kitchen "fly". The second option is a straight profile, for example kit 1506, and we place it with the screen parallel to the floor (NOT on the floor, namely parallel). In this case, we will get maximum light output from under the kitchen, with a less visible light gradient. The same LED strip for kitchen floor lighting is used in both cases. Depending on the desired brightness: either SMD 2835 4.8 W/m or 9.6 W/m, 60 and 120 LEDs per meter, respectively. By following these rules and using the necessary equipment, you can transform your kitchen beyond recognition.
Kitchen accent lighting with track lights:
Creating the right accent lighting for a kitchen with track lights is a more difficult task, and we recommend contacting our specialists at ENLED, we will develop a lighting design and select the right equipment necessary for your kitchen. Since it is not enough to buy a track and choose the lamps you like in appearance, it is important to choose the right optics, and wisely select the required power and location of the track lamps. The main nuances that you need to know to create accent lighting for the kitchen:
- There is no need for complex expensive equipment intended for shops, art galleries, etc. The usual household option in the form of a single-phase track busbar will suit you, even if you want to divide the lamps into several groups, it is easier to connect a different power supply to each section of the busbar.
- When choosing the optics of track lights, you need to take into account the area of your kitchen. If the kitchen is small, then you need to take narrower optics 24-45 degrees, with a power of about 7-12 W. With such lamps you can place accents on the necessary elements: cabinet doors, household appliances, decorative elements. If the kitchen is more than 20 sq. m, and it is necessary to highlight the entire kitchen set, thereby visually separating the cooking area and the dining area; track lamps with a wider scattering angle will be required here. An angle of 70 degrees or more will perfectly cope with this task, creating uniform illumination of the kitchen, illuminating it and highlighting it against the background of the rest of the furniture. The power of the lamps with such illumination is about 20 W.
In order not to make a mistake in choosing equipment, use the free service to develop a lighting design; this guarantees you high-quality kitchen lighting, without additional costs or unpleasant surprises.
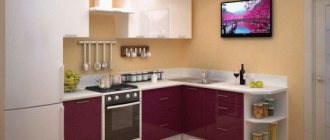
Kitchen lighting with soffits:
There are no complicated rules when lighting a kitchen with spotlights. Lighting can be provided both outside and inside cabinets (with glass doors). You can arrange the lamps and combine the intersection of light the way you like. Our only recommendation is that when choosing LED spotlights for the kitchen, choose models with a scattering angle of no more than 60 degrees, ideally closer to 40 degrees. This light distribution will create the highest quality effect. In both examples (pictures) of kitchen spot lighting, there are models of lamps with exactly this scattering angle.
If you find it difficult to choose equipment, or doubt the visualization of your wishes, call us, we will advise you, and visually in 3D we will show you what your kitchen will look like after creating kitchen lighting.
May 24, 2018
Choosing a suitable LED strip - classification and comparison
Most often, LED backlight installation is made from SMD LEDs. They are classified according to a number of characteristics:
- Number of crystals – from 1 to 4;
- Glow type – full color or monochrome;
- Dimensions - in the range of 1.06x0.8 to 5.0x5.0 mm.
Before you buy an LED strip, you need to decide what type of lighting you want to make. Here are the following recommendations:
- SMD 50x50 strip with three-crystal LEDs is perfect for lighting the work and dining areas and can provide uniform bright light.
- For decorative lighting, a single-chip SMD 35x28 tape is suitable.
LED strip (LED) consists of several small LEDs located within the same plane. It can also have several varieties depending on the density of the LEDs:
- 30 pcs/meter;
- 60 pcs/meter;
- 120 pcs/meter;
- 240 pcs/meter
The power consumption and the brightness level of the generated lighting depend on the number of LEDs.
Tapes are divided into groups according to the degree of moisture protection:
- IP20 – not suitable for the kitchen because it cannot withstand high humidity;
- IP65 – average level of moisture protection, can be used in the kitchen;
- IP68 – complete moisture resistance – even a swimming pool can be illuminated with this tape.
INSTALLATION OF LED STRIP WITH YOUR HANDS
With ready-made lamps, everything is more or less clear, but how to make lighting on a kitchen set with your own hands from an LED strip?
WHAT WILL THE LED LIGHTING BASED ON RIBBON BE CONSISTED OF?
To assemble a working lamp you will need the following materials:
- Diode strip of the required length.
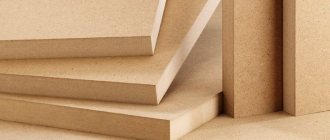
- If necessary, aluminum guide profile.
Kitchen lighting will look neater if placed in a special aluminum profile. This solution makes lighting installation easier
- Power supply 12 W.
- Switch.
- Electrical cable and plug or terminal block, depending on the type of connection. We recommend using a double-braided stranded copper cable with a cross-section of at least 2x0.75 mm2.
- Heat shrink tubing for sealing connections.
LED strip is often sold complete with power supply and control
HOW TO CHOOSE AN LED STRIP
The LED strip in the kitchen must be protected from water; this is one of the conditions for safe operation. The minimum level of moisture protection is IP44 (withstands individual drops of water), better than IP65 (water jet). Voltage - 12 W, as the safest.
LED lighting for the kitchen work area should be bright, with a spectrum close to natural daylight. We recommend using a strip with three-crystal LEDs of the SMD 50x50 type, consisting of 30 diodes of 12 lumens each per meter of length. If you want to have brighter light, especially when equipping the backlight with a dimmer, it is better to choose a product with 60 diodes. Color temperature ranges from 3300 to 500 K.
Additional lighting for the kitchen, as a rule, should not be bright. Often, the luminous flux of SMD 35x28 from 30 diodes of 5 lumens per meter is enough. Color does not play a significant practical role and depends more on the design idea.
Specifications for Recommended Tapes
HOW TO CHOOSE A POWER SUPPLY AND SWITCH FOR AN LED STRIP IN THE KITCHEN
To ensure stable LED lighting in the kitchen, we recommend choosing a power supply with a power reserve of about 25%. The power of the tape depends on the model; technical specifications can be obtained from the seller. So, SMD 50x50 from 30 diodes “takes” 7.2 W per meter of length. Thus, if the length is, for example, 4 m, the total power will be 28.8 W. Accordingly, a power supply with a 25% margin is 36 W. Choose a compact model, it will be easier to hide.
As for the switch, the following options are possible:
- Simple push-button.
- Sensory by touch.
- Infrared, responds to hand waves.
- Dimmer that regulates the luminous flux. The control can be mechanical, in the form of a rotating handle, or touch.
- A control unit that makes the light flash or shimmer with multi-colored lights if a multi-color RGB strip is selected. Although, such effects are used infrequently.
LED lighting for the kitchen based on several strips should only be carried out using a parallel connection diagram
How to choose a power supply
Power supplies come in different capacities, and therefore sizes. We need to determine the optimal option so that the power of the transformer is sufficient with a reserve, but at the same time so that it is not too large.
You can calculate the optimal power supply power for a five-meter SMD 5050 tape with a power of 12 W according to the following principle:
We multiply 12 W by 5 m (the length of the tape), for a total of 60 W. But since we need a reserve, we also take into account the coefficient equal to 1.25 - it turns out 1.25 × 60 = 75, therefore, we need to buy a 75 W transformer.
How to illuminate a tabletop or dining area with LEDs
For the work area, a device with an average degree of moisture protection is suitable - it has a special protective layer that protects against vapors and contamination, water and other liquids. This means that if wet cleaning is necessary, you can wipe down the cabinets along with the lamps.
Installing the tape to the table involves attaching a special aluminum profile. It is necessary to hide the wires and make the lighting aesthetically pleasing. You can also make lighting from self-adhesive tapes. By the way, by installing additional devices you can create a backlight that will change brightness and/or color.
Advice! A warm white LED strip color is optimal for a desktop, as it will not change the natural colors of the food.
Additional lighting can be made from LED strips in the work area. Designs with high moisture protection are also needed here. The tapes here are installed with double-sided tape. You can use several ribbons to create an expressive decorative effect.
Which is the best backlight to choose?
To illuminate the area under the cabinet, various types of lighting are used. LED strips, kitchen lamps, corner lamps, point light sources - this is an incomplete list of ways to implement lighting. Each type of backlight has advantages and disadvantages.
LED strip for wall cabinets
LED strip is a flexible conductive substrate on which LEDs are located. Compared to LED panels, it is small in thickness and allows you to make the lighting device almost invisible. Tapes can be high-voltage and low-voltage. The LED strip is supplied without a backing that provides heat dissipation, so it should be mounted on an aluminum profile.
Advantages of LED strips:
- works immediately, no warm-up time is required;
- almost invisible;
- minimal energy consumption;
- long service life;
- the number of on/off cycles does not affect the duration of operation.
Linear luminaires
Linear LED lamps are chosen for kitchen cabinets. They look like a fluorescent lamp and turn on and off with the touch of a finger. They are attached to the cabinet using metal brackets or magnets (to metal surfaces). The linear luminaire has all the advantages of LED lighting devices.
There are light beams on the market - these are fluorescent tubes. They are attached to the bottom of the cabinet using mounting hardware, which is sold complete with the device. The beams are easy to install, inexpensive, and durable.
The disadvantage of fluorescent light sources is their long turn-on time.
Manufactured in a stylish case with a protective panel.
Kitchen lamps
To illuminate the kitchen, recessed and overhead spotlights are used.
Built-in appliances are more than 50 mm high and are mounted in a cabinet, so installation becomes difficult. Incandescent, halogen, and fluorescent lamps are inserted into the lamp. The advantages include the ease of replacing the light bulb. If you install a spot, its light direction can be adjusted. The disadvantages of built-in devices are the need to drill holes in the cabinet and the lack of protection from moisture and dust. A professional solution for recessed lamps would be to install an additional shelf that will separate the light sources from the cabinet.
Overhead lamps and spots look less aesthetically pleasing; they are visible to the eye. At the same time, overhead lamps have the ability to regulate the light intensity. They are fixed to a bracket on which several lamps are later installed. The main problem with overhead devices is problems with the power cord, which has nowhere to hide.
Furniture lamps above kitchen shelving
Furniture lamps save kitchen space and are easy to install. Touch furniture lamps are convenient (no need for a separate switch). Easily turn on and off with one touch. Such lamps are installed in cabinets, racks, chests of drawers, shelves, and kitchen units. Selecting the right lighting fixture is not difficult, since there is a large assortment of products of various types and colors on the market.
You can buy furniture with pre-built lamps.
Kitchen wall lamps with motion sensor
Touch-sensitive LED lights with a motion sensor are often part of a smart light system. It works as follows: a person touches the body, the motion sensor reacts and turns on the light. Advantages:
- luminous flux with the required level of illumination;
- there is no need to look for the switch or wipe your hands before doing this - the light will turn on with one touch or swipe of your hand;
- takes up minimal space;
- can be installed anywhere in the kitchen.
Touch LED lamps come in different colors, which allows them to be used for various purposes - from organizing work lighting to decorative lighting.
Corner sensor lamp
The corner touch lamp is a surface-mounted device. The lamp is built into a housing protected from dust and moisture. Usually made from LEDs, the kit includes the necessary parts for connection. Reacts to a light touch on the sensor.
What do we need for installation?
Self-installation of LED backlighting will require the use of the following tools and components:
- The actual kit: tape reel (12W), electrical cable with a cross section of 0.74 mm square;
- Transformer - 12W power supply and dimmer with remote control (if available);
- Solder with rosin;
- Soldering iron;
- Scissors;
- Double sided tape;
- Insulating tape (or heat shrink tube with a heat gun);
- PVC corner and or aluminum profile for LED mounting – if necessary;
- Drill - if necessary;
- Electrical installation brackets - if necessary.