0
18031
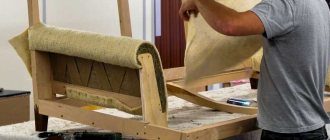
Thanks to its compact dimensions and high performance characteristics, a sofa with an accordion mechanism is very popular. This model transforms into a spacious sleeping area, so it is perfect for both living rooms and children's rooms. If necessary, upholstered furniture can be moved from one room to another. Knowing how to assemble a sofa accordion, this will not be difficult. The model has a simple design that every man can handle without much effort.
Assembling the sofa armrest
Let's start with simple parts - armrests.
Armrest dimensions: length – 900mm, width – 200mm, height – 550mm (600mm with legs). If you want to make an armrest with a shelf, then check out this project first. But please note that the dimensions are different and need to be changed.
We assemble the armrest in accordance with the drawings. In the drawings, I did not label the dimensions of the parts so as not to clutter them. Our list is small, it’s difficult to mix up the details.
List of parts for one(!) armrest. All dimensions are in millimeters.
- Chipboard : 160Х875 – 2 pieces
- 480Х875 – 1 piece
- 300Х775 – 1 piece
- 160Х510 – 2 pieces
- 875 – 2pcs
- 510Х880 – 1 piece
- 900Х200 – 1 piece
We take from the list the largest chipboard part and the two longest beams. The arrows in the drawing show the directions for tightening the screws. Please note that the screw rotates from the chipboard into the timber, and not vice versa. I recommend using 4X45 screws. You need to make a hole for the screw using a 3mm drill. If you use wood screws, no drilling is required. The step of attaching the chipboard to the timber (the distance between the screws) is at least 20 cm. Thus, screw four screws into each block in the upper figure in the direction of the arrow.
We screw two screws into the end of the beam. Since the screw is screwed into the end much easier, you only need to drill the hole for it half the length, or with a thinner drill.
The next step is to nail the fiberboard. We use 2X25 nails in increments of 10-15cm. If you are a fan of making things that last forever, you can use wood glue in addition to nails. Don't forget to nail the fiberboard to the central beam (it is shown by the arrow).
To make it clearer to you, in this picture I have labeled the sides of the armrest. We carefully screw the chipboard overlay, aligning it with the back and bottom edges. We use 35mm screws. Because We have a block running along the bottom edge; we screw it to it with longer screws.
The armrest is assembled, all that remains is to cover it with foam rubber. Everything here should be clear from the pictures. Before sticking the foam rubber, slightly smooth out the sharp corners and edges on the upper part of the armrest with a plane or a coarse file. Please note that we do not glue foam rubber to the back wall of the armrest; you can simply glue a layer of batting there. I leave the choice of glue for foam rubber up to you. I myself use Tapicer glue, it is a professional glue and, as far as I know, it is not sold in containers smaller than 15 kg. If you manage to get such glue or its analogues somewhere, great. Previously, many people used glue88 for foam rubber. There are also special spray adhesives in cans. You can buy Titan glue at a hardware store; it is used for gluing ceiling tiles. I tested various adhesives for their ability to bond foam. You can read about it here: kley_dlja_porolona.html
For the sofa you need to make two identical (mirror) armrests. All! The armrests are ready for upholstery.
You can leave your comments and questions in the Guest Book
Source: novamebel74.ru
How to make an armrest for a sofa with a shelf for books
For a corner sofa or Eurobook, you can make a simple armrest with shelves inside.
The production of such an armrest consists of two stages: first we assemble and cover the frame, then we assemble and install the shelf into the frame.
Let's look at the assembly diagram of the armrest frame. For the frame we use chipboard (or plywood), fiberboard, and timber with a section of 40✖40 mm or another similar section.
I will give the dimensions for the armrest with dimensions of 870✖590✖250 mm. You can change them as you wish. Details for one armrest:
- Chipboard : 650✖200 – 1 pc.
- 850✖518 – 1 pc.
- 200✖518 – 2 pcs.
- 850✖216 – 2 pcs.
- 410✖106 – 1 pc.
- 818 – 1 pc.
Below are drawings showing the assembly procedure. The armrest is assembled with 50 mm screws.
Now we cover the assembled frame with foam rubber. First, we glue 10 mm thick foam rubber on the side where we have the “window”. The foam parts should extend 15-30 mm inside the window to create a soft cushion, and our shelf fits in there tightly and without gaps. If you only have foam rubber 20 mm thick, then you can use it, but in this case do not bend it inward as in the second picture, but simply make a 10-12 mm release around the perimeter of the window. Then this release will be pressed with fabric and create the soft cushion we need.
Now we glue the foam rubber on the inside of the armrest (where we have a chipboard overlay for attaching to the sofa). To fasten the armrest, you need to provide bolts, cage nuts or hooks - depending on what method of fastening is provided for by the design of your sofa.
We glue thicker foam rubber on top - 40 mm (or two layers of 20 mm each). To make it softer.
Now we cover the armrest with fabric. Essentially, we are simply sewing the same simple cover as we did in the corner sofa project. We stretch it over the armrest, upholster it, and then cut out the central window. This must be done carefully, without cutting off excess. You should leave at least 5-6 cm of fabric around the perimeter of the window. Be especially careful in the corners - there you need to make diagonal cuts to the base. Do not cut right to the end, leave a couple of centimeters, you will cut more accurately when you stretch and nail the fabric, it is better to finally cut the fabric at the corners at the time of installing the shelf. After making the cuts, nail the fabric inside the window. Make the tension stronger so that the foam rubber does not shine in the corners, but make sure that the overall contour of the armrest is not distorted.
To install the shelf, you need to nail pads onto the support bars to compensate for the thickness of the foam rubber and fabric. Overlays can be made by collecting several layers of fiberboard and/or furniture cardboard. The thickness of the overlay depends on the thickness of the foam and fabric (as a result, on the size of your shelf). The shelf should fit inside the window quite tightly. I recommend sawing and assembling the shelf after you have covered the armrest with fabric. Measure the size of the resulting window in the fabric and assemble a shelf 4-5 mm larger.
DIY sofa armrest stand
An overhead stand for the armrest of a sofa is an excellent solution if you are going to sit on the sofa and want to have a laptop, tablet, phone, TV remote control, book, glasses and a glass of water next to you.
We offer a master class on how to make a comfortable wooden stand that is attached to the armrest of the sofa. Its stylish design will complement the interior, and its functionality will make sitting on the sofa even more enjoyable.
What is a sofa armrest pad?
Armrest pads are portable tables in the form of shelves that fit onto the armrest of a chair or sofa. This allows you to create a surface for glasses, cups, glasses and plates, as well as other small items that need to be kept at hand.
These accessories fit perfectly into the interior, and most importantly, significantly increase the level of comfort.
These devices are especially popular for living rooms that have a home theater, as they allow quick access to drinks and snacks. The pads can be equipped with pockets in which it is convenient to store small things like a book or remote control, so as not to waste time looking for them. The product can also be equipped with a small table lamp, creating a cozy place for reading or writing.
One of the advantages of sofa covers and tables is that they protect furniture surfaces from all kinds of dirt, accidentally spilled drinks and dropped snacks.
Necessary materials:
The amount of materials and the final size of the stand depends on the width of the armrests on your sofa. Take measurements of the armrests and make the stand in the manner described below, but adjusting the dimensions to suit your specific case.
- Wooden board measuring 80 cm x 50 cm with a thickness of 1.8 cm
- Screws measuring 4 mm x 35 mm (you can use others you have at home)
- Sandpaper (we used 240 grit here)
- Corner brackets (here measuring 40mm x 40mm x 17mm)
- Wood putty
- Wood glue
- Brushes (here there is one 50mm wide and one 25mm wide for finer areas)
- Wood paint (white here)
- Cork fabric size 45 cm x 30 cm
- Aerosol glue
- Decorative nails for furniture
Before implementing the project, make a small sketch to find out how many individual pieces of boards will be needed for production. THE DIAGRAM shows how the stand should look when finished. After this, you can go to a hardware store for materials and immediately cut the boards to the desired size.
How to disassemble a corner sofa
The corner one has large dimensions, but for easy movement it is made of blocks. Before disassembling, it is necessary to clear the room in which it is located for comfortable work. Remove pillows and covers, if any, from the sofa. If a rearrangement is planned, it is enough to simply disconnect the blocks, move them to the right place and connect them back. As a rule, the blocks are connected with fasteners; to disconnect, you need to lift the block to the top, but sometimes the blocks are connected with bolts, in which case you cannot do without tools. If you need to transport this piece of furniture, you should stock up on tools and find a disassembly diagram.
Scheme of the design of the armrest stand
The dimensions may vary for each sofa, but in any case you will need the following boards:
- a) a board corresponding to the width of the sofa armrest;
- b) a board corresponding to the height of the armrest (inward);
- c) a board defining the size (height) of the additional compartment; For example, in this case the size was calculated for a laptop: the width of the laptop plus 5 cm.
- d) a board that determines the width of the compartment and is its lower part;
- e) a board that limits the separation on the second side.
Step-by-step instruction:
Step 1: Connecting parts a + b
Using wood glue, we connect parts a and b together, following the diagram below. After the glue has dried, additionally secure the boards together with screws for a more durable fastening.
Note: Alternatively, if you want to leave the outside of the stand intact, secure the boards together from the inside with corner brackets and screws.
Step 2: Connecting parts c + d + e
Similar to the previous step, we connect parts c, d and e with glue, and then with screws, following the diagram given.
Step 3: Connecting all the parts together
Now you need to connect the parts assembled in the previous two steps. For this we also use glue and screws from the outside or corner brackets from the inside.
Note: You can also optionally add a board to cover the compartment at the front, that is, attach it to boards c, d and e.
Step 4: Apply putty
This step is necessary if you connected the parts together with screws from the outside and want to hide them. If you used corner brackets from the inside, then the outer surface is already smooth and does not require putty.
Here the screws were screwed in from the outside and the heads went slightly into the wood, forming small recesses. So we remove them using wood putty. After this, we smooth the surface with sandpaper so that the putty is level with the wood.
Step 5: Paint the stand
The color of the paint depends on your personal preferences; you can even varnish the wood, leaving its natural color and structure visible.
You can paint the entire stand, or just the outside, leaving the inside natural.
If you decide to paint the whole thing, apply the paint in several stages so that there is a side on which you can place a stand while the paint dries.
If you paint only the outside, then apply masking tape from the inside along the edges of the boards so that the paint does not get there and the inside looks neat. Here they just painted only the outer part.
TIP: In any case, when painting, you need to apply at least two coats of paint to ensure good coverage of the surface.
White paint, which is scratch-resistant, was used here.
Step 6: Attach the cork sheathing
Now all that remains is to attach the cork covering to the top of the stand. To do this, cut the cork fabric the width of the board located on top (board a), and the length a little more behind it so that you can wrap it under the board and attach it.
After this, apply spray adhesive to the surface of the top board and glue the cork fabric to it. Fold the edges inward and glue them; for reliability, you can secure them with decorative nails for furniture.
Now everything is ready!
- It took 3.5 hours to make a stand , and if you leave the natural color and do not apply paint, then the whole process takes about 1.5 hours.
- The result shows that the time was not wasted, because we get a beautiful and comfortable stand that increases home comfort!
We hope you enjoyed the master class, and soon you will be sitting relaxed on the sofa, drinking tea or coffee, and placing a cup on such a wonderful stand!
Source: kallibry.ru
Step-by-step instructions for assembling the product
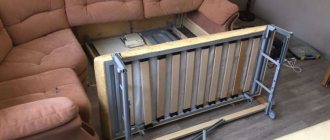
Before starting work, the mechanism support is placed on the frame of the sofa. Convenient to assemble with two people. The frame base consists of chipboard panels and plywood. It is recommended to assemble the structure, taking into account the fact that it is covered with textiles, soft filling, and a sheet of foam rubber. Legs are installed on the bottom side of the frame base. The bottom should be lower than the surface of the second part of the product. Instructions for assembling the sofa for users:
- Align the holes of the mechanism support and the rear part of the frame. A bolt is inserted from the outside, and a nut is secured from the inside. Place the spring on the rod and secure it with tendrils to the mechanism support and the seat frame.
- Do the same with the second side of the mechanism.
- The mechanism is unfolded. A mattress is placed on top of it. The surface of the product on which the Velcro is located is installed on the seat frame, where there are also Velcro.
- The mattress is laid in such a way that the sticky elements are connected. The distance between it and the plywood should be the same on both sides.
- Then the remaining Velcro is attached around the perimeter of the mechanism.
- Take out the upholstery fabric and lay it so that the Velcro on the cover coincides with the slots on the edge of the mattress. Insert the adhesive strips into the slots down under the mattress.
- Spread the resulting sofa cover over the entire mattress.
- Velcro connects the cover and the mattress.
- Remove the washers and nuts from the bolts and insert them into the mechanism supports. Insert washers from the inside and tighten with nuts. After the mattress is secured, proceed to installing the armrests.
- Align the mounting holes of the armrest with the mounting holes of the transformation mechanism bracket. The holders are secured and inserted into special grooves.
- After this, the back of the sofa is put on plastic connecting elements that tighten the armrests to each other.
- Assembly is complete. The sofa is placed in a position where you can reach the lamb and tighten it until it stops.
It’s not difficult to figure out how to assemble a sofa, but it will still be difficult to work alone, so it’s worth inviting an assistant.
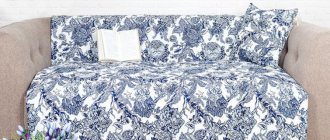
The width of the sleeping area of the sofa when unfolded is from 700 to 1800 mm. The orthopedic effect of the mattress is achieved through the use of the following types of wooden base in the structure: oak, beech. The “accordion” sofa is durable and lasts a long time, since the backs of the product do not touch each other. A practical model will be one that is assembled from high-quality materials and fittings: frame, hinges, retaining elements and wheels. The armor, made from good raw materials, breaks extremely rarely; you can fold and unfold the sofa every day
How to properly clean a leather sofa at home
Tips to reduce the likelihood of squeaking in the future:
- assemble the sofa;
- Using multifunctional silicone grease and a soft cloth, lubricate the fastening points;
- process the ends of the central spring;
- lubricate the surface of the bumpers and the moving joints of the hinges;
- Spray the surface of the hook with oil following the movement of the spring, the rivet on which the lock pawl rotates. Don't forget about the installation locations for all four legs.
How to sew a sofa cover with your own hands, step-by-step instructions for beginners
The sofa assembly diagram is usually kept by users. Once every 6 months, it is advisable to carry out maintenance of upholstered furniture with an “accordion” transformation element. If squeaking occurs, it is necessary to check the damaged areas by pressing on the mattress, remove the upholstery fabric and lubricate the fastening parts. It is necessary to process the same areas as when assembling the sofa, and put the furniture back. Taking care of the product and following the operating rules will extend the service life of the structure.
Expand the frame
Place a mattress on top of it
Special Velcro strips are provided for fixation.
Secure the mattress to the frame with them
Repeat steps around the entire perimeter of the sofa
Check the reliability of fixation
Remove the fixing and adjusting elements of the armrests from the frame
Secure the holders
Insert armrests into them
Make sure that they fit into special grooves for transformation
Feel the adjusting knob with your hand
Tighten it all the way
Mount the backrest
Assembled sofa
Tools and materials
First of all, choose the right fabric. This can be any piece of durable fabric. The covers on the armrests get dirty very quickly and will have to be washed frequently, so the material must withstand numerous treatments.
Beginners in sewing should not immediately take on expensive fabrics. It is enough to take thick cotton fabric of a suitable color. It is convenient to sew from it, and finished products are easy to wash.
To work you will also need a standard seamstress kit:
- tape centimeter;
- threads;
- needles;
- tailor's pins;
- scissors;
- chalk or soap;
- sewing machine.
Step-by-step instruction
The process of sewing covers for armrests consists of the following steps:
- Take measurements.
- Prepare the fabric - wash, dry and iron. This will avoid shrinkage of the finished product.
- Apply marks to the fabric taking into account the previously taken measurements. Don't forget about seam allowances.
- Cut out the details. There should be 4 of them. for each armrest - 2 side rectangles, 1 upper and 1 end. If the arms of the sofa are slightly rounded, which is often found in modern models, the last part can be made round, and the 2 side and top parts can be cut out in one piece.
- Sweep away all parts. This is very important even if the master believes that his measurements are as accurate as possible. It is not recommended to sew the product on a machine without basting and fitting. If you don’t want to use thread and a needle, you can carefully pin the product together with tailor’s pins along the future seam.
- Turn the cover right side out and place it on the armrest. If it fits well and you don’t need to change anything, then sew the parts together using a sewing machine.
- Remove excess threads and check seams for strength.
- Decorate the finished case with decorative elements, if necessary.
There is nothing difficult about sewing covers for sofa armrests yourself. The main thing is attentiveness and accuracy.
Source: postroika.biz
How to sew covers for sofa armrests?
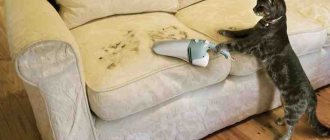
It's a pity when your favorite sofa becomes old and loses its original appearance. Sometimes our furry younger friends - cats and dogs - help him grow old. Some are tearing with their claws, others are marking their territory. Of course, we also “have a hand” to some extent.
The first thing that suffers over time on a sofa is, of course, the armrests. The pattern on the upholstery becomes very light, and it does not lighten evenly, but in spots; the armrests are torn.
The problem is easy to solve, in fact, if you choose a beautiful fabric. From this fabric we will sew armrests in an hour so that no one will think that this is your creativity.
The pattern for the armrests can be found online. I will not offer you this option.
I recommend doing the following:
1). Take an old newspaper/wallpaper/whatman paper. We place this sheet on one armrest, then on the second.
2). Visually assess the width of the pattern and length. We make marks for ourselves using a simple pencil. It can be dots, it can be lines. That is, in fact we will have a rectangle. I recommend making the length extra so that the armrest can be easily tucked in.
3). Cut off the excess using scissors. We place the resulting blank on the selected fabric.
Tapestry, for example, has many advantages. In addition to the luxurious colors, you also get a reliable armrest option - I think this is important.
Note that you don't have to sew anything. But I don’t recommend throwing the workpiece like that. This is a blank, because ideally it is better to sew a fringe along the edges, which will either match the color or support one of the tones of the pattern.
You can choose fringe of different lengths, I recommend not long - up to ten centimeters. Sew on and enjoy the amazing work.
If you need a more complex option, then I suggest working directly on the sofa.
We place the selected fabric on the armrests. Moreover, we place it so that the fabric “softly hugs” the armrest. We fix the fabric, for example, by tying it in a knot. Don't make it big. Then cut off the excess fabric.
Or you can make an armrest using the tattoo method. I'll tell you how easy it is to do it:
- we put fabric on the armrest (it is better to choose a thin material). We thread the fabric as if we had already sewn the armrest.
Folds should form on the sides. Now, of course, they don’t lie nicely. But we give them the direction with our hands, do them beautifully and fix each step with tailor’s pins. We remove the excess with scissors, cutting the fabric carefully.
Then we remove the rough version of the cover and sew stitches on the machine in the places where we have marked out the folds. There is nothing complicated, believe me. And you will really like the result.
By the way, I recommend making a drawstring at the bottom of homemade products like this - carefully fold the fabric one and a half centimeters.
Let's sew it on the machine and use the most ordinary underwear elastic (thin). There are many options, but it is better to choose an elastic band that matches the color of the fabric. That is, either black or white.
The covers can be washed both by hand and by machine.
But it is better to check the fabric before sewing - maybe it is shrinking.
I think that your sofa will now be the most beautiful.
Source: www.remotvet.ru
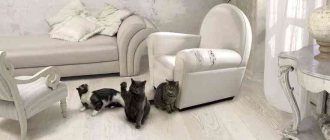
Sofa without armrests
More and more modern sofas in various styles: minimalism, modern, hi-tech and even classic, do not have armrests in their design. This appearance looks elegant, but the functionality of such models is often not appreciated.
Advantages of sofas without armrests:
- The absence of unnecessary details that often do not fit into the interior and layout of the room.
- No dangerous protruding elements (relevant for families with small children).
- Compact appearance and ergonomics of the product.
- The “usable” area of the sofa is wider than that of a sofa with armrests.
- Stylish modern appearance.
- The ability to use pillows of various types as a convenient design element and additional decor.
- The cost of products is lower than with armrests.
The only disadvantage of sofas without armrests is the frequent sliding of the pillow from under the head when the sofa is located in the center of the room, which is extremely uncomfortable when sleeping. However, this problem can be solved as simply as possible:
- Use additional Velcro strips on the seat and cushions that simulate armrests.
- Place the sofa close to the wall.
Replacing filling and upholstery
Absolutely any upholstered furniture has a certain content, which often loses its original appearance and functionality. In order not to seek expensive services from various types of specialists, you can correct the situation at home. Furniture foam rubber is ideal as a filler , as it can maintain its functionality even under heavy loads.
Upholstery is also subjected to various mechanical stress every day and may become unusable over time.
To replace the filling and upholstery, you first need to take measurements from your furniture attribute, then cut out parts of suitable parameters from the existing material.
The filler is fixed to the wooden frame using a stapler or special furniture glue, after which you should move on to the upholstery. The material must be cut taking into account the corners and side protrusions, which should be sewn together to form a kind of cover. Then the lower edges of the fabric need to be secured to the bottom of the wooden frame using the same furniture stapler.
Sofa with soft armrests
Fashion trends require designers and engineers to create the most ergonomic and modern models of upholstered furniture. This is what we call sofas with soft armrests. This concept can imply two types of structures:
- Sofa with removable soft armrests in the form of pillows;
- Sofa with fixed armrests, upholstered in soft filling.
If with the first option everything is relatively clear: densely stuffed oblong-shaped pillows lie along the edges of the seat with or without fixation. With the second type there is much more room for imagination.
Soft armrests can be of various shapes: round or rectangular, wide or narrow. Their design is a rigid frame made of the same material as the main parts of the sofa, a layer of filling and upholstery.
The filler for the armrests is selected to be the most durable and durable. If the sofa filler is chosen to be the same for all parts, it is necessary to take into account that the layer in the armrests should be slightly stiffer than on the seat or back, since it will have an additional load as a support.
When designing a soft armrest, special attention is paid to the choice of upholstery material. The combination of textiles and any type of leather looks most advantageous. Genuine or artificial leather looks elegant and is very easy to care for.
The presence of soft armrests gives the sofa a finished look, but does not add bulkiness. Interiors with such sofas look light and modern. The straight or intricate shape of the armrests will create a certain atmosphere in the room.
Assembly process
Varnish is applied to wooden surfaces in 2 layers.
Assembly is extremely fast. All pre-prepared holes are adjusted to each other, and then assembly takes place using self-tapping screws. The main thing is that all structural elements are firmly installed in place. This is the only opportunity to get a truly high-quality connection. After the assembly is completed, you can begin to coat the material with varnish.
The surface should be made as smooth as possible for this procedure. The varnish is applied in two layers. The first one must be pre-dried before the other one is laid on it. You can apply the varnish using a paint brush. If desired, the armrests can be additionally decorated with painting or wood carvings. This can bring the interior of almost any room to life as much as possible.
Article on the topic: Decor of a real and decorative well in the country (20 photos)
Everything should look as neat and natural as possible. If you can do this, then the job is done perfectly.
Sofa with wooden armrests
For classic sofas, the presence of wooden armrests is a prerequisite for design in a specific style. But wooden armrests are not only a decorative element of the sofa, but also a very useful functional element.
Among the main advantages of wooden armrests:
- Maximum wear resistance and durability.
- Resistant to stains and easy to clean.
- The ability to use the armrest as a stand for dishes, books or gadgets so that they always remain at hand.
- Can be used as a stand for notes on paper.
- Rigid arm support.
Wooden armrests can be of various shapes. A wide range of manufacturers includes:
- Rectangular armrests framing the seat and sometimes the back of the sofa;
- Separate elements that cover soft armrests;
- Streamlined shape, repeating the silhouette of the hand;
- Armrests of various designs: polished smooth, varnished, rough with imitation wood and others, with carvings or decorative details;
- Armrests that serve as a table top.
The most common types of wood for making armrests are: oak, walnut, ash, wenge, cherry, mahogany.
Disadvantages of wooden armrests:
- Often sharp or rough corners, dangerous for small children.
- Scratches may remain on the surface from pets, who often try to use the wood to sharpen their claws.
- Gives a bulky appearance to the structure.
The need and type of armrests in the selected sofa depends on the needs of the user and his personal habits. Even after describing all the advantages of alternative options, it is impossible to convince a person to give up his favorite type of furniture. The main principle of creating comfort in your own home is choosing furniture according to your own feelings and desires. No tribute to fashion will bring the necessary warmth and comfort to your home. We hope our article was useful and opened up new possibilities for long-known products.
Source: ladya.ru
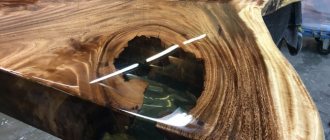
Restoring wooden armrests of a sofa: Is there a way to restore it yourself?
Tell me from knowledgeable people. The dog chewed the wooden armrest of the sofa. Is there a way to restore it with your own hands and, if so, what is it? Thank you in advance!
- ❤ 350
You can do it yourself, but you will need to be careful. Fill small dents with dark nitro wood putty. Dries quickly and holds tightly. Be careful, only dents. Protect undamaged wood with masking tape. After the putty has dried, level the surface with sandpaper, remove the tape, and tint with tempera, gouache or ink. Watercolor is not suitable in this case. Cover the top with non-areola varnish (it comes in two types: glossy and matte). Fill medium deep loss with automotive metal putty (without reinforcing fibers). It is stronger than wood putty and will hold the edge of the corner longer. Align with the shape of the ribs. After drying, use sandpaper to finally straighten the shape, tint with water-soluble black paint and cover with areola-free varnish. Important. Not with black paint and that’s it, but first with water-soluble black and then with colorless varnish. Otherwise, you will end up with “nasty” black spots that differ in color density and reflection. If you had ordered the restoration of the armrest in our workshop, we would have made up for the deep loss with wood of a suitable species, tinted it with water stain and treated it with colloxylin, alcohol varnish, polish or some other varnish that would be suitable in density and degree of gloss to the rest of the surface of the armrest. Here you will need a well-sharpened tool, the presence of wood, stains, an assortment of varnishes, and so on. The sofa is modern, so I can offer another way to eliminate the loss. Disassemble the armrest, make a piece from solid birch (in the photo the wood is white, it looks like birch), paint it with black water-soluble paint, and finish it with spray varnish. The main element of success is experience and skill. Try it first with automotive putty, and if that doesn’t work, then come to us. After home experiments, the part will most likely have to be replaced completely.