18473
Everyone furnishes their home based on their own taste preferences and idea of comfort. Even if you do not touch on the early stage of finishing work, but immediately move on to the selection of furniture, many will have difficulties with its implementation. Furniture items can be purchased or made yourself. The first option is faster, and the second is cheap, interesting and exciting. We invite you to learn how to create a kitchen with your own hands from furniture panels, a master class from experienced craftsmen.
The advantages of furniture made with your own hands
Designs made at home with your own hands from furniture boards have a number of advantages over factory-made samples. There is no need for expensive equipment; an ordinary tool that any owner can find will suffice. You just need to show a little ingenuity, patience and a creative approach to the issue - and now you are the happy owner of a modern and spacious wardrobe or a beautiful dining table for the kitchen. So, let's look at the positive aspects of furniture made from this material.
- Aesthetically attractive appearance. Furniture made of wood compares favorably with other materials and will decorate any room.
- Safety. As mentioned earlier, it is made from various types of wood, an environmentally friendly material without harmful impurities and harmful components.
- High maintainability. Is the door broken, the shelf lopsided, the countertop damaged? No problem. There is no need to go to a workshop to repair your favorite cabinet. This can be done with your own hands with minimal financial investment in repairs. Working with furniture board is much easier than with the same chipboard, due to the fact that wood forgives some chips and inaccuracies.
- Low cost. In all respects, furniture panels are not inferior to furniture made from cut wood. At the same time, cabinets, kitchen tables and shelves look no worse and are durable and easy to use.
Furniture board is a material based on natural wood.
You just need to arm yourself with patience, inspiration, and the necessary number of necessary tools.
What is the material
To make a kitchen from furniture panels, you will need a few carpentry tools and some practical skills. For those who work a lot in the country and constantly make or at least repair wooden benches, stairs and other things, it will be easier to understand such a complex production process as preparing the material and assembling the set. People with good theoretical knowledge will also cope well with the task. The main thing is to understand the features of the boards, study the characteristics, and know the safety rules when working with woodworking equipment.
Furniture board is a sheet of wooden boards glued together or compressed waste wood. The properties of the material depend on what raw materials were chosen for production: pine, aspen, beech, birch, spruce, larch, oak, cedar. Furniture panels are gaining popularity due to their environmental friendliness, strength, and lightness. The lamellas are easy to process and do not require special care during operation.
Wood is a natural material. Products made from it have always been in demand; they fit perfectly into any interior design. Pine is a strong, reliable material, has been used for a long time, and can withstand significant loads. Aspen and beech are considered wear-resistant, look more aesthetically pleasing than cheaper chipboard and MDF, and last longer.
Birch is hypoallergenic and is used to make many elements. Spruce is light in weight. Products made from larch and oak are able to maintain the necessary humidity in the room. Cedar panels are characterized by a simple processing process; they are produced by joining planed bars.
Thanks to modern technological production, the surface of any type of wood used to create a kitchen is smooth and even. The shield manufacturing technology itself is quite simple. First, the felled tree trunk is cut into strips, dried, and then lamellas are made from them. These bars are then assembled into panels in a special installation. Glue is used for fastening; after a few days, all surfaces of the panels are processed with a milling cutter. At the same time, the natural appearance and structure of the wood is preserved. The surface of the furniture board does not crack or undergo deformation over time.
Functionality of upholstered furniture for the kitchen, its main types
Pine
Beech
Birch
Oak
Like any wood, furniture panels have their pros and cons. The main advantages of the material include the following:
- its characteristics are not inferior to solid wood;
- The quality is superior to cheap analogues;
- has different prices, making it accessible to most craftsmen;
- has high strength;
- has the ability to absorb harmful substances;
- characterized by high environmental safety;
- has versatility;
- maintains humidity;
- does not deform;
- not afraid of fungus and mold.
Additional advantages of wooden furniture panels are practicality, thermal insulation and sound insulation, variety, durability, the ability to apply carvings and other decor, and beautiful appearance.
The main disadvantage of a kitchen made from furniture boards is that if the production technology is violated, the board can become deformed and crack over time. Therefore, you should purchase products only from trusted suppliers. No less important is the cost of the material. Compared to budget analogues, wood is more expensive, but is considered more reliable.
Choice of design and possible nuances
First you need to decide on the design of the cabinet or table. It is necessary to take into account the free space of the apartment that can be used. The next step is to create sketches and drawings. If it is not possible to develop a project yourself, then on the Internet there are a large number of drawings for a variety of design options. Based on the finished plan, detailing and calculation of the amount of required material are carried out. In addition, the design plan will help you decide what size it is better to purchase furniture panels and how to cut them to minimize the amount of waste generated.
Used for making components, drawers, shelves, etc.
Based on the desired size and design, it is possible to produce almost any type of structure for the home.
Don’t forget about the varnish, which is selected individually. Due to the fact that furniture panels are still wood, and wood needs special care. In order to prevent deformation, swelling of the surface, and soaking (this is especially true for kitchen furniture), it is necessary to purchase varnish and cover the surface with it at least 2 times. In addition, the varnish will protect the surfaces from the negative effects of ultraviolet rays and give it a presentable appearance. Today, the construction market offers a variety of varnishes, not only in a variety of colors, but also in textures. The same can be said about stains, which are successfully used in the processing of wooden products.
Designs made at home with your own hands from furniture boards have a number of advantages over factory-made samples.
A cabinet, desk or kitchen table, which you can easily make with your own hands, will meet all your requirements and fit harmoniously into the overall home environment.
To manufacture almost any structure at home, you do not need a large number of expensive tools. In the arsenal of every owner there is likely to be a screwdriver, a grinder, a hacksaw and an electric drill. With this set of tools you can easily assemble almost any furniture for your home.
You just need to show a little ingenuity, patience and a creative approach to the issue - and now you are the happy owner of a modern and spacious wardrobe or a beautiful dining table for the kitchen.
Classification
Thanks to changes in various properties of the base material, wooden panels are now used in many industries. Depending on the gluing method and the type of wood used, the resulting furniture board made of maple or other material can be used for external or internal finishing work. The veneered panel used has a very insignificant thickness of 4-8 cm due to the strong internal stress of the material, which can be significantly deformed during drying. It is glued exclusively along the width.
In this way, manufacturers managed to obtain a truly high-quality material that will not begin to warp over time and that does not contain internal stress. Furniture panels of pine needles or other natural materials are classified according to different areas of application.
To avoid drying out of the base layer, different technologies are used at each stage of production, while the material is impregnated with several impregnations, which increase its main indicators of strength and endurance several times.
Having understood what a furniture panel is, you can start combining it with other materials. Often, in the production of massive laminated boards, plastic, marble or granite are additionally used. The wenge shade is especially popular.
Procedure for making a cabinet
You can assemble the cabinet yourself using the example of the simplest model. This refers to a classic double-leaf cabinet made of furniture board for the kitchen with a missing vertical partition. Despite their sometimes small size, such furniture can be very roomy and ergonomic. After the preparatory work for the manufacture of the future cabinet, you will need to cut out all the necessary parts and pieces. This procedure is performed using a jigsaw and power saw. To assemble a double-door wardrobe you will need:
- doors – 2 pcs.;
- 2 side walls;
- bottom;
- 1 back wall;
- required number of shelves (shelf size may vary).
As mentioned earlier, it is made from various types of wood, an environmentally friendly material without harmful impurities and harmful components.
When all the main parts and frame are ready, you can begin assembly. First, you need to take into account the drawers and shelves that will fit into the closet. To do this, it is recommended to leave 775 mm width when cutting the sheet. Next, you need to fasten the 2 side parts of the wall and the bottom with self-tapping screws. It is best to fasten the structure at a distance of 50 mm from the floor. After these manipulations, you need to start cutting out and installing shelves and drawers. The best option for this would be a narrow furniture board, the holes in which should be made in increments of 100 mm. This is done to avoid deformation of the material during the assembly process. When the drawers and shelves are ready, they need to be screwed into the cabinet itself with self-tapping screws. Next, you need to install the cover on the frame, fix the back of the wall and secure the base to the corners. As for doors, it is recommended to use a surface with a size of at least 400 mm. Holes for the hinges are made in the doors, and the doors themselves are fixed with self-tapping screws to the side walls.
High maintainability.
Assembling a desk from furniture board
There is nothing difficult in making a multifunctional, compact and comfortable desk from a piece of furniture with your own hands. As with the cabinet, a sketch and drawing of the desired type will be required before the construction can begin. For production you will need:
- square;
- plywood (thickness should not exceed 20x20 mm);
- pieces of timber and plywood.
In all respects, furniture panels are not inferior to furniture made from cut wood.
You can assemble the cabinet yourself using the example of the simplest model.
To assemble the optimal table option, you need to take into account all the nuances and calculate the required number of niches, shelves and drawers. The size is selected according to individual preferences and room capacity. It is better to start making a table by making a table top. To do this, you will need to use a large shield and cut a blank from it. Pay special attention to the corners of the tabletop, which must be processed and reinforced with bars before assembly. After processing the corners of the tabletop, it would be a good idea to round off the most protruding parts. This will not only give the table an aesthetically attractive appearance, but will also make it less dangerous for all family members. After the tabletop, you need to start making drawers, shelves and doors. Two squares measuring 70x70 are cut out of plywood and cut so that they make 4 triangles. These elements are placed on the back of the frame wall. Based on the finished drawing, you should place shelves and drawers in specially designated areas of the table. The boxes must be screwed with self-tapping screws into the almost finished part of the structure, and then begin installing the doors. It is necessary to apply varnish to the structure, preferably in 2 layers. The final stage in the assembly will be the installation of pre-purchased fittings, and the desk is ready for use.
First you need to decide on the design of the cabinet or table.
When all the main parts and frame are ready, you can begin assembly.
Build your Home!
We will need shaped strips and paints.
Actions:
- We measure the required length and cut the strips, then glue them.
- After complete drying, paint the installed boards.
Method No. 3 Using mirror paper.
This method is very interesting and quite simple.
To decorate the cabinet, in addition to paper, we will need wallpaper and unusual handles.
Actions:
- Pre-treatment and painting.
- Pasting with wallpaper and mirror paper.
- Installation of handles.
Method No. 4 Accents.
This method involves the use of bright objects, such as curtains or dishes.
Actions:
- Prepare the surfaces of the kitchen furniture and paint them a neutral color.
- Install bright decorative elements that will attract the attention of guests.
Method No. 5 Contrast.
How to combine the incompatible. White top, black bottom and the presence of a third color in both compositions create a unique, unified ensemble.
Actions:
- After sanding the surfaces of the wall cabinet, it is painted white.
- The stained glass windows of the facade are glazed with turquoise glass.
- Work tables, bedside tables and sinks are painted black.
- Install a turquoise colored countertop.
But the fantasy doesn’t end there; you can decorate it with various stickers if you wish.
It is important to remember that when creating a custom kitchen cabinet, consider the distance between your cabinetry and the stove (and other appliances that emit hot air)!
Waterproof paint will be effective.
Do-it-yourself kitchen renovation
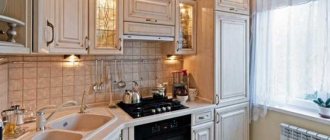
For many, the kitchen is considered one of the most beloved places in the home, maintaining overall family cohesion.
Any housewife dreams of her kitchen being cozy and practical.
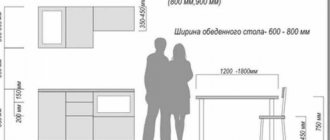
Kitchen furniture should not be piled up; the dining area, given the small size of the kitchen, cannot be too large.
When renovating a kitchen with your own hands, it is worth remembering that furniture kitchen sets do not fit into every kitchen.
It is very important to choose the right kitchen size, shape and color scheme.
Where to start renovating a kitchen
1. Kitchen layout and idea.
All good things start with a great plan. In our case, everything good is a renovation idea, an excellent plan is a convenient and practical layout. We take a tape measure, a sheet of paper (we recommend a roll of old wallpaper on the reverse side), a pencil, and begin to measure and write down. First of all, the dimensions of the room, then the dimensions of the interior items. Next, transfer it all onto paper (now you will need a roll of wallpaper).
We draw in three projections, a three-dimensional coordinate system or in 3D visualization, life-size or to scale, it doesn’t matter, the main thing is that the project is three-dimensional and you really imagine the future kitchen with a furniture set, a refrigerator and a microwave placed in it. In this sketch we embody everything that we wanted to get from the future kitchen to a greater extent: practicality, comfort or functionality. All the main interior elements that we see in our dream kitchen should be outlined here. The process is not momentary, but requires a serious approach and a certain amount of time. You can use the services of branded designers, but more pleasure will be brought by a kitchen modeled by your imagination, with a piece of your soul invested. This stage must be completed regardless of whether you are the owner of a small room in a Khrushchev-era building or a huge kitchen in a country cottage.
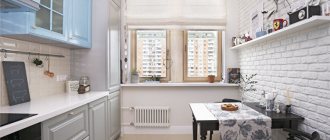
2. Kitchen design
It is very important to take time to think about your kitchen design. It can be classic or modern style, hi-tech or retro, or maybe country. The flight of your imagination may be limited only by the size of the room, but no one will stop us in the choice of materials, decor or colors. Experts recommend using green and orange colors for the kitchen. It is not recommended to use too dark colors, as they can visually reduce the area of the room and negatively affect the overall appearance of the kitchen. Although no one will forbid using, for example, red or the contrast of white and black. Everything will be original and unique in our kitchen.
Materials: what and how much
It is a detailed project that will allow you to accurately determine the types of materials and their quantity. We take in our hands a piece of paper (you can use a common notebook), a pen and a calculator. The second important document for the repair will be its estimate. Even if you take into account that you can do all the work yourself, you need to calculate as accurately as possible how much your repair will cost and where you can save money and where you will have to fork out more. At the same time, you need to anticipate all sorts of indirect costs, such as removal of construction waste or delivery of materials from the store. The ideal option is to have all the material at hand, but this will not always allow the area of the room being repaired. They can be delivered to construction in stages, depending on the work being performed, and this is an additional cost.
We will destroy everything to the ground, and then...
The project is ready, the budget has been determined, the materials have been purchased. We proceed directly to the repair work. First, we remove from the kitchen everything you need and everything that may be useful later. Then we throw away what is not valuable. Next, we break down unnecessary partitions and piers, peel off the ceiling and walls, remove tiles if necessary, dismantle the window and door, and dismantle the flooring.
Communications.
First of all, you should pay attention to the electrical wiring. It may need to be replaced if it no longer meets the load requirement. In addition, if during redevelopment we move household appliances to another place, then it is necessary to supply power there and install sockets.
We arrange functional and decorative lighting for the room.
The ventilation system also deserves special attention. As a rule, if the repair was done a long time ago, then all old ventilation ducts and fans must be replaced. It is advisable to install new equipment. The ideal option would be forced ventilation.
It is preferable to replace water and sewer pipes with new ones made from modern polymers. In addition to pipes, all shut-off and control valves must be replaced.
The heating of the premises is also undergoing reconstruction. As a rule, the pipes are replaced with plastic ones and modern heating radiators are installed. It is possible to install a “warm floor” system
The gas pipeline is connected using a flexible hose after the repair and installation of the gas stove is completed.
6. Ceiling and walls.
We start the repair from top to bottom, first the ceiling, window, doors, walls and go down to the floor. So, the ceiling can be equipped with a tension ceiling, a suspended ceiling, or simply leveled with putty mixtures and painted with water-based paint. Before applying the putty layer, the surfaces must be opened with deep penetration priming solutions. Before painting, you must wait until the putty has completely dried. The surface must be sanded with sandpaper. Installation of a suspended ceiling is carried out only after repair and leveling of the wall surfaces.
Afterwards we install windows and door blocks.
Isogypsum and santegypsum are most often used for puttying kitchen walls. Kitchen walls are most often covered with washable wallpaper. They are most practical in conditions where soot and grease settle. Also, as a rule, in the area of the sink and kitchen tables, a so-called working wall is laid out on the walls. Although often the entire surface of this wall up to the ceiling is tiled.
Floor.
We move on to arranging the floors. Typically, the floor surface is filled with a self-leveling mixture and then linoleum, ceramic tiles, parquet and even high-quality laminate are laid. If the floor is wooden, then partial repairs of individual elements are made and leveled. When installing “warm floor” systems, a cement-sand screed is made, the system itself is laid, then the screed is made again and, after complete drying, the flooring is laid to your liking.
The perimeter of the room is equipped with a plastic or metal baseboard. Since these materials are the most practical in the kitchen.
Kitchen interior design.
We install a kitchen set, made with our own hands from furniture panels, in the room, according to the developed project. We install and connect household appliances. We arrange and hang decorative elements.
Determination and hard work in the kitchen renovation process will give you the desired result!
Below are some modern kitchen design ideas.
You can also watch a video of a wall kitchen cabinet. Build process
Another video of furniture panel production
Computer desk made of shield
In this case, the principle of making the table is slightly different from the previous one. It is necessary to use 3 sheets, the size of which will be 2000x200x18 mm. This is the most optimal size due to its strength, and therefore durability. When making a table you will need:
- edged board (size can be selected as desired);
- plywood parts.
Based on the finished plan, detailing and calculation of the amount of required material are carried out.
The best option for this would be a narrow furniture board, the holes in which should be made in increments of 100 mm.
As in the case of a desk, before assembly begins, work must begin with the preparation of the tabletop, which is cut out of the panel in accordance with the previously taken measurements and the prepared drawing. It is recommended to make two small recesses on the side surfaces in order to place the table strictly against the wall, avoiding unnecessary gaps along the edges of the tabletop. On a vertical wall, the best option would be to install a transverse panel. Installation is carried out using self-tapping screws on the frame. The cross panel and the presence of plywood will help give the table rigidity and strength. After this, a frame is made for shelves and drawers, parts of which are attached to the finished structure. It is preferable to make as many drawers as possible on this type of furniture for greater capacity. To build the upper shelves with the required number of drawers, the shield must be cut, attaching it to the tabletop with self-tapping screws. For drawers and shelves, it is better to use roller mechanisms. As for the part under the keyboard, it is made of a shield whose size is 40 mm. Next, it makes sense to start installing the doors. After preparing all the components, varnishing should be done, after which final assembly is carried out.
Today, the construction market offers a variety of varnishes, not only in a variety of colors, but also in textures.
Holes for the hinges are made in the doors, and the doors themselves are fixed with self-tapping screws to the side walls.