37357
An original way to update the interior would be to make your own antique furniture; drawings and diagrams will help with this. Handmade is a very popular trend in recent years; unique technologies for creating vintage items have not bypassed the furniture sector. The future design needs to be carefully considered - whether it will be collapsible, which elements need to be decorated, since this determines what tools will need to be used.
Preparatory work before starting the aging process
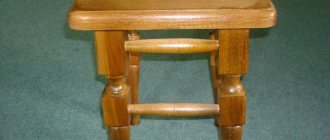
The appearance of furniture that still has a margin of safety, but cannot be used for its intended purpose due to the loss of its former luster, can be improved. If you have to work with chairs whose surface is coated with polish, you need to get rid of it by using a special compound purchased for this purpose at a hardware store. The surface can be covered with paint, which also needs to be removed using sandpaper; it needs to be worked until the base becomes smooth. The furniture may not be painted, then it is necessary to remove dirt from the surface using fine-grained sandpaper.
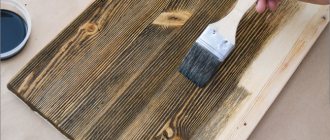
Before aging a chair, it is necessary to thoroughly clean its surface with sandpaper or a sanding machine.
It is important that the base is free of grease deposits. During the work process, it is recommended to use a respirator that will protect the respiratory tract, and the room in which the master works should be well ventilated. You should not begin further work after removing the top layer from the furniture until the room has been vacuumed and the surface of the product has been wiped with a damp cloth.
Due to the fact that you will be working with objects that have served for decades, their surface must be degreased by treating with a soap solution, after which the chairs must be left to dry. Puttying is not required, since a perfectly smooth surface is not needed, because the purpose of the work is aging, which involves slight wear; for this reason, defects in the base of the wood should be emphasized and not masked with the mixture.
The process of making a chair with a backrest
After sawing the elements, sequential assembly of the chair parts is carried out. First, the front part of the furniture is assembled from the transverse drawer, legs, and lower lintel. It is important to maintain the right angle of the structure; measuring instruments are used for this. It is better to fasten the product with screws.
Then the back is created. It is necessary to insert longitudinal jumpers and drawers into the grooves on the front surface of the backrest. The chair apron is assembled and connected to the front part. A seat is mounted to the finished frame.
To ensure high-quality assembly of wooden chairs with your own hands, it is recommended to make preliminary fastenings to the model in order to determine the joining distances of the elements and check that there are no distortions. If necessary, the parts are adjusted, then sequentially assembled, glued and connected. The frame parts are connected without metal fasteners, only the seat is fastened with self-tapping screws, which are screwed in from the drawer side.
It is possible to make a chair from wood without preliminary assembly if you use a filler router, which ensures precision in fitting the elements.
Seat
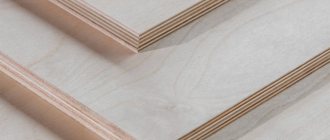
The seat is made of plywood panel or board 15-20 mm thick. The standard dimensions of the element are 430*440 mm, but it is possible to manufacture the part according to the author's design. On the short side, you need to mark the places for the openings and use a cutter to make recesses for further fastening the backrest. The right corners of the seat and the edges of the panel must be processed with a router for comfortable operation of the product.
Legs
Chair legs can be straight or curved, connected in the shape of a rectangle or square.
To make the rear legs, boards 25 mm thick are required. Markings are applied to the slabs according to the diagram, measured using a ruler, and grooves are marked for installing the crossbars of the rear drawer and backrest. Before cutting, it is necessary to drill out the grooves with a router or drill. The hole dimensions should reach a diameter of about 9 mm.
Then the legs are cut out and the surfaces are processed. On the finished legs, additional grooves are marked and drilled for installing side drawers. The elements are connected, during the process it is necessary to pay attention to the difference in the length of the elements.
Back
The back of the chair can be solid, hard, prefabricated, or soft. In the classic model, the back includes a wide horizontal strip, narrow jumpers (upper and lower) and vertical strips. The height of the backrest is calculated from the seat, not from the armrests. The first overlap on the back for support is placed 15 cm from the seat. The parts are assembled using fasteners (screws, dowels) and completed with the adhesive method.
Recommendations for aging
In order to decorate furniture as antique, you can use special chalk paints intended for private creative projects.
These compositions are produced under the brands Authentico, Annie Sloan, etc. If you decide to use these mixtures, you can choose from a wide range of colors, one or more of which will definitely suit a particular interior. In this case, there is no need to pre-treat the chairs.
Table of types of chalk paints.
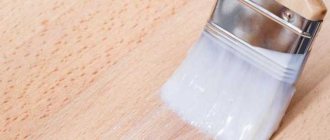
Chalk paint can be replaced with traditional matte paint intended for walls and ceilings. The latter composition is used in residential areas and is water-based. These paints will be easier to purchase as they are sold at any hardware store. If antique furniture will be decorated using this particular composition, then the surface will have to be primed in advance using a water-soluble composition called a primer. A universal primer will prevent the natural oils of wood from seeping onto the surface of the main paint; if the chair is treated in this way, the finishing composition will adhere better to the base.
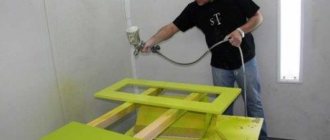
To decorate antique furniture, experts recommend using a paint roller rather than using a brush. Before starting work, it is necessary to protect the space around you with plastic film, and if possible, it is recommended that painting be done outside.
Required Tools
The second life of old furniture can change the overall perception of a boring interior. And you no longer need to think about what to do with old furniture. Many home craftsmen prefer to modify antique furniture with their own hands, and drawings and diagrams will help to measure all the necessary parameters and avoid mistakes in such an interesting task.
To begin the process, you need to familiarize yourself with the tools that will be used in the work, and also think about how to make the process as easy as possible. As a rule, tools are selected in order to solve a specific problem - how to age furniture. If you plan to create an entire interior yourself or decorate old furniture, then you should go to the store after preparing a list. The necessary equipment used to repair old furniture is presented in the table.
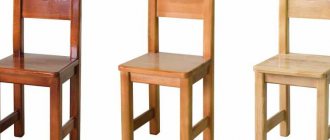
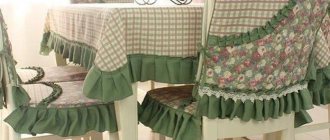
Antique staining of chairs
Self-made furniture can also undergo an aging process. In any case, you should start painting the chairs from the back, which is not so noticeable. This will allow you to understand how best to work, how much paint to use for one roller roll. During this you will be able to adjust the shade of the composition in time. Then you can gradually move towards the front side, applying the mixture in broad strokes, without leaving any smudges.
Tools for painting antique chairs.
Before you begin applying the next layer of paint, if necessary, you need to analyze the surface for the absence of smudges, which, if present, can be removed with sandpaper, only then you need to go over this area with a roller again.
Between applying layers, the tool should be kept in water to prevent it from drying out. The next layer should be applied after the previous one has dried. The period that will pass from the moment of application to the drying time depends on the room conditions, this concerns humidity and temperature. The time it takes to dry can be limited to 1-5 hours.
Technology of work execution
There are several techniques that can transform old furniture and radically change the facade of the furniture wall and its appearance.
Crackle
The whole process is based on the use of a special varnish called “craquelure”. This is a certain substance through which artistic microcracks begin to appear on the surface. The varnish is best used for processing wooden or glass objects. To ensure that antique furniture is painted correctly, it is important to follow the following instructions:
- On the previously prepared surface we apply the first layer of paint - the base. When microcracks appear, they will take on the shade of the base;
- Once the base has dried, you can apply the craquelure. In this case, all strokes should be performed strictly in one direction;
- After drying, apply the color as the finishing coat. As a result of its use, long-awaited cracks appear;
- We cover the resulting effect with furniture fixing varnish.
This method is perfect for those craftsmen who want to bring back the country or Provence style on their own. Making aged furniture using this technique will take very little time.
Apply paint
Apply craquelure varnish
Let the coating dry
Patina
Over the years, veins of a greenish-bronze color appear on the furniture, which indicates the “old age” of the item. This is patina. It is the result of high humidity or exposure to large amounts of precipitation. To achieve an illusory effect, you must take the following steps:
- Varnish the wood. It is recommended to use a special mixture that will protect the furniture from harmful external influences and extend its service life;
- We wait until the mixture hardens completely and apply a patina to the surface;
- After a half-hour rest, you can start working with a wire brush. It is important to note that the greater the effort, the brighter the effect becomes;
- Using a rag, we remove by-products of work in the form of dust;
- As in the first method, we finish the job with furniture varnish.
The main advantage of this technique is that there is no need for additional care. In addition, patina is quite easy to use with your own hands at home.
We wipe away the old paint
We prime the coating
Painting the surface
Applying patina
Wipe the coating with a rag
Varnish
Coloring
The main work is carried out using several colors. To achieve an antique effect, follow these instructions:
- To create the effect of clumsiness and shabbyness, it is necessary to inflict minor mechanical damage. This results in artificial aging of furniture, for example, the effect of old Soviet furniture, because it cannot be in perfect condition;
- We apply paint in such a way as to preserve the texture of the material;
- We go over the surface with sandpaper to form spectacular abrasions;
- Take paint of a different color, apply it with neat strokes and shade it.
Making cracks
Painting the surface
Process with sandpaper
Apply another layer of paint
Effect of artificial pollution
Things tend to get dirty and covered with dust over time. To produce a similar effect, do the following:
- Selectively apply wax to some areas of the surface. Movements should be in the same direction, but with breaks. Next, coat the item with varnish;
- If recesses were found on the item, the varnish will give them a darker shade, visually enhancing the effect of antiquity.
Any furniture, regardless of material or decorative design, requires proper care for a longer service life. It is worth paying attention to the following methods:
- We rub old chipboard furniture with our own hands with mastic or wax. They contribute to the formation of protection against high humidity and repel water. The compositions should be rubbed using a rag or a soft sponge;
- In addition, acrylic or a special varnish containing it is perfect. It must be applied periodically to “renew” the protection. You can cover the surface of the object with a mixture of acrylic and wax;
- When dust accumulates, the furniture loses its presentable appearance, so we periodically wipe it with an ordinary lint-free cloth.
Apply wax
Varnish
Antique effects
The number of layers of paint to be applied depends on the style that was decided to be used in the work. If you decide to prefer the standard look, which involves the classic rough effect, then one layer will be enough. Then it will be possible to ensure that the wood texture is visible through the paint. In order to obtain the aging effect with a smooth surface of the wooden elements of the chair, the first layer of paint must be treated with fine-grained sandpaper. Next, you need to rid the surface of dust using a brush, only after that you can begin applying the second layer of paint.
To give the chair a worn effect, you need to use sandpaper.
In order for the chair to acquire the effect of wear and tear, after applying the paint you need to use fine sandpaper. The paint should be somewhat worn in those places where it usually wears naturally during use: on the corners and edges of the object. Surface treatment in certain places must be carried out until the desired degree of aging is achieved, the intensity may not be too high, then it is worth reaching the primer layer and stopping, and for intensive aging you should get to the wood. At the next stage, you need to lightly sand the entire surface.
Paint bleed effect
After two coats of paint have been applied, lightly apply paint of a different color. This should be done using a dry brush, touching it only in certain places. For a greater contrast effect, it is recommended to use colors that differ in shades. For example, if the main color of the chairs is blue, then olive-colored paint may also show through on the surface. This technique is called “dry brush”, and such work can be done as follows. A dry brush should be dipped a little into the paint, and then wiped with a dry rag. The tool is now ready to apply an almost transparent layer of paint to the pre-painted base. This technique can also be used in cases where it is necessary to obtain the effect of old paint that has become ingrained into the wood.
The effect of a dirty base and multiple layers
Furniture that is used quite often also wears out in places where it is usually handled by hand. This effect can be achieved by using dark wax or mastic. Application should be uneven.
https://moyagostinaya.ru/www.youtube.com/watch?v=ZkHaOFjT7Ao
You can try another effect that involves layering paint. Application should be made with careless strokes, moving the brush in different directions. No sanding is required between coats. The final layer of paint should be coated with clear wax, which is necessary for protection, but after that you need to use dark wax, which will give an aged effect.
Each technology described above can be used separately or combined. All this depends on the desire and imagination of the master.
In order to carry out aging work, it is necessary to prepare tools and materials:
- sandpaper;
- respirator;
- primer;
- paint roller;
- brush;
- selected paint for a specific effect.
Stool Tools
In addition to the materials to create such furniture, you will also need the following tools:
- Pencil, ruler and tape measure
- Jigsaw
- Hammer
- Nails
- Hacksaw
- Sandpaper
- Screwdriver or drill
- Wood glue
Advice. Small tools and parts, such as nails or screws, should be laid out separately on a white cloth - this will make them easier to find and take while making the stool.
Applying protection to a painted surface
In order to protect the chair from rotting, it is necessary to cover its surface with a layer of wax.
All applied layers must be protected, for which you can use wax, which is represented by mastic made on the basis of wood wax. If water-based paint was used in the work, then this composition will perfectly protect it from exposure to water.
Wax can be purchased in clear or dark versions. The composition should be applied using rags that are not capable of leaving fibers; a traditional foam sponge will also work. The composition should be applied evenly to the base that has been painted, then rubbing must be carried out. In order for the composition to be completely absorbed and dry, it will take 15 minutes.
A protective layer can help adjust the resulting paint color. This can be done in two steps. To do this, the first layer should be transparent wax, which should be applied over the wooden base. After this, dark wax should be applied, which will give the furniture a certain effect, but for this the composition should be applied only in the right places.
If you want to make the previously applied paint with your own hands darker, then the dark wax should be distributed over the entire surface, replacing the transparent composition. It is also recommended to start experiments from the back of the chair. This will help you understand whether the resulting effect is suitable.
https://moyagostinaya.ru/www.youtube.com/watch?v=XbcCsiPXwqw
If the chairs you have decorated in an antique style are used quite often, they can additionally be protected with a matte acrylic compound designed for wood. Such coverage must be renewed periodically – once every 6 months. To care for such pieces of furniture, you need to use damp rags and special wood care products.
Chairs can also be decorated with unusual vintage elements, which today are easy to purchase in relevant goods stores or at stock exchanges. Such a minor addition will be a worthy completion of the master’s creative project.
https://moyagostinaya.ru/www.youtube.com/watch?v=FRJbpyzJuLA
Armchairs, if they have wooden components, for example, armrests or decorative legs, can be decorated using one of the described technologies. The main thing is that this piece of furniture is in harmony with the rest of the interior of the house or apartment.