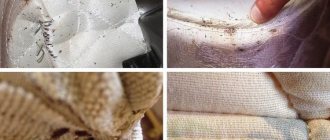
Furniture tends to quickly become unusable. Today, reupholstering kitchen corners at home is a fairly common undertaking. There are quite understandable reasons for this. Various liquids are periodically spilled on kitchen furniture, greasy food gets in, sharp knives and forks fall, and the fabric wears out over time. As a rule, one wash will not be enough to return the furniture to a presentable appearance. The kitchen corner needs to be completely reupholstered.
You don’t have to throw away the old kitchen corner; you can reupholster it.
Upholstering a kitchen corner is a creative process. requiring a thoughtful approach.
This process can be done at home and on your own. The main thing is to make the correct calculations. Upholstering a kitchen corner with your own hands will not only save you a serious amount of money, but will also give you room for creativity.
Selection of material for reupholstery
First of all, it is worth deciding on the choice of material for the upholstery, based on what qualities the desired material should have.
Today there are a lot of materials on the market that can be used to repair furniture. They have different quality characteristics and service life.
The most popular are:
The most presentable and expensive upholstery option is genuine leather.
- Velours. It is a dense fabric with short pile.
- Genuine Leather. The most expensive and durable finishing material, pleasant to the eye and to the touch. They can only be used to decorate wooden furniture, since chipboard often breaks.
- Faux leather. In terms of external characteristics, it is similar to its natural counterpart and is almost as durable as it, and costs significantly less. Does not absorb moisture and is easy to clean.
- Tapestry. A type of fabric specially created for furniture finishing. Durable, comes in a wide range of colors.
- Jacquard. The fabric is pleasant to the touch, but is difficult to clean and wears out quickly.
- Flock. Strong and durable material, impregnated with a special waterproof solution. Easy to clean.
- Jeans. The fabric is natural and strong. You can use all your household's old jeans for finishing - originality is guaranteed.
Tarpaulin. This material combines incredible strength and durability with low cost. such an acquisition will not hit the pockets of even people with the most modest income.
Do-it-yourself car interior reupholstery
What to do to reupholster the interior with leather yourself? To do this you need:
- buy material for reupholstering the car interior;
- remove elements from the car (dashboard, trim, seats, etc.);
- sheathe parts with material;
- install the removed parts.
In general, the work does not require great qualifications, but accuracy and attentiveness will be required. It is very important to choose the right material - there are a lot of them on the market now, so making a choice is not easy. In addition to genuine leather, various types of fabrics are used to decorate the interior of a car:
- velours;
- vinyl;
- flock;
- carpet;
- eco leather;
- Alcantara;
- other fabrics for upholstery.
Lately, no one has been upholstering interiors with dermantine; there are better quality artificial substitutes for natural leather. To complete the work you will still need glue; these products are also presented in a wide range on the market.
The question is often asked, how much material can be used for seats, dashboard, door panels? In order not to make a mistake, you should carefully measure all the parts that are sheathed and buy fabric with a small margin (20 percent more). Threads will also be needed; they must be specially designed for leather. You cannot use regular, synthetic or nylon threads - over time they can tear or stretch.
When doing the work yourself, you will definitely need a sewing machine, and it must be designed to work with dense materials. The machine can be industrial or home use; here it is important to choose a needle and foot for sewing with thick threads.
Calculation of the area of upholstery material
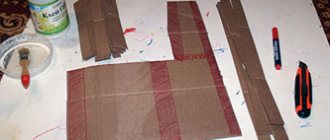
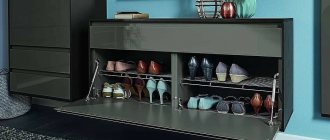
The kitchen corner consists of benches with backs, a corner lintel between them and chairs. In order for it to look harmonious, it is recommended to use the same type of fabric in the decoration. Before purchasing the material you like, you need to take measurements and make patterns.
You can make patterns in two ways:
To select the correct fabric size, you need to take measurements.
- Measure each element of the soft part of the corner and add 5-10 cm to it along the perimeter, necessary for bending and fastening. Transfer the result obtained to thick paper.
- Dismantle furniture and remove old upholstery. It will be a finished pattern. All that remains is to apply it to new fabric and apply the contours.
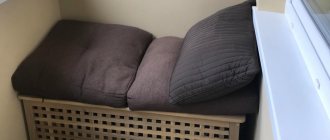
To calculate the required footage, ready-made patterns can be applied to an imitation of a roll of the selected fabric. (you can use newspapers or old unwanted sheets for this). or use a computer program. As a result, we will receive a cutting sheet with patterns drawn on it indicating their size and purpose. Having determined the required amount of fabric, we purchase it in the store with a reserve of one meter. The reserve will serve as the necessary insurance in case of mistakes and miscalculations. If the upholstery process goes well, then the reserve material can be used to make pleasant additions to the corner (for example, pillows) or save it in case you need to patch the upholstery.
As a rule, foam rubber is used as a filler for seats. The material is relatively inexpensive and comfortable, but short-lived and absorbs unpleasant odors. Therefore, when reupholstering a kitchen corner, it is not a bad idea to change the filling. The size of its fragments should be 1 cm larger than the perimeter of the backs and seats. This is necessary to give the furniture its shape after upholstery. The amount of foam rubber is calculated in the same way as the amount of fabric. As a rule, it is sold in the form of sheets of 1 × 2 m. The thickness of the filler is selected depending on the type of furniture.
Disassembly and maintenance of the kitchen corner
It is necessary to carefully prepare for the work so that everything you need is at hand and nothing distracts from the process. Reupholstering a kitchen corner with your own hands will not take up much of your time and will not disrupt the usual rhythm of life of your household.
Furniture must be filled with foam rubber.
For work we will need:
- sharp scissors;
- mites;
- chalk;
- pencil;
- stapler;
- device for removing staples;
- knife;
- set of wrenches;
- glue;
- staples 6 mm, 10 mm and 14 mm;
- plywood;
- foam;
- upholstery fabric.
Before carrying out work, it is necessary to clear the workspace, that is, the kitchen, from everything unnecessary - remove the dining table and various small things that can be carelessly touched and dropped/broken/smashed.
To avoid losing components (screws and nuts), we recommend preparing a plastic container for them before disassembling the corner.
- Dismantling is carried out in the following sequence:
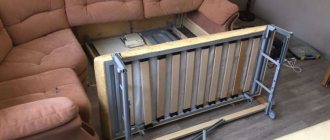
- We unscrew the bolts and nuts that connect the individual parts of the furniture.
- We remove the folding sofa seats and supports from the chairs.
- We remove the backs of the benches and the corner part.
- Separate the staples that hold the masking fabric. This is done with an anti-stapler or a screwdriver with pliers.
- We take out the staples securing the old upholstery.
- We remove the old foam rubber from the base and clean the surface.
https://vsyakuhnya.ru/www.youtube.com/watch?v=cM1xXpGdQyg
After this, you need to inspect the wooden base of the corner. It is possible that minor repairs will be required. Typically, the bottoms and backs of drawers can be replaced. Deformed fragments of fiberboard are replaced with more durable plywood, which should be well sanded and varnished. If necessary, we sand individual parts of the frame and treat it against mold and insects. It is possible that sizing and rigid fixation of cracked support elements will be required.
After the frame is processed, you can proceed to reupholstering the corner.
Volumetric leather wrap technique: simple hair clip
I would like to bring to your attention a lesson on the technique of volumetric leather wrapping. Using the example of making a simple hairpin model, we will go through all the stages of this technique, the basic techniques.
We don’t need any special tools to do the job, it’s simple:
1. Glue “Moment”. In fact, you can get by with one of these two presented, but I use both and here's why. “Moment” glue is used as follows: spread a thin layer on both surfaces to be glued, wait a few minutes, then press the surfaces firmly against each other. The instructions indicate the number of these minutes is 15-20. In fact, if the connection is not subjected to strong mechanical stress, this period can be greatly reduced. It is enough just to make sure that the smeared surface has dried with a non-staining film. This may be five minutes or less. So, the glue that is “extremely strong” takes longer to dry to a film than “Crystal”. This makes it possible to slowly coat large surfaces and long edges. “Crystal” dries faster, and when applying it, you need to hurry. Well, I would use the “extra-strong” one, and that’s all. But no! When gluing parts whose adhesive seam remains visible (for example, rear walls), the dried glue remains visible in some places. “Extra strong” hardens into a yellow mass and sticks out unsightly from the seam. “Crystal” is just a crystal because it is transparent and cannot be seen! So, if you have to choose one, I recommend the Crystal Moment.
2. Scissors. Good scissors are important. They should cut leather, foam rubber, and cardboard equally well, and be maneuverable and comfortable. Just like in the picture.
3. Cutter. Without compromise, sharp is better than wide. Perhaps the most specific thing on the list. Thin office knives with retractable, snap-off blades are good, but will not work here. It is better to have a sharpening stone for it, because during the sanding operation the cutter becomes dull in just a minute.
4. Markup tool. If marking is done on the wrong side, I prefer an ordinary ballpoint pen. She draws wonderfully on both leather and suede. Naturally, it is unacceptable to draw with a ballpoint pen on the outer surface of the product; traces of it are very difficult to remove from the skin.
5. Razor blade. Better new, even sharper. It is necessary towards the end of the work to trim off the excess.
6. Surface for sanding. We will get acquainted with the sanding operation itself in the process, but for now we will reserve a hard, smooth surface, for example, thick glass or, as in my picture, smooth ceramic tiles. Blue is not necessary. 
7. Well, you can do without a ruler. I used it to draw an even rectangle, and, in principle, this rectangle can be replaced with a freehand figure, it will be more interesting.
8. Lifesaver (it’s not in the picture). An auxiliary stick, preferably a wooden one, mainly for spreading glue.
Further. Materials.
1. Cardboard. Thick cardboard, one or two millimeters thick, you can try corrugated cardboard, but, as you understand, it is brittle and inconvenient. Cardboard is needed as the basis of the product.
2. Foam rubber. Thickness 2 cm. Foam rubber is needed for the volume of the product.
3. Actually, the skin. Thin clothes. You can take the skin by tearing apart old jackets, you can buy ready-made skins in special stores - it’s not that expensive. In this hairpin I use two types. For the left, right and back parts, I took a piece from an old leather jacket, textured, with a slightly shimmering brown tint. For the central, most decorative part of the product, I took a scrap from a purchased skin, a very interesting brown suede lining, interspersed with golden paint, a little like hieroglyphs.
4. Automatic hairpin. Such hairpins are sold individually in special stores such as “Needlewoman” or “Craftswoman”. If there are no such stores nearby, you can go to some consumer goods store, buy a cheap plastic Chinese hairpin there, and separate the accessories we need from it. This is not difficult; it is usually held on by plastic rivets that break off easily, or even by small screws. You just need to check the machine itself before purchasing, open and close it, otherwise there are a lot of defects in cheap goods.
Well, let's begin.
We draw or draw on cardboard the base - the full face of our hairpin, and cut it out.
On the reverse side of the skin for the back and side parts we mark these same parts. We mark the back part by tracing the contour of our cardboard base, and we mark the side parts by tracing the base with an allowance of 7-15 mm. Looking ahead, I will say that here I gave too little allowance, I needed at least a centimeter. As a result, the hairpin turned out to be not very plump, but I did not redo it, because the principle remains the same. So for foam rubber 2 cm thick it is better to make an allowance of 12-15 millimeters.
We cut out the side parts (still combined) along the line.
We cut out the back wall, retreating inward by a millimeter. This is so that, God forbid, the back wall does not stick out from behind the product.
We divide the larger piece into left and right parts.
This is what we got.
Let's get down to the basics. Lightly coat the cardboard with glue on one side, apply it to the foam rubber without pressing too hard, and peel it off immediately. This way we quickly lubricated two large surfaces.
We wait until the glue dries. This is a non-critical connection, so we don’t wait long, a couple of minutes. You can check with your finger, touch the surface - if it’s not wet, then it’s enough. We stick the foam rubber in its original place. Don't press too hard! Just attach, otherwise the foam rubber may be compressed to the adhesive layer and there will be dents.
Then we take scissors and cut off the excess foam. First along the edge.
Then we gradually cut off the edges,
We round the corners as much as possible, literally trimming the foam. A good test for your scissors. If the scissors jam or bite the foam, it’s better to look for others.
The result is a pillow like this. There is no need for a jewel-like, super smooth rounding; anyway, the stretched skin on top will make everything smarter.
Now let's begin the operation, which, as practice shows, is most difficult for beginners. We are talking about roughening the edge of the leather. The skin has its own thickness, even if in this case it is small, but when gluing two edges overlapping, an ugly and unprofessional step still remains. Therefore, the edges of the skin become thinner and disappear. This is called sanding. To do this, a piece of leather is placed on a hard and smooth surface, and the edge is slowly cut off with a sharp cutter at a strong angle.
It’s quite difficult to describe sanding in words and show it in a photo, so here’s a short video of the process:
We need to process all the edges of our three pieces in this way, except for the inner edges of the side panels. You need to sand the back wall especially carefully, because its edges will be visible from the outside.
This operation will not work right away. First you need to practice on unnecessary trimmings. Different leathers are roughed differently, some are easier, some stretch and tear. It is necessary to develop movements that allow you to calmly and confidently cut off the edge; the cutter must be very sharp, it must be periodically sharpened.
The next operation is also very important; this is the actual tightening operation. We take one of the side panels and apply a little glue around the perimeter, along the rough edge, except for the side that is not rough. Smear with a lifesaver. You can try to smear it directly with the spout of the glue tube, but this is more inconvenient.
Similarly, apply glue to one side of the base.
We wait a little longer. This is a fairly important connection, so wait about 5 minutes. Then we apply our sidewall with the back side to the foam rubber and start covering it.
This process is also better shown on video:
We start with straight sides and then tighten the corners. Leather is a pliable material, it can be stretched a little, kneaded, as if to “add” the shape a little.
Again, in this example I gave too little edge allowance, so I had to tighten it up a lot. The hairpin came out a little flat. I advise you to make a larger allowance.
We do the same with the other half, making sure that the two halves are equally stretched, looking at the hairpin from the side. It turns out to be such a pillow.
Let's move on to the central part. This is the most creative detail, so we focus on the fly. We try on a piece this way and that.
Having wrapped the future part around the product, we measure its length by eye. If it turns out a little longer, no problem, you can cut off the excess later. The main thing is not to be shorter. I grab it with my finger and roughly measure it with a ruler.
In this case, you can take any width of the central strip, because the entire hairpin is covered by the sides, only in the middle are the sections that need to be decorated. I made the center section wider, more than a third, because I like the pattern on this suede. When calculating the width, we take into account that there will be hems along the edges, and we will drape the part itself a little. Apply glue to the edges of the width.
I hope everyone understands what I mean by the width and length of the part? I almost got confused myself! The width is the distance between the edges on the front of the pin, and the length is the distance between the edges that go back and stretch and secure the part there. Ugh... Yes, the edges are wide. They are responsible for appearance. Spread it, wait for a minimum, carefully fold it over.
We sand the edges of the length.
We put the part on a pin, if it’s too long, we sand off the excess, if it’s too short, we make a new one. :)
We apply glue to the inside of the future hair clip; it is better to apply a larger area; it is not yet known how the part will finally fit. Apply glue to the rough edges of the central part.
Let it dry. Here you have to wait about 5 minutes, because this is a critical connection.
We begin to attach the decor. One side first. I specially make folds and drape, the hairpin will look much more lively.
We wrap the part around the hairpin, stretch it to taste, and glue it on the other side, continuing to drape. Perhaps the drapery will not work out; a little creative experience is also needed here. Moreover, the glue will not allow you to change the position; it’s glued here and that’s it. In principle, if you didn’t press it too hard, you can peel it off and re-apply it. But if you held it long enough and then pressed hard enough, it will most likely come back with “meat.” For simplicity, you don’t have to drape. Especially if the skin is beautiful and textured.
Finally, firmly press the glued edges with your fingers for greater strength.
On the inside of the hairpin there are most likely excess skin bumps. If you leave them like this, they will stand out unattractively on the back wall that will be glued later. We cut them obliquely with a razor blade, bending it slightly. Don't overdo it! Consider where the back wall will be glued.
This is what happened.
We are reaching the finish line. Back wall. We take a metal automatic hairpin and remove the central part from it.
We place it exactly in the middle of the wrong side of our neatly roughened back wall. Using a marking tool, we draw four lines along the outer sides of the side “forks”.
Having removed the piece of iron, we connect the lines to each other, getting something like two stretched “n”.
Holding the cutter perpendicular to the surface, use the tip to cut exactly along the lines. We cut towards ourselves, holding the part with the other hand. I laid the same tile underneath, but you can find something more suitable.
We put a pin on the back wall and thread the two sides through our tricky slits.
The inner parts of our letters "n" should skip the protruding parts, and fit inside under the "bridges". In general, if you dig deeper, you will understand.
If everything doesn’t quite match, pull it up and put it on. This is leather, a pliable material. Well, I've got it all stuck.
We separate the parts and apply glue to the side of the fastener where it will come into contact with the back wall, and on the back wall we apply glue to the place where the fastener will be.
Let it dry at least and connect these two parts as we connected before. We act carefully, because this time the glue will constrain us.
We press well and tuck the slots under the “bridges”.
Now we take the transparent “Crystal” Moment and carefully coat the inner sides of our resulting two parts of the product with it.
We carefully go along the edges of the back wall with a stick of glue, and I prefer to coat the inside of the main “body” with my finger. Somehow the relief feels better...
This connection is the most critical, so we follow the instructions for the glue. If it says wait 10 minutes, we wait.
Then we adjust and literally connect both parts in one movement. We strongly press the entire glued surface with our fingers. The metal fastener bends, so our hairpin should also bend a little.
We reinsert the inner piece of iron and carefully glue the loose edges of the back wall, if any are found.
Voila! The hairpin is ready.
Thank you for your attention and good luck!
The procedure for tightening the corner
Upholstery of kitchen furniture is carried out in several stages:
- Foam rubber is fixed to the backs and seats. This is done using glue, which is applied in lines to its surface. The edges of the foam rubber are fixed with 6 mm staples at intervals of 5-8 cm.
- The foam rubber is covered with fabric. The pattern is placed face down on the floor or table. A corresponding wooden fragment with attached foam rubber is placed on it. Fixation with staples is carried out from the middle of the opposite sides to the corners. Before the staple hits, the fabric is stretched. The interval between the staples is 4-5 cm. Before fastening, the corners of the fabric are folded with “ears”, which are nailed one by one to the base.
- The backs of the seats and backs are finished with camouflage fabric. For this purpose, staples measuring 6 mm are sufficient.
- Furniture is being assembled. First, individual parts are assembled, then they are combined into a single structure. If the connections become loose, then you will need to make new holes in their place into which additional tie elements are inserted.
https://vsyakuhnya.ru/www.youtube.com/watch?v=ORH_b7dglQo
Reupholstering a kitchen corner with your own hands is a painstaking process, but quite entertaining, and its result will delight you and your household for many years.