Just like several centuries ago, Orthodox homes are decorated with Christian icons. In the past, all symbols in the house were kept on the iconostasis, which is also called the red corner or the virgin. In modern apartments and houses, try to position the iconostasis in such a way that it fits harmoniously into the space and decor.
To make the space between the icons special and beautiful, you can build corner shelves among the icons with your own hands; you have the opportunity to turn any idea into reality and put part of your soul into the work.
Using modern materials and wood, you can make a corner shelf to suit every taste. Such a shelf can be made in a completely different way, for old times or with carvings. You can buy any shelf for icons at an icon shop or furniture store, but if you really want something original and unique, you should do it yourself.
How to make a corner shelf?
The priests say that the temple should always be open so that everyone who needs it can come to it. The houses of believers are small temples in which there are many shrines, and they occupy a place of honor in the house.
Recommendation! Let your skills and the interior of the room help you choose the material and shape for the future shelf.
You can make a shelf out of it:
- Plywood;
- Tree;
- Plastic;
- Metal.
Character shelves can be single-level or multi-level. Icons for iconostases can be mounted on the wall or placed on shelves. Let's consider the option of producing a wooden shelf, since this material is alive and has a certain strength in itself.
Stages of work
In order for the shelf to be beautiful and serve for a long time, everything must be done in a clear order, taking into account production technology.
- It is necessary to measure the future shelf, measure the length, depth and width of the corner intended for iconostases. We produce shelves 70 cm high, consisting of three sections.
- On a sheet of paper you need to draw a shelf with 3 levels, after which you can make a detailed drawing of it.
- Then transfer the design onto the wood or plywood with a pencil. If the material is dark, then the pencil is not visible, in this case it is better to use a wooden knife. For the convenience of the drawing, it is necessary to number all the parts, and then make them with the components already cut out.
- Use a jigsaw to cut out the components of the future iconostasis.
- If possible, all edges can be processed with a hand cutter, then they will look much more beautiful.
- To avoid bumps and stones, sand the entire surface with sandpaper, but only in the direction of the grain, then they will be smooth and beautiful.
- Nails or screws hold all the pieces together. They also use wood glue to improve durability.
- If desired, the shelf can be covered with stain and varnish.
- The corner symbol shelf can be secured to the wall with large screws or hinges attached to the back of the shelf.
Good to know! For a reliable design, it is necessary to glue the parts of the shelf with a special universal glue. PVA in the wood and then tighten the screws further.
Basically they make a shelf for icons in three rows, and the main row is Deisis. In order for the iconostasis to be correct and protect your home and yourself, you need to arrange the icons in a certain order:
- Theology is the top row, in the middle of which there is an icon of Jesus Christ, on the left side there is an icon of the Blessed Virgin Mary, and on the right there is an icon of John the Baptist. On the left is the Archangel Michael, on the right is Gabriel, as well as the icons of Peter and Paul.
- Holiday symbols should be located in the middle of the row. Symbols of the famous and greatest Christian holidays, ideally twelve.
- There are several symbols on the bottom shelf of the iconostasis. The lower shelf is commonly referred to as the local outhouse and has favorite symbols of the home's residents.
Location of icons
Images on the shelves should be placed in the prescribed order. Only in this case will they fulfill their task regarding the patronage of the residents of the apartment. The optimal number is considered to be 12 - according to the number of great Christian holidays. According to church canons, all structures are crowned with an Orthodox cross.
On the top tier in the center is an image of Jesus. On the left is the image of the protector - the Most Holy Theotokos, and on the right is John the Baptist. On the lower levels there are icons of the Holy Trinity, Nicholas the Wonderworker, Archangels Michael and Gabriel, Apostles Peter and Paul, Prophet Elijah, the Burning Bush and other saints revered by people.
Why is it worth making a corner shelf for icons?
Many centuries ago, icons were placed in huts in red corners. This corner was considered the most important place in the house, and none of the guests dared to approach it without the permission of the owners of the house. This corner of the house is still considered analogous to the altar and should be treated with great fear.
The corner under the symbols should be placed in the most visible place, and as soon as a person enters the room, they should see it. It is recommended to make a corner with symbols in each room, but this is not necessary. When choosing the location of the icons, you should be guided by the following recommendations:
- The shelf should not be located next to or in front of the TV.
- Do not hang symbols on the wall as they should have a special place.
- The shelf should be so high that you don't have to hit your head on it, and at the same time, you can see all the symbols without lifting your head - at one glance.
Advice! The height of the shelves should match the size of your characters, and maybe a little more.
If you really decide to build a corner shelf among the icons yourself, then you should go to church and ask for a blessing, then not only will your work turn out to be beautiful, but the shelf will also carry special energy in your home. Work only in a good mood and with prayers and cross stitch.
In the following video you will see a selection of photographs of shelves with symbols:
Page 2
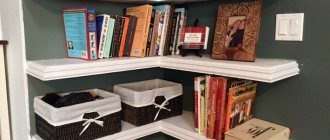
Today, in every home you can see shelves in various design solutions: Bookshelves and flower shelves in the living room, wine rack in the kitchen, shelf in the bathroom and shelves on the balcony.
It’s not surprising, because they not only decorate the interior and are easy to use, but also help us effectively plan our living space.
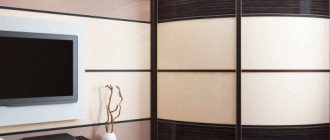
And in the age of media technology, when the wide-screen TV has become a worthy member of every family, it is very important to install a pedestal, stands and shelves for your home screen.
Design options
Shelves for the Orthodox canon may differ markedly from each other. It all depends on the location of such products. It is actually customary to place icons in a corner that will be directed to the east. Shelves can be multi-tiered or simple in one tier. Also, the shelf will look either angular or just straight, depending on the place where it is planned to be mounted. The shelves also have a noticeable difference in terms of design; often there may be some kind of carving on the back wall. The carving can depict both the outlines of the holy apostles, as well as some vegetation and even birds.
It is important to know that the shelf should contain only icons and everything that may relate to religion. It is not customary to place all sorts of foreign objects next to icons, which do not play a role in religion. Any do-it-yourself corner shelf for icons requires, first of all, a detailed thought out of the version of the shelf itself, and only after that can you prepare the materials that will be useful in the work and the actual tools for its manufacture.
Which shelf should you choose?
Depending on the functional load of the room in which the TV is installed, the most suitable type of shelves is selected:
- hanging;
- wall mount;
- Corner (inside and outside);
- shelf with holder.
And the most acceptable TV stand design:
- Console (horizontal plate fixed perpendicular to the wall);
- shelf with side walls;
- shelf with back wall;
- staircase;
- combined shelf.
Materials for working with surfaces.
In the Orthodox religion there are no prohibitions on metal and plastic. Wood is better suited, as it is easier to process and give the desired look. The craftsmen choose wood. Boards made of oak, pine, cherry and walnut are suitable for shelves. It is worth choosing pine. Pine is a strong wood and will last longer.
For work it is important to use:
- Hammer
- Drill set
- Wood hacksaw
And those you can’t do without: a screwdriver, a tape measure, a hammer.
When making a shelf out of wood, it is important to choose the size of the shelf. It is also important not to forget about the tools.
You will need:
- Plywood
- Selected wood planks
- Sandpaper
- Wood glue
- Set of tools.
And additionally, depending on the finish of the shelf:
- Dye
- stain
- Colored linen.
What to make a shelf for a TV from
Imagination can spread in the choice of material for a television stand.
Of course, you can also make a shelf from Czech crystal, marble, mahogany, decorated with precious stones, ...........................................................................................................................................
But, remaining true to the principles of minimalism and ergonomics, we rely on common and cost-effective materials, such as
.
- wood, chipboard or MDF;
- Drywall;
- Plastic or organic glass;
- durable tempered glass;
Types of fastenings
The basis for a shelf of any design is the fastening. This places special demands on load-bearing capacity and functionality.
The most common types of fastenings are the following:
- Using angles. The simplest and most practical method chosen by most beginning craftsmen. But in order to implement such a mechanism for rotating shelves, it is necessary to experiment with fasteners.
- Loop fastening. Hanging shelves fit perfectly into the interior, do not require a special approach when choosing tools, but do not always meet the criteria for the stability of the entire structure.
- Using parentheses. Brackets are very practical, but they will take longer to make. Again, special tools are required, which will significantly affect the final cost of the entire product.
Important: With the help of brackets, you can not only mount the TV on the wall, but also change the viewing angle by almost 90 degrees.
By using corner or loop fasteners made from a strong, lightweight material (such as aluminum), you can significantly reduce the time required to manufacture the entire structure.
Tools and materials
For the manufacture and installation of any type of racks:
- Cutting sheet material;
- electric puzzle;
- electric drill;
- screwdriver;
- template bar or tape measure;
- mounting knife;
- Marking tools (pencil, marker, etc.);
- Fastening kit: Fastening elements (corners or brackets), screws, dowels, anchors, etc.
- A set of drills (for metal, wood and concrete slabs), depending on the material of the product and the type of mounting surface;
Master Class
Currently, the tradition of decorating your home with Christian icons is returning; even in city apartments you can find a homemade “red corner”, which is often called a shrine. If you choose the right materials for the shelf, it can be made into a functional decorative element of the apartment’s interior. The priests say that icon shelves should be in the home of every believer.
In the manufacture of such products, you can use wood, plywood, polymer materials, and metal.
Depending on personal preferences, shelves for icons can be single-tiered or multi-tiered structures. Icons for the iconostasis can be mounted on a table or placed on a shelf.
To create a three-tier structure, stock up on a hand-held milling machine, a jigsaw, a ruler, a pencil, nails or screws, abrasive material, a hammer, and wood glue.
In order for the shelf to be beautiful and delight its owner for a long period, it is important to carry out preliminary measurements of the width, height, and depth of the planned structure.
Advice! Professionals consider the optimal size for a corner shelf for icons to be 70 centimeters in height.
You need to transfer the drawing to plywood or wood. If the surface is dark in color, it is better to use a construction knife instead of a pencil. Professionals recommend numbering the parts of the drawing to prevent errors during assembly. As soon as the main details of the planned iconostasis are cut out with a jigsaw, all edges of the product are processed with a hand router.
To ensure that there are no rolling pins or irregularities on the surface of the shelf, the surface is sanded with sandpaper.
Attention! When grinding, the abrasive material must be moved in the direction of the grain.
To connect the parts together, you can use nails or screws. For strength, you can also arm yourself with glue designed for wood. You can varnish or stain wood to protect it from high humidity and temperature changes, and also to give the product an aesthetic appearance.
Basically, shelves for icons are arranged in three rows, but there is one main row - deisis. In order for the created iconostasis to be made correctly and reliably protect the apartment and its inhabitants, it is important to arrange the icons in a clear sequence.
The upper part is the deisis, in its center there should be an icon of Jesus.
To the left of her is the image of the protectress - the Most Holy Theotokos, and to the right side is always the icon of John the Baptist.
Ideally, the number of icons is 12 pieces - according to the number of major Christian holidays. On the bottom shelf of the iconostasis you create yourself, you can place any icons that are revered in a certain region.
Sketch and detailed study
Once we have decided on the desired appearance of the future shelf, we start with a sketch. The outlines of the details are drawn on full-size paper. If everything suits you, we transfer the finished sketch to the material.
When making a shelf with shaped elements, there must be a straight section of 40 to 100 mm from the main side to the beginning of the bend between the main side and the beginning of the bend (see figure). With this approach, the edge becomes more precise after gluing.
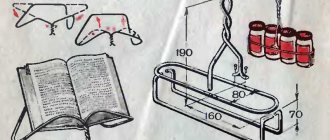
Making a hanging shelf
Functionally, this version is not suitable for installing a TV, as it requires the use of additional elements. But for a specific design solution, this idea may seem interesting.
All work can be divided into several stages:
- Holes were drilled in the ceiling, plastic spacers were inserted and special hooks were screwed on. A shelf hangs from it, which can be reinforced from below with a strip of wear-resistant material.
- The TV should be installed so that the center of gravity is exactly in the middle of the shelf.
- Now you need to install an additional mount to protect the device from falling. It can be located on the back of the TV or in the middle (usually included in the package).
Making a wall shelf
Wall mounting is the most common and easiest way to install a modern TV. The product design can be adapted to the interior and designed according to your taste.
- The standard model is a bottom, top and side wall connected at corners or otherwise.
- We then mark the wall and drill holes for the dowels.
- The pre-assembled shelf is attached to the wall using angles or brackets.
This design can withstand decent loads, takes up little space and is very functional when using swivel brackets.
In this case, fastening plays a special role. Angular ones with stiffening ribs are widely used. The design is considered reliable if its length matches the width of the shelf itself or is slightly less.
Watch out guys! When drilling holes in tiles (for example, in the kitchen), the drill should be turned on at low speed and all work should be done carefully, without changing the angle of the tool. It is best to use small drill bits first - this reduces the risk of cracks and crevices.
The simplest stand for an icon
A single-tiered corner white shelf consists of only two parts: a corner element and a figured cornice (barma), which simultaneously serves as decoration and fencing.
The figured outline of the cut must first be drawn on paper, then the sketch must be transferred to a sheet folded in half to obtain halves that are symmetrical relative to the center. Using the pattern, draw the outline of the edge and cut out the pattern using a jigsaw. If desired, the corner shelf for icons can be decorated with burning, painting or carving.
Related article: Easter basket made from newspaper tubes
To create a pattern for a corner element, you need to draw a right angle on a sheet. Its sides should correspond to the size of the icon, if there is only one, or be larger to accommodate several small images of saints, a lamp, etc.
Having set aside the required dimensions on the sides of the corner, you should connect the extreme points with a straight line. From the resulting triangle, you need to remove the part in the area of the right angle so that the shelf for icons can be conveniently installed on the wall.
Drill holes for the dowel in the edge of the long side of the corner. Part of it should protrude above the edge at a distance less than the thickness of the board from which the cornice is made. Lubricate the dowel with glue and insert it into the hole. Depending on the size of the corner, there may be 2 or several dowels for fastening.
The reciprocal recesses in the underside of the cornice must be drilled so that the holes do not end up through. The connection is made with glue; after gluing, the parts must be pressed tightly together until completely dry.
The simplest corner shelf for icons can be fixed to the wall with metal loops on the edges of the short sides of the triangle. You can nail planks to the wall, on which the corner element will rest. The length of the planks should be slightly less than the sides of the corner so that the cornice does not interfere with the shelf lying flat and horizontal.
A do-it-yourself icon shelf can be painted with acrylic and other paints, coated with clear varnish, or carefully sanded and waxed.
Corner two-tier plywood shelves.
A corner two-tier shelf can be made just as simply. Its difference from the previous version is that the corners are not mounted on the wall, but on shaped supports, which at the same time have an aesthetic function.
The backdrop of such a shelf consists of two identical parts that mirror each other. Their pattern and size are chosen arbitrarily. You can connect them with self-tapping screws or dowels using glue, placing one on the edge of the other and drilling the corresponding holes.
Related Article: Delightful Freeform Crochet Clothes
The white shelf for icons can additionally be decorated with cornices. To make other corner shelves for icons, corners with a rounded front part were used. It is most convenient to secure the shelves with self-tapping screws screwed into the edge from the inside of the backdrops. If you need a shelf for icons with three tiers or more, you can increase the length of the backdrops and install another row of corners of any shape and size.
Making a corner shelf
The simplest and most reliable system that does not require large investments. An ideal “budget” option, it can be used both for installing a TV (for example, in the kitchen) and for other household purposes.
No special fastening is required, just two aluminum corners, a few dowels and self-tapping screws are enough. The most important thing is accurate calculation and, of course, the golden hands of the master.
- First, drill holes in the corners, preferably in the middle, to make installation easier.
- Now you need to mount the product and attach the sticker to the wall.
- After completion of the work, the entire structure is securely fastened and ready for use.
There are many products available at retail that can help create a standard interior design that is affordable for many of us. But with imagination and skills in working with construction tools, you can create something unusual and original.
You can see how you can build a simple corner shelf under the TV with your own hands in the video:
Icon with decor
The two-tier corner shelf for icons looks very complicated only in appearance. Making it is not much more difficult than previous options. The drawings will help the home craftsman make a corner shelf for icons with his own hands in a few days, using only a jigsaw.
Thick plywood (8-10 mm) can be used for backdrops; thinner material (3-4 mm) is suitable for overlays. Transfer the decorative design onto a sheet of thin plywood and carefully cut along the contour using a hand jigsaw. Make the base of the backdrops from thick plywood. There should be 2 side parts.
The wooden corner shelf for icons is assembled like this:
- Sand the backdrop details on saw cuts and paint them dark.
- Cut out 8 mm corners from plywood according to the diagram (2 pcs.).
- Varnish the prepared decorative overlays or paint them with golden acrylic paint. Glue to the base of the backdrops.
- Lubricate the spikes on the edges of the corners with glue and insert them into the corresponding holes on the backdrop parts.
The corner shelf for icons is almost ready. Multi-tiered structures can be made in the same way, increasing the number of corner elements.
A self-made shelf for icons, wooden or made of chipboard, will look neat if, after sawing the parts, you process the front cuts with a grinder, chamfering or rounding the cuts.
If such a tool is not available, this operation can be done using a file and sandpaper. The edges can be highlighted by painting them in a contrasting color or gilded.
The best posts
- Two-color interior doors: why they are valued
- Bright design of bottles and glasses for a wedding
- How to choose curtains for wallpaper: designer tips
- Yin-Yang tree from beads: how to weave a wonderful home decoration with photos and videos
- Turquoise kitchen and 9 color combinations
- Rust protection of metal fence
- DIY Easter bunny knitted and crocheted
- DIY decorative cushions
Related article: DIY candy dumbbell: master class with step-by-step photos