Advantages of making your own key holder
Having a housekeeper for the hallway with your own hands has the following advantages:
- Its size, shape and number of hooks - all these parameters fully correspond to your taste.
- Its creation requires a creative approach and the absence of restrictions in actions.
- Its production will cost much less than buying a store-bought product.
- Possibility of adjusting the accessory if you decide to change the style of the corridor.
- The ability to give the interior of a room an unusual and interesting look.
Plywood key holder for the whole family
When a large family lives at home, a large plywood key holder is perfect. It is convenient because the keys of each family member will always be in front of their nose. Parents and children will not be confused or forgotten. This is due to the fact that a certain sign will be inscribed above each keychain. For example, you can give the contours of a drawing of a car, a house, or children. This kind of approach serves as key sorting.
Stages of work:
- The plywood board is carefully processed using sandpaper (the corners are rounded if desired).
- You need to plan in advance the background for the large key holder (drawing or picture).
- The image is transferred to the work area using a pencil or any other hard object.
- After drawing the contours, you can take a jigsaw and carefully cut out the required shape.
- In the area of individual figures you need to pierce holes for the key rings.
- The surface is polished again to avoid any debris from the piercing.
- The product is coated with varnish or paint, and then hung on the wall.
Weaving from rubber bands: overview of methods, step-by-step master class
How to make shelves for flowers with your own hands: ideas, types, instructions
Types of key holders
As you can see in the photo of handmade key holders, there are a lot of possible options. The choice of a specific solution must correspond to the interior style of the hallway.
The product can be made:
- from sawn wood;
- from unnecessary trash;
- from branches;
- from wine corks;
- from plywood sheet;
- made of wire;
- leather.
Key holder-pencilcase
This type of key case is the easiest to manufacture. It looks like a small pencil case fastened with a button.
To make it you will need:
- Genuine Leather;
- awl;
- braid for braiding;
- button;
- needle and strong thread;
- scissors;
- paper, ruler and pencil for creating a pattern.
The key holder pattern consists of two parts:
- Rectangle - the main part of the product.
- Strap.
First of all, you need to decide on the size of the product. The height of the finished accessory should be 1-2 centimeters greater than the length of the largest key, and the width depends on your imagination, as well as what you want to put inside.
On a sheet of paper, draw a rectangle as follows: the horizontal line should be equal to the height of the product, the vertical line should be equal to the width multiplied by two. The resulting pattern must be attached to a piece of leather and outlined, not forgetting to add half a centimeter on each side to the seams, and then cut out.
Now we cut out the strap. To do this, draw a rectangle on paper 1 centimeter wide and a length equal to a third of the height of the future key holder plus 2 centimeters. We round off the top of the resulting strip. We apply the pattern to a piece of leather, outline it and cut it out.
We lay out a rectangle of leather in front of us, mark the middle and fold it, smoothing the fold with our fingers. Using a ruler and an awl along the perimeter (except for the top side), we make holes at an equal distance from each other, retreating 7 millimeters from the edge.
Fold the flap in half. On one of the halves, mark the middle on the outside and sew a strap at a distance of 2 centimeters from the edge. We bend our rectangle in half again, find out where the end of the strap will be, and mark this place with a dot. We sew the button: one half on the strap, the second on the main part of the product.
We take the braid and thread it through the holes so that both halves of the rectangle are connected. We secure the end of the braid with threads. So, we made a leather key holder with our own hands, now you can use it.
Popular ideas
Nowadays, a large number of different ideas for making key holders have been invented. Let's look at the most popular models:
- Shelf. It is in greatest demand among the population and is suitable for standard housing.
- Box. Installed mainly in private buildings.
- Key holder for large farmsteads. Allows you to store keys in whole bunches.
- Organizer. Organizes other small items in addition to house keys.
Required materials and accessories
To make such a useful piece of furniture, you will need a number of different materials. Below is a sample list:
- wooden or cardboard structure as a base;
- leather or textiles;
- holder;
- key hooks;
- pendants;
- picture frame;
- branch of non-standard shape;
- acrylic lacquer.
You may also need:
- plywood sheet;
- branch of non-standard shape;
- cork;
- MDF or chipboard sheet;
- tree.
Tools worth preparing:
- drill;
- jigsaw;
- screwdriver;
Selection of design and construction solutions
The appearance of the accessory depends on where it will be used. For an office, the best solution would be a sleek steel cabinet with a lock.
For your home, the best option would be a model that fits harmoniously into the interior. It can be either luxuriously decorated or simple.
Note!
DIY feeder - step-by-step instructions for creating a feeder + detailed diagrams with photo reviews- Do-it-yourself rugs - TOP 120 simple patterns with master classes on how to make them yourself + photo reviews of finished rugs
Do-it-yourself dolls: a master class on making a beautiful doll. Simple instructions with photo examples of ready-made options
If you are not going to focus on such a product, you don’t need any particularly magnificent appearance from the key holder.
If you want to make the process of creating such a product as easy as possible, it can be made from an ordinary birch or oak branch.
No special skills are needed here. You just need to clear the tree of bark, drill the required number of holes and install hooks. The finished accessory should be varnished.
Key holder made from sawn wood
The style and originality of a wooden key holder will not go unnoticed by your guests. This is an ideal option for anyone who loves working with wood. Order of steps:
- Process the cuts using sandpaper.
- Remove dust, moisten the workpiece with water, dry it and sand it again.
- Cover the wood with several layers of stain.
- Print any picture, go over it and the base with acrylic varnish, put the image on the cut, roll it with a roller.
- After some time, roll up the paper layer, after moistening it with water.
- Make holes for fastenings and secure the finished product to the wall.
Key holder Dog made of fabric - step by step
The size of this original key holder is 10/10 cm. You can increase the size as you wish - to do this, increase the pattern itself. Before you sew a key holder, figure out which size is best for your keys. It is not necessary to have a sewing machine to sew such a “key house” - hand sewing is also suitable here.
For this craft you will need thick fabric, lining fabric, pieces of felt, white and red fabric. It is recommended to use not only a lining, but also a layer of padding polyester. The pattern is given without seam allowance.
To work you will need:
- Main brown fabric – piece size – 22/32 cm.
- Beige fabric for the muzzle – 9/11 cm.
- Dark fabric for ears – 12/12 cm.
- White and red fabric or felt.
- Fabric for lining – 22/32 cm, padding polyester (optional).
- Black buttons – 9 mm. (eyes) and 13 mm. (nose).
- The zipper for the back pocket is 10 cm (you can do without it).
- Key ring, 12 cm long cord.
- Carabiner (you can just use a bead).
- Scissors, marker, needle, thread.
I enlarge and cut out templates for work. If you have a tablet, you can put thin paper on the screen and trace each line with a marker, which saves time.
We cut out patterns from paper and cut out templates. We will get:
- Main part – 2 brown parts, 2 parts. linings, 2 pcs. padding polyester.
- Beige muzzle detail – 1 beige, 1 padding polyester.
- White detail (eyes) – 1 piece.
- Ears – 4 dark parts, 2 made of synthetic padding.
- Language – 1 detail.
If you decide to make a back pocket with a zipper, cut out the pocket part, put it on the main part and cut along the intended line. We bend the top edge of the pocket 0.5 cm inward, apply it to the zipper, pin it together and sew it together. We do the same with the top of the pocket.
We put the lining and padding polyester (lining on top!) on the main 2 parts (on the front side), on the rest - only padding polyester. Sew the ears like this: put padding polyester on 2 parts of the ears and pin them together. The yellow marker marks the places that cannot be sewn together (through these places we will turn the parts inside out). then we sew all the parts of the key holder 0.5 cm from the edge.
We turn all the details onto the face. We manually sew up the places through which we turned the parts onto the face. On the main part we manually sew first a white part for the eyes, then a beige part for the muzzle. At the end, we sew on the buttons for the eyes and nose, and stitch the fabric right through. Next, the ears are sewn with a hidden seam.
All that remains is to make a lace from leather or fabric, thread it through the ring and pull the top out through the center of the key holder. The pocket on the other half of the product is needed for small coins or any other small items. Next, we manually sew both finished parts, leaving the bottom unstitched.
So the key holder made of fabric with your own hands is ready.
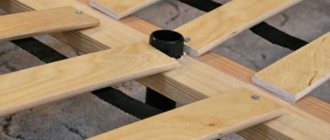
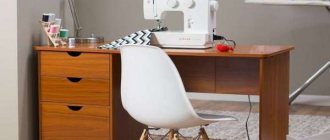
Model with shelf
This is a combined piece of furniture, since in addition to the key holder it includes a shelf for storing various small items. Most people are captivated by the simplicity of its creation. Need to:
Note!
- DIY satin ribbon bows - step-by-step instructions for creating unusual bows + detailed diagrams with photos
Do-it-yourself furniture restoration: step-by-step master classes on restoration at home (120 photo ideas)
- Do-it-yourself rack: step-by-step instructions with photos and descriptions on how to make an unusual rack
- sand the prepared wooden block;
- fix the suspensions in its rear part, and make openings 10 mm deep in the front part;
- attach the block to the base board.
If necessary, you can connect a couple more bars to the structure and get several ergonomic shelves.
Leather key holder
A leather-covered accessory for keys is considered a status item, the purchase of which will cost a pretty penny. Therefore, it would be more advisable to make it yourself. To do this you will need three things: a piece of leather, scissors and glue.
If you decide to make a pocket key holder, here are the instructions:
- Take a piece of leather of the required size, a zipper, and a carabiner for attaching the key.
- Make a template for the future product, apply it to the skin and outline it with an awl.
- Cut out the workpiece. Attach the zipper, having previously fixed its position with glue.
- Install the carabiner.
- Decorate the craft to your liking.
This item can be a great gift for a colleague or friend.
Leather model
If you prefer to carry your keys in your pocket, then pay special attention to the master class on creating a key holder with your own hands from leather.
The size of the pattern depends on the number of keys in your bunch. Taking it as a guide, you need to cut out all the elements of the product from the leather. Then you need to connect the blanks of the outer part and the lining, and turn them out. All that remains is to sew on the carabiner - and the key holder can be used.
Variant of their traffic jams
If you have wine corks lying around your kitchen, don’t rush to throw them away. They can serve as material for a key holder. Here are the instructions:
- Cut out the fiberboard base.
- Cut the corks in half and glue them to the plate, maintaining a minimum distance.
- Install hooks.
- Hang the accessory on the wall.
Note!
Corrugated paper flowers: TOP 100 photos of ready-made options + instructions on how to make them yourselfDIY family tree: instructions for creating a family tree + DIY design ideas
- Do-it-yourself sun lounger: photos with instructions for creating sun loungers + detailed diagrams of the stages of work
The key advantages of this type of cork decor are functionality, originality and environmental safety.
Key storage is a practical and useful thing. There is nothing complicated in creating it yourself, because the Internet is full of detailed master classes on making key holders with your own hands.
In addition, the design process will take very little time, and the end result will fully repay the invested effort and money. Therefore, if you are free, then it makes sense to organize a similar solution in your corridor.
Key holder
Do you have an old unnecessary leather bag collecting dust? Give her a second life! The wonderful artist Natalia Godes will teach you how to make leather goods with your own hands, and this master class on how to make a key holder with your own hands will tell you how to create an original accessory and a useful thing for storing keys from an old leather bag.
Housekeeper
Natalia Godes
Author - Godes Natalia , St. Petersburg +7 Write a letter [email protected] You will need materials and tools • A piece of leather (size depends on the size of the keys) • A piece of suede for lining • A leather punch • Scissors • Acrylic paint • Foam sponge (for tinting the edge of the leather) • PVA glue • Accessories for a key holder with carabiners • 2 rivets • Hammer Accessories, rivets and punches are sold in craft stores.
If it’s difficult to install the accessories yourself, then you can contact a shoe or clothing repair shop. This is what a nice key holder you should get
First, let's draw a sketch of the future product.
Let's collect all the necessary keys. We'll measure the length and width needed for this bunch of keys, and draw a pattern.
Let's cut out the pattern Transfer the pattern to the prepared leather Cut out the key holder part according to the pattern Using a brush, evenly apply PVA glue to the wrong side of the key holder part
Distribute a layer of glue over the entire surface Glue the suede lining Carefully guided by the upper leather part of the key holder, cut out the lining of the lining
We will process the end of the key holder parts with a hot tool, this will even out the edge or we will simply cut and trim both parts
Protonate the edge of the key holder and paint its end with acrylic paint with a textile additive
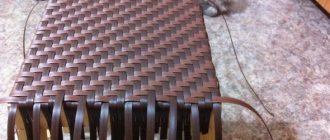
We perforate the edge using a special drum or rod punch. We will weave the edge of the key holder with a leather strap
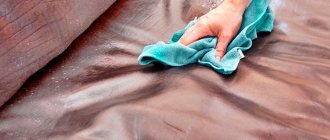
Apply a special composition (wax, oils) to the surface of the key holder; this will protect the skin from moisture and damage and give it greater elasticity.
Let's try on the accessories for the key holder
We will install rivets and attach decorative elements and fittings.
We will attach a cord on which the key holder will be wrapped around the outside
We admire it! (All photos are clickable!) Key holder
Natalia Godes
More about the author of the master class on leather: Natalia Godes - • Teacher of the course on creating an author's doll • Participant of international doll exhibitions in Moscow and St. Petersburg • Portrait, fantasy, articulated dolls and marionette dolls from various materials: baked and hardened plastics, wood, papier-mâché, textiles • Author's toys and accessories made of genuine leather • Works are in private collections in Europe, Russia, USA, Mexico, China and Japan
Awards: Winner in the categories “Doll made of baked plastics”, competition of the magazine “ Puppet master", "international exhibition "Doll Art", 2011, Moscow
Winner in the categories “Doll made of baked plastic” and “Coloristic solution”, competition of the magazine “Doll Master”, “International exhibition “Doll Art”, 2011, Moscow
2 Gold and 2 Silver medals, 4 Audience Choice Awards, Gold Cup GDS 2012, Global Doll Society Competition, 2012, Lucerne, Switzerland
View more master classes!