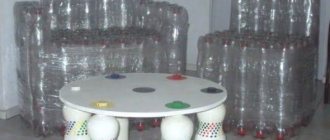
Creating a comfortable sofa
It looks great in the hallway and kitchen. Some craftsmen place such furniture in the garden. The sofa is made as follows:
- First, they buy containers. I advise you to purchase 500 2 liter bottles and secure them with wide tape.
- After this, they begin to make the base; it must be reliable.
- All bottles must have the top removed and cut accordingly. Insert the trimmings into the base of the containers, this will make the structure more durable.
- Place one more bottle in each bottle, cover them with the cut-off bottom, and use tape to secure the elements.
- You will get modules, they will be the basis of the design. You need to assemble the seat, then proceed to the support, and then make the armrests.
Who needs a homemade plastic sofa?
Plastic bottles are used to make:
- boats;
- Houses;
- garden decorations;
- souvenirs and crafts;
- country furniture.
Homemade furniture can be very useful in unguarded gardening, where, after the “winter migration” of the owners, dishonest people begin to operate. They sometimes take out not only metal objects and furnishings, but even doors and window frames. Dealing with this is difficult and even unsafe, so wise and enterprising summer residents do not leave freebie lovers any chance. One way is to fill the country house with convenient homemade items that cannot be used for enrichment.
Another option is to use one, which does not deteriorate from weather conditions. That is, it is possible
leave a sofa in the garden without fear of the onslaught of the elements. Ready-made garden furniture is quite expensive, and there is not always a place to put it away after the end of the season. An excellent solution is a do-it-yourself sofa made from plastic bottles.
Idea 6. Plastic bottles for plant protection
Bottles can be used to make excellent protection against rodents. To do this, take two bottles, cut off the bottom and tops, and cut the base lengthwise. Wrap plastic around the trunks and secure the structure with tape and rope. For stability, dig in the bottom part a little.
Cut the bottle into several fragments and bury them near the plants. Now slugs and mole crickets are not a threat to the crop!
Plastic bottles can be used to make traps. Cut off the bottom of the bottle and pour beer into it - an excellent bait for slugs is ready. Or make a fly trap. To do this, cut the bottle by a third, as shown in the diagram below, turn the top over and place it in the base, after first removing the cap. Secure the pieces with a stapler, tape, or superglue along the edges. Pour sugar syrup, fermented juice, meat broth, etc. through the neck.
Materials and tools
Making a regular chair is a long and labor-intensive process, and in addition, it is financially expensive. You need to cut out parts from wood or plywood and assemble them, which requires at least a jigsaw, wood glue, nails, a hammer, self-tapping screws, and screws. To make a simple chair from plastic containers yourself, you will need to stock up on a minimum amount of necessary materials, most of which are literally at hand:
- directly bottles of the same color, design and size (from 90 to 200 pieces, depending on the desired dimensions of the finished product);
- strong tape, cling film or stretch film;
- knife and scissors;
- fabric for creating covers;
- foam rubber for softness;
- sheets of cardboard and wire for the frame (if necessary).
All the above materials and tools are intended for making a simple chair. Depending on the design of the intended product, various additional elements may be required. For example, to make the body of a rocking chair you will need parts cut from chipboard or fiberboard.
Foam rubber
Cardboard
Bottles
Bottle shelves
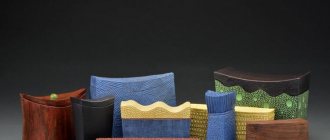
The easiest way is to make shelves; this process is accessible even to a child. Although you can combine business with pleasure and, together with your child, make a mini-shelf for the children's room. These shelves can be placed in the home and garden, pantry, left transparent or painted in bright colors.
To make this item, all you need is scissors, a ruler, a stapler, screws and a screwdriver. So, the manufacturing process is simple:
The shape and size of the product is determined.- Using a ruler, a mark is drawn on the bottle. Thus, every detail is marked.
- Bottles are cut off from the neck side. The resulting glasses are the same height.
- If it is planned that the shelf will be colored, then each part is painted separately. It is better to use acrylic paints or varnish.
- Connect the parts together after the paint has completely dried. Fasten them with a stapler in the required order.
- To make the shelf have a decorative look, you can add decorative elements.
- The finished shelf is screwed to the wall with self-tapping screws.
Original all seasonal flower beds
The summer season is passing, and living flower beds are being replaced by homemade plastic flowers that are no less beautiful than real ones. Their advantage is the ability to decorate the territory at any time. These flower beds pale in comparison to living plants, but in early spring and late autumn they alone attract admiring glances.
For daisies you will need small plastic containers of white (petals), yellow (centers) and green (leaves). You will also need an awl and a candle (for heating), “liquid nails,” scissors and stiff wire in green insulation.
We cut the base of the white bottle to the center, marking 16 segments - these are the petals. We bend the neat edges over the candle flame, and also make 2-3 chamomile corollas, which we connect in the center with an awl. Here the stem with leaves is fixed on a green wire, closing with the middle. We fill the center of the flower with a yellow basket with small cuts from 2 finely dissected circles with a fringe bent over the candle. We supplement the flower with green sepals from the bottom, collect all the parts and fix them together.
From the remaining pieces of green plastic, cut out leaves with a hole at the base (for stringing) and give them the desired shape, heating them over a candle flame. We attach the leaves to the wire handle; they should bend around it slightly. All that remains is for the chamomile to make several “companions” and find a worthy place for the bouquet.
All seasonal flower beds include mosaic compositions made from containers filled with earth. The lids are used to make wall panels. “Butterfly” or “ladybug” - in different versions.
DIY crafts for kindergarten from plastic bottles
A lot of crafts are made for kindergarten. Previously, the most common material was natural: leaves, acorns, cones, etc. All this could be turned into interesting compositions. Now this material is still in demand, but you can find a replacement for it, especially if it’s winter and you won’t find any leaves from the trees.
Caterpillar
For example, you can make a caterpillar like this. The bottoms of plastic bottles are used for it.
Cut off the bottom and fasten the two bottoms together. We are making several such modules. Their number depends on the length of the craft. Then we fasten these modules together. There are also traffic jams. We use them to make legs for the caterpillar. We make antennae for the caterpillar from wire and draw eyes. Each module can be painted one color or different colors. The result is a wonderful caterpillar.
If you attach a string to the front, as in the picture, then kids can drag this craft around like a car.
Bird feeders
In kindergarten they really like to carry out various environmental events, for example, feeding the birds. Why are feeder competitions organized? Plastic bottles work very well for this purpose. Of course, you can simply cut a hole in such a bottle and hang it on a tree. But, if you approach this issue creatively, you can get a craft like this.
Plastic bottles can not only be cut into pieces, but also used entirely. In this form they are well suited for making any figures. For example, this penguin.
Penguin
To such a whole bottle, penguin legs and wings cut out of paper of the appropriate color are glued. The cork is not removed, but the eyes and beak are glued onto it. Now there are opaque white bottles that are well suited for this craft. But, if you don’t have such bottles, then you can stuff cotton wool or white fabric inside a transparent bottle.
Pencil holder
There is no need to say that plastic bottles fit well under pencil holders. The simplest option: cut the bottle in half, paint it - and there you have it, the pencil holder is ready. But you can do it a little differently. We cut out an oval hole in a whole bottle, draw the face of an animal with an open mouth, and glue it onto the cut hole. As a result, we get such an original pencil holder.
Ships
If you get creative, you can make a boat. We cut off the longitudinal part of the bottle, install a mast or tower with a pipe, and paint it. You can put the doll as a captain.
Or you can make a yacht out of a bottle that will not just stand on a shelf, but float on the water, delighting not only children, but also adults. How to make such a yacht is described in the video below.
Toy
In addition to crafts that simply stand on the shelf and are pleasing to the eye, you can make one that will also be a toy in the hands of a child. Probably many people remember a popular pastime: throwing a ring and catching it on a stick. A similar toy can be made from plastic bottles.
Here we need the top part of the bottle, i.e. neck. Cut the bottle in half. We use the bottom for something else, for example for growing seedlings. We paint the bottle or make an applique, as in the picture. We attach a long rope to the cork. We tie a bee to the other end of this rope, which we make from a bottle cap. The toy is ready. We throw the bee up and catch it with a glass bottle, holding it by the neck.
Surprise for children
Plastic containers are an excellent material for making toys and accessories for children. The baby loves her doll, but her beloved Tanya does not have a crib or high chair. You can help a child without compromising the family budget. Doll furniture made from plastic bottles will delight and add a creative element to the game. Together with your child, making a bed for a doll, a table for her teddy bear guests, a cradle and even a stroller is an interesting process. This craft will help instill in your child creative skills, perseverance, and a love of work.
Using large containers, you can make a house for toys, and if you connect them together, you will get a multi-room dwelling. Or maybe the kid himself has already come up with a use for the bottles. Creativity and imagination will allow you to approach the process from an unexpected angle and create unique toys.
A plastic bottle is a simple item. But how versatile it is. Furniture made from bottles will be a wonderful decoration not only for a country house and garden, but also for a city apartment.
Originally posted 2018-04-19 05:20:13.
DIY children's crafts from plastic bottles
Whether it's entertaining or creating interesting decor, the ideal children's DIY plastic bottle crafts should combine both of these concepts. It would not be very pleasant if, as a result of painstaking and exciting work, you ended up with something not very beautiful
Therefore, when choosing among a variety of ideas, pay attention not only to the ease of implementation, but also to the end result, which must definitely find its place in the nursery.
For example, such a place can very easily be found by a stand for pencils and pens, made in the shape of a space monster, not at all scary, but very funny.
To work, you will need a suitable container, preferably already painted, so that you do not have to use additional paint from a spray can, as well as paper for applying the applique - face, hands, teeth, and so on. For more delicate natures, pencil cases with images of cats are suitable, which are also quite simple to make; the faces are not glued on, but carefully drawn with markers of different colors.
DIY crafts from plastic bottle caps
If the rest of the material has already been used to make beautiful flowers from plastic bottles, then we suggest you use absolutely all the spare parts and make crafts from plastic bottle caps with your own hands
, intended for children. It is the lids that accumulate a lot in the household, due to their durability, good shape and variety of colors, they can be very easily used as educational toys, objects for appliqués and even for didactic material that helps children's development.
The photo shows options for games that you can organize with or for children using multi-colored plastic covers. Worthy of attention is the option of turning the caps into chips for playing tic-tac-toe.
And if you insert small magnets from the back inside the lids and secure them with glue, you will be able to play not only on a specially drawn field, but also on any iron plate or refrigerator.
Animal toys created on the basis of lids will help you make a home puppet theater; with their help you can easily tell any fairy tale, from classics to stories of your own composition. As for drawings, this is a great way to teach children to count in older preschool years or learn colors in younger ones.
To do this, the picture shows circles of different colors, and the baby will need to find the right one among all the different colored lids and place it in the right place. The result is a simple and quite exciting game.
DIY crafts from plastic bottles for children
Do-it -yourself crafts from plastic bottles for children
It may not be very simple, because plastic is difficult to process; you need sharp scissors or a knife, special paints, hot glue, etc. Therefore, it will be better if you do all the work together, as a friendly team, trusting the children to complete simple steps, and leaving the work with cutting or treating surfaces at high temperatures for yourself.
In the photo you can see how easy it is to make small toys if you combine the bottom, stable part with the top. They can be securely connected with glue, or they can remain autonomous, looking like neat boxes. Be sure to paint it using acrylic or stained glass paints; children will like it much more. The idea of bottle nesting dolls painted in folk style is also interesting. To create them, you just need to find containers of different volumes, but of a similar shape, that could fit into each other.
This tutorial for making a lampshade using a container and lots of plastic spoons is a great option for a more complex collaboration. But the finished product will turn out so interesting and elegant that it can be used to decorate the interior, especially in a modern style.
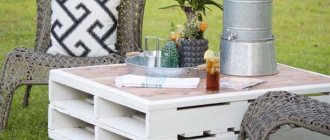
Picnic table
Next we will talk about country furniture, namely a table for breakfast in nature.
How to make such an original table? The principle of working on the product is quite simple. Glue the bottles to any surface, for example, a tray upside down. These will be the legs of the table, and the tray will be the surface.
To decorate the table, the product can be painted with acrylic paints, or various objects, such as old photos or postcards, can be glued to the tabletop. You can also use scraps of fabric for decoration.
If you are planning a large table, then the tabletop should be made of durable materials, for example, plywood, old wood, or a tabletop from an old table would be a good option for the top of a walking table. To give the table strength, you need to use more bottles, and you should also design the tabletop in the shape of a triangle, square, or circle. On the back of the table, make markings with a simple pencil and, using tools, connect the bottles and glue them with lids to the back of the table.
Related article: How to knit a beanie with stockinette stitch: master class with video
To lengthen and strengthen the table legs, you need to glue the bottles in a certain way. The bottom of the bottles from the first row should be in contact with the bottom of the bottles from the second row. You need special glue for plastic or universal glue.
Here is the finished table:
Crafts from plastic bottles for the playground
An incredibly beautiful bird with plastic plumage – a whole “clearing of fairy tales”. These are the peacock or firebird, swans, pigeons, bullfinches and parrots. All of them are made from empty PET bottles according to the general principle:
- Design an aesthetic bird's head with eyes and beak;
- Construct the torso and neck;
- String plastic plumage;
- Provide with wings and tail;
- Place on paws or secure to selected surface.
Plastic swans can be fenced off by a blue “lake” of upside down plastic bottles. Outlandish birds will decorate the trees in the corner of the garden, which is reserved for children's games. You can choose a themed decor, for example, a desert island with palm trees and parrots.
The material is collected throughout the year, but it’s easier to involve neighbors and acquaintances in the “ecological” cleaning project. There are special containers for plastic in the yards - it’s much easier to collect.
Preparation for work - removing labels and glue residues from plastic bottles; it is important to rinse well and discard the deformed material. If vertical fences are built, they need to be filled
Depending on the idea, sand, stone chips or dry soil are poured into PET bottles, burying them 1/3 of the way down.
If vertical fences are built, they need to be filled. Depending on the idea, sand, stone chips or dry soil are poured into PET bottles, burying them 1/3 of the way down.
For selected purposes, plastics of varying elasticity are used. Heat treatment required for filigree work (flowers)
It is important not to overheat the fragments cut into strips
Fairy-tale characters sometimes require additional painting. For example, it is better to cover pink piglets for a playground with an aerosol from a spray can and secure them with transparent acrylic paint.
Plastic bottles are an excellent material in the right hands. Using them as a basis, it’s easy to teach children a lesson in environmental education and fill your home or garden with practical things. With a creative approach, the color, volume and shape of plastic bottles themselves will prompt new ideas for an exciting creative process.
In modern times, many handicrafts have appeared who try to make furniture and interior items from old and unnecessary things. The scope for imagination in this area is enormous, so no one tries to limit themselves. Many people wonder how to make a sofa from bottles, because there is a great abundance of this raw material, and it is not very profitable to simply dispose of it.
And in fact, sofas made from bottles are very popular. They can fit very harmoniously into any country house or summer house. But people’s imagination is very developed and now some are already installing plastic sofas in their apartments. This is because it is very simple to make, you just need to be patient and have a large number of bottles of different denominations, but of the same shape.
There are special instructions on how to make a sofa from plastic bottles with your own hands, step by step. For this you will, of course, need a large number of bottles. It all depends on what shape you choose for your furniture. If you are making a sofa for the first time, then you should not aim at huge models; a small two-seater option is enough. If you are making simple furniture and are not going to cover it and soften it with foam rubber, then you can cope with this task in just a few hours. To do this you will need the following equipment:
- sharp and large scissors;
- regular and double-sided tape;
- about five hundred bottles with a denomination of two liters and four hundred with a denomination of one liter;
- sharp knife.
Cute donkey with a cart
This option is designed for beginners. This donkey will be an excellent decoration for your summer cottage. Thanks to the cart, the toy will become more original and can even serve as a flower pot.
So, you will need:
- A plastic container with a capacity of 5 liters, which will act as a body.
- 4 bottles with a capacity of 2 liters, from which the ears, neck, and head will be made.
- Milk containers with a wide neck - 4 pieces.
- Plastic bottles that are cut into thin strips to make a tail and mane. If you wish, you can use yarn instead, but this solution will not be practical.
- Glue, scissors, wire, tape, screws, small wooden planks, acrylic paint.
When all the materials and tools for making are collected, you can study the step-by-step instructions for making a donkey from plastic bottles with your own hands:
- We take a large plastic container and make a cutout in the neck area. The dimensions of the cutout should be the diameter of a two-liter bottle.
- The container intended for making the donkey's head should also have a similar cutout.
- We place two wooden planks in the body of the future donkey, which will act as the basis for the legs. To do this, you will need to screw on the caps of 0.5 liter milk bottles using self-tapping screws.
- We make 2 identical cuts on the donkey's head. The ears that we will insert into these cuts should be cut from 2-liter plastic bottles.
- Parts such as ears, head and neck should be connected using tape and glue, or wire.
Please note that to give the donkey stability, you can fill the legs with sand, and then screw them to the fixed lids.
The final touch is decorating the figure. It should be painted with acrylic paint, which is intended for outdoor use. We make the tail and mane from thick yarn, but it is better to use thinly cut strips from a plastic bottle. A homemade bottle cutter will do an excellent job with this task. We fix all decorative elements on the neck and leg of the animal.
You can make the donkey sad or happy if you draw its face. You can draw eyes or glue ready-made ones (you can buy them at a hardware store). An excellent base is plastic spoons. It is better to draw the nose and mouth, and in conclusion, do not forget to give your donkey a bridle and a cart.
Useful tips
Before you begin the process of creating an item, you should study some recommendations:
First, you need to decide, or better yet, schematically display the design of the future ottoman. This will be required in order to calculate the exact amount of material (bottles). The more massive you plan to make the product, the more bottles you need to take. Bottles must first be washed with a special brush, then dried open. This is done in order to remove foreign odors. The strength of the plastic can be slightly increased using one trick. So, the bottles should be placed in the freezer for several hours, then you need to tighten the caps of all bottles tightly and leave them at room temperature, due to which the air inside the container will begin to expand. In order to make a durable ottoman that does not deform even under strong pressure, it is necessary to fill 1/3 of the container with sand. This manipulation will allow you to get a durable product that will last for many years (the ottoman will be heavier and more reliable). An ottoman is a product that will be constantly sat on, so for its manufacture it is better to choose curved bottles, which are much stronger than straight ones. If you are going to make three-dimensional objects, then it is better to connect them in fragments using strong adhesive tape. This means that first you should tie two or three bottles together, and then form them into a product
You should not skimp on the connection, because the more tape you use, the better the design will be. To make the seat comfortable, the bottle structure is covered with a layer of padding polyester or other soft material on top, and only then can a cover be put on top. In order for the product to look aesthetically pleasing, it is important to make the cover exactly the size of the ottoman. The color of the product must be chosen in such a way that it looks harmonious with all interior items. When creating upholstery, it is necessary to use durable, wear-resistant material that will last a long time. Therefore, do not expect to sew a cover from silk, cotton or other delicate fabrics.
If pets live in the apartment, then you need to make sure that they do not sharpen their claws and teeth on the ottoman.
Manufacturing stages
Having decided on the desired type of furniture, you can proceed to its manufacture. It is necessary to calculate the required number of bottles in advance and prepare them. Some fans of recycling things collect basic material gradually. After waiting until a certain amount of empty containers is collected, they combine the bottles into a block.
In this case, it is necessary to take into account the thickness of the auxiliary elements - tape, film, covers. After creating a frame from plastic, the structure is supplemented with soft foam rubber, the seat is given rigidity through the use of plywood or chipboard, the furniture is decorated with fabric, although this does not significantly affect the occupied space.
To make a chair, you will need to create several sketches that, to scale, depict the desired piece of furniture from different angles. The drawing can be done schematically. Having previously indicated the length, width, height of all elements and plotting these parameters on the drawings, you can calculate how much material will be needed to bring the idea to life. When making a chair, you need to periodically (after creating each individual element) check the drawing.
Once all the necessary materials for making the chair have been collected, the preparatory work has been completed, you can proceed to the first stage. To make the blocks from which the frame is then made, you will need several bottles and tape. The whole procedure looks like this step by step:
- Two thirds of all plastic bottles should be cut in half. The part with the neck is directed with the lid down and inserted into the other half with the bottom. Then a whole bottle is installed into the resulting structure, onto the top of which the lower part of another cut container must be placed. The neck of the second bottle goes to waste. The result is a rather hard plastic element, reminiscent of a loaf.
- Having made a sufficient (according to calculations) number of such blanks, they should be connected into a single module using tape. For better stability, all bottles should be placed with their necks down.
- It is necessary to wrap the structure with adhesive film as tightly as possible. This way it will be possible to obtain an element that does not deform during subsequent use.
Cut off the neck of the bottle
Connect the whole bottle and the cut part, secure with tape
Connect the prepared elements with tape
For the base you need 4 blocks of 6 elements each
Assembly
You need to start assembling a chair from bottles by installing blocks in the form of a rectangle or square on the floor. Referring to the diagram, you need to fasten them with wire. This will create the foundation for the future product. The same blocks should be laid on top of it, but they should be placed across. If it is necessary to assemble in several rows, you can stack the elements in a checkerboard pattern. Next, you need to raise the rows to the height at which the seat is supposed to be built.
In order to make the structure stronger, it is recommended to install “risers” one or two bottles high in the corners of the base. They are formed from rounded blocks 10–12 elements thick. To fasten all modules, tape or cling film is used. The same round blocks are used to decorate the armrests. The back is created last - it can be made round or square, as desired.
Glue blocks with two elements to the base
Starting from level 4-5, add only backrest and armrest blocks
Ready product
The chair is covered with a suitable fabric over the foam pads. If you don’t have time to create a full-fledged cover, you can simply throw a blanket over the product. If possible and desired, furniture can be decorated with flock, nubuck, chintz, artificial leather, jacquard. If the product is intended for a cottage or garage, you should not use expensive materials - the cover can be sewn, for example, from old blankets. But at this stage, every craftsman who assembles a chair from plastic bottles with his own hands is free to let his imagination fly.
We invite you to familiarize yourself with New Year 2021 for children. How to have fun celebrating the New Year of the Rats with children at home: scenarios, ideas, competitions
Make a cover and put foam in it
Connect with tape
Cover with foam rubber
Creating upholstery
Cover with paint
Connecting bottles
Manufacturing workshops
Beginners should definitely read in detail the information on how to make furniture from plastic bottles. You should not take the master classes you like as the only possible assembly method. This is just food for thought, advice on technology and methods of connecting elements. Any ideas and inventions of your own are welcome. The only requirement is strength, ensuring the load-bearing capacity of the products. This is especially true for ottomans, armchairs and sofas. Other items may be less durable, such as cabinets. For a novice craftsman, it will be useful to familiarize yourself with certain assembly options.
Sofa
The plastic material from which the bottle is made is not designed for heavy loads. It will easily collapse under the weight of sitting people, so you will need a solid base. To make a sofa you need to stock up on plastic bottles. 2-liter samples will do. Assembly will require at least 500 pieces, so it is important to find the opportunity to find such a large number of products in advance. Some craftsmen simply purchase them at retail outlets. To connect the parts you will need wide tape.
Nuances of making furniture drawings, review of useful programs
The seat and other elements of the sofa are assembled from separate modules, each of which consists of bottles cut across. The procedure for manufacturing one module step by step:
- cut off the bottom and top of the bottle by about 1/3 of the height;
- insert the neck with the cork inside into the rest of the bottle;
- a whole bottle is placed in the resulting part, bottom first;
- the neck is covered with the previously cut bottom;
- All elements are wrapped with tape for a strong connection.
There should be enough such structures to make a seat of the required area. For one seat you need to assemble 16 modules. A two-seater sofa will require 32 such structures, and a three-seater sofa will require 48 for the seat alone. The back and armrests are assembled from similar elements, the length of which is increased to the required size. To do this, cut off the middle part of the bottle and use it as a connecting coupling between two modules.
After connecting the parts, thick cardboard and foam rubber are attached to the surface of the seat and backrest. The last step will be covering the sofa with upholstery material. Usually they make a cape that repeats the shape of the entire product. Some craftsmen take a more thorough approach and first attach a layer of padding polyester and burlap, which improves the quality of the soft element.
Assembly diagram of individual sofa modules
Ready sofa
Armchair
Assembling a chair is practically no different from making a sofa. The only difference between the two pieces of furniture is the length of the seat. Typically, it takes 250 2-liter bottles to create a chair. The set of tools is the same:
- scissors;
- wide tape.
Some craftsmen use cling film instead of the latter, which is much wider and allows the pack of modules to be wrapped much more evenly. They are connected with adhesive tape in 2 or 3 places, so the consumption of adhesive tape is quite large. Making master class:
- The modules are assembled. You will need 16 pieces for the seat, for the back and armrests - optional, depending on the design.
- The seat modules are first connected in pairs, then the pairs are fastened into blocks of 4 pieces, then 4 blocks of 4 modules each are wrapped with tape.
- Higher modules are assembled under the back and armrests. Here you should be guided by your own ideas about convenience. Usually they sit on the finished seat and lower their arms bent at the elbows freely. This is how you find the height of the armrests. For the backrest, the height criterion is the location of the back of the head of the sitting person.
- Collect all the parts and connect them together.
- Lay cardboard, lay a soft element (foam rubber, children's mattress).
- The product is decorated in a predetermined way.
Some sources claim that crafts from plastic bottles can be made literally on the go - they say, guests have arrived, but there is nothing to sit on. This is far from the truth; the assembly process is quite slow. But you can involve children in the work and teach them simple techniques for making furniture from plastic bottles.
Cut off the neck of the bottle and connect the cut part with the whole bottle
Tape the resulting joint with tape and connect several elements together
Assemble a block of 6 elements and make the base of the chair
Glue the blocks for the armrests and make several layers in the same way
Carefully secure each block and check the reliability of the connections
The chair is ready, if desired, you can sew a cover for it
Ottoman
Making an ottoman is one of the simplest and most reliable ways to make seats from plastic bottles. Even a novice master can handle it. There are two assembly options:
- Rectangular ottoman. Usually a cube or parallelepiped is assembled from plastic modules, covered with a soft foam element and covered with an outer cover made of upholstery fabric or a home-made decorative cape.
- Round ottoman. A stack of modules is a cylinder mounted on the end part. The design method is the same, but the shape of the cape is different - it is round at the top.
Making a cabinet for a balcony with your own hands, master classes
The procedure for assembling the ottoman:
- The first step is to make modules from bottles. One container is cut crosswise just above the label, the neck is placed in the lower part.
- The bottom of another bottle is inserted into the resulting blank, and its neck is covered with the cut bottom. It is possible to assemble modules of the desired height by adding a certain number of elements.
- The finished modules are first connected in pairs, then bundled into briquettes of 4 pieces. From these, a seat of the required size is selected.
- Place a rigid pad (cardboard, fiberboard) and foam rubber.
- Cover the finished item with a decorative cape.
Assembly diagram for a round ottoman
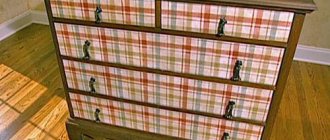
Shelves and cabinets
To make shelves or cabinets, perform the following steps:
- The part from the bottles where the narrowing begins (neck) is cut off. You won't need it, so you can throw it away.
- The elements are coated with acrylic paints. The choice of color is the prerogative of the owner; you can use any available option.
- When the paint has dried, the parts are connected to each other. If necessary, install various decorative elements or lighting.
- Fastening to the wall is done using self-tapping screws.
To assemble the cabinet, the same steps are performed, only in this case you need to add vertical elements (side walls). The number of shelves can be any, but you should remember the limited load-bearing capacity of such products. To increase rigidity, it is recommended to use a support structure made of plywood, a frame made of planks or tubes. With this approach, the strength of the shelves increases, and it becomes possible to store more things on them. The supporting structure must be painted in the same way as the shelf itself.
Bottle shelf
Mini bottle toy rack
Table and chairs
To assemble the table you will need a ready-made plane - a tabletop. This could be a piece of plywood, chipboard or a lid from a regular product. Then do the following:
- Markings are made on the back side of the lid, marking the installation points for the screws that will secure the bottle caps.
- The caps are screwed on with self-tapping screws, after which the bottles are attached to them. If a greater height is needed, the length of the material is increased.
- All bottles are connected to each other with universal glue.
If necessary, you can paint the supporting structure with acrylic paint.
The chairs are assembled using the technology of making an ottoman or armchair. However, there is another way:
- To make a chair, a frame is assembled from tubes, reinforcing bars or wooden planks.
- Only the seats and backs are made from plastic bottles. You can get by with just containers or lay foam elements on top.
The main advantage of this method is the strength and stability of the chairs. If a sitting person leans on the back, he will not fall back, as can happen in the case of a sofa or chair made only from plastic bottles.
Bottle table
Bottle chairs on a finished frame
Furniture for dolls
Doll furniture made from plastic bottles is made based on the size of the toys. Usually they make baths, cradles or cabinets for various small items. For example, a chair for a doll is made as follows:
- A piece equal to the height of the future product is separated from the bottom of the bottle.
- The area where the backrest meets the seat is cut out.
- Thin foam rubber or thick fabric is placed inside, imitating a soft element.
- A circle is cut out of cardboard and firmly inserted into the hole. This will be the seat.
- The same soft element as on the back and armrests is placed on it.
Features of the use of furniture polishes, popular brands
To make doll furniture from plastic bottles with your own hands, you do not need any technological rules, and the degree of strength and reliability is not important. The main advantage of this activity is the opportunity to teach children something new, give them a chance to show their imagination, and develop creative abilities. The child can come up with a way to make doll accessories, including mastering the basics of design art.
Materials for work
Cut a chair shape from a bottle
Place the piece on elastic foam and trace it along the contour to create a pattern for the entire chair. You need 2 such parts
Make the same patterns on fabric
Cut a circle out of cardboard
Glue elastic foam patterns to the bottle blank inside
By analogy, glue the workpiece on the outside
Cut three more circles from cardboard
Sew fabric patterns along the contour of the top of the chair
Then sew the side seams
Turn the cover right side out
Place the cover on the chair blank
Cut out a foam circle the size of a cardboard one
Glue the foam between two cardboard circles
Insert the structure inside the chair
Taking a cardboard circle, cut out the same one on the fabric, but increasing the contour by 2 cm
Sew along the edge of the fabric with a needle and pull the fabric with the cardboard circle inside - you get the bottom of the chair
Pull the fabric on the cover along the edge to tighten the bottom
Sew the bottom with a hidden seam to the chair
Take the remaining cardboard circle and attach the padding polyester to it so that you can understand how soft the seat will be
Cut the fabric so that there is enough for the entire seat and grip
Pull the fabric over the padding so that the cardboard circle becomes the bottom of the seat
Insert the seat into the chair
The chair is ready, you can play
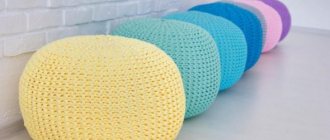
How to make an ottoman
The easiest piece of furniture to make, as well as the most useful piece of furniture for home use, is a pouffe or banquette. Such an item can be placed both in the hallway and on the balcony, in the nursery or in the bedroom. Or you can place it in the living room, where there are always not enough seats when a large company gathers.
A DIY bottle ottoman, skillfully decorated to match the interior, will surely impress your guests. And if they also find out what such a useful item is made of, their surprise will know no bounds, because from the outside the ottoman looks like ordinary furniture.
Necessary materials
For products that will serve as furniture, it is better to use dense, durable materials. It can be denim, thick linen or special furniture fabric. A pouf covered in faux fur looks very nice. This product immediately adds luxury and style to the room.
To create a handmade product from recycled materials, you will need some materials other than plastic containers. To make an ottoman from plastic bottles, you need:
- plastic containers with a volume of 2 l - 16 pcs.;
- Double-sided tape;
- thick cardboard or plywood;
- stationery knife;
- scissors;
- furniture fabric;
- foam rubber or synthetic winterizer 3-4 cm thick;
- lightning;
- sewing machine.
It is worth saying that if you do not have the skills to sew on a machine or if you do not have the machine itself, a reasonable solution would be to cut out the parts from the fabric and take them to a sewing workshop for stitching. Such an operation will take a few minutes and will not require large financial investments, but will guarantee that the cover will be sewn with high quality and accuracy.
https://youtube.com/watch?v=OAWBzHP6JLc
Manufacturing sequence
It is necessary to strictly follow the stages of creating an ottoman, because otherwise it is easy to miss important details, which will not have the best effect on the quality and appearance of the finished product. It is recommended to first draw on paper the desired product and a drawing with approximate dimensions, this will make it easier to track whether the furniture is the desired height and desired dimensions.
Making a pouf begins with a frame (base), the role of which is played by bottles. Step-by-step instructions for an ottoman made from plastic bottles, made with your own hands, look like this:
- Take the first bottle, it will perform the axial function. It is wrapped with tape and the next bottles are lined up around it in a circle.
- Each of them is wrapped with tape, and then all the bottles are wrapped together to secure the structure. In this way a figure resembling a cylinder is obtained.
- Cut out circles from cardboard or plywood to the size of a bottle cylinder.
- Cut circles are placed on the top and bottom sides of the cylinder. The upper circle will be located on the necks of the bottles, and the lower circle will be located under their bottoms.
- The top and bottom are secured with tape, having first carefully centered them relative to the base of the bottles.
- The entire structure is wrapped with padding polyester or foam rubber. You can secure it with threads or tape.
- The resulting foam pouf is measured and fabric parts are cut out according to the measurements. You should end up with 3 pieces (2 in the shape of a circle for the top and bottom and 1 in the shape of a long rectangle for the side).
- Using a sewing machine, the parts are sewn together, and a zipper is sewn into the bottom side of the cover.
https://youtube.com/watch?v=ue4S6Abj7Vk
You can even use such a chair as a bed for your favorite cat or dog. Pets are usually very fond of such soft pieces of furniture and make them their permanent habitat.
A pouf made of plastic bottles, a master class for which is presented on the website, can have many variations: cylindrical or cuboid, wide or flat, and you can make this piece of furniture tall and elegant by building 2 tiers of plastic bottles one on top of the other. You can even attach small legs to the product using small plastic jars or bottles. The imagination when making this piece of furniture from recycled materials is practically unlimited, and handicraft will certainly bring pleasure to the craftsman who is not afraid to master the process of creating furniture with his own hands.
Instructions for implementation
Let's take a closer look at how to make common furniture options from plastic bottles.
Lightweight and comfortable pouf made from bottles, covered with fabric
Ottoman
- We take the bottle and make an incision in its wide part;
- insert another part into it with the neck;
- repeat steps 1 and 2 until the desired height of the product is obtained;
- wrap the resulting structure tightly with tape;
- we make a sufficient number of such blanks of the same height and fasten them together with adhesive tape;
- result: round design;
- we cover it with foam rubber to ensure softness;
- we upholster the product and get a full-fledged ottoman.
The product can be decorated in different ways, the main thing is to choose the right pouf style.
We make a beautiful ottoman from bottles according to instructions with photos
Shelf
This version of the product is suitable for manufacturing by beginners. The shelf is suitable for a room, country house and location on the site. It does not take up much space and is suitable for storing small items. To make the product, you need to complete the following steps:
- select the size and shape of the structure;
- cut off the material at the neck;
- cover the resulting parts with acrylic paint (you can take several colors);
- We fasten the parts with tape to each other;
- We fix them to the wall with self-tapping screws.
You can add an additional element - plywood, to which the parts are secured, this will add reliability to the structure.
Convenient and spacious shelf for toys made from large plastic bottles
Sofa
A sofa made from plastic bottles will look original in the garden. To do this, you need to follow the steps provided:
- purchase two-liter elements in quantities of 500 pieces;
- you need to buy wide tape;
- make a reliable foundation;
- The top is removed from each bottle, and the neck down should be inserted into the lower part;
- Another bottle is installed in this design, which is covered with a cut-off bottom;
- We use tape to connect two elements; the product must be wrapped securely;
- the resulting modules serve to form the structure itself;
- first the seat is assembled, then the supporting part, and lastly the armrests;
- We fix all the elements with tape.
You will need quite a lot of adhesive tape - this should be taken into account when preparing the tools. The sofa can be decorated as desired.
Beautiful sofa made from bottles with your own hands
Stylish and comfortable sofa frame made from bottles
The process of making a chair from plastic bottles with step-by-step photo instructions
Stool
Even a beginner can make such a piece of furniture. To do this you will need to complete several steps:
- preparation of 10 two-liter parts filled with sand or water for structural reliability;
- rewind them tightly with wide tape;
- production of individual sections (used as legs) and their fixation;
- installation of a seat embedded from a plywood sheet, it is nailed or screwed to the bottle caps.
It is necessary to use a large amount of adhesive tape to increase the reliability of the stool.
Simple stool made from plastic bottles
Original do-it-yourself stool made from bottles
New Year's crafts from plastic bottles
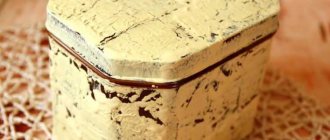
Editorial “So Simple!” I have prepared for you an unusual master class on how to make a Christmas bell from a cola bottle. Easier than ever and without extra costs!
Manufacturing
- Cut the plastic bottle into two parts as shown in the photo. The neck of the bottle will serve as the basis for the future bell.
- Carefully wrap the neck of the bottle with cling film in 2-3 layers.
- Randomly wrap the base of the bell with linen thread, coating the joints of the thread with PVA glue. You need to make 2-3 layers of winding (depending on the thickness of the thread).
- After the bell has dried, carefully remove the film along with the plastic neck.
- Voila! Our Christmas decoration is ready!
I also suggest that you familiarize yourself with a few more ideas for New Year’s decor that can be made from unnecessary plastic bottles.
- Plastic is a material that is everywhere now.
Of course, people find plastic items very beneficial and useful, but we shouldn’t forget how harmful it is to the environment. In my opinion, a great way to combat the excess of plastic items is to transform them into useful and beautiful things. Here is a striking example: making New Year's penguins from plastic bottles. - You can also cut a plastic bottle into thin rings, then fasten and decorate them to create such unusual and beautiful Christmas tree balls.
- You can make equally beautiful Christmas wreaths from the bottoms of plastic bottles; you can use them to decorate your front doors, windows, staircase railings and fireplaces.
- Even multi-colored plastic can be skillfully used as decoration. A little imagination and scissors is all you need.
- And this idea is perfect for those who have dirt and slush outside the window, but really want to build a snowman!
- I really like the idea of creating snowflakes from plastic bottles. All you need is to cut off the bottom of the bottle, make a hole with an awl and, of course, draw the snowflake itself.
You can assemble a creative Christmas tree from these snowflakes.
Editorial Board
We also have a wonderful master class for you on how to create a caramel New Year's garland using plastic bottles, colored packaging garland and LED lanterns. On the eve of the New Year, don’t be lazy to make such a decoration. It will come in handy more than once, tested from my own experience!
As you can see, even ordinary plastic bottles can become an excellent material for creativity. Moreover, the New Year is just around the corner, which means that you need to create something new and get rid of the old. And these ideas will just help you get rid of the old, while creating an original and beautiful holiday decor.
Share these bright New Year's ideas and ideas with your friends, they will be grateful for it.
Flight of fancy
Making furniture from bottles is a way not only to save money, but also to show individuality. Indeed, exterior and interior items are quite expensive . An alternative could be furniture made from scrap materials. Plastic containers are used as containers for food and drinks. Every day there is at least one empty plastic bottle in the trash bin. But even from garbage you can create a unique designer item.
You can make budget pieces of furniture, for example, for a dacha yourself, from plastic bottles.
If you have handicraft skills and a wild imagination, you can create beautiful objects that will fit perfectly into any interior.