Deciding on the sizes
If you choose the right bedside table, it will fit perfectly with the bed and look like a single ensemble with it. Although we note that the color of the cabinet may contrast. In this case, the dimensions must be selected with special attention - it is important that the bedside table does not become “sandwiched” by the bed and the wall, since you should always leave enough free space. But if free space is in short supply, then it is better to give preference to a hanging cabinet - in this case it will suit better.
Hanging bedside table
On a note! For a bedroom, a cabinet with closed and open shelves is perfect, which will allow you to hide your personal belongings from others, while a vase of flowers or various kinds of decorative items can be placed on open shelves. As an option, you can make a coffee table with your own hands.
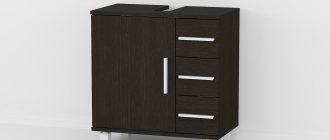
Large bedside table-chest of drawers
Guides
If you decide to purchase modern products for drawers, you need to consider the following:
We recommend watching
Instructions on how to make a coffee table with your own hands: step-by-step description of how to build high-quality furniture (120 photos and videos)
DIY mirror decor - the best design ideas and tips for creating a stylish decoration with your own hands (130 photos and videos)
- How to make a cat house with your own hands - 110 photos of original ideas and solutions. Tips for choosing and using scrap materials
There is no need to look at the brand; the important nuance is the features of the fastener. Reliable manufacturers sell hardware with shaped heads, and a suitable key is included in the kit.
The assembly manual must contain complete product specifications.
The best option would be inexpensive guides with propylene rollers. But they are not designed for heavy loads.
A few words about the functionality of bedside tables
If you plan to store a large number of small items, then it is better to give preference to a cabinet with many drawers. If only a few books are stored there, then you can get a lightweight non-standard design, abandoning the massive traditional “cube”.
Mirrored bedside tables are perhaps the most popular of all mirrored items. They constantly appear in fashionable interiors
The optimal location for the bedside table is near the bed. It’s not even worth talking about the benefits of a bedside table - you can store books here, and put an alarm clock or, say, a glass of water on top. In addition, in the nightstand there may be a place for linen - both underwear and bed - or a first aid kit, cosmetics and other things indispensable in everyday life. And for the most convenient and ergonomic arrangement of all this “good”, the selection of a bedside table must be taken with full responsibility.
DIY bedside table in grunge style
Obviously, the floor design is the most common. In addition, such a cabinet can be of two types:
- without legs;
- with legs.
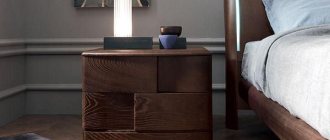
Mahogany cabinet
The original option is an open bedside table without legs.
A slightly less common option is a hanging one. Due to its design features, it looks weightless, as if floating in the air.
Hanging cabinet that matches perfectly with wall decoration
In any case, you will have to decide for yourself which cabinet to buy/make yourself - it all depends on the interior features of the bedroom and your personal preferences. But we note that a hanging cabinet still has a significant advantage over a floor-standing one - it allows you to install some objects underneath it (say, a basket for various small items or a box).
Also, bedside tables are classified depending on their shape. Let's take a look at the most common options.
Rectangular/square . Such designs are universal, and therefore will easily fit into any design. In addition, they can be located anywhere in the room.
Square bedside table with decorative windows on the door
Angular _ The best option for small spaces.
Convenient and comfortable corner bedside table
Oval/round . They look, of course, elegant, but are not universal, so they will not be appropriate in every interior.
Unusual round bedside table in red
Important! There are also more exotic cabinets - such as a design in the form of a pyramid or chest. Yes, such bedside tables can hardly be considered universal and functional - they are rather decorative interior items.
Country-style suitcase bedside table
Another classification is based on the purpose of the bedside tables. Medical care, which should be in every home, deserves special attention.
Cabinets in the hallway
In this room, a nightstand comes in handy. Not much attention is paid to pieces of furniture in the hallway, but space for shoes is needed here.
A shoe cabinet can be made quite easily by calculating the expected number of pairs and the required dimensions for them.
In addition to shoes in the hallway, you need space for gloves, hats, bags and the like. The design will also depend on individual preferences.
Features of choosing a bedside table depending on style
Yes, each interior style has its own type of bedside table. And it is not surprising, because we are talking not only about a useful thing, but also about an element of the interior that can emphasize the stylistic direction of the room or, alternatively, negate all efforts. How to organically fit a bedside table into the interior? Let's get acquainted with the most popular styles and find out which designs are suitable for each specific case.
Interesting and comfortable bedside tables and tables that will elevate the interior
East style . In this case, the ideal option is a bedside table with small legs made of rattan. Frequent weaving, natural colors, and a traditional rectangular silhouette will look great.
Bedside table in colonial style
Classic style . Here preference should be given to furniture made of natural wood. You can, for example, use a large and squat cabinet with curly handles as decorative elements. As for color, dark tones will look good in a classic style. A bedside table that meets all these requirements will emphasize the aristocracy and fundamentality of the classics.
Palazzo . The main thing in the Italian style is attention to detail (aged or varnished shelves, forged iron elements, etc.).
Italian bedside table
Scandinavian . The best option for him would be a white cabinet made of natural wood and without unnecessary decorative elements. The design should be as simple as possible. A good option is a bedside table made of unpainted beech. Give preference to massive legs and narrow simple shapes.
Interior in Scandinavian style - rational, but very attractive
Provence . Wooden cabinets are suitable for this style, preferably with graceful outlines and narrow curly legs.
Bedside tables in Provence style
Minimalism, hi-tech . Obviously, designs with metal frames are more suitable for these styles. Glass doors would be a great addition. It is important that a minimum of unnecessary parts be used.
Sophistication and rigor of high-tech style
Finishing
The easiest way to finish is to cover a finished and sanded bedside table with adhesive film, color matched to the overall interior design, preferably coated with acrylic-based varnish.
Under varnish, even when exposed to direct sunlight, the appearance will last for about ten years.
Next, we will consider the types and designs of cabinets.
We recommend watching
- How to make an ottoman with your own hands - step-by-step instructions and basic options for how to build an ottoman (100 photos)
How to make upholstered furniture with your own hands - basic principles of furniture construction and instructions for beginners (98 photos)
Instructions on how to make a table with your own hands - tips on choosing the design, size, shape and type of table (95 photos)
What material should I use for the bedside table?
Most often, the difficulty in this matter is the choice of material from which the bedside table is made. Let's take a look at the most popular options.
- Natural wood. Durable, environmentally friendly and simply aesthetically attractive material. But the cost of wood is corresponding. Give preference to birch, pine, mahogany, beech and oak - these species are the most popular. Typically, the cost of pine is much lower than oak. A cabinet made of natural wood will serve for decades, and therefore, if you have a habit of frequently changing furniture, such a design may somewhat limit your freedom of choice.
Wooden bedside table - Chipboard, MDF. A more budget-friendly analogue of natural wood. The service life of materials is shorter. A good option for those who want to save money and like to frequently change the decor of the room.
Wooden cabinet with chipboard front
Side tables in the living room
The cabinets in the living room, according to the latest standards, are made in long and low dimensions.
The configuration of the product is selected in combination with the design style of the room. You can also provide space for television equipment.
Is it possible to save money somehow?
Any repair work is, first of all, a blow to the seed budget. Yes, it is at least impractical to save on building materials, but the situation can be saved by making furniture with your own hands - by the way, even a non-professional can easily cope with this, having detailed step-by-step instructions. Undoubtedly, this applies mainly to simple subjects. A bedside table, for example, can be made quickly and inexpensively with your own hands.
Homemade bedside table from old drawers
On a note! You cannot skimp on materials for DIY production. After all, everyone knows that the stingy has to pay more than once. If you use low-quality consumables, the work may have to be redone.
Yellow bedside table
Bedside tables
You can make a simple bedside table for your bedroom. Optionally combined, in which the top shelf without doors is intended, for example, for:
- glasses;
- telephone;
- alarm clock;
- phone.
The closed parts can be used to store anything from books to bedding.
Shelves in the form of racks are preferred by fans of functionality.
Making a bedside table - drawings and preparation
First you need to decide on the design of the future bedside table. You can draw a drawing on paper, although it is easier to use special computer programs (Google SketchUp, T-FLEX Furniture, Astra Furniture Designer). In any case, you need to know exactly the design parameters - height, length, width...
Bedside table - drawing
Corner cabinet diagram
Scheme of a simple cabinet
Drawing of a large wooden bedside table for a TV
Drawing of a solid wood bedside table
Blanks can be ordered from the nearest carpentry workshop. Here, of course, it is better to trust the specialists, but you can still save money. So, you can glue the edge to the end of the boards with your own hands using a regular iron. To do this, you need to purchase tape and, using an iron, fix it on the ends of the workpieces. You can go even further - make your own blanks using chipboards. But in this case, the workpieces will have to be additionally processed with a grinding machine to make their surface smoother. Also, all elements should be treated with stain to protect them from harmful environmental influences.
Dark rectangular cabinet suitable for loft style
Wall hanging bedside table for bedroom
Now all that remains is to assemble all the elements into one structure using glue and screws. The blanks ordered in the carpentry workshop must be connected with hexagon bolts - for such fastening it is necessary to first make holes of the required size.
At the end, the selected fittings are installed. By the way, when choosing it you need to be guided by both external attractiveness and functionality. The edges need to be glued.
Neutral colors are pleasantly soothing, setting you up for relaxation and a pleasant stay.
Another idea for a bedside table
On a note! Now let’s take a closer look at the process of making a bedside table with your own hands. Below are step-by-step instructions for making a few easy options you might be interested in.
Video – Bedside table
Cabinets on the balcony
It is better to make a bedside table for the balcony on the basis of a frame. This will make it possible to save on sheathing, because only the facade will have to be sheathed if it is designed without gaps on the sides; this option will also be much stronger, allowing the tabletop to be used for various purposes.
Option No1. Simple DIY bedside table
This example will look at the assembly process from blanks ordered from a carpentry workshop. So, for work we will use:
- 6 furniture corners (plastic double);
- 1 tabletop;
- 2 drawer bottoms;
- 2 sidewalls;
- 1 back wall of the bedside table;
- 1 internal lower shelf;
- 4 guides;
- 4 front/back walls for drawers;
- 2 handles;
- 2 drawer fronts;
- 2 facades of the lower part.
We also note that chipboard sheets were used to make the bottom shelf and drawers, wood (pine) was used for the fronts and sides of the drawers, the countertops, and 5-mm fiberboard was used for the back wall of the structure.
Making a bedside table with your own hands
Step 1. After receiving all the required blanks, painting begins. There is nothing complicated in the process itself, so let’s just get acquainted with the result of the work.
Blanks for the future cabinet
Painted blanks
Step 2. The lower shelves were not painted - even if this is not very attractive, no one will see them anyway.
These are the future drawer bottoms
Step 3. To begin with, furniture corners are screwed to the inside of the sidewall - 2 at the bottom (100 mm from the edge), 2 at the top flush, as in the photo.
Sidewall of the future design
The lower furniture corners should be located 10 cm from the edge
Screwing the lower corners Fixing the upper corners
Step 4. An internal chipboard shelf is attached to the lower corners, and a tabletop is attached to the upper corners. When the 4 elements of the frame are assembled, the structure may be slightly skewed - do not be alarmed, everything will be aligned using the back wall.
Attaching the inner shelf
The bottom shelf is screwed on
Important! By the way, about the countertop. Its width in our example is 600 mm, and its depth is from 430 mm (at the edges) to 460 mm (in the center). As a result, the front tabletop turned out to be somewhat convex to match the design of the bed.
The table top is screwed on
The front of the tabletop protrudes slightly
The frame of the bedside table is assembled
Step 5. After assembling the frame, the guides are attached.
Guides are attached
In our example, they are screwed to the bottom of the drawers, but this is a little incorrect. It is preferable to attach the guides to the middle of the drawers so that they do not touch the facades. In addition, the length of the guides should be less than the depth of the entire structure, by about 5-10 cm. They must be mounted flush on the front side.
The length of the guides should be 5-10 cm less than the depth of the bedside table
Step 6. Below you can see the handles that were chosen for the drawers.
Drawer handles
Step 7. After painting the facades in one layer, mark the locations of future holes for handles.
Marking future holes on the facade
Step 8. Next, the holes themselves are drilled. It is worth remembering that they must be strictly in the middle, and therefore you should act very carefully.
Holes are drilled
Step 9. This is what facades with handles painted in one layer look like.
Facades with handles after the first painting
Step 10. This is how they should look after applying the third layer of paint (the handles, of course, need to be removed before each painting).
Facades with handles after the third painting
Step 11. The next stage is assembling the boxes.
Assembling boxes
The drawer parts are fastened with self-tapping screws, for which holes were previously made with a thin drill.
Box assembly process
The assembled boxes should look something like this.
Assembled boxes
Step 12. The bottom of each box is attached using a stapler. On one side the bottom is fixed flush, while on the rest it is leveled so as to avoid distortions.
The bottom of the box is secured with a stapler
Step 13. After this, the drawers are attached to the guides.
The guides are screwed in. The bottom drawer is almost ready.
Step 14. Next, holes are drilled for self-tapping screws, through which the drawer fronts will be secured.
Holes for self-tapping screws are drilled
Step 15. The fronts are attached to the drawers. After this, a fixed facade is attached, for which a couple of furniture corners are used.
Fastening the lower fixed façade
The process of attaching the lower facade
The work can be considered completed. The result looks like this.
This is what the finished bedside tables of the design described above will look like
Option No2. Unique pine bedside table
Today it is not easy to find a truly original, but at the same time simple bedside table. And if you have previously dealt with wood, then we suggest making such a unique design with your own hands.
The end result should be a bedside table like this
Table. Instructions for making a bedside table from pine.
| Steps, photo | Description of actions |
| Step 1 | To begin, prepare all the necessary tools shown in the image. |
| Step 2 | The material will be natural wood (pine), which can be purchased at a hardware store. |
| Step 3 | Work begins from the inside of the future structure. |
| Step 4 | The boards are connected to each other as shown in the image. |
| Step 5 | They are installed vertically. |
| Step 6 | After this, the lower and upper parts of the bedside table are nailed. |
| Step 7 | The result should look something like this. |
| Step 8 | Here are the materials you will need to make the box. |
| Step 9 | First, the bottom of the box is created. |
| Step 10 | Photo of the work done. |
| Step 11 | After this, the guides are nailed. |
| Step 12 | The second guide is nailed on the opposite side of the box. |
| Step 13 | The finished box will look something like this. |
| Step 14 | All that remains is to insert the finished box into place. That's it, the simple wooden cabinet is ready! |
| Step 15 | At the end, you can paint it (preferably with white paint) or cover it with stain. |
Details
Having decided on the dimensions, you can begin making blanks.
According to the dimensions indicated in the diagram for assembling the cabinet, compiled with your own hands, prepare the main parts:
- two side walls;
- back wall;
- table top;
- bottom part.
The rest depends on the design of the cabinet.
Option No3. Bedside table made of pallets
To minimize costs when making a bedside table, you can take pallets from building materials. They (pallets) can be not only wooden, but also metal and plastic.
Pallets have many standard sizes, but often only 2 are used:
- 120x80 cm (European);
- 120x100 (North American).
Stage No1. Preparing everything you need
For work you will need the following consumables:
- pallets (in our example – large double ones);
- pieces of plywood (can be replaced with other sheet material);
- nails;
- glue;
- screws;
- glossy varnish (for wood), water-soluble.
Pallets are used to make the cabinet.
As for the tools, you will need:
- pencil, square and tape measure;
- mount;
- screwdriver;
- hammer;
- clamps;
- Circular Saw;
- holdfast;
- Sander;
- electric jigsaw;
- ballerina (or hole saw);
- screwdriver;
- electric drill.
On a note! If we talk about glue, then it is better to give preference to PVA - it dries quickly, provides a strong connection, and can be easily removed when squeezed out.
Stage No2. Removing the pallet
Of course, new lumber can be used instead of old pallets, but the cost of the bedside table will increase greatly because of this. Therefore, we begin this instruction by disassembling the pallet.
To work you will need a hammer and a pry bar. To minimize damage to the wood, it is recommended to first loosen the boards using a chisel. By the way, an electric reciprocating saw is perfect for dismantling - its metal blade should be inserted along the joint of the boards to cut the nails connecting them. After this, the nails can be easily removed, while the wood will remain virtually undamaged.
Stage No3. Blanks for creating a frame
It will consist of 10 planks (4 for the back wall, 3 for the side walls), which will be connected by a pair of rectangular frames.
Drawing of a wooden bedside table
Using a circular saw, 10 boards are cut, each 520 mm long (the length can be any). Planks for the rear wall and those of suitable quality for the side walls are selected. Each set of planks is chipped together to measure the overall width. The resulting figure will be needed when creating rectangular frames.
Measure the width of the folded boards
Each frame is made of 4 bars. When cutting bars, it is very important to observe all dimensions exactly.
Frame drawing
Note! It is advisable to use a hand tool for cutting workpieces rather than an electric one - this way the results will be more accurate. You will be surprised, but a hacksaw is ideal for this. If we consider power tools, then preference should be given to a band jigsaw, but, alas, not every home craftsman has one.
Stage No4. Rectangular frames
When all the blanks are made, rectangular frames are assembled. In the finished cabinet, the latter will not be visible, and therefore you don’t have to worry too much about the aesthetics of their connection. The width of each workpiece is 7 cm. If there are no screws of the required length, holes are made with a 12 cm drill to 1⁄2 the width of the block.
Finished frame for a bedside table frame made of wood
You need to make sure that the dimensions of both frames are identical . When tightening the screws, it is recommended to clamp the lower and upper parts together so that they exactly match in size.
Stage No5. Planks for countertops
Upon completion of the previous stage, blanks for the table top of the structure are cut. Pieces of the required length are cut with a circular saw with a slight allowance.
Preparing boards for countertops
Stage No6. Workpiece grinding
Before assembling the frame, the boards are thoroughly cleaned with a grinding machine. Of course, you can try to do this manually, but using a grinder is both better and easier. The movements should be circular - this will create a beautiful texture.
Sanding boards
Note! If you want, you can get an unusual effect - to do this, the external surfaces should be thoroughly cleaned (almost to a mirror shine), and then treated with coarse coarse sandpaper to deliberately create defects and irregularities.
Stage No7. Frame
For the final assembly of the structure body, only nails are used. Additionally, you can use glue, but this is not necessary - the frame will already be quite strong.
It is important that the wood is dry during work, otherwise it will dry out once it is in the house, and its attractiveness will noticeably decrease. Yes, this can later be attributed to the rustic style, but it is still advisable to dry the wood first.
First of all, the top cover is assembled on a rectangular frame. The ends of the boards that extend beyond the structure are brought to the required dimensions using a grinding machine.
The tabletop of the future design is being assembled
Next, the back and side walls are nailed. Let’s make a reservation right away that this is quite difficult to do - the lower frame must be well fixed, otherwise the rectangularity will be disrupted when hammering in nails. After this, the front surface is assembled.
Installation of bedside tables
Important! Instead of nails, it is still better to use screws - this way the parts will be properly fixed without the risk of shifting from being hit with a hammer.
Stage No8. Plywood inserts
To make the drawer slide easier and more freely, a couple of pieces of plywood are glued from the inside to the bottom frame (see diagram below).
Gluing plywood inserts
Stage No9. Drawer
In our case, it will be assembled from a piece of plywood (recommended thickness - 4 mm) and five pieces of wood.
Making a box
- The required piece of plywood is marked and cut using a saw.
- After measuring the height in the workpiece from which the front wall will be made, a groove of 8 mm depth is cut out. The plywood will be inserted into this groove.
- The remaining walls are cut off.
- The walls of the box are placed on top of the plywood and connected with nails (additionally, glue can be used).
The finished drawer of the bedside table
Due to the fact that it is the drawer that will be subject to the greatest loads, its walls can be additionally connected with iron corners - this way its rectangularity and strength will be preserved.
Stage No.10. Shelf
When the box is ready (its front wall will be finalized a little later), you can begin strengthening the shelf. A pair of slats are attached to the side walls using screws, after which all that remains is to make sure that the box moves freely inside the structure. If yes, then you can safely nail the shelf to the slats. By the way, to mark its position, you can first place the box inside to draw a couple of lines a few millimeters higher than the side walls.
Making a shelf
Stage No11. Sweetheart neckline
First, we note that the cutout on the front wall can have any shape - it all depends on your personal preferences. According to our design, it will be shaped like a heart, although you can simply make a simple pattern with a few small holes (these can be drilled with a drill).
- So, first a piece of board of the required size is cut.
- Next, a heart is drawn on the board; it must have the correct shape. If a hole saw is used for cutting, for example, 3.2 cm, then it can serve as a template.
- A pair of holes is drilled using a hole saw.
- All the pieces that remain are finally cut out using a jigsaw.
- After this, the front wall of the drawer remains to be completely assembled, which will require the same nails and glue.
Cutting a hole in the shape of a heart
On a note! Cutouts and other shapes will look great - these could be, for example, images of card suits. However, for this, the bedside table must have the appropriate number of drawers.
Stage No.12. Finishing touches
Once assembly is complete, the cabinet can be coated with clear varnish to protect the wood and reveal the details of its texture. Moreover, the varnish can be slightly tinted with pigment (white or black) - this way you will get a slight gray haze.
So what you need to do:
- clean the tree;
- sand it with sandpaper No. 150;
- clean again;
- coat with a layer of varnish, then wait at least 4 hours;
- lightly sand with No. 200 sandpaper;
- clean again;
- apply a second coat of varnish.
Note! The finished bedside table will look great if you treat the surfaces with stain before applying varnish. By the way, instead of stain, you can use a solution of potassium permanganate or iodine, diluted tea, etc.
Homemade wooden bedside table in the interior
Homemade wooden bedside table in the interior
Video – Bedside table in Provence style
Bathroom cabinets
In bathrooms, cabinets are often made for sinks, so the design of the product depends on the installation of plumbing and the area of the room.
But you need to take into account humidity and temperature changes in the room when choosing a material for making a bedside table.