Purchasing kitchen furniture is not cheap. Therefore, it is a shame when, after several years of operation, it loses its attractive appearance and problems appear in the functioning of its individual elements. It’s a shame to throw away old cabinets, bedside tables, tables and chairs, but buying new ones is expensive. Repairing kitchen furniture can not only extend the life of these items, but also significantly transform them, adding charm and originality.
Do it yourself or order furniture repairs at home?
Before you begin restoring kitchen furniture, you need to assess the amount of work and decide whether to do everything yourself or hire specialists.
Kitchen sets made from natural wood can be restored many times. Such furniture is not subject to significant deformation. Most often, wooden surfaces become covered with scratches, chips and abrasions during use. Eliminating these flaws with your own hands is possible even for a novice master.
It is more difficult with cabinet furniture made of MDF or chipboard with individual parts made of plastic, glass and metal. Remaking the body elements of bedside tables or cabinets that are swollen or have lost their geometry can be an overwhelming task, which means that the manufacture of new parts will have to be entrusted to specialists. But you can handle cosmetic repairs to the facade or countertop, adjusting or installing new hinges on the doors yourself.
Therefore, we have 2 ways:
- Carry out furniture repairs yourself. This option is suitable when you need to fix minor defects, you don’t need to make complex replacement parts, and also in a situation where you want to do without spending money. This path will allow you not only to save money, but also to bring your creative ideas to life.
- Contact a company offering furniture restoration services. This solution makes sense when damaged or lost-looking elements of the set cannot be repaired; a complete replacement of individual blocks, for example, facades and countertops, is required. In this case, you will have to spend money, but compared to buying new furniture, such a service will be inexpensive. The cost of replacing facades starts from 2200 rubles. per sq. m., countertops – from 4200 rub. per m.p.
During the repair process, it is useful to check and tighten all threaded connections: furniture assemblers often do not tighten them well enough, which leads to further loosening and distortion of the structure. And also lubricate all hinges and hinges to eliminate unpleasant creaking and ensure easy operation of these elements.
Our advantages
By ordering the required service from us, customers will receive inexpensive kitchen furniture repairs, as well as the following benefits:
- Quick departure. By filling out an application on the website or by phone, customers can be sure that the craftsmen will arrive on time. Clients can also set the exact time for specialists to arrive.
- Carrying out work at home. Kitchen furniture repairs are carried out at home, so customers do not have to overpay for the transportation of the furniture.
- Use of quality materials. During the work, our specialists replace outdated parts with new spare parts from leading manufacturers. Thanks to this, we guarantee a long service life of furniture after repairs.
- Registration of an official guarantee. We provide a long-term guarantee for all types of services. If during this period the client discovers a defect, our specialists will perform the restoration free of charge.
Depending on the size of the surface, replacement may take up to 8 hours of continuous operation.
Replacing one door is made to order, not done at the factory. Call a specialist Repair of kitchen facades
Manufacturing of kitchen facades
Door repair
A common defect in cabinet furniture is poor functioning of cabinet doors and bedside tables: they warp, do not want to close, and open spontaneously. The reasons are different: incorrect adjustment, defective hinges or magnetic latch, misalignment of the entire structure, swelling or delamination of the material.
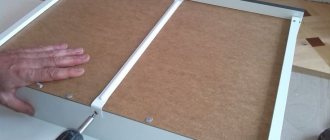
Note: changes in the geometry of cabinets are often associated with the unsatisfactory condition of the back wall. The fiberboard sheet nailed there plays the role of a kind of retainer. If necessary, it is changed by cutting out the required fragment to size and attaching it with nails or small screws.
If the problem is in the loop, then replacing it is not always necessary: in most cases, adjustment helps. For this purpose, the design of the device has two screws: one is responsible for the fit of the door to the body, the second regulates its position in the frontal plane, moving it to the right or left.
A loop that has been torn out with meat can be put back in place using screws of a larger diameter. Another option is to drill holes, place wooden dowels in them using wood glue, and then screw fastening screws into them.
If the hinge breaks, it is replaced. Installation in old sockets is simple: mounting screws are screwed into the existing holes. It is more difficult if the hinge is installed in a new place or the door is changed. Assembly occurs in the following order:
- Sockets with a diameter of 35 mm for disc hinges are marked and cut with a milling cutter.
- A hinge plate is inserted into the slot located in the door perpendicular to the end and secured with a pair of self-tapping screws.
- The second plate is placed in the body, secured with screws through special holes in the bosses.
- Screw in the two adjusting screws to achieve the desired door position.
USEFUL INFORMATION: What color to paint the walls in the kitchen
Details of adjusting the hinges are shown in the video.
Spontaneous opening of doors occurs when the magnetic strip is faulty. In some cases, it helps to clean the magnet and the iron plate it attracts from contamination, adjusting their relative position strictly opposite each other. If these measures do not help, then the element is changed.
And one more video: a little trick that will solve the problem of adjusting a cabinet with worn out hinges without replacing them.
Repair methods
The specificity of breakdowns of kitchen units consists in a large number of options for solving the problem. Furniture repair can be carried out in various ways. The choice of a specific one depends on the nature of the problem, its scale, materials and other factors, so the first action should be a careful inspection of the item, determining the degree of complexity of the upcoming work.
You should decide how you will repair kitchen furniture yourself, make yourself a list of the necessary tools and materials. All preparatory work should be considered the first stage, which cannot be neglected. Haste in such things only delays the process, since you often have to correct defects and redo the work all over again. It is convenient to combine furniture restoration with general kitchen renovation, as this will greatly simplify the task. Some procedures can be dusty and dirty, so it is recommended to immediately carry out a complete renovation of the room.
Recommendations for reupholstering a kitchen corner with your own hands
Existing breakdowns of kitchen furniture can be divided into three groups:
- restoration of the appearance of the facade;
- repair or replacement of a door (or all doors at once, if necessary);
- restoration, replacement of a dining table or tabletop set.
All these actions represent different problems that must be solved using appropriate methods. There is no universal way to work with kitchen furniture, so each type of repair should be discussed separately.
Façade restoration
Replacing the countertop
Door repair
Restoration or replacement of facades
The facade of the kitchen set is the entire visible part of the furniture, which is also complemented by the countertop. By its condition one can judge the quality and age of the entire set. The fact is that the facade of furniture in the kitchen experiences significant loads - from mechanical (mainly elements of the lower tier) to temperature and fat settlement (upper zone).
The main components of the furniture facade are doors. They can be made from different materials:
- Chipboard. This is the most common option and is used in inexpensive kitchen sets.
- MDF. A denser material that is relatively resistant to moisture.
- Glass. Usually such elements are simply broken and soon replaced with new ones.
- Solid wood. Such facades are available in expensive furniture sets. They are quite capricious, but to a greater extent they can be restored.
The most affordable repair option is a complete replacement of all elements of the frontal plane. Some sources recommend finding other furniture doors and installing them in place of the old ones. The advice is good, but difficult to implement - it is necessary that the new and old parts are exactly the same. The right decision would be to order the doors from a furniture manufacturing company.
laminated chipboard
Solid wood
MDF
Glass
Step-by-step repair instructions:
- Dismantle the entire façade of the kitchen unit, including doors and drawer linings.
- Take measurements from old elements of the product. Dimensions are determined by the contours of pieces of furniture. You should also separately calculate the distance from the edges of the holes for the hinges to the edge of the door itself.
- According to available data, order new sashes and trims.
- Install furniture fittings - hinges, handles. Sometimes locks or magnetic latches are necessary.
- Install new elements on the kitchen set.
Features of the design of the kitchen cabinet-pencil case, advantages of the model
If you are installing a finished sash or trim, you only need a screwdriver and an awl to make holes for the screws. To make holes for the hinges, you will need an electric drill and a Forstner drill with a diameter of 35 mm. It is recommended to install the drill in the machine and adjust the depth of the drill so as not to damage the front sides of the parts.
Removing old doors
We measure the doors
Installation of fittings
Installation of new doors
Sometimes it is easier and faster to restore the appearance of the façade of kitchen furniture. Restoration is carried out in three ways:
- Coloring. Used on parts that do not have significant damage. To do this, you will need rollers or brushes, but the best option is to apply paint using a sprayer. The door to be painted is removed from all additional elements (hinges, handles), installed in a horizontal position and covered with a layer of paint. When it dries, the part is turned over and the reverse side is painted.
- Pasting with film. There are many varieties of self-adhesive products. You can choose the most suitable color and decorate the facade elements with film.
- Rattan finish. This is a type of vine that is used for weaving furniture or other products. You can find ready-made rattan fabric, cut it to size and glue it to the surface of the set.
Pasting with film
Facade painting
Rattan finish
Doors
The most common problems include failure of door hinges. They are loaded more heavily than all other elements and therefore require repairs much more often. Usually the doors are completely replaced, and this is done as follows:
- old parts are removed from the headset;
- unscrew the screws and remove the hinges;
- mark the new elements, repeating the position of the loops on the old parts;
- using a Forstner drill with a diameter of 35 mm, sockets for new hinges are made;
- install the fasteners and hang the door on the set. In this case, the upper structures are fixed first, and then the lower elements.
If you do not plan to replace the door, you just need to strengthen the fittings. To do this, you need to remove the hinge, and in the places where the screws were attached, drill 2 holes - thinner and larger. The depth of the holes is about 10 mm. After this, you need to take a small wooden stick, make 2 chopsticks up to 10 mm out of it, coat them with glue. Repeat the last step with the holes made. Hammer the choppers into them. The next day, you need to make holes on them for self-tapping screws, then install and attach a loop.
There are many different designs of furniture hinges, but they all require the same socket size - a recess with a diameter of 35 mm. It is important not to overdo it so as not to drill through the door. To do this, it is useful to install a limiter or use a drilling machine, which will ensure that the front side is kept intact.
Unscrew the old hinges
We make markings for new loops
Screwing on new hinges
We hang the door and secure it
Countertop and dining table
Repairing countertops is a common need. The kitchen table performs many functions and experiences different types of loads. Hot containers are placed on it, and the surface is used for cutting food. Such exposure contributes to accelerated failure of the surface. The optimal solution to the problem is to replace the countertop. Purchasing a new product is an expensive undertaking, especially since the base often remains virtually untouched.
The nuances of choosing and installing LED lighting for kitchen cabinets
Sequencing:
- The old tabletop is removed from the base. Unscrew the screws or other connecting elements and separate the working plane.
- Take measurements and purchase a new countertop.
- Using the old surface as a template, make the necessary holes or recesses. All sockets and attachment points should be exactly repeated.
- Place the new countertop in place.
The above procedure is suitable for products made from chipboard or MDF. For solid wood panels, a suitable option is to restore the surface by grinding followed by varnishing. For work, various machines are used - orbital or vibrating. When scratches or gouges are completely removed, the surface is varnished. It is recommended to use solid, moisture-proof varieties of the product.
Dismantling the old surface
Marking under the sink
Installing a new countertop, cutting a hole for the sink
Sanding wooden elements
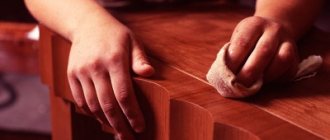
In many apartments there is wooden furniture, often inherited from grandparents. In terms of workmanship and artistic value, it is superior to a cabinet one, but over many years of service, the surface becomes covered with numerous scratches, chips and stains. The easiest way to make cosmetic repairs is sanding.
You will need the following tools: a scraper, sandpaper or a sander. The technique of using the scrapers is not difficult: the scraper is held with both hands and progressively moved in the direction of the wood grain. The disadvantages of rough grinding are eliminated with fine sandpaper.
The restored surface is treated with a primer. It will protect the wood from moisture and ensure good adhesion to the varnish coating. The varnish will add shine to the furniture and protect against the appearance of mold or mildew stains. It is applied similarly to paint, using a brush.
change the fronts (doors) of kitchen furniture
and she will come to life again, delighting you!
New from the company! production and development of children's furniture >>>.
|
| This is not the magic of Photoshop. This is real work done |
Cosmetic repair of cabinet furniture
Small chips, abrasions or scratches can be eliminated by simple manipulations:
- The edges of the chips are trimmed with a chisel, after which the damage is filled with wax. When it hardens, the excess material is removed, the surface is sanded and painted over with a suitable felt-tip pen or a special furniture marker. A varnish applied over the top will protect the restored area.
If possible, it is better to buy furniture wax of the desired shade, which will help disguise any defects on the furniture.
- The procedure for repairing scratches is similar: a layer of wax, sanding, painting, applying a varnish coating. When using colored furniture wax, coloring is not required.
- Scuffs are painted over using a soft cloth onto which dye is applied from a felt-tip pen.
- The cracks are filled with PVA glue using a syringe with a thin needle, and then tightened with clamps.
The following video shows how you can easily mask chips on furniture made of chipboard using furniture wax chalk.
And this video shows the technology for repairing large chips on the surface of a tabletop using an enamel felt-tip pen, super-hard wax and acrylic varnish.
Replacing the end edge
A common occurrence is a peeling end edge. Having found an edge that matches the color, prepare the tools necessary for repair: scissors, iron, painting knife. To smooth it you will need a roller or cloth.
- Cut the workpieces with allowances of 1–2 cm in length.
- With the tabletop facing up, apply the edge and smooth it with an iron. The heat will melt the glue.
- The glued workpiece is pressed to the end and smoothed with a cloth or a piece of felt, directing the movements along.
- Excess edges are removed using scissors and a carpenter's knife.
- The joints at the corners are sanded with fine sandpaper.
Coating restoration
A mixture of linseed oil and alcohol will help restore the varnish coating in case of small amounts of damage. It wipes the damaged area, after which it is polished with cloth. The process will be facilitated by using a mixture of GOI paste with kerosene.
In case of large-scale damage, the varnish is washed off using special solvents. The softened composition is removed with a spatula, after which the surface is dried, sanded and re-varnished.
USEFUL INFORMATION: Installing a drinking water filter tap
Repair with self-adhesive film
The self-adhesive film will give the headset a unique appearance.
Repairing facades using film is simple:
- The surface is prepared: the fittings are removed, the facade is sanded, degreased and primed.
- A piece of film is cut with an allowance of 2 cm on each side.
- The protective layer is removed from an area of 10–15 cm, the film is glued to the edge and at the same time smoothed with a piece of fabric.
- Next, gradually unwinding the roll, you need to fix the entire fragment on the facade, avoiding, if possible, the appearance of air bubbles.
- When pasting the ends and rounded areas, it is recommended to slightly heat the film with a hairdryer to make it more elastic.
- If it was not possible to avoid their formation, the bubbles are pierced with a needle or carefully cut to allow air to escape. All that remains is to smooth out the film.
- Excess material is carefully trimmed.
More details in the video.
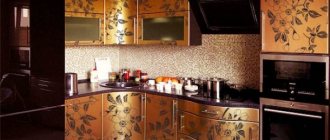
The use of self-adhesive film during renovation often completely transforms kitchen furniture.
Restoration options
When starting restoration, the first thing we do is evaluate the strength of the frame, the reliability of the door opening mechanisms, the durability of the finishing of facades, countertops and other elements of kitchen furniture.
Minor restoration of an inexpensive headset can be done with your own hands.
Vintage or antique kitchen sets made of natural wood will require professional restoration.
We determine the style of the future kitchen in order to choose restoration options:
- A kitchen in a classic style always looks expensive and elegant. It is distinguished by its rigor and symmetry of shapes and the use of natural materials. The room is usually decorated in light colors. All kitchen elements, including the dining table and chairs, are made from the same material. Large kitchens and combined, spacious kitchen-dining rooms look ideal in the classic style.
<
Figure 2. Classic style furniture.
- A feature of the interior of a Provence or country kitchen is the demonstration of the natural texture of wood. Provence style assumes the presence of pastel colors in the interior. Country - moderate colors, close to the natural tones of wood, fallen leaves, tree bark, pine needles or ripe wheat.
These styles are characterized by the presence of a large number of hanging shelves that are securely mounted above the countertop.
Figure 3. Country style kitchen.
- A kitchen in the shabby chic style requires the presence of antique, vintage kitchen sets: chairs with curly backs, massive dining tables, buffets and chests of drawers.
A distinctive feature is slight aging.
To give your kitchen set a shabby chic style, it is enough to paint it with light paint, in blue, pink, cream tones, decorate it using decoupage technique or apply a patina.
Figure 4. Shabby chic style.
Having decided on the style, we select options for restoring kitchen sets.
Self-adhesive film
Using self-adhesive film, you can restore smooth facades made of MDF or fiberboard:
- We remove the facade elements, unscrew the fittings, sand the facade, degrease and prime it.
- We cut the decorative film to size, leaving allowances of 15-20 mm on each side.
- Gradually removing the protective layer, we glue the film onto the surface of the facades, preventing the formation of bubbles. Smooth the surface with a rubber roller.
- We wrap the film on the ends of the facades, heating it with a hairdryer for greater elasticity. We pierce any randomly formed bubbles with a needle and press the film tightly. We trim off the excess film.
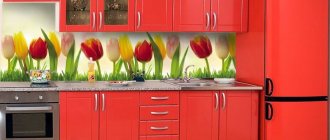
Figure 5. Updating kitchen furniture using film.
An interesting solution in the restoration of facades would be the use of film in different color variations. These can be shades of the same color or a combination of contrasting colors. Kitchen units covered with a bright film look modern.
Interior stickers
Using interior PVC stickers, you can mask individual local defects. It is important to fill the uneven areas with acrylic putty, sand them thoroughly and coat them with a primer. The sticker is applied sequentially from top to bottom. Smoothed from the center to the edges, preventing the presence of air bubbles.
Decoupage
The decoupage technique is the decoration of surfaces using applications made of fabric, paper wallpaper, oilcloth, and napkins. Facades made of MDF, fiberboard, glass, wood or plastic are suitable as a basis.
If necessary, level the surface of the facades with acrylic putty. After complete drying, we process it with fine sandpaper or a grinder. Glass and plastic surfaces are pre-degreased.
We cut out ornaments or fragments of designs from the selected material and glue them to the prepared surface with PVA glue. Carefully level with a rubber roller, removing air bubbles.
You can apply patterns and ornaments using cardboard stencils.
We cover the dried decorated surfaces with acrylic varnish in three or four layers, waiting for layer-by-layer drying.
Figure 6. Furniture finishing in decoupage style.
Photo wallpaper
Self-adhesive photo wallpapers are ideal for restoring kitchen furniture facades. The finishing technology is similar to gluing film. Laminated material does not require additional protection. Paper photo wallpapers must be protected with two layers of varnish.
Installing a new countertop
The kitchen countertop is the most vulnerable element, most often exposed to mechanical stress, water or high temperatures from hot dishes or a nearby stove.
If the countertop has significant defects or mechanical damage, the best solution would be a complete replacement.
When choosing a table top, you need to take into account the material of the facade and the style of the furniture.
Countertops made of natural or artificial stone look harmonious in expensive antique sets.
Wooden countertops look solid and expensive, but require special care and careful handling. They are not particularly strong or durable.
For budget options, table tops made of MDF or chipboard with a laminated coating are suitable.
A new one is installed in place of the old countertop. The main thing is that it matches the size of the furniture. The joints between the countertop and the sink are sealed.
Figure 7. Replacing the countertop.
Facade replacement
It is better to replace kitchen facades that cannot be restored.
There is a large selection of options for the front part of the headset:
- Natural wood is an ideal material for kitchen furniture. Natural material is environmentally friendly and safe. Suitable for decorating a kitchen in a classic style, Provence or country style. The only drawback of natural materials is their high cost.
- Doors made of laminated MDF or chipboard are the most budget option. They are exposed to aggressive environments and do not tolerate high humidity and temperature changes.
- Frame facades made of aluminum with various fillings are characterized by high strength and durability. Resistant to mechanical stress and high humidity. The disadvantages of such materials are their high price and the need for special fastening systems. In addition, aluminum elements fade over time.
- MDF coated with PVC, laminated plastic or enamel are the most popular due to their affordable cost, resistance to aggressive environments and ultraviolet radiation. They do not lose their attractiveness for many years.
When choosing facades, it is important to consider the style of the kitchen space.
After selecting and purchasing new façade elements, we carefully dismantle the old structures. We mark and drill holes for new fittings. We screw on the handles, hinges, canopies and guides. We fix the door and drawer elements in place, adjusting the correct installation according to the level.
It is important to correctly assess your strengths and skills. If you have no experience in performing such work, it is better to entrust the restoration of kitchen furniture to specialists.
Removing old film from furniture
A small peeling of the old self-adhesive film can be eliminated using PVA glue. The hardest part is getting to every hard-to-reach place.
But with large-scale damage you will have to do something radical: remove the film layer completely. This is done as follows:
- All fittings are removed. For convenience, it is worth dismantling the facade parts and working with them in comfortable conditions.
- The film is heated with a hair dryer, then removed with gloved hands.
- The surface is cleaned of glue residues, degreased, and then ready for further finishing: gluing a new layer of film or painting.
replacement of kitchen facades
old ones for new ones, thereby saving precious time, nerves and the family budget. We all know very well that ordering a new custom kitchen is completed within 40 to 60 days, this is if the manufacturer is serious about its brand, but it often happens otherwise, we give an advance payment to the eloquently speaking measuring manager and wait for the weather by the sea. Then the installers come and almost always problems begin: the wall is crooked, the floors are not correct, or the kitchen drawers do not fit, this is not humor, this is from personal experience. And that’s half the trouble, because you also need somewhere to attach everything that has been accumulated for years and compacted into the drawers of the old kitchen. The filling of an ordinary 2-meter kitchen occupies half of the bedroom. Well, why all this torment when you can just
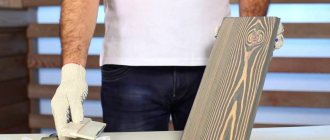
Furniture painting
It is often easier to paint the facade than to restore the old varnish coating. At the same time, you can radically change the design of your kitchen.
Proper painting includes the following operations:
- Disassembling the headset: removing fittings, hinges and drawers.
- Surface preparation: cleaning from dirt, grinding, removing dust, degreasing, priming. The latter is performed several times with breaks of 6–8 hours: this will reliably protect the material from external influences and ensure high paint adhesion.
If you plan to paint in different colors, the part of the surface on which a different shade will be applied is covered with masking tape. The same applies to elements that need to be protected from paint during the repair process.
It is best to paint using aerosol cans or a spray gun: this way it is easier to ensure uniform color and no streaks from a brush or marks from a roller will be visible.
Decoupage
This technique is a kind of appliqué made from various materials. Most often they use drawings cut out from napkins or magazines.
It is recommended to layer the paper so that the applique protrudes less above the general level of the facade. The further algorithm of actions is as follows:
- We prepare the surface: remove handles and other fittings, clean the paintwork, sand and repair defects.
- To achieve transparency of the varnish layer, mix white acrylic varnish and white paint.
- We paint the background in the direction of the wood grain.
- We place the prepared pattern, cut out and thinned, symmetrically relative to the facade and cover it with a layer of PVA.
- After letting the glue dry, we treat the surface with fine sandpaper, after which we apply a transparent varnish composition.
- After sanding the dried varnish, apply a new layer. And so on until the desired result is obtained.
A detailed master class on decoupage of furniture from chipboard is in the next video.
Another option for decoupage is the formation of ornaments using putty:
- Mix PVA glue and oil putty until the consistency of thick sour cream.
- We make a stencil of the future design from thick paper or cardboard.
- We fix the stencil on the facade, then apply the prepared solution with a spatula.
- After drying, we sand the ornament and coat it with varnish: first transparent, and then matte.
Decoupage can transform the most unattractive furniture. There are a great many options for the materials and technologies used. It all depends on the imagination and artistic taste of the master.
USEFUL INFORMATION: Mixer combined with drinking water filter
What you might need for cosmetic restoration of chipboard furniture
Each type of defect and restoration requires its own approach, materials and tools. Let's look at what you might need to repair laminated chipboard furniture:
- furniture wax (soft and hard). It has moisture-repellent properties and is used to seal scratches, cracks, chips on wooden and laminated surfaces of furniture, doors, parquet, etc.;
- retouching agents. Markers or felt-tip pens, with the help of which the texture of the material at the restoration site is completed after treatment with furniture wax. You can also use paints, office corrector, iodine and even shoe polish;
- varnishes and polishes, to restore the coating after removing scratches and abrasions;
- PVA, two-component glue, wooden cokes for filling holes and recesses from fasteners and hinges;
- tools: utility knife, chisel, rubber spatula, fine sandpaper, iron or industrial hair dryer and rags for finishing.
Set for restoring furniture with wax pencils
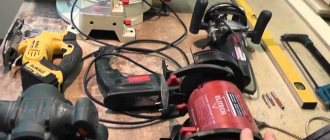
Furniture repair tool
Restoration of countertops made of chipboard or wood
Areas of the tabletop that are swollen from moisture or chipped are quite easy to restore. The repair procedure will be as follows:
- Remove loose pieces of material.
- Thoroughly dry and sand the surface.
- Mix PVA glue with sawdust to form a thick mass.
- Fill the indentations with the resulting mixture, place the weight and leave for 24 hours.
- We apply a protective coating to the surface.
Restoring a burnt countertop
Such damage is not uncommon for the surface of kitchen cabinets and tables. Replacing the countertop is a radical measure, but you can try to do without it by eliminating the damage yourself.
- Using a pencil, outline the boundaries of the defect with an allowance of 2 cm onto the undamaged surface.
- We remove the burnt area of the chipboard. A router is used for this operation. They sequentially remove layers of material: first along the intended line to one depth, then using a longer cutter to remove the next layer. And so on until the defective material is completely removed. The result is a stepped depression that looks like a miniature diamond and coal mine.
- Using a router, we make teeth along the contour of the cutout for better adhesion of the patch material to the base. This will also help make the transition smoother.
- Fill the hole with wood putty. We cut off a piece of the required size, knead it with our hands until soft and carefully compact it into the cutout. You need to work quickly, as the putty dries in a matter of minutes.
- We remove excess material protruding beyond the plane of the tabletop with a tool with a smooth edge. Some craftsmen use an old plastic card for this. To speed up the process, use a milling cutter with special grinding attachments.
- We polish the smooth surface using GOI paste with a soft-coated nozzle. This will add shine to the patch.
- All that remains is to paint the area to be restored, repeating the color and texture of the main part of the tabletop.
Making a tile countertop
What to do if the countertop is swollen or warped from moisture? The easiest option is to replace it with a new one, but there is no guarantee that it will not share the fate of the old one. Tile coating is more reliable, and it is not difficult to carry out such modernization of a kitchen set.
Tile countertop
DIY tile tabletop
Kitchen table with tiled surface
Countertop and splashback made of the same tiles
Work order:
- The basis of the new countertop is made up of sheets of expanded polystyrene, fixed with liquid nails.
- Protective elements are attached to the same composition. Metal skirting boards are best suited for these purposes: corner ones, connecting the surface of the tabletop and the wall, end and thin ones, serving as edging for the tiles.
- Tile adhesive is applied to the new base surface of the countertop.
- The tiles are being laid out. Its height should correspond to the thin baseboards around the perimeter of the tabletop.
- After the glue has dried, the joints are grouted. It is recommended to use silicone-based waterproof compounds. This will prevent moisture from entering the structure.
The result is a smooth and durable surface that is not afraid of water.
Prices for kitchen furniture repairs
| Types of jobs | Price |
| Replacing foam rubber in the kitchen corner | from 10,000 rub. |
| Reupholstering a corner kitchen sofa | from 3500 rub. |
| Upholstery of a corner kitchen sofa with soft armrests | from 8000 rub. |
| Chair upholstery (hard back) | from 500 rub. |
| Chair upholstery (soft back) | from 1000 rub. |
| Chair reupholstery (hard back) | from 500 rub. |
| Chair reupholstery (soft back) | from 1000 rub. |
| Gluing a wooden chair | from 500 rub. |
| Chair repair | from 500 rub. |
| Chair restoration | from 1000 rub. |
| Covering the kitchen with film | from 1900 rub. |
| Restoration of kitchen facades | from 900 rub. |
| Painting kitchen facades | from 2400 rub. |
| Repair of kitchen facades | from 900 rub. |
| Installing a bottle holder in the kitchen | from 1300 rub. |
| Installation of kitchen legs | from 900 rub. |
| Installing a dish dryer | from 2400 rub. |
| Replacing gas lift in the kitchen | from 450 rub. |
| Installing kitchen lighting | from 2800 rub. |
| Replacement of kitchen facades | from 2800 rub. |
| Countertop repair | from 900 rub. |
| Replacing kitchen countertops | from 2900 rub. |
| Installing an artificial stone countertop | from 10,000 rub. |
| Replacement of accessories | from 450 rub. |
| Replacing hinges | from 100 rub. |
| Replacing opening hinges with a closer | from 180 rub. |
| Replacing a drawer | from 800 rub. |
| Replacing a drawer (with a closer) | from 1500 rub. |
| Plastic base | from 180 rub. |
| Replacing the magic corner | from 7900 rub. |
Chair repair
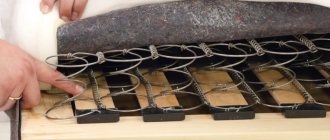
Damaged coverings of old kitchen chairs can be restored using the above methods. The exception is furniture with soft seats: re-upholstering them without skill is quite problematic, although possible. But there is a simple option: make a cover. In this case, reupholstery will not be required, and the appearance problem will be solved.
Loose parts are strengthened using wood glue. In exceptional cases, self-tapping screws are used with mandatory drilling of holes for them. Painting and decoupage transform an old, unsightly chair into an original and beautiful piece of furniture.
You should not throw away old kitchen furniture that has lost its outer luster. With a little imagination, you can give it a completely new appearance, adding originality to the interior of your home.
Repair of laminated chipboard furniture
Serious repairs to laminated chipboard furniture frames are required in cases where hinges, guides, fasteners and fittings are torn out of the board due to excessive load or improper use. Let's consider various options for restoring buildings.
Restoration of holes for fasteners
Laminated chipboard is a fairly durable material, but as long as its integrity is not compromised. Due to loads, improper operation, periodic disassembly of furniture or frequent opening of facades, holes very often break, as a result of which screws, confirmations, hinges and other fittings fall out of their fastening points. Simply screwing the fastener into the same place will not work, since the diameter of the hole has increased. However, there is one method that furniture assemblers use.
In order to be able to screw a screw or confirmation into the old place, you need to proceed as follows:
- use a drill with a diameter of 8 mm to expand the existing hole;
- pour PVA or wood glue inside;
- drive a wooden wedge or “coke” into the hole and cut off the excess;
- make a hole in the “coke” with a diameter smaller than that of a self-tapping screw or confirmat;
- screw the hardware into place.
Now you can install the hinge mounting and adjustment pad
How to repair a broken furniture hinge
It happens that a furniture hinge on the facade itself is pulled out of its seat along with pieces of laminated chipboard or MDF. The simplest option is to completely replace the module door. But the façade material may differ slightly in shade from the rest of the structure, and the cost of such repairs may be high. You can repair the canvas and install the hinge yourself and at minimal cost. There are two options:
- Moving hinges above or below the original installation location.
- Repair of the hinge seat.
The first option is the simplest and fastest, but you will still have to seal the old holes. To disguise a broken seat, you can use a special plastic plug. Large holes are restored using PVA mixed with fine sawdust. After the mixture has dried, it is masked with wax pencils and polished.
Moving the loop to another location
The second option is more complex, but, nevertheless, it will avoid making new holes and will extend the life of the facade for several more years. To restore the hinge seat you will need:
- epoxy resin;
- small sawdust;
- rubber or plastic spatula;
- electric drill;
- loop cutter.
Loop torn from the façade with “meat”
First of all, you need to clear the seat of the torn loop, mix sawdust with epoxy resin and fill the recess, leveling the mixture with a spatula. Allow to dry and, if necessary, add more filler. After complete drying, sand the hinge installation area. Next, make markings and, using a cutter or electric drill, drill a groove of the required depth for the mount.
Prepare a mixture of sawdust and epoxy resin and fill the seat of the furniture hinge bowl
Reinstall the hinges
A simple but dubious method
There is another way to attach a torn loop, but it is quite dubious, both from an aesthetic and practical point of view. A wooden block or plywood strip is installed in place of the hinge using glue or self-tapping screws. The fastening for the facade is mounted on them. The plank or block is fixed using screws or glue. However, with this method of installing the hinge, the facade can move significantly relative to its original position, and no adjustment can correct this.
For your information! In order for facades to last for a long time, you need to follow a few simple recommendations. It is necessary to tear off the doors of cabinets and bedside tables smoothly, without sudden movements. Do not hang heavy objects on the handles of the facades, as this leads to increased load, distortion and tearing of the hinges from the landing sites.