VIDEO: Do-it-yourself reupholstery of a computer chair.
Computer chairs are a very common piece of furniture.
The service life of a chair depends on its quality and the materials from which it is made.
Most often, the coating from which the seats and backs are made becomes deformed and loses strength.
Woven materials can tear if used carelessly, artificial leather cracks and becomes scuffed. The chair becomes uncomfortable and looks unsightly
Buying a new computer chair is an expensive solution to the problem.
But reupholstering an office chair is easy to do at home.
- You don't need to pay a master for the work.
- Upholstering a chair at home will take from 30 minutes to 1 hour - this is much faster than in a workshop.
- You don’t need to take the chair anywhere; you can replace the upholstery in your apartment.
- The costs of the procedure are minimal.
- Everyone has the necessary set of tools.
- Disassembling and assembling the chair is not at all difficult; you do not need any special skills. By re-upholstering the chair with your own hands, you can save both time and money.
- Take measurements from the back and seat. If you plan to add additional foam, you should take this point into account when taking measurements. To the data obtained (length and width of the back and chair) you need to add 5 cm. The fabric will be attached from the inside, for this you need allowances.
- You can first disassemble the chair and remove the old covering. This can cause difficulties, since the upholstery is tightly stapled to the frame parts. Then you should measure the finished darts, adding allowances for using foam rubber.
Replacing the cross
We purchase a new crosspiece. If you took a plastic one, then it may not look very respectable, so it needs to be covered with leather and painted.
To reupholster the armrests we use a single piece of leather, which must be painted and nailed, for beauty we use decorative ones. Then we wash off the paint and we get a stylish distressed look.
The last stage of work is installing the buttons into the drawstrings on the back. To make them look organic, they need to be upholstered with the same upholstery material that was used to upholster the chair.
We tighten the buttons and secure them on the back of the chair using a stapler. The back of the chair is ready and can be put in place. The work is completed.
Now you can safely get to work and give new life to your old office chair. If you still decide to purchase a new one, then the best options are waiting for you at zltamebel.ua.
Types of chairs
There are many different types of chairs, varying in level of comfort, cost, and methods of placement in space. The design is an “improved chair”, which has a soft back and seat covered with textiles, leather, faux leather, fur, and in some cases, armrests, a footrest, and a rocking mechanism.
The main classification looks like this:
- by purpose - for relaxation (interior), for work (office);
- according to design features - with a rigid frame, without a frame;
- at the place of installation - in the living room, in the garden or on the veranda, office (computer), gaming (game) rooms.
The design of the item itself is also different, there are:
- ordinary - installed on four legs, have a soft back, armrests, coffee stands, poufs, and other details that provide maximum comfort;
- chair-beds - designed for cramped rooms, significantly saving space. It is not recommended to constantly sleep on such furniture, but it is possible to place an unexpected guest who is staying overnight on it, and also to use it in a summer cottage;
- rocking chairs - made classic (on ski runners), with a pendulum mechanism (have a fixed base), spring (rattan papsan rocking chairs), as well as “Viennese chairs” (runners are connected in a closed circle);
- advertisers are especially comfortable, expensive models that can be fully reclined and have a footrest. Transformable manually or electrically. A ventilation system, mini-bar, vibration massage, etc. are sometimes built in here;
- hanging - it can be a hammock, an “egg”, a ball, a “cocoon”. Hanging is done on the ceiling, wall, stand, beam.
Frame models are made of natural wood, metal, plywood, chipboard, and plastic. Usually several materials are used at the same time. Frameless options are pillow bags filled with foam balls and synthetic fluff. There are also convertible, lightweight inflatable items.
How to update old furniture: ideas
Old chairs are often very strong and durable. But after a long period of use, they lose their attractive appearance. Do not rush to throw away such furniture, as it can be easily restored.
The technology for updating a chair depends, first of all, on its design. This can be done using several approaches:
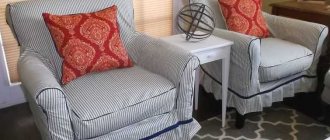
- Pieces from the 60s can be restored simply by changing the upholstery.
This process is relatively simple. The main thing is to choose the right fabric style. Some designers recommend using several color shades that will fit into the overall interior. - Restoration of the external covering.
This approach involves changing the paint layer on wooden or metal surfaces. It is used for chairs made of rattan, wood, wicker and other natural products. This also includes restoration of natural or artificial leather (painting, cleaning, etc.). - Replacement of certain elements.
An old chair will look original if you replace the armrest with a product of a different shape. You can do the same with the legs or back. Here everything depends only on your imagination and capabilities.
Fabric selection
When choosing fabric for upholstery, you must remember that the fabric must be dense and quite durable
It is important that the material is easy to clean and, if possible, impregnated with a special water-repellent solution. In addition, the conditions in which the chair will be used are immediately thought through.
For example, if there are pets in the apartment, then it is better to purchase anti-vandal material, for example, flock. Such a coating will not break through the claws of cats or dogs and will not even become covered with snags.
For a chair in a children's room, chenille or matting is more suitable, which do not wear out from everyday use, but are easily cleaned from stains and other consequences of children's games. The advantages of these materials include:
- density;
- naturalness;
- long service life.
An armchair in the living room should look impressive, so it is better to give preference to materials such as:
- jacquard;
- tapestry;
- leather.
It is better to choose fabrics with a distinct pattern that demonstrates the good taste of the owners.
Tools and materials needed to repair the chair
To repair or reupholster a chair, you will need, first of all, fabric, and not necessarily the same fabric that was on the chair. If you have a leather chair, we even recommend using woven material. For example, furniture tapestry fabric used for upholstering sofas. It is quite dense and drapes well (corners are laid). In addition, the price of such fabric is quite affordable, especially since the fabric only needs 70 cm and a width of 150 cm. At least this chair needed exactly that much fabric. But it should be taken into account that fabrics with a geometric pattern or stripes need to be “adjusted”, so their consumption will be higher. But in any case, a 1 meter long piece is enough for any standard office or computer chair.
From the tools you will need screwdrivers (flat and Phillips), a tape measure, wire cutters and, without fail, a stapler and staples for it, 6-8 mm long.
Repair and design of the frame
Chair restoration begins with preparatory work:
Use rags and soft brushes to clean all surfaces of dirt. Any soap solution will do for this.
It is important to do this quickly so that the tree does not get wet for a long time. The stool is then completely dried. If the product has dried out, disassemble it as carefully as possible, inspect the parts for defects, and glue cracks, if any, together. After complete drying, sand all the spikes with sandpaper. Assemble all the parts of the chair into a single structure, carefully gluing the joints
Leave for two days until completely dry, securing the gluing areas with clamps.
Scratch removal work:
- Very minor damage is painted over with a special retouching pencil, marker, or rubbed with iodine.
- Deep scratches and cracks are initially sealed with wax of a suitable color or any of the above mixtures. After drying, the surface is carefully sanded first with medium and then fine sandpaper, dust is removed from it, and covered with varnish or enamel.
- Chips on the wooden surface of a chair are a serious defect, but it can also be eliminated with wood putty. Once dry, it completely imitates wood.
Step-by-step instructions for opening a chair with varnish:
- If desired, you can leave the color of the wooden product in its original form or use stain, which is tinted in 1–3 layers with a brush or swab. 2-3 hours are enough for drying.
- The next step is to apply a primer under the polyurethane varnish. To do this, mix three parts of varnish with one part of solvent and paint over it evenly, allowing it to gradually absorb into the wood. It takes half a day or a day to dry this layer.
- Since the surface of the wood becomes rough after drying (the wood “raises the pile”), it is carefully smoothed with a fine-grained sanding sponge (No. 100 or 120).
- Then apply 3-4 layers of varnish, each time allowing it to dry for 24 hours.
For quality coloring:
the frame of a dry, dust-free chair is primed in two layers, allowing each to dry for 24 hours; between layers the primer is sanded with fine-grained sandpaper (for example, No. 220); paint the chair 2-3 times, also allowing each layer to dry thoroughly (it is important that the paint does not leave streaks); treat the chair with matte varnish and wax.
To get a thing with a worn effect, paint of a darker tone is applied to the edges of the seat, back, and armrests and covered with wax. Then paint the entire chair in 2-3 layers in the main color. After which the dark “substrate” is exposed with fine-grained sandpaper.
Decoupage is a low-cost way to make even the most ordinary-looking furniture original and attractive. Decorating a chair with it yourself is very simple. This option is ideal for decorating products in the kitchen or a children’s high chair:
- after sanding and sealing cracks, the frame is primed and coated with water-based paint;
- cut out a suitable picture from a paper napkin or a special decoupage card, coat the surface of the chair with glue and carefully apply the picture;
- smooth the napkin from the center to the edges and allow to dry;
- the completely dry surface is varnished.
How to repair it yourself?
Chairs today have different designs, on which the algorithm for repair work depends. If this is an ordinary wooden product, then repairing it is quite simple. It is necessary to identify the problem, which is often poor-quality fasteners or a violation of the structure of the material. This can be corrected by replacing the wooden element (backrest elements, frame base, etc.) with a new one or simply tightening the bolt.
More difficult to repair are shell chairs, which often have fabric outer upholstery. To get to the breakdown, you first need to dismantle the fabric. The process of repairing such chairs is much more complicated, so it is not always possible at home.
Office chairs are mechanisms that consist of several parts. There are many reasons why this design loses its characteristics:
Rollers falling out. Often this can only be corrected by replacing the crosspiece or these moving elements
It is important to first check the cause of the breakdown (broken hole, missing retaining ring on the roller, etc.).
Gas lift malfunction. There are also several reasons for this, including improper fastening of the piastrum or malfunction of the control lever mechanism
Therefore, you should check these attributes first.
Breakage of the cross. The functionality of this element can only be restored by replacing it with a new one.
The back does not spring. The main cause of this problem is the violation of the integrity of the metal parts inside. Sometimes the spring mechanism also fails. Operation can only be restored by replacing parts with new ones.
Upholstered furniture used daily quickly wears out and loses its attractiveness. It is not necessary to purchase a new chair right away: when the frame is in good condition, you can replace the upholstery yourself and give the product a “second life.”
- Screws are removed with screwdrivers;
- Use wrenches to loosen bolted connections;
- Nippers and staples are removed with wire cutters and pliers;
- The new casing is secured with a stapler;
- used if the fabric covering has a complex shape;
- In most cases, the flaps are held together with a needle and thread.
New fabric is selected according to density and quality; tapestry, jacquard or velor are suitable.
- Sintepon;
- Foam rubber;
- Batting;
- Coir;
- Horsehair.
The advantage of do-it-yourself restoration is the ability to choose the most convenient structure for the updated chair.
- Burlap and foam rubber are cut to size for the seat;
- The padding polyester is cut 50–100 mm larger on each side;
- The first layer is burlap, the second is foam rubber;
- Due to its large size, the third layer of synthetic padding covers the “pie”;
- The edges of the top material are hemmed to the frame;
- The pillow in the middle is additionally fixed with threads in 4-5 places.
The chair can be upholstered with any material, depending on the client’s taste preferences, interior design or financial capabilities. This can be leather, its substitute or another textile analogue.
Repair options
If the permanent contact or crosspiece fails, you can do the repair yourself. Broken piastres, pneumatic cartridges, and swing mechanisms will have to be replaced with new parts. The same rule applies to damaged wheels.
Replacing rollers
Over time, the rollers may fall out of the beams of the cross due to wear of the plugs, especially if the latter are made of aluminum or plastic. To repair these elements, you need to perform a number of actions:
- The chair is turned over so that the rollers are on top.
- The wheels are removed from the cross. To do this, you just need to pull them towards you.
- Remove the casings from the beams of the cross using a screwdriver.
- Damaged plugs are pulled out of the housing.
- Install new seals and assemble the parts in the reverse order: casings, then rollers.
A broken wheel is treated with superglue or replaced with a new one. A common cause of breakage is the accumulation of debris, hairs, and threads. In this case, the rollers are removed, cleaned, and installed in their original place.
If the socket for fixing the axle of the wheels in an office chair fails, most likely you will have to change the crosspiece.
Use a screwdriver to pry off the fastener and remove the support
Install new wheels
Breakage of piastres
You can repair an office chair yourself if the technician has experience working with mechanics. First of all, it is necessary to clarify what material the crosspiece is made of. It is better to replace the plastic part immediately, since it is pointless to restore a fragile product. Restoration of piastres is carried out as follows:
- The chair is turned over, for convenience, its seat is placed on a chair so that the back is pressed against the floor surface.
- The wheels are removed from the mounts.
- Unscrew the 4 bolts that secure the rocking mechanism and piaster to the seat.
- Disconnect the gas lift by lightly tapping it with a rubber or wooden hammer. You must act carefully, otherwise the mechanism will become deformed and become unusable. The “stuck” compound is treated with a special liquid.
- Using a screwdriver, remove the pneumatic cartridge stopper, the washer, and then the gas lift rod.
- The piastra is knocked down with gentle tapping.
- Repairing a plastic part involves gluing and soldering, but these methods are only relevant if there is minor damage.
- The broken beam of the crosspiece is fixed with plastic or metal plates, secured with screws or superglue. Metal parts are restored by welding.
Variety of IKEA armchairs, basic designs and iconic models
Repairing a computer chair must be done very carefully and carefully. Careless handling can lead to damage to the piastres or pneumatic chuck.
Unscrew the bolts
Knock down the piastra with light taps
Screw on a new one
Destruction of the swing mechanism
If the swing mechanism breaks down, you will have to replace it. The part is attached to the seat with 4 screws, so for dismantling you need to perform a number of steps:
- All connecting bolts are unscrewed with a screwdriver.
- The pneumatic cartridge is carefully knocked out of the mounts.
- Drill holes in the part or use adapter plates.
- Replace the damaged element.
A computer chair is a popular type of furniture, but most models are made in China. Domestic spare parts that can be found in the relevant departments are not suitable for them. In this case, you will have to order parts or try to repair the swing mechanism yourself (for this you will need a welding machine).
Modern modifications of the Papasan chair, tips for assembly and placement
Unscrew the bolts
Carefully knock out the air chuck
Screw on a new part
Connect with gas lift
Air chuck failure
The pneumatic cartridge is a two-chamber product, inside of which there is air under pressure. The gas lift cannot be disassembled and repaired at home; only a complete replacement of the part is possible. To repair an office chair with your own hands, you must follow the instructions:
- Disconnect the fasteners that hold the mechanism. To do this, remove several screws from the seat.
- The seat is removed, the gas lift is removed, after lightly hitting the structure from the side of the cross.
- The mechanism is removed from the metal case using a wooden or bronze drift.
- A new pneumatic cartridge is installed in the crosspiece and fixed to the seat.
The mechanism may break due to careless handling of the office chair, exceeding the recommended loads, or prolonged use. Self-disassembly of the pneumatic chuck is strictly prohibited, as the technician may receive serious injuries. The optimal solution would be to purchase a new part and replace the damaged one.
Destruction of permanent contact
Thanks to permanent contact, the office chair provides reliable support for the spine. If a part breaks, you do not need to purchase a new one; you can repair it yourself. The necessary actions will depend on the nature of the failure:
- Deformation of the thrust spring, bending of the brackets. To restore elements, it is necessary to return them to their original shape.
- Wear of screw fasteners. In this case, only replacing them will help.
- Loose backs. Sealing the permanent contact connections will help get rid of this problem.
A step-by-step description of the steps will help you figure out how to properly repair an office chair without resorting to the services of specialists. Usually, work on replacing and restoring elements does not cause difficulties for home craftsmen. After repairs, it is necessary to follow the standard rules for operating furniture, and then the products will last longer.
How to sheathe it yourself?
The process of upholstering a chair is slightly different from reupholstering, although in many ways it is very similar to it. This operation involves covering the chair with fabric. For such purposes, only furniture is used that was not originally equipped with fabric upholstery.
Upholstery technology involves performing several sequential operations:
Before upholstering a chair at home, you should stock up on some tools and materials. To perform such operations you will need fabric. Products made from bamboo, cotton and other natural materials can be used as this substance.
It is important that the fabric can withstand constant loads and retain its properties for a long time. You will also need a construction stapler, scissors, etc.
d.
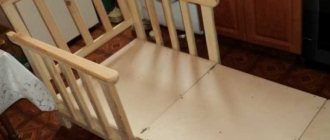
At this stage you need to disassemble the chair into separate parts. This will significantly speed up the sheathing process. At the same time, try to remember in what order the elements were dismantled, so that in the future it is easy to assemble the structure back.
After this, fabric blanks are made. They are cut out in accordance with the dimensions of the individual element of the chair. Try to use substances with a small margin in order to be able to adjust the location of the material on the surface. If you are planning to make an upholstered chair, foam rubber is placed inside it. This substance also takes up a certain volume, which should be taken into account when forming a fabric blank.
The final stage is sheathing. They start with small parts, such as the armrest. The plating algorithm is quite simple. Initially, the fabric is placed on the surface of the product and stretched a little so that it is level. It is advisable to do this with an assistant, which will significantly speed up the process. When everything is in place, the material is nailed to the frame from the inside. It is important to constantly monitor the tension to prevent distortion.
How to assemble a computer chair
First of all, unpack the box with the chair. It is necessary to carefully inspect all parts for cracks, scratches or other defects. The standard set includes the following components:
- Seat and back (or one-piece monoblock).
- Armrests.
- Rollers (at least 5 pieces).
- Bolts, nuts and screws.
- Screws and air chuck.
- Cross.
- Casing.
- Mechanism for fastening the seat and backrest.
The back of a computer chair may differ from other models in upholstery and additional fastening for the headrest. Next, assembling a computer chair will not be difficult. Below are detailed instructions that will help you assemble the chair in a short time.
- The first thing to do is install the rollers on the cross. To do this, press the wheel pin into the beam of the cross. If that doesn't work, you can use a rubber hammer.
- After installing the wheels on the chair, the crosspiece should be placed on the rollers and the pneumatic chuck should be connected to its central part. It is worth noting that on some models, manufacturers install a decorative cap that hides the button on the pneumatic cartridge. Before installation, you need to disconnect it and only then proceed with installation. Otherwise, the chair may not lower or rise.
- Next we attach the armrests. Often, to install them, three screws are used, which need to be inserted into the hole in the seat and tightened tightly. Also, in addition to screw fastening, some models may use brackets.
- At the next stage, we install the assembled seat with backrest onto the pneumatic chuck. To ensure the tightest possible fit, you can press down on the seat of the chair or sit completely on it.
- After the computer chair is assembled, you need to check its functionality. The back should bend back without unnecessary crunches and return to its original position on its own. If the chair lowers and rises using the lever, then everything is installed correctly.
On average, it takes no more than 20 minutes to assemble a standard computer chair.
Office computer chair reupholstery
In order to save the budget spent on updating the office environment, computer chairs are also restored by hand. If the frame is completely intact, only re-upholstery is required, which gives the structure an aesthetic appearance. Since the chair is used many hours a day, the most wear-resistant, durable fabrics, as well as genuine leather, are selected for upholstery. Leatherette and thin textiles will become unusable in a matter of months.
Measurements are taken separately from the back and seat, taking into account their thickness, allowances for turning and seams. If the filler is “leaky”, additional foam rubber is purchased. The product is disassembled using a screwdriver, the seat, back, and armrests are disconnected
In the process, it is important not to lose all the screws - it is better to put them in a box. Next, the upholstery is separated, and new foam rubber is attached in its place with construction staples. Afterwards the fabric is stretched - it is important that folds do not form on the surface
Now the chair is going back
Afterwards the fabric is stretched - it is important that folds do not form on the surface. Now the chair is going back
Product disassembly stages
If an office chair breaks, the first thing you need to do is disassemble the structure. To do this, you will need a rubber hammer, slotted and Phillips screwdrivers, and a ring drift. All actions are carried out in stages:
- First of all, remove the seat, turn the chair over, and remove the fasteners.
- Unscrew the bolts that secure the armrests and remove these parts along with the plates.
- Disconnect the fasteners holding the permanent contact.
- The crosspiece is separated from the pneumatic chuck by gently tapping the connection with a hammer.
- The wheels are removed from the mounting sockets, and the plugs located in the steel case are removed. The procedure is performed using a slotted screwdriver.
The best models of bean bag chairs, features of selection and operation
It is recommended to carry out all manipulations with the mechanisms while holding the structure suspended so as not to break the fragile plastic parts. For the same reason, you should not use physical force when unscrewing fasteners. After completing the dismantling of the computer chair, you need to collect all the parts in one place so as not to lose anything.
How to reupholster a chair with your own hands step by step, computer, video, tools for work
How to reupholster a chair with your own hands: a question that worries many housewives who want to tidy up an outdated set. Before starting the operation, you need to stock up on the necessary tools:
- stuffing material (batting, foam rubber, etc.);
- linen canvas;
- upholstery fabric;
- stapler;
- nails;
- hammer;
- scissors;
- chalk or soap;
- centimeter.
Below we will look at the process of reupholstering a chair step by step at home.
After selecting the tools, we proceed to disassembling the lower part of the chair. Inside it there is usually a frame made of wood, foam rubber on the back and seat, and also plywood with which the back wall is secured:
Be sure to remove the tenon parts using a rubber hammer
It is important to maintain the polish and not spoil the edges. The grooves are cleaned with a knife or scissors
First, the back wall is removed, then the plywood bottom, then the foam rubber is removed, the nuts are tightened and all metal parts are removed. You also need to get rid of all fasteners and foam padding.
Here you need to remove the upholstery material. This is done like this:
- using a screwdriver, unbend all the staples from the back of the chair and cut off the fabric with a knife;
- Next, all the foam rubber is removed; if it is worn out, it must be replaced;
- the frame must be completely rid of glue;
- The old fabric should be smoothed out and secured to the back with a stapler.
You also need to get rid of the cushions and other external parts that exist on the old chair. There is no point in throwing them away if they are not worn out and look normal.
It is important to preserve the old fragments in order to cut out new ones. When there is a pattern on textiles, you should think about how the elements will look and fit together. If the fabric is fleecy, then it is important to check the direction of the pile
It should be pointing down
When there is a pattern on textiles, you should think about how the elements will look and fit together. If the fabric is fleecy, then it is important to check the direction of the pile. It should be pointing down
Important! At this stage you need to be careful so that the furniture in the future does not look ridiculous
! You can use velor, suede or tapestry as upholstery. This is the most popular fabric
If you want to experiment, pay attention to microsuede, flock and faux suede.
Before fastening the fabric, you need to lay the parts on the frame and put foam rubber on them. If the foam is thick, the corners that protrude can be cut off. Next, the padding polyester is placed on top of the foam rubber and secured with a stapler. The fabric is attached directly like this:
The material is applied to the base and straightened. It is necessary to fasten according to the diagram in order to avoid displacement and distortion. Using staples, textiles are attached to the ribs in the middle. Then stretch the fabric proportionally, securing with staples. Two on each side is enough. The fabric should not sag, so it should be pulled very tightly. It is advisable to cover the back part with lining material for an attractive appearance. After tightening the last part, assembly is completed. If you remember what the chair looked like, that’s good, but it would be better to take a few shots so as not to make a mistake during assembly. Next, in the reverse order, as we disassembled, you need to fold the chair
It is important not to make mistakes so that the furniture has a diligent appearance. All screws and fastenings are tightened
If the chair is on wheels, for example, an office or computer chair, then it is reasonable to replace these parts with bearing ones. If all operations are carried out correctly, the chair will look like new.
Some people are interested in how to reupholster a computer chair with their own hands? Carrying out this work is easier than reupholstering a home chair, since they are smaller in design. By following the rules and instructions, you can put your computer chair in order without spending money on a new one. Masters of their craft can tell you how to reupholster an office chair with your own hands.
Advice! If you can handle this task, then you can certainly handle reupholstering a sofa.
This video shows how to reupholster a chair with your own hands.
To reupholster an old office chair you will need the following tools and equipment:
- Furniture stapler (for securing new upholstery) and staples for it.
; The size is indicated on the stapler. - Screwdriver or screwdriver;
Both tools are suitable for disassembling the structure. - Scissors.
For cutting fabric.A screwdriver can be found in every home, and a furniture stapler can be borrowed from friends or rented from a furniture store.
Let's start covering the office chair with our own hands
First we have to disassemble the chair. To do this, turn it over and disconnect the gas lift from the seat. Let's start working from the back. It needs to be removed and all the staples that are attached to the old fabric removed. A flathead screwdriver is suitable for this. Remove foam rubber and old fabric. Now we need to stick the backing on the seat. For this we need a sheet of polyethylene foam. It is often used as a backing because, unlike foam rubber, it is more elastic and does not undergo severe deformation over time.
Next, we take 20 mm thick foam rubber and glue it to the backing, then bend it and attach it with a stapler. We take measurements and make patterns. Now we need to sew a cover from upholstery fabric and leather. Since we will be using genuine leather and not a substitute, we will make the seams by turning them outward. To attach the seat cushion we need to sew on Velcro strips. Then we put on the cover and attach it with a stapler at the bottom.
Let's move on to the seat cushion. It is better to make it using two layers of foam rubber, 20 mm and 40 mm. Then we cut it out, apply it to the seat, try it on and trim it if necessary. We take measurements for the pillow and make a cover. It would be better if it had a zipper. Then we attach the Velcro. We wrap the pillow with padding polyester and put a cover on it.
If you don’t want to sew a cover, then you don’t have to do this. It is enough to simply stick thick foam rubber onto the seat (for example, take a 40 mm product and use it in two layers). Then we cover it with a single piece of fabric.
Stool care rules
Regardless of whether there is contamination or not, you still need to take care of your stool. Follow simple rules:
Don't eat at the computer desk
This is positive for both computer equipment itself and furniture. Periodically pay attention to the wheels; they need to be wiped free of dust and lubricated so that sliding remains normal. It’s also not a good idea to rotate and roll around on the chair, bending the back. This causes damage to stool elements. When washing the chair, do not use excessive amounts of liquid, as this will cause the upholstery material to stretch. Clean dirty stains carefully with soapy water.
All stains should be washed from the edges of the stain to the center, so as not to spread it over a large area.
Everything done with your own hands is a pleasure, and looks no worse than the work of a professional. In addition, you can know exactly what materials were used and what step after what was done.
Vehicle seat reupholstery
In order for the car interior to look harmonious after reupholstering the seats, the color scheme of the upholstery must be precisely matched to its main shade and not stand out from the overall picture.
Material and tools for changing seat upholstery with your own hands
The upholstery for car seats can be made of leather, fabric, leatherette or Alcantara. The latter is a material with short pile, somewhat reminiscent of natural suede. It is necessary to work with Alcantara very carefully, taking into account the direction of the fabric hairs when cutting.
To replace leather coverings, artificial or synthetic leather can be a good alternative to a natural surface. It is more convenient to eliminate defects in velor upholstery or leatherette using special compounds that are available at any auto store.
In addition to the coating material, you must have the following tools available:
- set of hand needles;
- awl;
- chalk or a piece of dry white soap;
- thick silk threads;
- glue;
- hammers;
- keys and nuts with washers;
- cold welding;
- tow strap;
- pliers;
- hacksaw;
- screwdrivers;
- machine vacuum cleaner.
Also, do not forget about foam rubber for lining car seats. All this can be found on the Internet, including on your beloved Ali.
Step-by-step instructions for self-repairing car seats
Dismantling and disassembling seats into parts. It is advisable to do this on the table, signing each removed element and fragment of the structure. The covers and pillow should also be separated and marked for convenience in the future sewing of the upholstery. The case is removed by unclamping the metal clips on the back of the chair in an upward direction.
Ripping out the seams of the seat trim. To quickly and conveniently cut threads, the working area should be slightly stretched and an incision should be made along the line and stitch. If there are problem areas, you can use gasoline to soften the surface a little.
Completion of complete disassembly of the seat frame, upholstery, backrest and cushion structure.
Preparing to install new chair elements. Using the patterns of old covers, fresh patterns and sketches are created, which are carefully transferred to the work surface.
Assembly of prepared seat components. You can fasten parts using a sewing needle, glue or welding
Do-it-yourself car seat repairs are completed by connecting the cushion to the back of the chair and attaching the hinges with screws.
Secrets of replacing upholstery on car seats
Any reupholstery of car seats must be accompanied by reinforcement of the upholstery material with foam rubber. This is an important nuance without which high-quality repair of car seat upholstery is impossible. A prerequisite for a pillow is a fabric base with a synthetic backing and its thickness equal to 5 mm.
Small abrasions, scratches or cuts are best repaired using small pieces of upholstery. The main thing is that the quality and color are in complete harmony with the main surface. The material is sewn along the edges of the parts, strictly following the marks. Deviation or violation of the contours of the sketch will spoil not only the material, but also the entire result of the work done. It is better to glue the foam rubber to the upholstery fabric with spray adhesive and before connecting the elements of the case
This procedure should be done carefully so as not to burn the surface.
How to repair it yourself
If the crosspiece and permanent contact fail, you can repair these parts yourself, without resorting to the services of a service center. If the pneumatic cartridge, piaster or swing mechanism is broken, they must be replaced. The same goes for rollers. If repairing it yourself seems difficult, you can contact specialists; they will repair the furniture quickly and efficiently.
Damage to the cross and replacement of rollers
In the event of such a breakdown, it is very easy to repair an office chair with your own hands. If the rays of the cross are not connected firmly, the part begins to wobble and loses stability. To fix the problem, you need to insert a hollow plastic tube of smaller diameter inside the base. It must be firmly fixed in the center of the structure.
The pipe will play the role of a kind of rod on which the base rests
To replace worn rollers, you need to carefully remove them from their slots, without using physical effort, and install new ones. Anyone who has repaired a base knows: it’s not at all difficult.
We knock out the gas lift from the cross
Installing a new cross
Making videos
Inserting new videos
Breakage of piastres
This type of breakdown occurs frequently in office chairs. If the piastre fails, it must be carefully removed from the pneumatic chuck. These two parts are connected using the cone method. There are no threads, so no screwdriver is needed. To separate the gas lift and piastra, hit them forcefully with a mallet. As a rule, one hit is enough. Next, you should replace the piastra with the broken foot with a new one.
Separating the gas lift and piastra
We attach the new piastra to the seat
Destruction of the swing mechanism
In the event of such a breakdown, the metal structural element must be replaced. However, if you have a welding machine, you can eliminate the malfunction, and the swing mechanism will last for a long time. If a decision is made to replace a part, it must be dismantled. The mechanism is connected to the seat using four screws, so you will need a shaped screwdriver. For disassembly you need:
- unscrew the bolts connecting the mechanism to the seat of the chair;
- knock out the pneumatic cartridge from the mount;
- drill holes in the element and replace it.
If you don't have a drill at hand, you can use so-called adapter plates. It should be borne in mind that Russian-made swinging mechanisms are not suitable for Chinese office furniture. The difference in size is approximately 50 mm.
Unscrew the bolts
We knock out the pneumatic cartridge
Drill holes and tighten bolts
Connecting
Air chuck failure
An old, worn gas lift must be replaced. Some craftsmen repair it, but after repair the pneumatic cartridge still will not last long. It needs to be dismantled and replaced with a new one. To do this, disconnect the seat and use a hammer to knock the gas lift out of the crosspiece. The main thing is not to damage the base. After this, a new pneumatic cartridge is inserted. It is attached to old bolts. You can first watch a video on the topic “repairing a gas lift” or consult a service center.
Removing the seat
We knock out the gas lift from the cross
Insert a new pneumatic cartridge
Destruction of permanent contact
Breakage of permanent contact is a common occurrence. It is not necessary to purchase a new part; you can repair the old one. This type of DIY office chair repair will not take much time and effort. The main thing is to identify the cause of the malfunction.
If the thrust spring is deformed, it must be returned to its original shape. The same goes for brackets. However, if the screw fasteners are worn out, you will have to replace them with new ones. If the back of the chair is wobbly, the permanent contact connections need to be sealed and tightened.
Permanent contact