Resin for pouring countertops: features
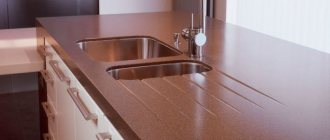
The epoxy filling is intended for the top board of the kitchen unit - two-component, including resin and hardener. When hardened, the substance does not become smaller in volume, cracks do not appear, and it perfectly masks minor irregularities. The material is resistant to moisture, it does not leave scratches, however, under the influence of high temperatures it becomes fusible.
A table with an epoxy top is highly moisture resistant.
See also: MDF countertop for the kitchen: classification, tips, recommendations.
About a DIY epoxy resin countertop: step-by-step instructions
Epoxy countertops are becoming more popular every year. And this despite the fact that their cost in a store or workshop is quite high. They are resistant to moisture and are easy to clean with modern chemicals. But their main advantage is that you can create unusual designer pieces of furniture from this material. Further in the article we will figure out how to make such a table with your own hands, consider its production step by step and warn about common mistakes.
Advantages and disadvantages of the material
Pros of epoxy resin:
- The top board of the table, filled with epoxy, is not susceptible to any damage, and it looks very impressive, especially if decoupage technique or a similar one is used.
- Dried material does not shrink.
- When the surface hardens, it becomes as smooth as possible, like glass.
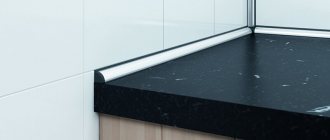
The table is filled with epoxy resin and is resistant to external damage.
A countertop with epoxy filling is not susceptible to either aggressive cleaning agents or moisture.
Cons of epoxy:
- To perform high-quality filling, it is necessary to strictly observe the proportions of the components.
- A sharp decrease in t leads to the appearance of white “flakes” in the fill, its deepest layers.
NOTE! Eliminating the last drawback will not be difficult. Warming the table top to +60 will help get rid of white flakes.
When pouring resin on a table, you need to carefully follow all steps for an effective result.
See alsoDesign of a room for a teenage girl, photo.
Varieties
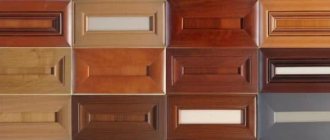
Epoxy countertops come in the following variations:
- Made from boards with resin filling as a protective layer. The basis of the surface can be the following material: fibreboards, solid wood, OSB, etc. Often the filling of this part of the kitchen unit is preceded by decoration (stencil painting, decoupage, print, shells, mosaic, etc. - whatever suits your taste ).
- Made entirely of epoxy, no support. This type is often found when making surfaces for which significant loads are not planned: coffee tables or coffee tables.
- Combined - in this case, the filler material alternates with elements of another, usually wood.
Tabletop with a combination of epoxy resin and wood.
See alsoWood cuts for decoration
Fill
A tabletop made of epoxy resin is poured with your own hands using a certain technology. You can learn more about it using the video. Many professionals share their experience by showing a master class. But the algorithm of work can also be described verbally.
- First, solid wood or other decorative elements are laid out. Naturally, if there is a base, it is placed underneath. Please note that some elements may float in the liquid resin, so it is useful to take care of them statically.
- The dye is added to the resin before the hardener. To thoroughly mix the paint you need to use two containers. First, the composition is mixed in one container, then poured into another container and mixed again. This will avoid the presence of unpainted areas, which are usually localized at the bottom of the container. Only after the paint has been completely mixed is the hardener added. It will not be possible to indicate the procedure here, since it is necessary to follow all the recommendations from the instructions for a specific brand of epoxy.
Expert opinion
Oleg Vasiliev
Master of making furniture and interior items from epoxy resin. She creates unique items to order in her own production.
Ask a question to the master
To fill a river, up to several kilograms of the mixture can be used at a time. In this case, the resin is mixed with a clean paint mixer using a low-speed drill or screwdriver. Since the mixing time with a mixer should be several minutes, the dye can be added at any stage, both to the resin and simultaneously with the hardener. The main thing is to mix the mixture thoroughly. The dye is dosed either drop by drop, or, with a large volume of the mixture, with a regular disposable syringe.
- First, the first layer is poured; it is considered the base layer and should not be less than the minimum one discussed earlier. Despite the fluidity of the resin, it is not recommended to pour it into one place. If the filling is layer-by-layer, then you need to prepare a portion for one layer. After it hardens, the process is repeated and another layer is formed.
Useful to know > Types of self-leveling floors made of epoxy resin and features of their use
Modern compounds are made using new technologies. They do not tend to form bubbles, but this phenomenon cannot be completely avoided. Even if the wood has been pre-treated and coated with a thin layer of resin, bubbles are common. It can be minimized by layer-by-layer pouring, and you can get rid of bubbles by heating the resin. Don't overdo it. You need to keep an eye on the bubble. As soon as it starts to float, heating should be stopped. An excellent tool is a hair dryer.
The resin can be preheated to 35-40°C in a typical kitchen microwave at low power. The fluidity of the heated resin increases very significantly.
Removing bubbles is not a one-time procedure. Even if they are not present at the moment, they may appear after a certain time while the resin is liquid. After pouring the layer, professionals advise periodically heating the resin for 2-3 hours. It is dangerous to use a torch as the epoxy may ignite.
Criterias of choice
The resin for pouring the table top must be transparent and also have a sufficient life expectancy, otherwise there is a risk of seeing with your own eyes how the resin “boils” or spending a very long time pouring in layers.
Resins, which are called base ones, are not at all suitable in this situation, since they are thicker: air bubbles will not be able to escape. Also, base resins are more fragile and are not always colorless. Moreover, the hardeners used with such resins will not produce a long-term mixture. This threatens both boiling of the mixture and deformation of the table during rapid hardening.
Base resins are not very suitable for pouring a table.
See alsoRules for decorating a wedding table, photo.
Epoxy Resin Selection
Epoxy is chosen based on what problems you need to solve. That is, do you need elasticity of the product or a convex lens, etc.
The material must:
- harden slowly;
- have low viscosity;
- be transparent;
- do not lose volume when pouring.
When choosing a resin, pay attention to the transparency of the material.
See alsoPostforming kitchen countertops: what is it, features, pros and cons, useful tips
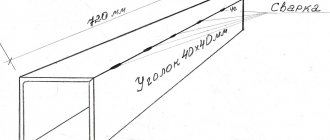
Calculate the amount of resin required to make a table cover
To do this, it is worth remembering the volume formula and multiplying the desired length and width of the table by the thickness of the fill. For example: 210*15*4 (respectively) = 12600 cm3 or 12.6 kg of filling material. It is worth considering: the density of the resin is greater than the density of water K = 1.1. Therefore, the final calculation result will look like this: 12600 * 1.1 = 13860 kg of resin.
See alsoHow to choose a coffee machine for your home, what you need to know when choosing, useful tips
Filling the countertop
IMPORTANT! Carefully read the instructions for the purchased resin set!!! This will help avoid possible unpleasant surprises during the work.
Before you start pouring the table, you need to prepare all the necessary elements.
Prepare the form or assemble the formwork. Make sure the frame/mold is sealed. Because even through the smallest crack, the entire future surface of the table can leak. The cracks are sealed with a special sealant, paraffin, thermal glue, or possibly plasticine.
Now the frame/mold should be treated with a release agent. Then we level it!
See also Wooden kitchen countertops: types, care tips, stylish models, tips
Artificial and liquid stone: what's what
When choosing countertops for a kitchen or bathroom, buyers are often faced with the problem of which material to choose, and here the cost of the product plays a big role. Manufacturers offer traditional countertops made of chipboard, countertops made of natural and artificial stone.
When choosing a countertop made of artificial stone, consumers may be misled due to their ignorance. The fact is that artificial stone, along with sheet acrylic stone, is often called products made from cast stone, called “liquid”, which at first glance, although similar to sheet stone, has a number of significant differences, which we will discuss in this article.
Artificial, or acrylic stone, is a product produced using the technology of polymerization of purified acrylic resin with a mineral filler. The process of mixing ingredients takes place in specialized industrial-type mixers equipped with automated quality systems that allow you to control the accuracy of the dosage of components and ensure full compliance of the color of the finished product with the previously selected sample.
Vacuum pumps are connected to the mixer design, creating an airless space in the mixing containers, which guarantees one hundred percent uniformity of the material over its entire area. The material is produced in sheets, the weight of 1 m² of material is 22 kg.
Sheet artificial stone has hygienic certificates and permits for contact with food products.
The complex manufacturing process results in a solid, non-porous material that can be easily worked with, i.e. it can be cut, drilled, sanded, glued and repaired if necessary.
Artificial sheet stone is a homogeneous material supplied to manufacturers in the form of plates measuring 3660 mm x 760 mm and 12.5 mm thick. Next, the material is cut into the required elements and a tabletop structure is created using special glue.
In order to connect the kitchen countertop with furniture cabinets, a frame made of moisture-resistant plywood is mounted inside the structure, which allows you to fasten the kitchen cabinets to the tabletop anywhere. The frame itself does not affect the strength of the product, since the stone can withstand a load of up to 50 kg per m².
In addition, sheet artificial stone has a very rich palette of shades and a huge number of variations depending on the size of the grains of inclusions (from the smallest to 5-6 mm in diameter), as well as inclusions imitating granite. Therefore, artificial sheet stone can be difficult to distinguish from natural natural stone.
In addition, it has a number of undeniable advantages compared to natural stone:
- the seams on the product at the junction of the elements are absolutely invisible, which is impossible to achieve when making a product from natural stone;
- manufacturing a cast sink that is integrated with the countertop, which is also impossible in the case of natural stone;
- a countertop made of artificial sheet stone weighs several times less than a similar one made of natural stone, which means that the manufacture of special, especially durable, expensive furniture cabinets is not required;
- unlimited possibilities for bringing design ideas to life: combining a tabletop with a window sill, sidewalls, a bar counter, manufacturing a product of any shape with smooth, seamless transitions.
Manufacturers of products made from poured (“liquid”) stone position them as an environmentally friendly material that can be installed even in kindergartens. They claim that artificial sheet and “liquid stone” are made from the same material.
Expert opinion
Romanova Ksenia Petrovna
Interior design expert and fabric store manager
In reality, gelcoat, polyester resin and fillers are used to produce liquid stone. In order to reduce the shrinkage of the polyester resin, a rather expensive filler must be used - aluminum hydroxide.
However, to reduce the cost of the production process, it is replaced with calcite, which costs several times less. The chemical solvent of gelcoat and polyester resin is styrene (a toxic volatile substance with hepatotoxicity.
Routes of entry into the body: respiratory system, mucous membranes and skin, digestive tract).
To polymerize the material, peroxide (butanox) is used, which reacts with polyester. Styrene, on the other hand, does not enter into any reaction, but, on the contrary, is released - evaporates.
The final evaporation time of styrene from 5 mm thick polymerized polyester resin is up to 1.5 years. The evaporation process can be accelerated by using special thermal chambers (oven with t=850°C, relative humidity 40-50%, vacuum of at least 0.4 Pa and CO² supply.
Heating cycle is at least 8 hours). Only in this case can we talk about removing 50% of styrene from the product, and the remaining 50% will evaporate for another 5-6 years.
Thus, products made from cast stone can only be used in non-residential ventilated areas.
The technology for manufacturing a product from “liquid” stone is as follows: on a base made of chipboard (usually not moisture-resistant to reduce the cost of the product), a thin layer (up to 3 mm) of the “liquid stone” composition is sprayed (since the products are all individual, they are not produced in a factory, but in a makeshift way, practically “on your knees.” Here, not only is ultraviolet equipment and thermal chambers not used, but often the post-curing time of the material is not even maintained (at least 14 days), so the final curing of the polymer occurs on site.
“Liquid stone” is a material produced on the basis of a mixture of gelcoat and polyester resin with a mineral filler, the dimensions of which are limited by the diameter of the spray gun nozzle and cannot exceed 1-2 mm, otherwise the surface of the product will not look uniform (with bald spots), but the total thickness of the applied layer does not exceed 1.5-3 mm. That is, in its essence, “liquid stone” is paint applied to the base and creating the illusion of a strong and durable material, and the strength of such a product directly depends on the strength of the chipboard, which is the basis of the countertop.
In addition, the resins that make up the “liquid stone” do not have the necessary degree of adhesion to the surface and it often happens that in some places the “liquid stone” peels off and bubbles appear. Such products last from several months to a couple of years, then they are completely destroyed (they crack due to the swelling of the chipboard, often in the area of the sink and hob).
Unlike sheet acrylic stone, “liquid” does not have so many shades or large inclusions. When you tap on such products, you feel a thin layer of stone and a thick layer of chipboard (dull sound).
It has a matte surface, as it cannot be sanded to a mirror-glossy surface due to its loose structure. stone is based on the ability to spray patterns onto the surface, greater resistance to thermal influences and a price that is 30-50% lower compared to artificial sheet stone.
However, whether the small difference in price is worth the significant difference in quality is up to everyone to decide for themselves.
Step-by-step instruction
If it is necessary to tint the resin, then the introduction of the hardener into the resin should precede the addition of the dye.
Stir thoroughly until smooth. To make the pigment disperse faster, the resin is heated to 40 C (in a water bath or placed near a radiator).
Mix the components, following all the instructions. Mix along the edges of the walls and in the middle.
IMPORTANT! If the mixture turns out to be inhomogeneous, it will ruin your product!
Now a thin layer of resin is poured onto the bottom of the mold and decorative elements are laid out.
Pour the prepared mixture into the mold. It can be poured at once if the thickness of what is being poured is no more than 5 cm.
Pouring a wooden tabletop with epoxy resin.
If a table surface with a thickness of 6 cm or more is cast, the pouring is done in two layers, in 2 stages. It should take one to two days for one layer to harden.
ATTENTION! The resin is poured into one point in a thin stream. You can pour along an inclined stick lowered into the mold.
See alsoDo-it-yourself countertop repair. Tips and tricks
Tabletop installation
Once the epoxy resin table top is made, it is installed on the frame. To avoid the need to make holes in the poured surface to install the legs, these locations are marked in advance and reinforced with small sections of pipes of the required diameter. When the resin hardens, the pipes are pulled out and the legs of the product are put in their place.
Original table design with transparent epoxy resin.
See alsoHow to remove a scratch from a refrigerator: ways to prevent it from appearing, useful tips
Tips for use
For each type of countertop, there are certain recommendations, following which will extend the life of your work surface. We present only the most important ones.
- do not use aggressive chemical liquids or abrasive detergents;
- cut food only on a cutting board;
- do not place hot dishes and other utensils on the countertop;
- do not hit or drop heavy objects onto the surface;
- Do not use sponges with a rough (hard) coating.
- a hot object can be placed directly on the countertop for only a few seconds (in an emergency);
- try to use a stand for hot dishes;
- dark glossy surfaces require constant wiping, as fingerprints are clearly visible on them;
- It is not recommended to use abrasives, as well as hard brushes, sponges, etc.
Popular types of resin grades
When deciding which epoxy resin to choose for pouring the countertop, we suggest paying attention to the following brands:
See alsoStorage systems for the kitchen: types, features, useful tips
"Art-Eco"
Most suitable for thin layers, especially when sufficient hardener is added. Among other things, this brand implies excellent colors that allow you to give any shade to the material.
Epoxy resin Art-eco.
QTP-1130
Suitable for making a transparent cover of a coffee table or desk, if the filling layer is no more than 3 mm. This epoxy is especially transparent and can level itself.
Crystal Glass
Transparent resin, its distinctive feature is fluidity. This is an ideal option when creating small layers, as well as when working with various fillers (grass, wood fragments, coins, etc.).
"ED-20"
The resin is characterized by low viscosity and demonstrates the maximum combination of advantages; it is very common and in demand. It has an acceptable cost.
CHS Epoxy 520
Suitable for activities with complex fillers, it is the best and most popular material for making the top board for the table. Therefore, if this important part of the kitchen set will be placed where the sun falls, you should pay attention to this option when making a countertop.
N3 -PEO-610KE
Over time, it does not turn yellow at all under the influence of heat and direct rays of the sun.
Epoxy resin table in interior design.