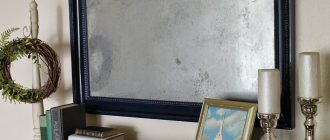
In the photo we see a mirror on the wall in the hallway.
It's hard to imagine a house without mirrors. They decorate the room and visually expand the space. Professional designers use mirrors in their work and use them to create an intricate play of light and shadow.
Choosing a suitable mirror for your home is not difficult; it all depends on personal preferences, but installing it may pose some difficulties. In this article we will talk about how to hang a mirror without a frame on the wall, and we will describe in detail three methods of do-it-yourself installation.
Three installation methods
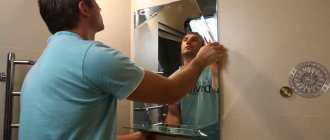
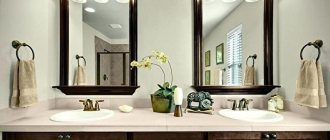
We see the process of installing a frameless mirror on a bathroom wall.
At first glance, all decorative wall mirrors seem the same. Of course, if the differences are in form, but this is already the work of a master, but in essence it is all the same material.
This is not actually the case, and mirrors differ from each other in several ways. We deliberately started our article with this, because before you buy and hang a mirror on the wall, you need to know about its characteristics. For different rooms it is necessary to use different mirrors, and their first and main difference is the thickness of the sheet.
The thinnest mirror can be only 4 millimeters thick. This is a very fragile product that needs to be handled with extreme care. Any awkward movement and your mirror will crack or even break completely.
The weight also depends on the thickness, and naturally, installing a heavy mirror on a wall is a much more complicated process and not every wall will withstand it.
A mirror without a frame can be decorated with openwork moldings.
Mirrors and amalgam may also differ. This is a special coating on the back side that turns ordinary glass into a mirror.
Cheaper models are made using aluminum amalgam. No, we cannot say that these mirrors are bad or of poor quality. Aluminum will last for many years, and it does not fade, but such mirrors have one significant drawback - they fog up when the temperature changes. This can often be observed in the bathroom when the mirror becomes covered with perspiration as soon as you turn on the hot water.
To prevent this from happening, a decorative wall mirror should be made with silver amalgam. Such mirrors are more expensive, but condensation does not form on them, and this is very convenient. On the other hand, a mirror on the wall in the living room does not need such qualities, and there is simply no point in taking such an expensive option.
So, we have figured out the characteristics of mirrors and we can move directly to the question of how to hang a mirror on the wall.
Method one: glue
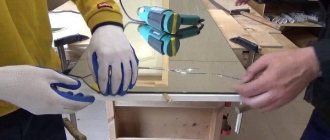
We see the process of applying glue to the mirror.
The simplest, fastest and at the same time reliable method of fastening. Even a large mirror on the wall will adhere perfectly to the adhesive base and will not sag over time. Special glue for mirrors is sold in tubes and has a consistency similar to the well-known liquid nails.
Important! Installation of a mirror on a wall is carried out only with the help of special mirror glue. It is not known for certain how manufacturers make it, and how it differs from liquid nails, but experience shows that only it is capable of providing high-quality fastening.
In order to fix the mirror, simply apply glue to the amalgam and press it against the wall for a few minutes. The glue sets time is 3-5 minutes, so no problems should arise. Unfortunately, despite the simplicity of this method, it cannot always be used.
The mirror on the wall is glued on, it looks neat.
There are a number of limitations and subtleties that you need to be aware of when choosing a method for mounting your mirror:
- To attach a mirror with glue, the wall must be perfectly flat. If there are differences and defects on the wall, the glass will be under constant tension and sooner or later it will simply burst from the slightest unfortunate touch.
- The glue has excellent adhesion to mineral surfaces, but does not interact at all with the glossy surface of ceramic tiles, so this method is not suitable for attaching mirrors, for example, in the bathroom or kitchen.
- High humidity and frequent temperature changes are also limitations for the use of glue. Over time, they will destroy its structure, and the mirror will begin to move away from the wall, and it’s good if you manage to detect this in time.
- A mirror glued to glue can no longer be removed without damage. To be more precise, the only way to dismantle it is to split it, so think carefully before you get to work; you won’t be able to re-weigh it.
- Before installing the mirror on the wall, make a complete marking using a level. The glue will set quite quickly and you won't have time to adjust the placement. The mirror should be glued only according to the pre-applied markings.
As you can see, there are quite a few restrictions, but if the place where you are going to hang the mirror meets all the listed requirements, consider yourself very lucky and you will complete the installation quickly and without much effort.
Method two: tape
We see the process of applying double-sided tape to a mirror.
Popular wisdom says: if something cannot be secured with tape, it is better not to start working at all. There is some truth in this. Scotch tape is a brilliant invention, and double-sided tape is a miracle.
Mirrors can also be glued using double-sided tape, and unlike the adhesive installation method, this option has a number of advantages:
- The mirror can be easily removed and repositioned at any time. Modern adhesive tape can be easily peeled off if necessary and does not even leave marks on the surface.
- The curvature of the walls when installing with adhesive tape is not important, you just should not try to press the canvas if it does not reach the adhesive tape. Better use an additional mount.
- Scotch tape does not lose its qualities under the influence of moisture and high temperatures.
We see a mirror in a frame on the wall.
Unfortunately, this method of fastening is not ideal either. Scotch tape, like glue, cannot be used on tiles, and from a low-quality mirror it can tear off part of the amalgam during dismantling.
Also, you should not hang large mirrors on the wall using tape, since it does not have a very high endurance rating and under heavy load, the mirror can simply slide off the mount.
Advice! Do not use regular rolled tape for fastening; it is very difficult to remove. Today there is a special fastening material based on double-sided tape, which uses a special technology for safe removal. The price of such fasteners will be higher, but you do not risk damaging the mirror during dismantling.
Method three: dowels
We see an example of dowels on which you can hang a mirror on the entire wall.
The most complex and time-consuming method, which will require from you not only the ability to handle power tools, but also increased accuracy. This is the only way to attach a mirror to tiles and can be used on uneven surfaces.
Mirror fasteners have a special design and consist of several components:
- Plastic sleeve. It gets hammered into walls and expands when a screw is driven into it.
- The screw itself.
- Clamping element. Screws onto a screw and has an external thread for fixing a decorative plug.
- Decorative plug . Made from chrome or nickel plated metal.
To mount it on dowels, you will need to drill holes in the mirror. It is very difficult to do this without damaging the product, so it is better to contact specialists.
If you order figured mirrors for the wall, then immediately clarify this point. You can, of course, drill them yourself, but this requires experience and knowledge of the intricacies of the process.
We see how a mirror looks on dowels on the wall.
The glass is drilled using a special diamond-coated drill. This process is long and complex, so instead of going into lengthy descriptions, we recommend that you watch the video in this article, which shows instructions for working with mirrors.
Today you can find a huge range of mirror fasteners. Each of them is designed for different materials from which the walls are built.
For example, brick fasteners cannot be used on plasterboard partitions (see: Cladding walls with plasterboard: do it sequentially), since special dowels called “butterflies” have been developed for them. The butterflies do not just unclench inside the wall, they press the dowel from the inside, due to which the load on the partition is significantly reduced.
Advice! Before hanging a large mirror on the wall, make sure that it does not reach the floor. The ideal distance to the bottom is 10 centimeters. This will protect the mirror from accidental impacts during cleaning.
How to hang a mirror without drilling into the wall? 3 easy ways
How to hang a mirror? It would seem that the answer is obvious - using screws, hinges and other metal fasteners. But to do this you will have to drill into the wall, which is quite difficult and sometimes impossible. And then glue comes to the rescue
Liquid nails for mirrors
The very idea of gluing a heavy and fragile mirror looks quite risky. Of course, this cannot be done with simple universal glue. There are special mounting mixtures for mirrors, and their range is quite wide. So what should you choose?
Obviously, the glue that can fix the mirror must be strong and durable. It requires good adhesion to smooth surfaces, as well as resistance to deformation, humidity, and temperature changes. And of course, it cannot be so aggressive as to dissolve the amalgam (the reflective layer on the “underside” of the glass).
The first thing that comes to mind is the so-called liquid nails
. We are talking about glue with a special clay filler, which provides adhesion even to porous surfaces. Using this mounting mixture, the mirror can even be glued to a brick wall.
A relatively small mirror can be glued on your own, but if its area exceeds 1 m², it is better to entrust this work to professionals
Of course, the choice is not limited to liquid nails. The market offers us many special installation adhesives
. For example, “Tytan Professional for mirrors” from Selena, “Glue for mirrors 47A” produced by Soudal MirrorFix (Penosil), “Quelyd Mastifix for mirrors” (Bostik), “Mirror” (Krass), “Mounting glue for mirrors” (Poli- R). The average cost is 150-300 rubles. per package with a capacity of about 300 ml.
Adhesives for mirrors
Most mirror adhesives are based on synthetic rubber and resins in an organic solvent. This formula provides the material with high strength, durability, immunity to moisture and, unfortunately, a strong unpleasant odor. There are also acrylic water-soluble adhesives that do not have this drawback. Their disadvantage is that they are “hydrophobic”, which does not allow use in the bathroom or kitchen.
When choosing an adhesive, it is important to carefully read the information on the packaging. It is not advisable to use universal compounds, even those that allow working with glass - there is a risk of damaging the amalgam.
In an effort to reduce the cost of the material, manufacturers often add caustic substances to the formula that can dissolve the reflective layer. If the product is intended specifically for mirrors, there is no need to worry about this.
If you need to glue a relatively small mirror, you can use a car mirror sealant, such as acrylic-based Permatex or DoneDeal two-component silicone compound. Products of this kind are sold in compact, easy-to-use packaging and contain detailed instructions for use.
Technology of working with assembly adhesive
High-tech mounting mixtures allow you to fix the mirror on any surface - concrete, brick, wood, glass or tile. The operating technology is almost the same in all cases.
The gluing of the mirror should be carried out at a temperature of 10 to 30°C. The colder the room, the longer it will take for the glue to harden.
The first thing to start with is thorough cleaning of the surfaces to be bonded from dirt and dust, as well as degreasing with white spirit, acetone or gasoline. A concrete or plastered wall should first be impregnated with “Concrete Contact” type soil to strengthen the material and make it evenly absorbent.
The glue is applied to the back of the mirror in strokes 5–7 mm wide in increments of about 5 cm, 3–4 cm from the edge. Then apply it to the wall, cabinet door or other surface and remove it for 2-5 minutes. During this time, the solvent will evaporate from the mounting composition and the mass will become sticky. Then the mirror is applied again, leveled (the master has a few minutes for this) and left until the mixture completely hardens, which is usually about 24 hours.
Installation with double-sided tape
An alternative to glue can be special double-sided tape.
. In this way, only small mirrors can be mounted - with an area of less than 0.5 m² and a weight of less than 6 kg. The main advantage of this technology is the extreme ease of installation. The tape is cut into pieces of the required length, laid out on the wrong side, the protective film is removed, applied to the wall and pressed tightly.
If for one reason or another the mirror needs to be removed, this can be easily done using fishing line or a thin metal string. It is brought between the mirror and the wall and the tape is cut with sawing movements.
Examples of mirror mounting tape include Unibob from Tesa and Scotch. The cost of this product is 200-500 rubles. depending on the length, which varies from 1.25 to 5 m.
Using mounting tape, the mirror should be applied to the wall evenly and accurately. It will no longer be possible to correct the error, as in the case of glue.
Methods for attaching mirrors to the wall
When renovating or arranging an apartment or home, sometimes you need to fix a mirror that does not have a frame. Recently, this is the most popular design method. In general, there are five ways of fastening. They are selected depending on the type of base on which the installation will be made and the area of the mirror surface. You can hang a mirror in the following ways:
- Glue to the surface using special glue or adhesive-sealant.
- Install special holders on the wall.
- Drill holes in the mirror and fasten them to the wall or furniture door. You can use ordinary self-tapping screws, but there are special fasteners with plastic compensators that prevent the fasteners from being “tightened” and protect against cracks.
You can hang a mirror on the wall of a bathroom, corridor, or hallway using fasteners, glue, and mounting tape.
- Install a decorative profile on the wall, lower the bottom edge of the mirror into it, and secure the top edge using one of the methods described above.
- Hanging with special tape (3M mounting tape).
- Attaching a mirror to a wall without drilling is possible only with glue or special double-sided tape. This may be required when installing on a plasterboard wall, partitions made of foam blocks, or other materials with low load-bearing capacity. This method is also useful if you don’t want to damage tiles, furniture doors, etc. All other methods involve drilling holes.
Mounting methods
A reflective element, a mirror, necessary for everyday use, can be mounted on a tiled bathroom wall in the following ways:
- through through holes with hardware;
Fastening the mirror with decorative screws. - frames or holders.
Special holders. - gluing to tiles with special compounds;
Gluing the mirror. - on double-sided tape;
Gluing with double-sided tape. - on a hinged mount;
Fixing a cosmetic magnifying mirror to the wall cladding in the bathroom. - on suction cups;
Suction cup mounting. - pendant on a cord;
Pendant on a cord.
All installation options will require drilling tiles and walls with special drills. An exception is gluing a mirror to a tile, but here you need to choose the right tape or adhesive.
Attention: The mirror can be glued directly to the wall by dismantling the wall cladding in a separate area. The mirror is glued to the wall using tile adhesive.
Holders and frames
Special fasteners for glass and mirrors allow you to mount them on the wall without drilling (the mirrors themselves) or other damage. This category includes several types of holders:
- hooks;
Hook shaped holder. - fastenings with hardware holes outside the mirror perimeter;
Clamp type holder. - holders with screw holes inside the mirror perimeter;
Fastening with internal placement of hardware.
In the first case, a frame is bent from wire, on which the lower edge of the decorative element rests. The frame itself is attached to the wall with self-tapping screws. Depending on the width of the bottom shelf and the height of the hooks on the outside, the glass may have an inclination of the upper part towards the wall or be in the same plane with it.
The second category of holders is easy to mark on the wall and fasten after drilling a blind hole and driving a caprolon dowel into it. The tips of the holders are usually in the shape of a cylinder or washer with a chrome or bronze coating.
The last category of holders either has the shape of a hook or a vertically oriented cylinder with a groove along the thickness of the glass with amalgam.
It is very inconvenient to mark the hooks, since the hole for the hardware is under the glass during fitting. Therefore, first you have to outline the edge of the holder from the outside, remove the mirror, and re-apply the hooks to the installation site to mark a point for drilling a blind hole.
There are no such problems with turned holders; the hardware inside them is always located outside the outer perimeter of the glass with amalgam. Holders are the most convenient way to attach large mirrors to tiles.
Here is more information about how and what to drill tiles correctly.
Adhesive compositions
Despite the smooth surface of the glaze of the tiled wall covering, a medium-sized mirror can be fixed to it using the gluing method:
The main nuances are:
- the surface of the tile must be degreased;
- It is better to impregnate the grout in the joints with a primer;
- glue for a bathroom mirror should not destroy the amalgam layer.
Experts recommend gluing mirror elements to any base with neutral silicone sealant. Unlike acidic (acetic) sealant, it prevents the formation of salts harmful to the amalgam mirror.
Plate holder
The industry produces special holders for household mirrors in the form of a metal plate with mounting holes. The plate itself is glued to the back of the glass with amalgam, then the entire structure is hung on two anchor hooks.
The sealant is applied in a continuous layer with a spatula, similar to putty compounds.
Therefore, this method can be attributed to both the gluing technology and the method of fixation with special holders.
Attention: The reliability of neutral silicone sealant is evidenced by the fact that the reflective elements of the car’s side mirrors are attached with this particular compound. The adhesive retains its strength under the influence of atmospheric and vibration loads.
Double-sided tape
A universal material for attaching small mirrors to tiles is double-sided tape. Features of the technology are:
- You need to glue the tape around the perimeter and crosswise in the middle;
Applying double-sided tape to the back of the element. - the protective paper layer is removed immediately after application;
- the sticky surface should be immediately brought to the installation site;
- Holding the mirror with your hands is inconvenient; it is best to use glass jacks.
Vacuum glass jack.
Vacuum jacks are attached to the face of the mirror before applying double-sided tape. Then the structure is laid on the backs of the chairs with the back side up so that the jack handles do not interfere with the installation of the adhesive tape on the amalgam.
Fixing the mirror through through holes with decorative screws.
Typically, tape is used in conjunction with sealant - tape around the perimeter, sealant inside in several strips. Since the tape itself is not very reliable, but it allows you to hold the mirror on the wall while the sealant sets.
Decorative hardware
The next option, which allows you to attach mirror elements to a smooth tile surface in the bathroom, looks like this:
- 4 through holes are drilled in the mirror with special drills closer to the corners;
Drilling a mirror with a special drill. - Contour lines are made on the tile along the perimeter of the reflective element, taking into account the horizontal and vertical levels;
- the mirror is leaned against the marking lines, dots or crosses are applied inside the holes with a marker;
- Blind holes are drilled in the tiles and plastic dowels are driven into them;
- At the last stage, the mirror is attached with self-tapping screws with protective and decorative caps. Fixing the mirror through through holes with decorative screws.
Attention: The self-tapping screws must be fitted with cable braided casings of a suitable size, taking into account the existing gap. The length of the bushings should be equal to the thickness of the glass so that the material does not crawl out. This will prevent the glass from breaking.
Pendant on a cord
For some types of interior, the mirror can be hung on a hook or self-tapping screw using a cord. There are several options for this:
- make a frame/frame for the reflective element with eyes for cord knots;
Homemade frame for attaching rope. - buy a mirror with a cord;
Factory made mirror with cord. - drill holes for the rope;
The cord is passed through the drilled holes. - attach a decorative cord around the perimeter of the reflective element using a glue gun with a thermoplastic rod;
Gluing rope to a mirror.
The desired option is selected depending on the interior design of the bathroom and how much the user is willing to spend on finishing the bathroom.
Suction cup mounting
Bathroom interior stores sell small mirrors with suction cups. This allows you to independently install reflective elements in the bathroom and move them as needed.
For installation, it is necessary to degrease the surface of the tile and moisten the surface of the suction cup with water.
If the quality of fixation is unsatisfactory, or the vacuum element has lost elasticity over time, the suction cup can be glued to transparent silicone sealant.
Some manufacturers supply the suction cup with a cellophane or polyethylene circle. It needs to be glued to the glossy surface of the tile, and the vacuum element must be attached to its outer side.
Swivel mount
There are mirrors with one or more degrees of mobility of the hinge elements. They are small in size, but have a magnifying effect. This mirror element dramatically improves the quality of shaving, hair removal, and other hygiene procedures.
For this type of mirrors, installation is standard - using the included hardware, screwed into plastic dowels inside blind holes drilled in the wall.
At what altitude
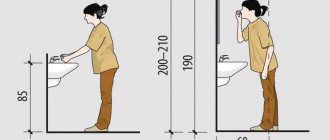
The installation height of mirrors depends on the installation location and its purpose. In the bathroom it is hung so that the middle of the mirror surface is at eye level. The height of residents may vary, but on average the center is at a height of 160-165 cm from the floor.
Bathroom mirror installation height
When hanging in the hallway or dressing room, mirrors are usually installed long and narrow. In them, a person should be displayed in full height. To do this, its upper edge should be slightly above the head - 3-5 cm. When hanging on cabinet doors, use its upper edge as a guide. If the closet is tall, the mirror is also fixed a few centimeters above the head.
Mirror holders and installation methods
If after some time the mirror has to be removed/replaced, it is more convenient to install it on the holders. They are of two types:
- end-to-end;
- non-through (ordinary).
Non-through ones are installed on a wall or door; the edge of the mirror is inserted into them. They can be attached almost flush to the plane of the wall/door, or they can be remote-mounted. In the second option, a gap of 5 mm to several centimeters remains between the wall and the mirror. This saves you if you need to install it on uneven walls.
Holders for mounting mirrors on the wall
When using conventional holders, they are placed two at the bottom (if the mirror is small, you can place one at the bottom - in the center), two on the sides. When installing, you need to carefully measure and set aside the dimensions. The lower holders are positioned strictly horizontally at an equal distance from the edge, and the side holders are placed so that the edge of the mirror fits easily into their grooves. Moreover, it should not fall out even with a maximum shift to one side. Typically, the installation distance of the holders should be 2-3 mm wider than the mirror, but there may be variations depending on the design of the holders.
Another option is two at the top and two at the bottom. In this case, the distance between the fasteners is also a couple of millimeters greater than the height of the mirror.
Through holders are used if the mirror surface has holes for fasteners. They can be made in a glass workshop. The holders themselves are ordinary self-tapping screws or dowel-nails with plastic linings and decorative caps of various shapes and diameters.
They are installed like regular dowels. First, holes for installation are marked (attach the mirror to the wall, make marks with a pencil or marker), holes are drilled, and plastic plugs are installed for the dowels. Then the fastener with the plastic plug in place is threaded through the hole in the mirror surface and installed in place. The final stage is the installation of decorative overlays.
Attaching a mirror to the wall with glue
Not every wall is easy to install fasteners. For example, to hang something on plasterboard partitions or walls, you must either install fasteners in the place where the profile passes, or use special butterfly dowels. Each such mount can support about 20 kg. This is enough to mount a mirror, but not everyone wants to make holes in the wall. If the walls are smooth or the mirror needs to be installed on the door of a cabinet or other piece of furniture, it can be glued.
Mirrors can be glued to flat surfaces
Which glue to choose
For installation, a special glue is used, which is called “glue for mirrors”. They differ from ordinary ones in that they do not damage the amalgam coating. The important point is that the composition must have good adhesion (adhesion) to the surface on which you are going to glue the mirror.
Here are some names of popular formulations:
- Moment Installation Liquid Nails. Made on the basis of synthetic rubber, it does not harden after drying and remains elastic. Suitable for application on wood, plaster, painted surfaces, metals. A 310 ml cartridge for a construction gun costs 160 rubles.
- SOUDAL 47A.
Composition: synthetic rubber, suitable for gluing to concrete, brick, ceramic, and plastered substrates. It is characterized by a short curing time and has good adhesive ability. Contains a weak solvent that may damage poor quality amalgam. If you are in doubt about the quality of the coating, you should conduct a test before use. A 310 ml tube costs 190 rubles. Fixing the mirror to the wall is possible using special glue - Tytan for mirrors. Based on synthetic rubber and resins. Suitable for gluing to porous surfaces (concrete, plaster, brick, wood and wood materials, drywall). It sets in 10-20 minutes, the color is beige. A 300 ml cartridge costs 170 rubles.
- Penosil MirrorFix H1296. The base is synthetic rubber, can be glued to stone, wood, glass, metal, concrete, painted surfaces, plaster. Suitable for installing mirrors up to 6 mm thick (except those coated with epoxy powder). The color is beige, setting time is 10-15 minutes. A 310 ml tube costs 260 rubles.
There may still be many compositions; the most common ones have been described. They "set" quickly, but final drying occurs only after 72 hours or more.
What else can you glue on?
Neutral silicone sealant is suitable for gluing mirrors. It has excellent adhesive ability and does not damage the amalgam. The cost of mirror glue and silicone sealant is approximately the same, and the setting time is also approximately the same. When choosing, be careful: acidic (acetic) silicone sealants destroy amalgam. Therefore, carefully read the composition and scope of application.
Neutral silicone sealant works well
Any composition will do, but for attaching a mirror to a bathroom wall, it is better to use one with antifungal additives. This will prevent the development of fungi and mold. Silicone for aquariums can also be used in damp areas. It is always made on the basis of silicone, neutral, fungi and mold do not appear on it. The cost may be slightly more expensive than regular sanitary silicone.
Bonding technology
Attaching a mirror to a wall with glue is a simple procedure, but there are some points you need to know. Before gluing, the surface on which the mirror will be glued and its back side are cleaned of dirt, dust, and degreased (wipe with alcohol, wash with soapy water and dry). A strip of glue is applied to the mirror like a snake and pressed against the wall at the installation site. The adhesive composition can also be applied pointwise - in a checkerboard pattern over all surfaces. This kind of fastening of the mirror to the wall is reliable, but if replacement is necessary, it will need to be broken, the glue removed with a spatula, and a new one installed.
To hang it evenly, you can first draw a line on the wall along which to align the bottom or side edge.
Applying glue to the back surface of the mirror
When gluing large-area mirrors, the technology changes slightly. Glue is applied to the leveled, primed and dried wall and spread over the entire surface with a spatula with a very fine tooth. These spatulas are used for gluing cork. They should not be confused with those used to apply adhesive to tiles. They have too much space between the teeth. A mirror is glued to the prepared surface. It is carried and held using special handles with suction cups.
Attaching a mirror to a wall with glue is considered reliable. This method is used in the bathroom if it is necessary for all the finishing to be in one plane. In this case, first lay out the tiles, then install the mirror. In this case, when installing the lower edge on the tile, you need to put a gasket several millimeters thick. The same gap remains on the sides and bottom. After the glue has dried, it is filled with silicone sealant or grout, which was used for jointing. This gap will compensate for the difference in thermal expansion of materials - it is different for ceramics and glass. This gap will also prevent cracks from appearing during shrinkage and movement of the house.
Spatulas for applying glue
Since the glue does not harden immediately, the mirror may begin to slide down the wall. I don’t really want to hold it for all 15-20 minutes, so they take measures to fix it in advance. To do this, before applying the glue, several pieces of double-sided tape are glued to the back side. It will hold the mirror until the glue dries.
The second option is to glue a strip to the wall that will serve as a stop. Choose a glue that can be easily cleaned from the surface. If possible, you can tighten several screws, etc. In general, any stop that will hold a heavy piece of glass (1 square meter 4 mm thick weighs 10 kg) in place.
How to glue a mirror with double-sided tape
Mirrors that are small in size and weight can be glued to a special 3M double-sided tape. An adhesive composition is applied to the foamed polyethylene or polyurethane on both sides. The foam base compensates for some unevenness of the base and also serves to absorb movement of the base. The thickness of the base (adhesive tape) can be from 0.8 mm to 1.6 mm, the width of the tape is 6-25 mm.
Glue quickly and securely using special 3M double-sided mounting tape
Pieces of tape are glued onto a clean, grease-free base. It is distributed evenly over the entire surface. It is not worth gluing along the perimeter; it is better to glue all the pieces vertically in a checkerboard pattern at a distance of about 10-12 cm from each other. The tape consumption depends on the mirror area; experimental data are given in the table.
Consumption of double-sided foam tape for gluing mirrors
| tape width 19 mm | tape width 25 mm | tape width 19 mm | tape width 25 mm | tape width 19 mm | tape width 25 mm | |
| 600 | 14 cm | 11 cm | 19 cm | 14 cm | 24 cm | 18 cm |
| 800 | 19 cm | 14 cm | 25 cm | 19 cm | 32 cm | 24 cm |
| 1000 | 24 cm | 18 cm | 32 cm | 24 cm | 39 cm | 30 cm |
| 1200 | 28 cm | 22 cm | 38 cm | 29 cm | 47 cm | 36 cm |
| 1400 | 33 cm | 25 cm | 44 cm | 34 cm | 55 cm | 42 cm |
| 1600 | 38 cm | 29 cm | 51 cm | 38 cm | 63 cm | 48 cm |
| 1800 | 43 cm | 32 cm | 57 cm | 43 cm | 71 cm | 64 cm |
| 2000 | 47 cm | 36 cm | 63 cm | 48 cm | 79 cm | 60 cm |
| 2200 | 52 cm | 40 cm | 69 cm | 53 cm | 87 cm | 66 cm |
| 2400 | 57 cm | 43 cm | 76 cm | 58 cm | 95 cm | 72 cm |
| 2600 | 62 cm | 47 cm | 82 cm | 62 cm | 103 cm | 78 cm |
| 2800 | 66 cm | 50 cm | 88 cm | 67 cm | 111 cm | 84 cm |
| 3000 | 71 cm | 54 cm | 95 cm | 72 cm | 118 cm | 90 cm |
The final touch is to remove the protective film from the glued pieces and install the mirror in its intended place. Manufacturers of this type of tape provide a guarantee for 10,000 adhesives, so if it is installed incorrectly, you can correct it.
Fastening the mirror to the wall using 3M adhesive tape is reliable - this material is used in industry for gluing smooth fragments. This compound is not afraid of ultraviolet radiation and has a wide temperature range of use (from -40°C to +90°C). The adhesive composition has excellent resistance to water. The only limitation is that this tape adheres much worse to porous surfaces. But with ceramic tiles, laminated MDF or chipboard, adhesion is excellent. If in doubt, you can conduct an experiment - glue something heavy, then try to tear it off. Based on the results, you can draw your own conclusions.
How to hang a mirror without a frame on the wall
Of course, every person has a mirror in their bathroom, and before it can be found there, it will need to be somehow hung on the wall.
Of course, if a mirror has a frame, then it is equipped with a special device on this frame with which you can easily hang this mirror on the wall.
How to hang a frameless mirror on the wall
This is a really difficult question, although it can be done with your own hands.
Where can you hang a mirror?
First you will need to decide on a place where you can hang the mirror. The mirror should be hung only above the washbasin to make it convenient to use - approximately it should be located at a height of about 1.5 - 1.6 meters from the floor.
We hang a mirror on the wall.
In order to hang a mirror on the wall in the most common way, you will need to use the following tools:
— Hacksaw for wood; - Regular pencil; — Roulette; — Alcohol level; — Reiki made of alcohol; — The mirror itself; — Painting tape; — Double-sided tape for attaching the mirror.
Once these materials have been collected, you can begin the process of installing the mirror on the wall:
1) In relation to the washbasin, the height should be approximately 20 centimeters, although this also depends on the exact size of the mirror;
2) then, using a pencil and tape measure, you will need to measure this distance on the wall;
3) Prepare two supports - it is best to use wood for them - these should be two small planks that can hold the mirror for some time;
READ ALSO: A video has appeared from the scene of an accident where a driver hit a woman and a child
4) then you will need to make the same supports according to the measurements that were made earlier. To do this you will need to use a hacksaw for wood;
5) when the supports are ready, they will need to be installed in a vertical position, and they must be supported on the two extreme points of the sink. You need to check whether they really stand perfectly vertically using a spirit level. Then, using masking tape, you will need to fix these supports.
6) Then you need to glue a special tape to the back of the mirror itself, which is glued on both sides. In this case, the strips of this tape should be glued exclusively in a vertical position at a distance of approximately 15 centimeters from each other;
7) After this tape has been applied, the mirror will need to be carefully leaned against the desired wall. Using the same spirit level, you can see how smoothly it is installed;
 at the very end, you will need to very carefully walk over the entire area of the mirror and carefully press it against the wall to which it is attached.
What can you hang a mirror on other than this method? There are other ways in which you can hang a mirror without a frame on the wall.
Interesting! Chainsaw Taiga 245, repair it yourself, here!
Hanging a mirror using liquid nails or glue. To hang a mirror in this way, you will need to evenly distribute liquid nails or glue over the entire area of the mirror - special attention should be paid to the edges of the mirror. You need to apply at a distance of 5-8 centimeters from each other.