30127
Large companies selling kitchen units offer their customers a paid installation service. However, many people prefer to do this work themselves in order to save significant money. In fact, assembling kitchen furniture is not considered a very difficult job if you understand it carefully.
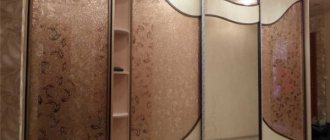
Scheme and sequence of work
Regardless of the chosen furniture model and the place of purchase of the kitchen set, the furniture will be delivered to the house or apartment in the form of packages packed in paper, laminated panels, boxes with fasteners and furniture fittings. In fact, assembling a kitchen set begins with a thorough inspection and counting of all delivered packages, checking for scratches and damage and the completeness of all parts. As a rule, the kitchen set includes:
- Packages with side walls, shelves and doors of cabinets of the lower tier of furniture;
- Kits for assembling lower tier drawers are supplied separately;
- Panel kits for assembling and installing the upper tier of wall cabinets;
- Sets of canopies, handles, support slides, door closer parts and door closing shock absorbers sealed in polyethylene.
Before assembling the kitchen set, it is necessary to sort and arrange the bags with fasteners and accessories into packs with packaged laminated panels. This will avoid fastener loss, confusion, and improper use.
Most manufacturing companies mark the packages, and in the summary sheet for the kitchen set they indicate information about the belonging of a particular package with accessories to a specific kit for assembling a cabinet. This greatly simplifies the preparation for assembling the kitchen set with your own hands.
Kitchen set assembly sequence
There are no strict instructions on the order in which the work should be performed; there are manufacturer’s recommendations and a flow chart describing how to assemble a kitchen set with your own hands at the most difficult stages of assembly work. If the installation of kitchen furniture in the kitchen is carried out by a team of several people, work on assembling the set can be carried out simultaneously for the upper and lower tier of cabinets.
The only condition that must be observed is the sequence of installation of the assembled kitchen cabinets on the prepared area in the kitchen:
- The top tier of cabinets and drawers are hung first; if a corner kitchen set is to be assembled, then the installation process first begins with the installation of a cabinet located in the common corner of the set;
- The second stage is the installation of the lower tier, cabinets and cabinets are connected with through fasteners, drawers and pencil cases are installed;
- The third stage is laying the countertop set, installing ovens and hobs, sinks and mixers.
One of the most common defects in hasty assembly and installation of kitchen units is the formation of gaps between the walls of wall cabinets. This is usually due to either crooked or insufficiently rigid kitchen walls, or inaccurate assembly of the kitchen cabinets themselves. The formation of cracks is especially noticeable in corner cabinets. Therefore, the craftsmen recommend that before assembling the kitchen corner set on the kitchen wall, try on and adjust the joints on the cabinets in the corner of the room.
For your information! To ensure the correct assembly and installation of the upper tier of the set, the hanging cabinets are loaded with the working weight of dishes and kitchen utensils.
If the weight of the load between the hung cabinets does not increase the gaps, you can tighten the upper tier of the set with through fasteners and proceed to installing the lower tier of kitchen furniture.
Assembly tools
Any furniture, as a rule, comes to the client in disassembled form. You can hire furniture makers to assemble it, or you can do it yourself.
- Drill and drill bits. High-quality furniture, however, does not require any drilling - everything is done at the factory precisely and correctly, but in some cases this still happens.
- Screwdrivers (screwdriver). If you don’t have this power tool, then you can get by with screwdrivers, although this will slow down the work.
- Hammer. It is difficult to hammer reinforced concrete walls manually, and an electric drill is a weak assistant in this matter. Holes in the walls will be needed to secure the upper elements of the kitchen.
- Hacksaw or pendulum saw (jigsaw). This tool is needed to cut a window in the countertop under the sink.
- Hex key. They use it to tighten special furniture euroscrews - confirmats. However, very often these keys come with furniture.
- Level. Ensures that upper cabinets are hung correctly.
- Ruler.
- Square.
- Hammer.
Lower tier cabinets
The most difficult stage of installing kitchen furniture is traditionally considered to be the assembly of cabinets with drawers, so before you rush to study the instructions on how to install a kitchen set, you will need to stock up on useful tools:
- Electric screwdriver with a set of conventional and carpentry tubular drills;
- Construction level, carpenter's corner, tape measure, set of clamps;
- A wooden strip or glazing bead for cutting mounting plugs, a tabletop electric sharpener.
It may seem that the given set looks quite unusual, like for assembling kitchen furniture with your own hands, but this is a deceptive impression. Kitchen sets made of fiberboard or chipboard, solid wood, have always been assembled on wooden pins or dowels; sometimes the grooves and pin tenons do not match or break during assembly and installation.
Therefore, you have to drill new holes, grind out additional sets of tenons and join the bodies of kitchen cabinets, and only then screw furniture screws into the parts of the set.
Many kitchen furniture manufacturers offer to assemble furniture cabinets and cabinets using steel corners and clips. One of the options for such a DIY kitchen set assembly is shown in the video. This is the cheapest, but not the best technology.
Hanging on foam blocks
Foam block, although not drywall, is still not a durable material: it crumbles easily, and when drilling, the hole often breaks even from the slightest beating of the drill chuck. Therefore, you need to provide everything for reliable fastening.
- Long dowels.
- Dowels for foam concrete.
- A metal plug that can be opened with a screw.
- Self-tapping rack.
- Nylon dowels with a diameter of more than 10 mm. They screw into the wall.
- Chemical anchor . In it, a special capsule is broken during installation, and the chemical composition strengthens the hole, reinforcing it
Installing cabinets on concrete is more difficult due to the special strength of the wall material. If you have a hammer drill and concrete dowels, the issue is resolved by itself.
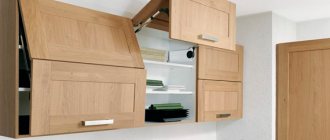
Lower tier cabinet with door
First of all, the selected parts of the future cabinet are laid out on a clean and dry surface of a sheet of chipboard or plywood laid on the floor. An example of such a kitchen set assembly is shown in the video.
Assembly operations are performed virtually on the floor, that is, the kitchen cabinet is laid on the back side and assembled from start to finish, remaining in a horizontal position. This is why it is important that the base of the floor is perfectly flat.
The cabinet is assembled in the following order:
- From the unpacked kit, select the panel with two milled holes for the cabinet. This is a door, and the holes are made as sockets for installing door hinges;
- We install the hinges, level and fix the canopies using self-tapping screws. Next, we attach the door to the wall and transfer the markings of the canopies onto it. We are not attaching the door itself yet; you just need to install the canopy's counterparts on the cabinet wall using the markings;
- Next, we install wooden dowels in the holes of all four walls, and connect the panels into one body of the future cabinet. If there are no comments on the quality of the joining, you can disassemble and install the dowels with glue, preferably PVA or any polyurethane compound;
- While the glue dries, the body is turned over and, using a carpenter's corner, leveled so that all angles are 90°, after which a thin back wall made of DFP or plywood is stuffed onto the back side.
Once the glue has dried, you can install and secure the cabinet front door. Furniture canopies are pre-aligned and adjusted so that the side end of the door is in line with the cabinet wall.
The final part of the assembly and installation of any element of kitchen furniture is the installation or tightening of furniture screws. It is enough to mark the installation point, drill it with a thin drill to a depth of ¾ of the length of the fastener and screw the self-tapping screw into the end of the wall using a screwdriver with a hexagon installed.
All cabinets with doors are assembled in a similar way, regardless of which tier of the kitchen set they belong to. The only difference is that plastic legs or racks need to be installed on the cabinets of the lower tier, and steel hanging hinges are attached to the back of the wall cabinets of the upper row.
Advice! If possible, it would be a good idea to purchase one set of furniture canopies in stock. As a rule, standard hinges are enough for 3-5 years of intensive use of the cabinet.
Assembling a cabinet with drawers
Assembling and installing a cabinet with drawers is a little more labor-intensive. Today, in almost any model of kitchen set, cabinets with drawers remain one of the most popular furniture elements.
The first part of the installation process, namely, assembling the cabinet body is no different from the gluing scheme of the cabinet body with the door. The only difference is that the cabinet does not have a door, there is only a facade formed by a vertical row of front panels of drawers.
Step one, installing the drawer slides
To install each drawer, you will need to attach a pair of guide slides and one plastic closer strip to the inside of the cabinet body. You can install drawers without a closer, but using the lower tier of the kitchen set is much more convenient if the design has a finishing mechanism.
First you will need to draw the skid mounting lines. This can be done using a regular building level, the main thing is to maintain the horizontal direction of the marking. The gaps between the supporting surface of the guide slides and the rollers of the drawers are large enough, so that if a small error is made during fastening, this fact will not particularly affect the quality of installation and functioning of the sliding parts of the kitchen set.
The closer design consists of a hinge that will need to be installed on the side of the drawer, and a small plastic mechanism that is attached just below the guide slide.
Step two, assembly and installation of boxes
The drawer is made of two sides, a back strip, a wooden bottom and a front panel. The first three elements are attached to the bottom with ordinary self-tapping screws, resulting in a wooden box without a front wall. Sidewalls are usually made of metal or plastic, with support rollers installed on each side.
All that remains is to correctly install the front panel for each drawer separately.
The main difficulty is to install the front panel exactly according to the profile of the cabinet, so that the front part of the lower tier of the set looks as even and symmetrical as possible.
To install the facade panel, we use two metal fasteners, first transfer the markings from the box to the inside of the laminated board and screw the “pieces of iron” with ordinary self-tapping screws.
The last step is to adjust the position of the panel in such a way as to ensure a small gap of 1.5-2 mm between the drawers and align the façade panel as accurately as possible along the line of the future countertop. To do this, use additional adjustment screws located on the metal corner mount.
Hang cabinets on drywall
Often apartment owners have to solve the question: how to hang the kitchen on drywall.
As you know, such material is not durable, but we need guarantees of high-quality installation - who wants a cabinet to ever collapse on the floor?
The problem is still doable.
- Butterfly dowel. Only suitable for light wall-mounted modules weighing up to 5 kg. The dowel body is aluminum, made in the form of a collet (a hollow cylinder with longitudinal cuts). When the screw is screwed into the dowel, the antennae move apart and are pressed into the surface of the hole in the sheet.
- Mounting rail. It is attached to a sheet and a wooden frame - this ensures higher reliability of fastening. Knowing in advance that the cabinets will be hung, you need to, if possible, take care of a more durable base (mortgages) under the drywall in the form of timber.
- In order to secure very bulky furniture , they also use additional fasteners: decorative cable. It is attached to the ceiling. In addition, tubes coated with a layer of chromium are used. They are screwed to the floor and serve as a frame.
We assemble the upper tier
Before hanging wall cabinets and shelves, you will need to do two small preparatory steps. Firstly, it is necessary to draw a marking line on the wall along which the upper tier of the headset will be installed, and secondly, lay wiring in the wall to which the hood and lamps will be connected.
The upper tier of kitchen cabinets can be attached in two ways:
- Hanging on metal hinges attached to the back of each cabinet;
- Direct fastening with self-tapping screws through plastic “ears” - hangers installed on the inner surface of the vertical walls of wall boxes.
The first option is much simpler, as it does not require special skills in working with furniture. It is enough just to install hanging dowel hooks according to the completed markings. When installing the cabinet on built-in hangers, anchor studs are sealed into the kitchen wall, after which the cabinet is inserted onto them and the plastic hanger is tightened so that the entire structure of the set fits as tightly as possible to the kitchen wall.
Types of fasteners for hanging
There are many fasteners, and each of them is applicable, even the seemingly most outdated ones. Their main function is to securely hold the cabinet.
- Dowels. The most popular type of fastener used for wall cabinets. A pair of screw-dowels is available in the assortment of any hardware or construction store. They can also be included in a set of furniture . The most rational size of these is 8x80 mm. A galvanized coating is desirable, since the kitchen is a room with somewhat high humidity.
- Hooks. Like screws, they are also screwed into dowels and sold in pairs. In this case, there is no need to think about whether the screw head will fit into the hinge.
- Rail. A golden solution for hanging several cabinets in a row. The steel strip is secured with screws and dowels. The hangers on the cabinets are of a special design and adjustable. How to hang kitchen cabinets on a mounting rail is not difficult - the adjustable fastening hooks are hung on it. This design solution allows for the installation of wall-mounted cabinets evenly, even perfectly, regardless of the curvature of the walls.
- Wooden plugs with screws. This type of fastening is as old as the world, but many people still use it to this day.
When the cabinets are attached with screws or hooks, and there is a kitchen apron made of tiles on the wall, it is better to hang the cabinets on a wooden strip, the thickness of which should correspond to the thickness of the tile along with a layer of tile adhesive - then the upper elements will hang parallel to the wall.
When the fastening is selected, the cabinets are assembled, and the hanging remains. If the walls are too uneven, like the corners, then you should think about properly preparing the walls.
- Putty or plaster.
- A necessary tool.
- Complete the installation of sockets and lamps.
- Put up wallpaper.
Expert opinion
Kovalev Viktor Georgievich
Interior designer with 7 years of experience.
Correct installation of upper cabinets, first of all, requires equally correct markings. Comfort of use and proper design will depend on this.
- The distance between the table top and the bottom edge of the wall furniture is measured. You need to measure very accurately, using a tape measure. The marking itself is done with a sharpened pencil or a thin marker. You can tighten the painting thread by leveling it using a level. The top edge of the cabinets is also marked.
- The cabinet is placed against the wall for accurate measurements, and, as an option, the holes for the dowels are marked. It’s easier to take simple measurements so as not to carry heavy cabinets on yourself - for this you need a partner. If it doesn’t work out any other way, then to make work easier, you need to remove the shelves from the cabinets and remove the doors.
If there are wall cabinets, then you need to start with them.
Subtleties of the lower tier assembly process
After all the cabinets and cabinets of the kitchen set have been assembled, we proceed to installing the lower tier on the prepared kitchen area. First, you need to move all the cabinets and bedside tables to the installation site and place them in the same plane so that the distance from the facade to the wall surface is within 50-55 cm.
At the second stage, a rough adjustment of the height of the working surface is performed. For this, height-adjustable legs of a bedside table or cabinet are used. By rotating the screws, we ensure that the upper plane of each cabinet or cabinet is aligned in height and horizon. After leveling, all components of the lower tier are pulled together with through fasteners into one rigid monoblock.
Correctly hanging kitchen cabinets
Let's figure out how to hang kitchen cabinets on the wall so that everything looks beautiful, everything opens and closes well, and it is convenient to use your kitchen.
Before you take on such an important task as hanging cabinets, you need to determine the height of the hinge. This is an important factor on which the comfortable operation of the headset , and aesthetics too.
Correct mounting height:
- The bottom edge of the upper cabinets should be on average at a distance of 0.55 - 0.6 meters from the surface of the countertop.
- It is necessary to take into account the growth of kitchen owners.
- A hanger that is too low can make it difficult to comfortably operate kitchen appliances standing on the countertop.
However, sometimes you have to hang cabinets at an inconvenient height —higher than required—due to the fact that if you hang them lower, then the design of the kitchen will suffer significantly, since you need to mount wall cabinets above the refrigerator, install high pencil cases, etc.
Tabletop installation
As a rule, the kitchen countertop is assembled from two separate parts, joined in a corner or in the area where the hob is installed. The same wooden pins and glue are used to secure the tabletop. Initially, holes for dowels are marked and drilled in the upper part of the installed cabinets. Next, install the pins into the holes, after which the fasteners are carefully pressed down with light blows with a wooden hammer. Using a ruler, a building level and a sharp knife, the upper parts of the pins are cut so that their ends are at the same height and in the same plane.
At the next stage, it is necessary to determine the exact position of the tabletop on the base of the lower tier. To do this, apply bright paint to the ends of the cut pins and lay the countertop slab exactly as it should be located according to the diagram for the kitchen unit. Using the paint imprints on the back side of the slab, blind holes are drilled and it is re-applied onto the pins. After the countertop is in place, mark the cut-out holes for installing the sink and hob.
For the final installation of the countertop, the pins and the top of the cabinets are glued with silicone or polyurethane glue, after which they are installed in place and evenly loaded with pressure. The edge of the junction with the wall apron is sealed with a plastic profile made of transparent silicone.