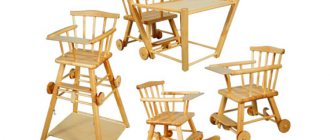
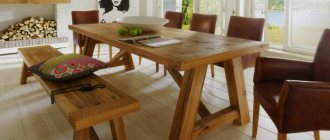
Why a bar stool in the house?
Before acquiring such an unusual item, it is worth considering several important nuances:
- Where will he stand
- How to fit into the interior
- Need one item or more
- How will it be used
The size and design of this piece of furniture depend on these nuances. Before making furniture, you should first decide on its dimensions. The size of the product depends primarily on the height of the bar counter. Recommended height: the chair should be 30-40 cm below the counter. If family members are thin and there are small children in the family, then a difference of 30 cm is recommended. If the family members are well-fed adults, then it is better to choose a difference of 40 cm.
People who like to make things with their own hands can make such a simple item on their own, especially since it is not technically difficult to implement.
Product option - DIY bar stool with height adjustment. This model can easily serve as a stool when the seat is lowered and a bar stool when it is raised. This will be very convenient for a small apartment or studio. Here, in everyday life, you can use stools, and when many guests come, you can raise the seats and use them as bar furniture.
This is an excellent option for small spaces, as the furniture has compact dimensions.
The size of the seat depends on the size of family members. You should also consider the safety of the product if there are many small children in the house. They will probably want not only to sit on such furniture, but also to use it in their games.
For spacious interiors, original bar stools become an effective, stylish decoration that can be used to divide the area into functional zones.
It is important that the furniture fits harmoniously into the interior. For a classic interior or a room in a rustic style, the most harmonious option would be to make your own bar stool from wood. For a room in a loft or high-tech style, you can make furniture from metal.
Deciding on the design and construction of a bar stool
First you need to think about what height the chairs will be. This directly depends on the size of the bar counter. Take into account all the nuances - you should be comfortable sitting on the chairs. Design is also important. The furniture should be combined with the design of the kitchen and match other interior items.
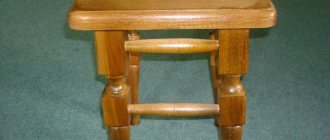
The simplest version of a bar stool is made of wood and plywood.
When choosing a design, many factors are important:
- number of legs, the most reliable is four;
- height regulator;
- it is convenient if the chair has a footrest, back and armrests (these parts of the chair must be present if the bar counter serves as a dining table);
- upholstery and the material from which they will be made. (it depends on this whether the chair will be good or not).
Depending on the option chosen, you need to take solid wood or plywood.
Features of making a bar stool
This type of furniture has its own characteristics. It should be durable, comfortable and lightweight. However, due to the fact that the structure itself is quite voluminous, it is quite difficult to produce a lightweight product.
The compact size of the furniture does not require much space.
Crossbars between the legs will add reliability and convenience. Moreover, they can be located not in one row, but in two. This will make it easier for shorter family members to sit. It should be taken into account that massive crossbars will make the product very heavy and it will be inconvenient to rearrange it. Therefore, it is important to maintain a middle ground. DIY version of a wooden bar stool - with additional parts made of lightweight aluminum or plastic.
Bar stools will successfully contribute to the zoning of a room, for example, into a working and dining area.
Important! First you need to decide on the size of the product and how it will be used. And only after that think through the design and select the material. Otherwise, you may end up with beautiful furniture that will be uncomfortable.
Chair drawing and design
Before you start making furniture, it is important to create a drawing and measure the main parts again. A drawing of a bar stool will also help you think through your furniture design more accurately. When choosing a design you should consider:
- What will the legs of the product and its support be like?
- What will the seat be like?
- Consider the presence of a backrest and armrests
The classic version is a product with a support on four legs, which are connected to each other by crossbars. This option is also the easiest to manufacture, but it will be the most cumbersome.
Here you need a standard set of tools, materials and a correctly drawn up drawing.
The seat can be round or square. It is more convenient to attach the backrest and armrests to a square seat. A model with armrests and a back is already a whole bar chair. This option is the most convenient and safe to use. But making it with your own hands is the most difficult thing.
Advice. It is better to avoid a square seat without a back, as high angles create a risk of injury and it will be uncomfortable to sit on such a chair. It is better to choose a round seat or seats with a backrest.
This homemade chair is a product with high legs about 80 cm high, with a special footrest at the bottom.
Standard sizes:
- Height up to 85 cm. The difference between the height of the chair and the stand should be 30-40 cm.
- Seat width 30-35 cm.
- The height of the lower crossbars is 25 cm.
- Back height – 25-30 cm.
- The minimum distance between the legs at the bottom is 40-45 cm.
Selection of materials
The next stage is the selection of materials and their purchase. For manufacturing you will need the following materials:
Wooden boards. They can be made from inexpensive pine or from more valuable species: oak, beech, walnut or even wenge wood. The type and color of wood is a matter of personal taste of the owners. It is better to use solid wood for the legs, as it is the most durable material.
Wood is a plastic material that can be easily processed.
MDF or plywood. These materials can be selected for the seat, back and armrests, and bottom rails. They weigh less than solid wood and are cheaper. MDF and plywood are easier to process.
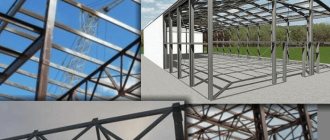
Profile metal pipe. It can be quite light and durable, but its processing will be the most difficult, since you will need a grinder and a welding machine.
Soft materials for the seat. To make the seat more comfortable, it can be upholstered with foam rubber and beautiful fabric. A regular furniture tapestry will do for this. A more expensive option is to cover the seat with leather or leatherette.
You can choose the material for the seat at your discretion.
In addition to materials, you will also need tools:
- Roulette
- Screwdriver Set
- Drill and drill bit set
- Hacksaw
- Sandpaper
- Chisel
- Fasteners, screws, furniture corners
- Bit
- Glue
- Plane
- Hammer
Build process
Assembling a wooden bar stool with your own hands is quite simple. It consists of several steps:
- Preparing parts. It is necessary to make legs, crossbars and a seat from wood or metal. It is better to also make a backing for the seat; it should be 10 cm smaller than the size of the seat. With its help it will be more convenient to attach the seat to the legs.
- You need to use a plane to shape the legs - narrow them down or cut out beautiful curves.
- Sand all parts with sandpaper until they are smooth.
- Mark the places where the parts are attached. First you need to attach the legs to the seat. After this, the side bars are attached to the legs. At the very end, the armrests and backrest are installed.
- To fasten the parts, they must first be placed on glue, and then secured to each other using self-tapping screws and furniture corners.
- After the frame is assembled, the product must be varnished and the seat covered with fabric.
A person should feel free and not be afraid of losing their center of gravity, despite the fact that the chair is taller than standard sizes.
Production process
Despite the fact that there are a lot of ideas for making bar stools, both on the Internet and in magazines, it always comes down to one thing - melting measurements.
First, you must decide on the height of your chair. It should be approximately 35-40 centimeters below the bar counter - this is the distance from the tabletop of the counter to the seat of the chair. After this, you can safely make drawings, or use ready-made ones that you can easily find on the Internet.
For the simplest bar stool, you will need four legs, preferably the same number of legs, and the seat itself. In the case of a backrest, you need to make two legs longer, about 30-35 centimeters, since their protruding part will become the basis of the backrest.
During all stages, you can easily make a mistake. This may apply to both measurements and preparation of parts. To do this, it is better to check your measurements several times before entering them into the drawings, or cutting off an unnecessary part of the part.
Ready-made drawings, which I have already mentioned several times above, can help you with this. This is especially true for those who have never designed them before. The main thing is not to rush anywhere and work for the result, and not for show.
Metal bar stool
To make a metal model, you will also need a welding machine and a grinder. Manufacturing process:
- Prepare the necessary details. Cut them to size.
- Weld a base for the seat from metal. This is a square frame.
- The legs must be welded to the frame. After this, the legs are connected to each other by crossbars, which also need to be welded. An option is to make the crossbars wooden by simply screwing them.
- After the metal base is ready, a wooden seat is attached to the frame.
- The product must be painted and the seat, if desired, covered with a beautiful fabric.
The high stands are very comfortable; your legs don’t get numb or tired while sitting.
Decorating a chair
Decorating a product is a fascinating and important process. You can make the product suitable for your design and interests with the help of handmade covers for bar stools.
- Making a kitchen table with your own hands - step-by-step instructions for building a beautiful and durable table (115 photos)
- How to make an ottoman with your own hands - manufacturing options and a master class for building an original ottoman (110 photos)
- How to make a cabinet with your own hands - ideas for original projects, their manufacture and assembly of various types of cabinets (85 photos)
You can use the effect of aging wood and painting on the material. Everyone decorates as their imagination dictates!
Advice! If you decide to sew chair covers, use materials that are easy to wash. For example, linen or cotton.
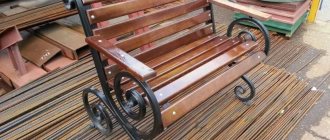
Covers for bar stools
The final stage of production will be decorating the product and covering it with soft fabric. The most practical would be to create removable covers, since they can be washed periodically. You can also create a soft seat covered with regular fabric and sew a top, replaceable cover.
The covers are:
- Removable with ties. These are small mats made to fit the size of the seat. They are tied to the legs using ties.
- Fixed, which are pulled over the seat. These covers are made exactly to the size of the seat and are attached to it using an elastic band at the bottom or nailed with small furniture nails. Fastening with an elastic band allows you to periodically remove the cover, which is more hygienic.
Progress
Measure the height of the bar counter from the countertop to the floor. The distance from the seat to the table should be approximately 30-40 cm.
Calculate the amount of material by planning the drawings. First, let's prepare all the necessary details. On the blanks we make offset marks with the rest of the parts.
We cut out the seat from the drawer using a jigsaw. Its diameter will depend on the design. For example, let's take 380 mm. Cut out a second circle of smaller diameter. It will serve as a fastener.
- Beautiful DIY lampshade - simple ideas for making stylish design options for table lamps and floor lamps
- Do-it-yourself upholstery of a chair - methods of using upholstery and a review of the best materials (85 photo ideas)
- Beautiful corner shelf with your own hands - 95 photos of options for making and using shelves in interior design
Let's make the legs. Using a plane we give them the correct shape. The diameter of the seat should be significantly thicker than at the ends. We form the crossbar so that it connects the middles of the legs on one side. This will significantly strengthen the structure.
We take a circle with a smaller diameter and use a drill to form two holes for each of the four legs. The dowels must be found with effort. We attach metal clamps to the legs.
We attach screws with a large radius to the screws. Place the chair on a flat surface and install the legs correctly.
We treat the chair with sandpaper and cover it with impregnation and varnish.
If the design allows, make a bar stool with backs and armrests with your own hands. You can make the seat soft with upholstery.
Bar stool decor
In addition to creating covers, the product can be decorated in other ways:
- Decorate the legs and back using decoupage technique
- Braid the product with jute rope
- Decorate the seat with fringe or tassels
- Cover the legs with rhinestones
- Paint the legs with gold paint, imitating aged gilding
In your style decision, adhere to the general design of the interior and the requirements of the genre itself.
All these methods of decoration will give the furniture a unique, original look and create coziness in the kitchen.
Option No2. Backless bar stool with metal legs
Let's look at the process of making a simple chair made of walnut (seat) and metal. An old bed frame was used for the legs. The height of the structure is approximately 64 cm.
A simple bar stool that we will make
A distinctive feature of this option is its shape, which makes it easy to weld and strengthen pieces of metal. If you are planning to use a welding machine for the first time, then in the process of making such a chair you will definitely gain valuable experience and learn how to cook well.
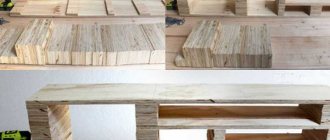
The wooden part is made of walnut
Step 1. Start by creating the shape of the future structure. Cut a suitable material (for example, chipboard) into four parts of 54.5x23.2 cm. All elements are fixed with a side joint using screws, resulting in a square “pipe” 58.5 cm high and sides 20 cm long.
You need to cut 4 identical parts
The result is a square “pipe”
Step 2. Make an angled base for the mold using a piece of 9.5 cm thick board. You will need to cut the pieces at an angle so that they all fit. To do this, find a suitable angle using a tape measure and set it so that everything fits. As a result, after cutting you will get beveled edges.
First, a suitable angle is found
The desired angle is set
You can start cutting
Prices for the popular range of miter saws
Miter saw
Step 3. Fit the pieces with the edges cut at an angle of 45 degrees around the perimeter of the base part. Attach the beveled base using plywood and small nails, as in the photo below. You do not connect this part to the “pipe”, and therefore it can be easily removed if necessary.
The segments are adjusted around the perimeter
Everything needs to be carefully controlled
The parts are attached with pieces of plywood
Step 4. Thanks to the made shape, you can easily determine the location of the legs. No changes are required, just attach and mark.
Future legs just need to be applied
The first leg is applied
First, mark and cut the legs from the bottom. To make the process easier, you can hang a corner of the base over the edge of the table and then secure the iron piece in place. Then cut off the bottom ends.
The corner of the base can be hung over the edge of the table
The lower end of the leg is cut off
The cut leg is attached
After this, place everything in the mold and begin marking the upper ends of the future legs.
Next, mark the upper ends of the legs
Step 5. For the top of the structure, use 4 corners. Mark everything you need using the square you made earlier. Glue the pieces together, then remove them from the mold in order to fit the weld on each side.
4 corners are used for the top part
The parts are glued together
The parts are now welded together
Important! It is better not to place a vice, as in the photo, on wood. Because the bolts that hold everything together can fly out, and everything will have to be redone.
It’s better not to put a vice on wood
Step 6: Cut some more pieces of metal to make the footrest. In our example, the length was approximately 30 cm and the angle was 45 degrees.
Let's start making the footrest
Ready-made footrest
Step 7. The support with footrest was held with the top of the structure and blocks for the supports. Weld everything together. Weld a metal pad on the bottom of each leg. Upon completion of the work, sand everything with sandpaper (recommended grit - 40).
The support is welded to the legs of the future chair
Metal pads are welded at the bottom
Next, everything is processed with sandpaper.
Step 8. Now it's time for the walnuts. Cut the main part into 2 thick boards and sand them with sandpaper. To sand beveled edges, use sandpaper with a grit size of 100-220.
We begin to make a seat for a chair
Wood cut into 2 parts
The boards are sanded
The wood also needs additional processing.
Step 9. Treat the frame of the future structure with a primer, then with black paint. Finally, attach the wooden seat to the pre-drilled holes using screws.
The seat is installed, the bar stool is ready for use
Prices for different types of wood stains
stain
Video - DIY wooden bar stool
50 design options for bar stools in the interior
Option No3. Wooden bar stool with round seat
Another great option, but, compared to the first, much more difficult to implement. But first things first.
We are considering another option for making a bar stool
Step 1. First, prepare the necessary lumber. It is better to use a block with a section of 30x30, although in our example we use 30x40 due to the lack of a suitable one on sale. All this will cost a very reasonable amount.
First you need to buy all the necessary materials
Step 2 : Start cutting. Prepare 4 bars 45 cm long, another 4 - 57 cm.
First of all, the bars are cut
Step 3. First of all, make 2 blanks from bars of the “long-short-long” type, then glue 2 more short ones between them. By the way, in our example, in addition to clamps, clamps from a circular saw and a grinder are also used.
A pair of short bars are glued between the blanks
Step 4. Make a milling box from the leftover boards and plywood. It is necessary that the 8-gauge stud goes through the entire rack (although it is better to use larger diameter bolts to minimize vibration). In the example, the stud is tightened with nuts; the workpiece rotates inside the box when the nut is constantly tightened. Ideally, it is better to make a cutter for this, which rotates the blank by 10-15 degrees.
Stages of manufacturing a milling box
Prices for different types of routers
Fraser
Step 5. In the end, you will carve a stand like this.
Turned stand
Step 6. Start making the seat and footrest. They will be round, their diameter will be 31 cm. For greater strength, you can glue them together from two panels, placing the lamellas across each other.
These parts are glued together from two panels
Step 7. Cut a ring from plywood using a router. With this ring you will process the outer edges of the footrest and seat, as well as the inside of the latter.
Using a plywood ring
Step 8. Something like this. The inside was milled using a copy sleeve, and the outside was done using a milling cutter with a bearing.
Photo of the manufacturing process of the seat and footrest
Step 9. Mark the footrest - place the central post in the right place, then trace the outline.
Footrest markings
Step 10. Mark in the corner where exactly the vias need to be made. By the way, a feather drill can “tear” wood; if this happens, you will be forced to putty a lot.
The locations for drilling via holes are outlined.
Step 11. Using a thin drill, mark the point where the pen tip will pass. Next, use a feather drill to make holes of the required diameter, cut out sections with a jigsaw, and then level everything with sandpaper on a block.
Stages of making a footrest for a bar stool
Advice! Experts recommend first making a plywood template and milling out the holes - in this case, you can get a higher quality cut and reduce the amount of work with sandpaper.
Step 12: This is what the wood will look like after filling the gaps left by the feather drill.
Photos of wood before and after treatment
Step 13. Glue the leg blanks from the bars.
Gluing leg blanks
Step 14: Shape them using a plywood template. Be careful and securely fasten the template with nails, otherwise it may be torn off the workpiece.
Plywood template torn from the workpiece
Step 15. Glue the crosspiece, assembled on the grooves, into the seat.
Gluing the cross into the seat
Step 16. Make similar grooves in the legs to assemble them.
Grooves are formed in the legs of the chair
Step 17: After routing the edge, begin assembly.
Finished legs of the future chair
Step 18 Sand the seat with extreme care.
Polished seat
Step 19. Pre-assemble the bar stool (without glue) to try on the parts.
The structure is assembled without glue
Step 20. Connect all the parts together.
Connecting chair parts
Step 21. After final assembly, apply stain and varnish to the glue. The result you get will definitely please you!
This is what the finished chair looks like
Table. The cost of making such a bar stool.
| Expense item | Amount, in rubles |
| Lumber (we still have some) | 500 |
| Emery block (180) | 70 |
| Stain, 2 types | 300 |
| Varnish | About 350 |
| Glue | It was spent a little, you can’t count it |
On a note! In general, making such a chair will cost about 1,400 rubles.
Required materials and tools
Before starting work, you need to prepare all the required materials and tools. To make a bar stool from wood, you will need:
- boards, bars, sheet of plywood;
- screws, metal corners, dowels, glue;
- a screwdriver or drill with drills of different diameters and a bit attachment;
- electric jigsaw, hand saw, plane;
- sandpaper or grinder;
- tape measure, pencil, hammer.
To create a chair from a metal profile or pipe you will need:
- a round or rectangular pipe (profile) for the frame and a piece of plywood for the seat;
- grinder with a metal disc;
- Grinder;
- drill with a set of drills for metal and wood of different diameters;
- machine for bending metal parts;
- metal corners;
- bolts with nuts and washers;
- tape measure, chalk or marker.
If you have a welding machine and the skills to work with it, the elements of the metal frame can be connected by welding. In addition, you will need upholstery material and soft filling.
What materials are used to make chairs?
A bar stool, like any other furniture, can be made from almost any material. But, if we talk about making such chairs yourself, then it is better to choose the most common options for materials that are easier or more convenient to work with. However, some parts can be purchased ready-made (for example, legs or seats).
Most often, simple bar stools are made of metal or wood.
When making structures yourself, polycarbonate plates are sometimes used, which are suitable for creating unique products. Their main advantage is resistance to high temperatures and various negative environmental influences. Polycarbonate boards are sold in various shades, and such surfaces are quite easy to care for. In addition, they have an attractive appearance that imitates glass.
Plastic plates
Natural wood is the most famous material that has long been used to make furniture. It is chosen by lovers of environmentally friendly options, because it is difficult to find something safer than natural wood. It should be remembered that such material requires pre-treatment with an antifungal substance. In addition, it must be dried before starting carpentry work.
Wooden bar stools can be of any configuration, from the simplest to the most complex and unusual. Wood is easy to paint, you can coat it with varnish, wax or oil to preserve the texture, you can choose the shade of wood to suit any interior - this is why many professional craftsmen and amateurs like to work with wood.
Wooden bar stools
Metal is also a fairly popular material that is often used in the manufacture of such products. Finished structures have an attractive appearance, are reliable and durable. The seats of such chairs are covered with soft material or left in their original form. Often only the base of a bar stool is made of metal, and the seat is made of wood, plastic or other material that is less rigid.
Metal fits well into high-tech interiors
Height
Chair height
Bar stools have their own standard sizes, which are based on the principles of ergonomics. In most cases, their height range ranges from 75–85 cm. Although some manufacturers produce products in smaller sizes. In general, the height will directly depend on the height of the rack. Below are tables for the ratio of tabletop to chair height:
Table to chair height ratio
So what should you consider when determining the height of your bar stool? Let's consider the main factors: