In what ways can you update old furniture, what materials to use, what paint to paint chipboard - you will find answers to all these questions in our material. There comes a time in every person’s life when they really want to update their interior, but finances don’t allow it. But this does not mean that you have to endure tired old furniture. It can be easily restored or repainted to your taste. Construction stores have many tools, devices and materials that can greatly facilitate this process. And you will find little tricks that will save time and money in this article.
How to update chipboard furniture with your own hands: the restoration process
Almost every person has furniture made from chipboard in their home.
This material is very widely used in the production of all types of furniture. It is used due to its low cost and excellent practicality. Sometimes chipboard furniture needs to be updated. The easiest option is to go to the nearest furniture store and purchase a new piece. However, do not forget that any furniture these days is not cheap. You'll have to stock up on a tidy sum to buy something really worthwhile. However, there is another way out of this situation. Scheme of a chipboard wall.
It consists of restoring old chipboard furniture. In fact, this will help bring new colors to life and completely update the already familiar interior. How to update chipboard furniture with your own hands? In fact, the process itself is not that complicated. In this case, you do not have to use expensive materials. The work itself takes several hours, and almost anyone can handle it.
Types of edges
The most popular types of furniture edges are:
- Melamine edge with glue is the most budget-friendly, but not the highest quality type. It is afraid of moisture and can fall off over time (even without mechanical impact), easily crack and wear off at the corners. The only plus is the pre-applied layer of adhesive, so melamine edging remains a popular option at home.
When purchasing furniture, it is important to pay attention to the quality of finishing of the ends. It is better not to buy furniture treated with melamine, as it will not last long.
- Furniture edging made of PVC 2 and 0.4 mm is the best option. It is much more stable and durable. A thickness of 0.4 mm is usually used to process hidden places, and 2 mm is glued to the outer ends that will be visible. However, its application requires a special edge processing machine, so it is used only in production.
- The edge made of ABS plastic is a more environmentally friendly analogue of the previous option, which is less common on sale.
- Mortise T-profile - inserted into a milled groove at the end of the chipboard. It was popular in those days when a special machine for PVC edges was rare, and there were plenty of milling machines in the shops.
Mortise T-shaped edge Profile C18
- The C18 U-profile overlay is a good option because it can be used for chipboard at home. Usually the C18 U-profile is simply put on the end and glued to liquid nails. The downside is that the edges protrude a few millimeters, under which dirt gets clogged. On the other hand, this feature is very convenient if you cut chipboard with your own hands; large edges will hide uneven cuts and chips. This type is often used for homemade wardrobes.
List of materials
Before you start updating, you should purchase all the necessary materials. All of them are sold in many specialized stores. Moreover, the list is small.
So, to update chipboard furniture with your own hands you will need the following materials:
- self-adhesive film of two types. One of them will be used for furniture, and the second, matte, will be used for gluing the glass surface;
- furniture layout. It will also be self-adhesive, chrome color;
- knife, iron and scissors.
These materials are quite enough to transform the appearance of any chipboard furniture.
Upgrade steps
Before gluing the film, the surface of the furniture must be moistened with water to smooth out the wrinkles that form on the film.
Let us show how the renovation process occurs using the example of a furniture wall.
- The wall is first disassembled and untwisted into its component parts. In this case, all old fittings must be removed.
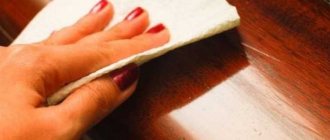
- All surfaces that will be pasted must be cleaned and degreased. For cleaning you need to use water with the addition of dishwashing detergent.
- After this, you can wipe the surface with a cloth and add a small amount of vinegar. This will completely degrease the surface. Do not forget that this process is very important. If degreasing is not carried out completely, the self-adhesive film will peel off. The entire restoration will go down the drain.
- Now you need to cut the required amount of self-adhesive tape. Also, do not forget about a small reserve. About ten millimeters on each side will be enough. The reserve is necessary so that you don’t have to redo everything later. A few extra centimeters can later be cut off with a knife.
- The surface to be pasted is sprayed with water using a spray bottle. This is necessary so that the film does not grab the surface instantly. If any distortions or folds occur, it can be easily corrected. If the surface is wet, the film can be moved and laid in the desired position and direction without any problems.
- After the film has been laid, it is necessary to smooth it out. For these purposes, you can use a soft cloth, which is passed from the middle of the tape to the edges. In this case, excess air will be removed from under the film, and it will also lie smoothly on the surface of the chipboard. Sometimes air bubbles are not so easy to eliminate. You will have to pierce the bubbles with a thin needle. After the puncture is made, the area should be smoothed using a soft cloth.
Stages of work taking into account materials
Each decoration method requires following certain steps and has its own nuances. It is important not only to properly prepare the piece of furniture, but also to do the decoupage correctly. In this case, the finished result will please you for many years.
Napkins
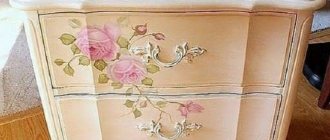
Decoupage with napkins is the best option for beginning craftsmen. The method is simple and gives complete freedom in choosing a pattern. So, for decoupage of kitchen furniture, thematic pictures with cooks, fruits or vegetables, and floral patterns in country style are suitable. You can choose neutral patterns, flowers, and ornaments for your bedroom. It is recommended to decorate the headboard of the bed with patterns in vintage style. Floral patterns on closet doors and chests of drawers look beautiful. Images of animals, cartoons or toys, and decoupage cards are suitable for the nursery. They can be used to decorate cabinets, cribs, and drawing tables. For the living room, it’s also easy to find suitable ideas depending on the room’s design style; for example, marine-themed images on the table surface and cabinet doors look beautiful.
This decoration method is perfect for decorating doll furniture.
To decorate the surface with the selected napkins you need:
- Apply a solution of PVA glue and water (1:1) to the prepared product, and then proceed to gluing the napkin element you like.
- The image should be carefully straightened, expelling the air.
- After gluing, treat the surface with glue and leave for a while.
- When the decor is completely dry, cover everything with furniture varnish.
Assortment of furniture lamps, examples of design and placement
Glue the cut out elements of the napkin onto the prepared product, straighten the images, expelling the air
Apply glue to the surface and leave to dry.
Coat with furniture varnish
Shell
The decor with nut or eggshells is reminiscent of craquelure patterns. Despite the apparent complexity, this is a simple technique. Moreover, it can be performed either separately or with additional decoupage patterns. When using shells, you can achieve the effect of antiquity, and some craftswomen even use this technique to imitate reptile skin.
A similar effect will look beautiful on kitchen furniture; the appliances can be used to decorate cabinet doors and table surfaces. In the bedroom and living room, products that seem to be covered with the skin of an exotic reptile look beautiful and appropriate. For a children's room, you can decorate a chest of drawers in a vintage style or decorate the cabinet doors using the decoupage technique with napkins and add shells.
To work, you will need raw egg shells. It is thoroughly washed and the inner film is removed. You should also prepare PVA glue and a brush. After this you need to proceed as follows:
- If you are planning a decor with an image, then the first thing you need to do is apply the design using the technique you like.
- Apply a layer of PVA glue to the area of the surface selected for decoration, then apply a shell and lightly press on it so that it cracks.
- Using the back of the brush, place the pieces in the desired order. Then press down lightly again.
- Then, when the pieces are in the desired position, lightly tap them with the back of the brush. In this way, you should cover the entire desired surface with decor, then coat the shell again with PVA glue diluted with water.
- To give the effect of reptile skin, lightly tint the shell with special wax, and finally secure the decor with 2-3 layers of varnish.
Prepare furniture
Apply a layer of PVA glue to the surface, place the shell pieces in the desired order, tap on the surface with a brush
Apply a solution of glue and water, add a design if desired, secure the decor with several layers of varnish
Paper
The most popular methods of decoupage furniture using paper. These could be photographs, unwanted wallpaper, clippings from comics, newspapers or magazines. For the living room, wallpaper that matches the decor of the room is suitable. They can be used to decorate a closet, chest of drawers or coffee table. It is better to choose comics and clippings from fashion magazines for the children's room. In this way you can decorate a table, chest of drawers, closet or headboard. It is recommended to decorate the compartment doors in the bedroom with photographs.
It should be remembered that the thicker the paper, the more glue it requires to get wet. For example, wallpaper requires at least 3-4 layers. They must become plastic in order to fit as tightly as possible to the surface. Do-it-yourself furniture decoupage is performed in the following sequence:
- Properly prepare the surface of the furniture.
- Spread the area for decoupage and paper with glue. The latter should become as flexible as possible.
- Place the paper on the surface and gently smooth it out, expelling air bubbles, then apply diluted glue to it and leave to dry.
- To secure, coat the product with varnish.
If desired, this technique can be combined with coloring. It is permissible to use craquelure varnish.
Spread the area for decoupage and paper with glue
Place the paper on the surface, smooth it out, expelling air bubbles
Apply diluted glue to the surface, leave to dry, and coat the product with varnish to secure it.
Textile
Fabric can be decorated in different styles. Using this material, it is possible to create volume so that the drawings seem as realistic as possible. To decoupage furniture with fabric, you can use any smooth textile - from chintz to silk.
In this case, you can use either large pieces of fabric or work using the patchwork technique. Such decoupage will look very beautiful on cabinet doors and bed headboards. For the kitchen, you can use fabric that matches the color of the walls or household appliances. Children's cabinets or a chest of drawers will be transformed after decoupage with bright, colorful fabric, and the living room will look beautiful after decorating with floral motifs.
How to choose the right furniture paint for different surfaces
Master class step by step:
- Carefully soak the selected material with PVA glue.
- Place a piece of fabric on the surface for decoupage and give it the desired shape.
- Leave to dry.
- Afterwards, if desired, paint the necessary parts with acrylic paint and add additional decor.
After everything has dried, you need to coat the fabric with acrylic varnish in several layers. Lace decor has its own characteristics. Such elements should be covered with putty so that they stick well later. However, the product will have to be removed from all the recesses so that the texture of the lace decoration appears.
Impregnate the material with PVA glue and place it on the surface of the furniture.
Give the required shape, leave to dry, cover the fabric with acrylic varnish in several layers
Leaves
This technique requires collecting the leaves you like, placing them between white paper and ironing them. As the substrate gets wet, it should be replaced. Thus, it is necessary to completely dry the leaves.
Using dried leaves, you can lay out ornaments, flowers, drawings on furniture, or decorate the entire surface. So, in a nursery it will look beautiful if you decorate the head of the bed with delicate leaves and flower petals. For the bedroom, you can decorate the cabinet doors with an autumn herbarium. A country-style living room will be decorated with a chest of drawers with falling leaves on the front side; it is recommended to decorate the kitchen cabinet with leaves of fruit trees or grapes.
To decoupage using this method, you should prepare leaves, PVA glue and brushes. Then you need to act like this:
- Apply PVA glue to the surface to be decorated.
- Lubricate the leaf and apply to the product. Next, you need to carefully iron the element and cover it with diluted glue.
- This is how you should decorate the entire area.
- Wait until the surface is completely dry and coat it with varnish.
Apply PVA glue to the surface to be decorated
Lubricate the leaf, apply to the product, iron the element, cover with diluted glue
Wait until the surface is completely dry and apply varnish.
Restoration process
Tools for furniture restoration: self-adhesive film, furniture layout, iron, knife, scissors.
You can start smoothing the surface with a heated iron through the fabric. Now the film will adhere perfectly to the surface of the chipboard. It is very important to act extremely carefully at this stage.
The surface of the film may be damaged if an iron that is too hot is used. A tool that is too cold will also not work, as the work efficiency will be minimal.
Now you can move on to further work, which consists of replacing furniture fittings. It is replaced with a furniture layout. You can add a little originality to an old wall.
- For this purpose, lighting is provided. This can now be done using LEDs. You can get by with single options, or you can buy a whole LED strip. These days it doesn't cost that much to save on beauty. In this case, you need LEDs that will operate from a home network of 220 Volts. If necessary, a power supply can be purchased separately. The LEDs need to be positioned in such a way that the backlight shows all the beauty of the updated furniture as clearly as possible;
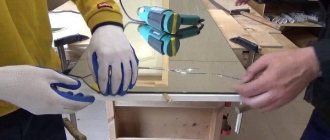
- Then you can start gluing the glass. Film is used for this. The principle of pasting is the same. That is, first the glass needs to be degreased with the same materials and substances, then the film must be cut off with a small margin of approximately 10 mm;
- only after this the film is applied to the wetted glass and then smoothed with an iron. It is worth noting that the film is glued to the glass from the inside. You should use an iron heated to the optimal temperature. It should not be too high and not too low.
Glue the edge yourself
For those who want to save money, there is a melamine edge with glue that is glued with an iron. This option is quite suitable for repairing old furniture - there is no need to carry several small boards to the workshop. To solve the question of how best to glue the edge to the tabletop, it is better not to be lazy and contact the manufacturer, or still use an overlay profile, since melamine will quickly deteriorate from moisture and abrasion.
An old Soviet iron or a hair dryer is best suited for gluing. The iron thermostat is set to approximately 2.5 position. In addition, you will need a rag, a knife, fine sandpaper and a stand for fixing the parts.
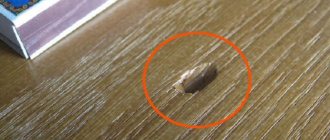
- The part is fixed and the edge is cut off with a margin of a few centimeters. Then it is applied and carefully heated with an iron, in sections of about 40 cm. When it heats up well, the glue for the edge will melt and it will sag a little.
- Immediately after this, you need to press the edge tape well with a rag. This is done quickly as it cools quickly.
- When you're done gluing, you need to trim off the excess. First, cut off the end parts, and then those that go along. The knife must be held at an angle. In this case, the movement of the knife is directed towards the part, and not outward. For convenient work you will need a sharp knife without burrs. When cutting off the excess, be careful not to cut off the corners.
- For final finishing, go over the corners with sandpaper. For the edge to last longer, it should not cling when touched.
You can also remove old edge tape using an iron. To do this, it is heated and pryed with a spatula or knife. In this video you can see how to glue a 2 mm edge at home:
Additionally, you need to cover the ends of the kitchen countertops with a special metal attachment with sealant to prevent moisture from getting inside, then the countertop will not swell (see the article on how to assemble a kitchen).
To achieve a really good result, it is still better to order factory edging. The overpayment will not be too large, but the durability will increase significantly. Now on sale you can find almost any color of tape to imitate wood or a plain version.
Source: remboo.ru
Summarizing
Thus, the process of updating furniture made from particle boards can be considered complete. Now everyone can carry out this procedure at home without any problems. As is clear, this does not require any global monetary costs.
Self-adhesive film can be purchased at almost any household store. It is not so expensive that you can save on quality material. Scissors and a knife can be found in every home.
That is, the cost of updating is just a pittance. If you compare it with the cost of a new wall or cabinet, the benefits become obvious. So this article is worth taking note of for those who are planning to update their chipboard furniture in the near future.
This is much easier to do than it might seem at first glance.
How to paint chipboard and MDF facades in PVC film?
It seems absurd why paint chipboard and furniture plastic. But, nevertheless, the customer’s demands and legibility have grown significantly and sometimes, in order to solve some problem in the manufacture of furniture or interior items, it becomes necessary to paint chipboard or facades lined with plastic or film.
When does it become necessary to paint chipboard and films?
Chipboard is painted when they want the front part of the furniture body to be the same color as the painted facades.
When they can’t find chipboard of the right color. Then they do this - buy white chipboard and paint it in the desired color. Costs, both material and time, are lower than when painting MDF.
When they want products coated with film or plastic to have a more advantageous decorative appearance after applying varnish. This, in particular, applies to the creation of a decorative patina finish for film facades.
When you need to paint MDF facades with complex milling. In this case, MDF facades are wrapped in white film in a membrane vacuum press and then finished with enamels.
How to cover a closet with self-adhesive film
Self-adhesive films allow you to update the appearance of any furniture. Such coatings are used to restore damaged veneer or laminate, improve the performance characteristics of a kitchen table or set, and mask defective areas. The technology for applying coating to the base surface is quite simple. Even an inexperienced user who knows the sequence of work and has patience can perform such work. From our article you will learn how to cover a cabinet with self-adhesive film and which film to choose for covering furniture.
Types of films for cabinets
Self-adhesive coatings for cabinets and other furniture elements allow you to protect the surface of products from fading, prying eyes and falling fragments (if the material is glued to glass or mirrors). Colored products with ornaments or geometric patterns allow you to decorate your closet and make it stand out from other pieces of furniture. Let's get acquainted with the main types of self-adhesive coatings.
Decorative films for cabinets
Such materials are quickly glued and do not require special care. The protective decorative layer protects the product from scratches and increases the life of the furniture.
Sometimes the film is applied to wardrobe mirrors or glass inserts. Decorative films are characterized by a huge selection of colors and shades, easy application to the base, resistance to abrasive particles, and ease of maintenance.
Color films
The products in question are used to restore the glass surfaces of sliding wardrobes. Colored protective coatings maintain transparency. Their main features are considered to be high resistance to abrasive particles, ease of maintenance and gluing of surfaces.
The most popular color film for sliding wardrobes is Oracal series 641.
Stained glass films for sliding wardrobes and mirrors
When decorating mirrored cabinets or products with glass inserts, films that imitate stained glass are often used. Stained glass film for cabinets sticks well to the base, is quickly removed, and is resistant to abrasive substances.
How to properly cover a cabinet with self-adhesive film
The work of covering a sliding wardrobe with Oracal film will not take much time, the main thing is to be patient and familiarize yourself with the technology. In addition, you need to prepare the tool.
Required tools and materials
Before covering an old cabinet with self-adhesive film, we prepare the following tools:
- construction tape or long ruler;
- a sharp knife for cutting fabrics or scissors;
- black marker or pencil;
- dry cloth;
- hair dryer;
- flower sprayer filled with soap solution;
- self-adhesive film for the cabinet.
When all the tools and materials are prepared, you can begin the main work.
Preparation
Work begins by preparing the base. First, all the fittings on the kitchen cabinet are removed, and the doors are also dismantled. Now we examine the surface of the cabinet for defects, chips, gouges or cracks, and other protruding parts.
We unscrew all the bolts with a wrench and use a Phillips screwdriver to remove screws or self-tapping screws. It is more difficult to level out uneven areas; they are filled with putty. After the solution has dried, the surface is cleaned with fine-grain sandpaper. Before laying the film, it is necessary to degrease the furniture. To do this, use a solution of ethyl alcohol or a mixture of water and detergent.
If the cabinet is made of chipboard, MDF or natural wood and does not have a special coating, then it is better to use a primer to improve adhesion. The solution is applied to the base and allowed to dry.
Tools and consumables
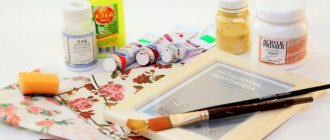
Before you do anything using the decoupage technique, it is important to prepare all the tools and supplies necessary for the process. The quality of work and the convenience of the master depend on this. To prepare the surface you will need sandpaper, both coarse and fine grit. In addition, a spatula is useful for leveling the surface with putty or applying a base coat.
For better adhesion of the decor to the surface, it is recommended to degrease it with alcohol-containing products.
To treat the surface and apply the background, you need foam sponges and synthetic brushes of different sizes. Disposable plates come in handy; they are used instead of a palette. You will need scissors for cutting out pictures, acrylic primer for pre-treatment of the surface.
Main types of furniture profiles, characteristics, application
For decoration, three-layer napkins and pieces of wallpaper are used. Nowadays, fabric, lace, leather and magazine clippings are also used for these purposes. To glue pictures, use PVA glue, glue-varnish for decoupage, to depict the background - acrylic paints, to cover the decorated surface - varnish.
The craquelure effect is often used in decoupage. It allows you to get artificial cracks in the old style on the surface to be decorated. For this purpose, craquelure varnish is used. The product is processed in several stages. Initially, apply regular paint, then varnish and again a layer of paint. As a result, when the surface dries, it becomes covered with a network of small cracks. This is how you get the old effect on the product.
Wardrobe pasting
Pasting the cabinet can be done using the wet or dry method. The choice of method will affect the result.
Dry pasting method
Thus, the dry method is used if the kitchen facade is peeling off in small areas, as well as in the case of applying decorative details on the corners of furniture or uneven areas. In this case, a small part of the protective backing is separated, which will free up the base. After this, the new coating material is applied and leveled.
How to stick film without bubbles? During such work, it is necessary to pull off the substrate and alternately secure the roll to the base surface. Leveling is carried out using a silicone spatula.
Wet method
If it is necessary to cover an old cabinet with film, the wet method of laying the decorative coating is used. In this case, the material is fixed on a moistened base, which will allow for correction during work. To moisten the adhesive mixture applied to the base, use a spray bottle. The backing must be completely removed. The inside of the product is wetted with a soap solution. To prepare it, dilute 10 milliliters of liquid soap or other detergent in a liter of water.
What should be taken into account when developing technology for painting chipboard, films and plastics?
Melamine films and laminates have a thermosetting coating, which is usually chemically very passive. The adhesion of paints and varnishes to them is less than to PVC plastics. To ensure adhesion of paintwork materials to them, a number of reliable adhesive primers have been developed.
When developing a technology for varnish finishing of surfaces lined with plastics, as well as chipboard, one must take into account, first of all, 3 points.
Consider the adhesive properties of the surface
Sanding of coated parts may not be necessary.
Plastics have a chemically passive surface, which requires the use of special highly effective adhesive primers to ensure adhesion.
The variety of impregnating resins and technologies used in the production of laminated plastics is reflected in the fact that the adhesive properties of the surfaces of different brands of plastics can vary greatly.
Therefore, to ensure maximum technical and economic efficiency, a specific adhesive is sometimes selected for a specific plastic.
Consider the surface topography and how it is formed
Parts with flat surfaces and parts lined with plastics after milling are easier to finish than parts milled after gluing films.
To obtain a high-quality finish on milled areas, it may be necessary to locally apply several layers of primer to them.
Consider the smoothness of the surface
The main problem, as a rule, is the area of grooves and milling. The worse the quality of the slab material used for the parts and the lower the quality of the milling, the thicker the layer of soil required for smoothing.
The use of low-gloss varnishes can reduce the visibility of base defects to some extent.
Possible problems when gluing the cabinet
How to fix problems when gluing a cabinet:
- Not everyone knows how to disguise a damaged wardrobe mirror. During such procedures, visible swelling defects appear on the front side of the film. If they are noticed at the stage of the main work, you need to peel off the base of the film and re-attach it. If the material has adhered well to the base surface, make a cross-shaped cut in defective areas with a sharp knife or pierce the fabric with a needle. After releasing the air, the coating is rolled with a roller. The capabilities of the film make it possible to obtain a smooth surface after such exposure.
- If, after carrying out work, dents appear on the furniture facade, PVA glue is poured into the defective areas of the surface using a syringe through the film. This material is rolled up with a roller. As a result of this effect, the coating is leveled, and the glue fills the void and creates a solid base; the remaining solution is wiped off with a soft cloth.
- For a novice user, gluing the canvas onto glass surfaces or milled cabinet edges may seem difficult. In the places where the curves are made, cuts are made and the remaining material is removed.
If you need to remove self-adhesive film from the surface of furniture, watch the following video, which describes the entire process:
Features of chipboard lamination
In industrial settings, belt or conveyor presses are used to bond the base and coating. They not only press the laminate tightly to the base, but also heat it up greatly. As a result, the impregnation melts and spreads, and the coating is connected to the base as tightly and evenly as possible. Laminated chipboard is made by gluing the cladding to the surface. Pasting films at home is partially similar to both of these methods, but due to the lack of special conditions, the applied coating is not as durable as an industrial one.
Communities › DIY › Blog › First experience of gluing chipboard with HPL plastic
Good afternoon, dear ones. This post is intended not so much to show what I can do, but to ask for advice, am I doing the right thing?
Due to the nature of my work, I was faced with the need to manufacture a table covered on all edges with high-pressure plastic HPL (the same one that is used to cover tabletops).
I had a little, just a little bit of experience in this, a couple of years ago I tried to cover a coffee table, it turned out well, there’s no photo, so let’s forget about this experience.
So, we bought a sheet of black plastic, a bucket of KIILTO Kestopren glue, several brushes, rollers, and various sandpapers for the sander. I also photographed the tools to make it clearer.
First, as usual, I looked for information about the method of pasting; the technology is vaguely covered on the Internet, so I came up with a kind of collective image of what needs to be done.
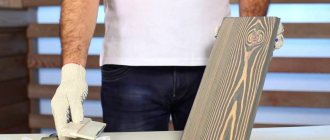
The first step is to prepare the surface. Ideally, use untreated chipboard, the glue sticks to it better, but it is what it is. I sanded the assembled structural elements with a machine until smooth, and tried to bring all the joints and ends into a plane. Then the process of cutting the plastic. We mark the necessary parts with a small margin. I haven’t found a more convenient method for cutting plastic other than with a grinder. It’s convenient, but our area is small, it’s a little inconvenient to do it alone.
Then apply glue to both prepared and degreased surfaces. At first I used a brush, but it does not allow me to apply the glue evenly, the stains dry immediately, and when I pass the brush again, pellets form, which is unacceptable. I decided to use something straight and not hairy. For example, a piece of HDF. Then I switched to a spatula altogether. So, we applied the glue and wait. The bucket says to wait from 15 to 45 minutes, I usually waited 20-25 minutes.
Then press both surfaces to be glued tightly. The grip is instantaneous, it will no longer be possible to move it, therefore, either the reserve is greater, or the positioning is more accurate.
Ideally, for such things you need a press, but I don’t have one, so where possible I use clamps. It is unknown how long it will take to wait under pressure; I waited less than an hour.
Then I remove the excess overhangs with a router, and the final finishing of the corners is done again with a grinder. The project is not completely ready yet, so the question is, am I doing everything right? If you have knowledge and skills in this matter, please enlighten me, I will be very grateful! Thanks to all!
An interesting example of developing chipboard painting technology from True Factory
Let's give a practical example from True Factory, which concerns the painting of melamine-coated chipboards. The manufacturer encountered poor adhesion of the paint and varnish coating, which is, in principle, expected for surfaces with low porosity.
The low-quality soil from a little-known manufacturer used by the company did not help. True Factory technologists conducted a series of tests using different options for adhesive primers.
The best results were obtained using the following combination: Sayerlack TUL3530/00 Adhesive Primer for Melamine Paper (100%) + TH0790/00 Hardener (10%) + DT0452/00 Solvent (40%).
See the results in the photo below, in the photo test before and after using the TUL3530/00 adhesive primer. For testing, we used a familiar adhesion test - lattice cuts.
What does this experience from True Factory show us? First of all, do not be shy and contact the technologists of paint suppliers in case of problems with painting chipboard, laminate in terms of adhesion and more, to select the required adhesive primer and obtain stable painting results.
| Rice. 3. Adhesion of paintwork materials before applying adhesive primer |
| Rice. 4. Adhesion of paintwork after applying adhesive primer |
Feedback from site visitors:
I’ll tell you about my own experience in painting chipboard and film facades in furniture production.
Painting chipboard
Chipboard was painted, but rarely when the project indicated that, for example, the outer side wall of the kitchen or the details of the portal had to be the same as the painted or patinated facades.
In this case, the surface of the chipboard was sanded with paper of P220 grit or coarser in order to break the top protective layer of the laminate on the chipboard to a matte surface. Next they applied paint, but more often they worked according to the scheme - sanding, one layer of primer, sanding, finishing. No adhesives were used.
Problems arose if the edge was poorly glued and after finishing the paint fell into places where the edge did not fit well, worse if it peeled off, but again this was due to poor performance of the gluing equipment, a violation of the gluing technology.
Painting facades covered with PVC film
We had to resort to the technology of painting film facades in order to simplify the technology of painting facades with complex internal milling.
What were the difficulties: the main ones were the labor intensity of grinding complex milled profiles and the risks of damaging the profile itself, which already required reworking the facades.
In addition, it was necessary to apply sealing primer, sand it, apply base primer, sand, apply primer again, and sand again. In the case of film, the surface and profile of the MDF facade in PVC film were simply pre-grinded and finishing layers were applied.
It turns out that the technology was reduced to a minimum, well, sometimes they could apply primer to the film before painting, but sanding the primer in this case was much easier than sanding unlined MDF.
An important point in all this is how well the film is glued to the MDF facades. If the film peels off from the edge, if there are inclusions under the film, glue sagging, poor-quality milling, poor preparation of the facade surface before pressing, then we will get not the advantages, but the disadvantages of this technology.
Therefore, the technology for pressing facades in a membrane vacuum press must be at a high level.
In addition, the film itself must be selected for the facades. Firstly, it should be white, and secondly, it will be better if it is intended just for painting, that is, without a protective top coating.
Film suppliers called this film primer. In principle, you can use just white film, but a trial application and an adhesion test are necessary.
Interestingly, no adhesive primers were applied to the film facades; it was enough to matt the film by sanding. But, in any case, experiments are always needed, and then mass application of the technology, otherwise primer may be needed to improve the adhesion of paint to film or chipboard. For such primers, contact your suppliers, they will help you select the necessary paints and varnishes.
Source: kraski-laki-gruntovka.ru